1
User Guide
English ( 3 – 5 )
Guía del usuario
Español ( 6 – 8 )
Guide d'utilisation
Français ( 9 – 11 )
Guida per l'uso
Italiano ( 12 – 14 )
Benutzerhandbuch
Deutsch ( 15 – 17 )
Appendix
English ( 18 )
User Guide (English)
Introduction
Box Contents
MPK mini
USB Cable
MPK mini Editor (download)
Software Download Card
User Guide
Safety & Warranty Manual
Support
For the latest information about this product (system requirements, compatibility information,
etc.) and product registration, visit akaipro.com/mpkmini.
For additional product support, visit akaipro.com/support.
Quick Start
Device Setup in Software
To select MPK mini as a controller for your digital audio workstation (DAW):
1.
Connect MPK mini to your computer using a standard USB cable. (If you are connecting
MPK mini to a USB hub, make sure it is a powered hub.)
2.
Open your DAW.
3.
Open your DAW's Preferences, Options, or Device Setup, select MPK mini as your
hardware controller, and then close that window.
Your MPK mini is now able to communicate with your software.
MPK mini Editor Installation
We recommend visiting akaipro.com/mpkmini and downloading the MPK mini Editor, which
gives you a visual and intuitive way to edit the various MIDI messages that MPK mini's
controls (pads, knobs, and X-Y controller) send to your computer.
Learn more about the MPK mini Editor in the User Guide included with the download package.
3
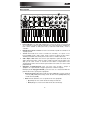
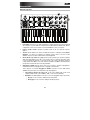
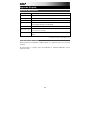
Features
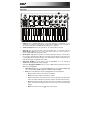
Top Panel
2
7
5
6
4
4
12
13
8
8
8
8
14
14
14
14
8
8
8
8
14
14
14
14
9
10
11
1
15
3
1.
USB Port: Use a standard USB cable to connect this USB port to a USB port on your
computer. The computer's USB port will provide power to MPK mini. This connection is
also used to send and receive MIDI data to and from your computer.
2.
Sustain Pedal Input: Connect an optional 1/4" TS sustain pedal to this input.
3.
Keyboard: This 25-note keyboard is velocity-sensitive and, in conjunction with the
Octave Down / Up buttons, can control a ten-octave range. You can use the keys to
access certain additional commands, as well.
4.
Octave Down / Up: Use these buttons to shift the keyboard's range up or down (up to
four octaves in either direction). When you are higher or lower than the center octave, the
corresponding Octave button will light. Press both Octave buttons simultaneously to
reset the keyboard to the default center octave.
5.
Arpeggiator On/Off: Press this button to turn the Arpeggiator on or off. Pressing it
during a latched arpeggio will stop the arpeggio.
Hold down Arpeggiator On/Off and press a key on MPK mini's keyboard to enter new
settings for the Arpeggiator:
•
Time Division: 1/4 note, 1/4 note triplet (1/4T), 1/8 note, 1/8 note triplet (1/8T), 1/16
note, 1/16 note triplet (1/16T), 1/32 note, or 1/32 note triplet (1/32T).
•
Mode: The mode determines how the arpeggiated notes are played back.
o
Up: Notes will sound from the lowest to the highest.
o
Down: Notes will sound from the highest to lowest.
o
Incl (Inclusive): Notes will sound from the lowest to the highest, and then back
down. The lowest and highest notes will sound twice at the directional change.
o
Excl (Exclusive): Notes will sound from the lowest to the highest, and then back
down. The lowest and highest notes will sound only once at the directional
change.
o
Order: Notes will sound in the order they were pressed.
4
6.
o
Rand (Random): Notes will sound in random order.
o
Latch: The Arpeggiator will continue to arpeggiate the notes even after you lift
your fingers. While holding down the keys, you can add more notes to the
arpeggiated chord by pressing down additional keys. If you press the keys,
release them, and then press down a new combination of notes, the
Arpeggiator will memorize and arpeggiate the new notes.
•
Octave: Arpeggio octave range (Arp Oct) of 0, 1, 2, or 3 octaves.
•
Swing: 50% (no swing), 55%, 57%, 59%, 61%, or 64%.
Tap Tempo: Tap this button at the desired rate to determine the tempo of the
Arpeggiator. The minimum number of taps required is programmable in the MPK mini
Editor.
Note: This button is disabled if the Arpeggiator is synced to an external clock.
7.
X-Y Controller: Use this 4-axis thumbstick to send MIDI pitch bend messages or send
MIDI CC messages. You can use the free, downloadable MPK mini Editor to assign how
this X-Y Controller functions.
8.
Pads: The pads can be used to trigger drum hits or other samples in your software. The
pads are velocity-sensitive, which makes them very responsive and intuitive to play. You
can use the free, downloadable MPK mini Editor to assign what MIDI message each pad
(in each pad bank) sends.
9.
Bank A/B: Press this button to switch MPK mini's pads between Pad Bank A or Pad
Bank B. You can use the free, downloadable MPK mini Editor to assign what MIDI
message each pad (in each pad bank) sends.
10. CC: When this button is active, MPK mini's pads will send MIDI CC messages instead of
MIDI Note On messages. You can use the free, downloadable MPK mini Editor to assign
what CC message each pad sends.
11. Prog Change: When this button is active, MPK mini's pads will send MIDI Program
Change messages instead of MIDI Note On messages. You can use the free,
downloadable MPK mini Editor to assign what Program Change message each pad
sends.
12. Full Level: Press this button to activate or deactivate Full Level Mode in which the pads
always play at a maximum velocity (127), no matter how hard or soft you hit them.
13. Note Repeat: Press and hold this button while striking a pad to cause the pad to
retrigger at a rate based on the current Tempo and Time Division settings.
14. Assignable Knobs: Each 270º knob sends a MIDI CC message. You can use the free,
downloadable MPK mini Editor to assign what CC message each knob sends.
15. Prog Select: Hold down this button and press Pad 5, Pad 6, Pad 7, or Pad 8 to select
the Program whose number is printed above that pad (Prog 1, Prog 2, Prog 3, or Prog
4).
5
Guía del usuario (Español)
Introducción
Contenido de la caja
MPK mini
Cable USB
Editor del MPK mini (descargar)
Tarjeta de descarga de software
Guía del usuario
Manual sobre la seguridad y garantía
Soporte
Para obtener la información más reciente acerca de este producto (requisitos de sistema,
información de compatibilidad, etc.) y registrarlo, visite akaipro.com/mpkmini.
Para obtener soporte adicional del producto, visite akaipro.com/support.
Inicio rápido
Configuración del dispositivo en el software
Para seleccionar el MPK mini como controlador para su estación de trabajo de audio
digital (DAW):
1.
Conecte el MPK mini a su ordenador utilizando un cable USB estándar. (Si está
conectando el MPK mini a un concentrador [hub] USB, asegúrese de que sea un
concentrador alimentado).
2.
Abra su DAW.
3.
Abra Preferences (Preferencias), Options (Opciones), o Device Setup (Configuración de
dispositivo) de su DAW, seleccione el MPK mini como su controlador de hardware y
luego cierre esa ventana.
Su MPK mini es ahora capaz de comunicarse con su software.
Instalación del editor del MPK mini
Recomendamos visitar akaipro.com/mpkmini y descargar el editor del MPK mini, el cual le
brinda una manera visual e intuitiva para editar los diversos mensajes MIDI que los controles
del MPK mini (pads, perillas y palanca de mando de pulgar [controlador X-Y]) le envían a su
ordenador.
Para aprender más acerca del editor del MPK mini consulte la Guía del usuario incluida en el
paquete de descarga.
6
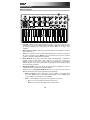
Características
Panel superior
2
7
8
5
6
4
4
12
13
8
8
8
8
8
8
14
14
14
14
8
14
14
14
14
9
10
11
1
15
3
1.
Puerto USB: Utilice un cable USB estándar para conectar este puerto a un puerto USB
en su ordenador. El puerto USB del ordenador proporciona alimentación al MPK mini.
Esta conexión también se utiliza para enviar y recibir datos MIDI desde y hacia su
ordenador.
2.
Entrada para pedal de sostenido: Conecte a esta entrada un pedal de sostenido TS de
1/4 pulg. opcional.
3.
Teclado: Este teclado de 25 notas es sensible a la velocidad y, en conjunto con los
botones Octave (Subir / bajar octava), puede controlar una gama de diez octavas.
También puede utilizar estas teclas para acceder a ciertos comandos adicionales.
4.
Subir / Bajar octava: Utilice estos botones para desplazar la gama del teclado hacia
arriba o abajo (hasta cuatro octavas en ambos sentidos). Cuando esté más arriba o más
abajo que la octava central, se enciende el botón Octave correspondiente. Pulse
simultáneamente ambos botones Octave para restablecer el teclado a la octava central
predeterminada.
5.
Arpegiador encendido/apagado: Pulse este botón para encender o apagar el
arpegiador. Si se pulsa durante un arpegio enganchado, se detiene el arpegio.
Mantenga pulsado Arpeggiator On/Off y pulse una tecla en el teclado del MPK mini
para introducir nuevos ajustes para el arpegiador:
•
División de tiempo: 1/4 (negras), tresillo de negras (1/4T), 1/8 (corcheas), tresillo de
corcheas (1/8T), 1/16 (semicorcheas), tresillo de semicorcheas (1/16T), 1/32 (fusas)
o tresillo de fusas (1/32T).
•
Modo: El modo determina como se reproducen las notas arpegiadas.
o
Up (Arriba): Las notas suenan desde la más baja a la más alta.
o
Down (Abajo): Las notas suenan desde la más alta a la más baja.
7
6.
o
Incl (Inclusivo): Las notas suenan desde la más baja a la más alta y luego
vuelven a la más baja. Las notas más baja y más alta suenan dos veces en el
cambio de sentido.
o
Excl (Exclusivo): Las notas suenan desde la más baja a la más alta y luego
vuelven a la más baja. Las notas más baja y más alta suenan solo una vez en el
cambio de sentido.
o
Order (Orden): Las notas suenan en el orden en el que fueron pulsadas.
o
Rand (Aleatorio): Las notas suenan en orden aleatorio.
o
Latch (Enganche): El arpegiador continua arpegiando las notas aún después
de que levante sus dedos. Mientras mantiene pulsadas las teclas, puede
agregar más notas al acorde arpegiado pulsando teclas adicionales. Si pulsa
las teclas, las suelta y pulsa luego una nueva combinación de notas, el
arpegiador memoriza y arpegia las nuevas notas.
•
Octave (Octava): Gama de octavas del arpegio (Arp Oct) de 0, 1, 2 o 3 octavas.
•
Swing: 50% (sin swing), 55%, 57%, 59%, 61% o 64%.
Tap Tempo: Golpee ligeramente este botón al ritmo deseado para determinar el tempo
del arpegiador. El mínimo número de golpes requerido se programa en el editor del MPK
mini.
Nota: Este botón se desactiva si el arpegiador se sincroniza a un reloj externo.
7.
Palanca de mando de pulgar: Utilice esta palanca de mando de pulgar de 4 ejes para
enviar mensajes de inflexión de tono MIDI o mensajes de CC MIDI. Puede descargar y
utilizar de forma gratuita el editor del MPK mini para asignar las funciones de esta
palanca.
8.
Pads: Puede utilizar los pads para disparar golpes de batería u otras muestras en su
software. Los pads son sensibles a la velocidad, lo que los hace de rápida respuesta y
muy intuitivos para tocar. Puede descargar y utilizar de forma gratuita el editor del MPK
mini para asignar el mensaje MIDI que envía cada pad (de cada banco de pads).
9.
Banco A/B: Pulse este botón para conmutar los pads del MPK mini entre el banco de
pads A y el banco de pads B. Puede descargar y utilizar de forma gratuita el editor del
MPK mini para asignar el mensaje MIDI que envía cada pad (de cada banco de pads).
10. CC: Cuando este botón está activo, los pads del MPK mini envían mensajes de CC MIDI
en lugar de mensajes de nota MIDI activada (MIDI Note On). Puede descargar y utilizar
de forma gratuita el editor del MPK mini para asignar el mensaje de CC MIDI que envía
cada pad.
11. Cambio de programa: Cuando este botón está activo, los pads del MPK mini envían
mensajes de cambio de programa MIDI en lugar de mensajes de nota MIDI activada
(MIDI Note On). Puede descargar y utilizar de forma gratuita el editor del MPK mini para
asignar el mensaje de cambio de programa que envía cada pad.
12. Nivel máximo: Pulse este botón para activar el modo Nivel máximo, en el cual los pads
siempre tocan a máxima velocidad (127), independientemente de lo fuerte o débilmente
que usted los golpee.
13. Repetición de nota: Mantenga pulsado este botón mientras golpea un pad, para hacer
que redispare a un ritmo basado en el tempo y la división de tiempo actuales.
14. Perillas asignables: Cada perilla de 270° envía un mensaje de CC MIDI. Puede
descargar y utilizar de forma gratuita el editor del MPK mini para asignar el mensaje de
CC que envía cada perilla.
15. Selección de programa: Mantenga pulsado este botón y pulse Pad 5, Pad 6, Pad 7 o
Pad 8 para seleccionar el programa cuyo número está impreso encima de ese pad (Prog
1, Prog 2, Prog 3 o Prog 4).
8
Guide d'utilisation (Français)
Présentation
Contenu de la boîte
MPK mini
Câble USB
MPK mini Editor (à télécharger)
Carte de téléchargement de logiciel
Guide d'utilisation
Consignes de sécurité et informations concernant la garantie
Assistance technique
Pour les toutes dernières informations concernant ce produit (configuration système,
compatibilité, etc.) et l’enregistrement, veuillez visiter le site akaipro.com/mpkmini.
Pour de l’assistance supplémentaire, veuillez visiter akaipro.com/support.
Guide de démarrage
Configuration logicielle
Pour configurer votre logiciel audionumérique (DAW) afin que vous puissiez le
commander à partir du MPK mini :
1.
Branchez le MPK mini à votre ordinateur en utilisant un câble USB standard. (Si vous
utilisez un concentrateur USB, assurez-vous qu’il est auto-alimenté.)
2.
Lancez votre logiciel audionumérique.
3.
Ouvrez le menu Préférences, Options ou Configurations de votre logiciel
audionumérique, sélectionnez MPK mini comme votre contrôleur matériel, puis fermez
cette fenêtre.
Le MPK mini est maintenant en mesure de communiquer avec votre logiciel.
Installation du MPK mini Editor
Nous vous recommandons de visiter akaipro.com/mpkmini et de télécharger le MPK mini
Editor, une interface intuitive pour modifier les divers messages MIDI qu'envoie le MPK mini
(pads, boutons et contrôleur X-Y) à votre ordinateur.
Vous pouvez en apprendre davantage sur le MPK mini Editor en consultant le Guide
d’utilisation inclus avec le téléchargement.
9
Caractéristiques
Panneau supérieur
2
7
8
5
6
4
4
12
13
8
8
8
8
8
8
14
14
14
14
8
14
14
14
14
9
10
11
1
15
3
1.
Port USB : Utilisez un câble USB standard pour relier ce port au port USB de votre
ordinateur. Le port USB de l'ordinateur permet d’alimenter le MPK mini. Cette connexion
est également utilisée pour la transmission de données MIDI vers et depuis votre
ordinateur.
2.
Entrée pédale de sustain : Cette entrée permet de brancher une pédale de sustain TS
de 6,35 mm (1/4 po).
3.
Clavier : Ce clavier de 25 notes sensibles à la dynamique peut commander une plage de
dix octaves à l’aide des touches Octave. Vous pouvez utiliser les touches pour accéder à
certaines commandes supplémentaires également.
4.
Octave Bas/Haut : Ces touches peuvent être utilisées afin d’augmenter ou de diminuer
la plage d’octave jusqu’à quatre octaves dans l'un ou l'autre sens. Lorsque vous
dépassez en plus ou en moins l’octave du milieu, la touche Octave correspondante
s’allume. Appuyez sur les deux touches Octave simultanément afin de remettre le clavier
à l’octave du milieu par défaut.
5.
Arpeggiator On/Off : Cette touche permet d’activer/désactiver l’arpégiateur. L’enfoncer
lorsque l'arpège est verrouillé permet d'arrêter l’arpège.
Maintenez la touche Arpeggiator On/Off et appuyez sur une des touches du clavier du
MPK mini afin d’entrer de nouveaux paramètres pour l'arpégiateur :
•
Division temporelle : Noire (1/4), triolet de noires (1/4T), croche (1/8), triolet
de croches (1/8T), double croche (1/16), triolet de doubles croches (1/16T), triples
croches (1/32) ou triolet de triples croches (1/32T).
•
Mode : Le mode détermine comment les notes arpégées sont rejouées.
o
Up : Les notes joueront de la plus basse à la plus haute.
o
Down : Les notes joueront de la plus haute à la plus basse.
10
6.
o
Incl (Inclusive) : Les notes joueront de la plus basse à la plus haute, puis
redescendront. La note la plus basse et la note la plus haute joueront deux fois
lors du changement de direction.
o
Excl (Exclusive) : Les notes joueront de la plus basse à la plus haute, puis
redescendront. La note la plus basse et la note la plus haute ne joueront
qu’une fois lors du changement de direction.
o
Order : Les notes jouent dans l'ordre qu'elles ont été jouées.
o
Rand (Aléatoire) : Les notes jouent de façon aléatoire.
o
Latch : L'arpégiateur continuera d'arpéger les notes même après que vous
soulevez vos doigts. Tout en maintenant les touches enfoncées, vous pouvez
ajouter d’autres notes à l’arpège en appuyant sur d’autres touches. Si vous
enfoncez des touches, les relâchez, puis jouez une nouvelle combinaison de
notes, l'arpégiateur mémorise et arpège ces nouvelles notes.
•
Octave : Plage d’octaves de l’arpège (Arp Oct) de 0, 1, 2 ou 3 octaves.
•
Swing : 50 % (aucun swing), 55 %, 57 %, 59 %, 61 % ou 64 %.
Tap Tempo : Tapez cette touche au rythme désiré afin de régler le tempo de
l’arpégiateur. Le nombre de tapes minimum requis peut être modifié dans le MPK mini
Editor.
Remarque : Cette touche est désactivée lorsque l’arpégiateur est synchronisé à une
horloge externe.
7.
Contrôleur X-Y : Ce manche à balai 4 axes permet de transmettre des messages MIDI
de pitch bend ou de contrôleur continu (CC). Vous pouvez utiliser le MPK mini Editor,
téléchargeable gratuitement, pour régler le fonctionnement du contrôleur X-Y.
8.
Pads : Ces pads peuvent être utilisés afin de déclencher des sonorités de batterie ou
d’autres échantillons du logiciel. Ils sont sensibles à la dynamique, donc très nerveux et
intuitifs. Vous pouvez utiliser le MPK mini Editor, téléchargeable gratuitement, afin
d’affecter les messages MIDI aux pads des deux banques.
9.
Bank A/B : Cette touche permet de basculer entre les banques de pads A et B. Vous
pouvez utiliser le MPK mini Editor, téléchargeable gratuitement, afin d’affecter les
messages MIDI aux pads des deux banques.
10. CC : Lorsque cette touche est activée, les pads du MPK mini permettent d’envoyer des
messages MIDI de contrôleur continu au lieu des messages d’activation de la note. Vous
pouvez utiliser le MPK mini Editor, téléchargeable gratuitement, afin d’affecter les
messages MIDI aux pads des deux banques.
11. Prog Change : Lorsque cette touche est activée, les pads du MPK mini permettent
d’envoyer des messages MIDI de changement de programme au lieu des messages
d’activation de la note. Vous pouvez utiliser le MPK mini Editor, téléchargeable
gratuitement, afin d’affecter les messages MIDI aux pads des deux banques.
12. Full Level : Lorsque le mode Full Level est activé, les pads jouent toujours à la vélocité
maximale (127), peu importe la force à laquelle ils sont frappés.
13. Note Repeat : Maintenir cette touche tout en frappant un pad permet de redéclencher le
pad en fonction des paramètres du tempo et de la division temporelle.
14. Boutons assignables : Chaque bouton rotatif 270º envoie un message MIDI CC. Vous
pouvez utiliser le MPK mini Editor, téléchargeable gratuitement, afin d’affecter les
messages CC aux boutons.
15. Prog Select : Maintenez ce bouton enfoncé et appuyez sur Pad 5, Pad 6, Pad 7 ou 8
Pad pour sélectionner le programme, dont le numéro est imprimé au-dessus de cette
touche (Prog 1, Prog 2, Prog 3 ou Prog 4).
11
Guida rapida (Italiano)
Introduzione
Contenuti della confezione
MPK mini
Cavo USB
MPK mini Editor (download)
Scheda di download del software
Guida per l'uso
Istruzioni di sicurezza e garanzia
Assistenza
Per le ultime informazioni in merito a questo prodotto (requisiti di sistema, informazioni sulla
compatibilità, ecc.) e per effettuarne la registrazione, recarsi alla pagina
akaipro.com/mpkmini.
Per ulteriore assistenza sul prodotto, recarsi alla pagina akaipro.com/support.
Guida rapida
Configurazione del dispositivo nel software
Per selezionare l'MPK mini come controller per la propria workstation audio digitale
(DAW):
1.
Collegare l'MPK mini al computer servendosi di un cavo USB standard (se si collega
l'MPK mini a un hub USB, assicurarsi che sia alimentato).
2.
Aprire il DAW.
3.
Aprire il menù Preferences, Options o Device Setup (preferiti, opzioni o configurazione
dispositivo) del DAW, selezionare MPK mini come controller hardware e chiudere quella
finestra.
L'MPK mini è ora in grado di comunicare con il software.
Installazione dell'MPK mini Editor
Si consiglia di recarsi alla pagina akaipro.com/mpkmini e di scaricare l'MPK mini Editor, che
offre unmodo visuale e intuitivo per modificare i vari messaggi MIDI che i comandi dell'MPK
mini (pad, manopole e controller X-Y) inviano al computer.
Maggiori informazioni in merito all'MPK mini Editor sono contenute nella Guida per l'uso
inclusa con il pacchetto di download.
12
Caratteristiche
Pannello superiore
2
7
8
5
6
4
4
12
13
8
8
8
8
8
8
14
14
14
14
8
14
14
14
14
9
10
11
1
15
3
1.
Porta USB: servirsi di un cavo USB standard per collegare questa porta a una porta USB
del computer. La porta USB del computer fornirà l’alimentazione all'MPK mini. Questo
collegamento serve anche a inviare e ricevere dati MIDI da e verso il computer.
2.
Ingresso pedale sustain: collegare un pedale sustain TS da 1/4" opzionale a questo
ingresso.
3.
Tastiera: questa tastiera a 25 tasti è sensibile alla velocità e, unitamente ai tasti Octave
Up/Down, è in grado di controllare una gamma di dieci ottave. Si possono inoltre
utilizzare i tasti per accedere a determinati comandi aggiuntivi.
4.
Octave Down / Up (ottava su / giù): premere questo pulsante per spostare la gamma
delle ottave della tastiera verso l'alto o verso il basso (fino a un massimo di quattro ottave
in ciascuna direzione). Quando ci si trova più in alto o più in basso dell’ottava centrale, il
corrispondente tasto Ottave si accende. Premere entrambi i tasti Ottave simultaneamente
per riportare la tastiera all’ottava centrale predefinita.
5.
Arpeggiatore On/Off: premere questo tasto per accendere e spegnere l’arpeggiatore.
Premendolo durante un arpeggio bloccato, l’arpeggio verrà interrotto.
Tenere premuto il comando Arpeggiatore On/Off e premere un tasto della tastiera
dell'MPK mini per inserire nuove impostazioni per l'Arpeggiatore:
•
Time Division (divisione di tempo): 1/4, 1/4 di croma ("1/4 T"), 1/8, 1/8 di croma
("1/8 T"), 1/16, 1/16 di croma ("1/16 T"), 1/32, o 1/32 di croma ("1/32 T")
•
Modalità: la modalità stabilisce il modo in cui le note arpeggiate vengono riprodotte.
o
Up (su): le note suoneranno dalla più bassa alla più alta.
o
Down (giù): le note suoneranno dalla più alta alla più bassa.
13
6.
o
Incl (Incluso): le note suoneranno dalla più bassa alla più alta e viceversa. Le
note più basse e più alte suoneranno due volte al cambio di direzione.
o
Excl (Escluso): le note suoneranno dalla più bassa alla più alta e viceversa. Le
note più basse e più alte suoneranno solo una volta al cambio di direzione.
o
Order (ordine): le note suoneranno nell'ordine in cui vengono premute.
o
Rand (casuale): le note verranno riprodotte in ordine casuale.
o
Latch: l'Arpeggiatore continuerà ad arpeggiare le note anche dopo che
vengono sollevate le dita. Tenendo premuti i tasti, si possono aggiungere
ulteriori note all'arpeggio, premendo altri tasti. Se si lascia la pressione dai tasti
e si preme una nuova combinazione di note, l’Arpeggiatore memorizzerà e
arpeggerà le nuove note.
•
Ottava: gamma di ottave di arpeggio (Arp Oct) di 0, 1, 2, o 3 ottave.
•
Swing: 50% (no swing), 55%, 57%, 59%, 61% o 64%.
Tap Tempo: battere il pulsante al tempo desiderato per determinare il tempo
dell’Arpeggiatore. Il numero minimo di battiti richiesto è programmabile nell'MPK mini
Editor.
Nota bene: questo pulsante è disattivato se l’Arpeggiatore è sincronizzato con un
orologio esterno.
7.
Controller X-Y: servirsi di questo joystick a 4 vie per inviare messaggi di bend del pitch o
messaggi MIDI CC. Si può utilizzare l'MPK mini Editor, scaricabile gratuitamente, per
assegnare il funzionamento di questo controller X-Y.
8.
Pad: si possono utilizzare questi pad per attivare colpi di batteria o altri campioni del
software. I pad sono sensibili alla velocità, cosa che li rende molto reattivi e intuitivi da
suonare. Si può utilizzare l'MPK mini Editor, scaricabile gratuitamente, per assegnare il
messaggio MIDI inviato da ciascun pad (in ciascun banco pad).
9.
Bank A/B (banco A/B): premere questo tasto per far commutare i pad dell'MPK mini tra
il banco pad A e il banco pad B. Si può utilizzare l'MPK mini Editor, scaricabile
gratuitamente, per assegnare quali messaggi MIDI vengono inviati da ciascun pad (in
ciascun banco pad).
10. CC: quando questo tasto è attivo, i pad dell'MPK mini inviano messaggi MIDI CC anziché
messaggi MIDI Note On. Si può utilizzare l'MPK mini Editor, scaricabile gratuitamente,
per assegnare il messaggio CC inviato da ciascun pad.
11. Prog Change: quando questo tasto è attivo, i pad dell'MPK mini inviano messaggi
Program Change MIDI anziché messaggi MIDI Note On. Si può utilizzare l'MPK mini
Editor, scaricabile gratuitamente, per assegnare il messaggio Program Change inviato da
ciascun pad.
12. Full Level: premere questo tasto per attivare o disattivare la modalità Full Level in cui i
pad suonano sempre alla massima velocità (127), indipendentemente dalla forza con cui
vengono battuti.
13. Note Repeat: tenendo premuto questo tasto quando si batte un pad, questo verrà
riattivato ad una percentuale basata sulle impostazioni attuali di Tempo e Time Division.
14. Manopole assegnabili: ciascuna manopola 270º invia un messaggio MIDI CC. Si può
utilizzare l'MPK mini Editor, scaricabile gratuitamente, per assegnare il messaggio CC
inviato da ciascuna manopola.
15. Prog Select (seleziona programma): tenere premuto questo tasto e premere Pad 5,
Pad 6, Pad 7 o Pad 8 per selezionare il Programma il cui numero è stampato sopra a tale
pad (Prog 1, Prog 2, Prog 3 o Prog 4).
14
Benutzerhandbuch (Deutsch)
Einführung
Lieferumfang
MPK mini
USB Cable
MPK mini Editor (Download)
Software-Download-Karte
Benutzerhandbuch
Sicherheitshinweise und Garantieinformationen
Kundendienst
Für die neuesten Informationen zu diesem Produkt (Systemanforderungen, Informationen zur
Kompatibilität etc.) und zur Produktregistrierung besuchen Sie akaipro.com/mpkmini.
Für zusätzlichen Produkt-Support besuchen Sie akaipro.com/support.
Schnellstart
Geräteinstallation in der Software
So wählen Sie MPK mini als Controller für Ihre Digitale Audio-Workstation (DAW) aus:
1.
Verbinden Sie die MPK mini mit einem handelsüblichen USB-Kabel mit Ihren Computer.
(Wenn Sie Ihre MPK mini mit einem USB-Hub verbinden, sorgen Sie dafür, dass der Hub
mit Strom versorgt wird.)
2.
Öffnen Sie Ihre DAW.
3.
Öffnen Sie Einstellungen, Optionen oder Geräte-Setup in Ihrer DAW, wählen Sie MPK
mini als Hardware-Controller aus und schließen das Fenster.
Ihr MPK mini ist jetzt in der Lage, mit der Software zu kommunizieren.
MPK mini Editor-Installation
Wir empfehlen, akaipro.com/mpkmini zu besuchen und den MPK mini Editor
herunterzuladen, der Ihnen eine visuelle und intuitive Möglichkeit bietet, die verschiedenen
MIDI-Nachrichten zu bearbeiten, die von den MPK mini Steuerelementen (Pads, Drehregler
und XY-Controller) an Ihren Computer gesendet werden.
Erfahren Sie mehr über den MPK mini Editor im Benutzerhandbuch, das im Download-Paket
enthalten ist.
15
Funktionen
Oberseite
2
7
8
5
6
4
4
12
13
8
8
8
8
8
8
14
14
14
14
8
14
14
14
14
9
10
11
1
15
3
1.
USB-Port: Verwenden Sie ein Standard-USB-Kabel, um diesen USB-Port mit Ihrem
Computer zu verbinden. Der USB-Anschluss des Computers versorgt Ihr MPK mini mit
Strom. Diese Verbindung wird auch verwendet, um MIDI-Daten vom und zum Computer
zu senden und zu empfangen.
2.
Sustain Pedal-Eingang: Schließen Sie ein optionales 1/4" TS Sustain-Pedal an diesen
Eingang an.
3.
Keyboard: Das 25-Tasten-Keyboard ist anschlagdynamisch und kann mit den
Oktaventasten Auf/Ab zehn Oktaven ansteuern. Sie können die Tasten auch verwenden,
um auf bestimmte zusätzliche Befehle zuzugreifen.
4.
Oktaventasten Auf / Ab: Mit diesen Tasten können Sie den Tastaturbereich nach oben
oder unten verschieben (bis zu vier Oktaven in beide Richtungen). Wenn Sie Oktaven
gewählt haben, die höher oder tiefer als die mittlere Oktave sind, wird die entsprechende
Oktaven-Taste leuchten. Um in den mittleren Oktavenbereich des Keyboards
zurückzukehren, drücken Sie beide Oktaventasten gleichzeitig.
5.
Arpeggiator Ein/Aus: Drücken Sie diese Taste, um den Arpeggiator ein- oder
auszuschalten. Drücken Sie diese Taste während ein eingerastetes Arpeggio gespielt
wird, um es zu stoppen.
Halten Sie Arpeggiator Ein/Aus und drücken Sie eine Taste am Keyboard des MPK mini,
um neue Einstellungen für den Arpeggiator einzugeben:
•
Zeiteinteilung: 1/4-Note, 1/4-Triole (1/4T), 1/8-Note, 1/8-Triole (1/8T), 1/16-Note,
1/16-Triole (1/16T), 1/32-Note oder 1/32-Triole (1/32T).
•
Modus: Der Modus bestimmt, wie das Arpeggio wiedergegeben wird.
o
Aufwärts: Die Noten werden von der tiefsten bis zur höchsten wiedergegeben.
o
Abwärts: Die Noten werden von der höchsten bis zur tiefsten wiedergegeben.
o
Inkl. (Inklusive): Die Noten werden vom tiefsten bis zum höchsten Ton und
umgekehrt wiedergegeben. Die tiefsten und höchsten Noten werden beim
"Richtungswechsel" zweimal wiedergegeben.
16
6.
o
Exkl (Exklusive): Die Noten werden vom tiefsten bis zum höchsten Ton und
umgekehrt wiedergegeben. Die niedrigsten und höchsten Noten werden nur
einmal beim Richtungswechsel wiedergegeben.
o
Reihenfolge: Noten werden in der Reihenfolge abgespielt, in der sie gespielt
wurden.
o
Rand (Random): Die Noten werden in zufälliger Reihenfolge zu hören sein.
o
Einrasten: Der Arpeggiator wird weiterhin die Akkordbrechung durchführen,
auch nachdem Sie die Taste losgelassen haben. Während Sie die Tasten
gedrückt halten, können Sie dem Arpeggio-Akkord noch mehr Noten
hinzufügen, indem Sie zusätzliche Tasten drücken. Wenn Sie die Tasten
drücken, sie loslassen und anschließend in einer neuen Noten-Kombination
spielen, so speichert der Arpeggiator dies ab und arpeggiert die neuen Noten.
•
Oktave: Arpeggio-Oktavenbereich (Arp Oct) von 0, 1, 2 oder 3 Oktaven.
•
Swing: 50% (kein Swing), 55%, 57%, 59%, 61% oder 64%.
Tap-Tempo: Tippen Sie in der gewünschten Geschwindigkeit auf diese Schaltfläche, um
das Tempo des Arpeggiatos zu bestimmen. Die minimale Anzahl von erforderlichen Taps
ist im MPK mini-Editor programmierbar.
Hinweis: Diese Taste ist deaktiviert, wenn der Arpeggiator mit einer externen Taktquelle
synchronisiert wird.
7.
X-Y-Controller: Mit diesem 4-Wege-Ministick können Sie MIDI Pitch Bend-Befehle oder
MIDI CC-Nachrichten senden. Sie können den kostenlosen, herunterladbaren MPK miniEditor verwenden, um einzustellen, wie dieser XY-Controller funktioniert.
8.
Pads: Die Pads werden zum Triggern von Drumsounds oder anderen Samples in Ihrer
Software verwendet. Die Pads sind anschlagdynamisch, was sie besonders
reaktionsfähig und intuitiv spielbar macht. Sie können den kostenlosen, herunterladbaren
MPK mini-Editor verwenden, um einzustellen, welche MIDI-Meldung jedes Pad (in der
jeweiligen Pad-Bank) sendet.
9.
Bank A/B: Drücken Sie diese Taste, um bei den MPK mini-Pads zwischen Pad Bank A
und Pad Bank B zu wechseln. Sie können den kostenlosen, herunterladbaren MPK miniEditor verwenden, um einzustellen, welche MIDI-Meldung jedes Pad (in der jeweiligen
Pad-Bank) sendet.
10. CC: Wenn diese Taste aktiv ist, senden die MPK mini Pads MIDI CC-Nachrichten anstelle
von MIDI Note-On-Nachrichten. Sie können den kostenlosen, herunterladbaren MPK
mini-Editor verwenden, um einzustellen, welche CC-Meldung jedes Pad sendet.
11. Prog Change: Wenn diese Taste aktiv ist, senden die Pads des MPK mini MIDIProgrammwechsel statt MIDI Note-On-Nachrichten. Sie können über den kostenlosen,
herunterladbaren MPK mini-Editor einstellen, welche Programmwechselnachricht jedes
Pad sendet.
12. Full Level: Drücken Sie diese Taste, um den Full Level-Modus zu aktivieren/deaktivieren,
in dem die Pads immer mit der maximalen Anschlagstärke (127) abgespielt werden, egal
wie stark oder schwach die Pads betätigt werden.
13. Note Repeat: Wenn Sie diese Taste gedrückt halten, während Sie auf ein Pad drücken,
wird das Pad immer wieder getriggert - und zwar entsprechend des aktuellen Tempos
und der Zeiteinteilungseinstellungen.
14. Zuweisbare Drehregler: Jeder 270º-Regler sendet eine MIDI CC-Nachricht. Sie können
den kostenlosen, herunterladbaren MPK mini-Editor verwenden, um einzustellen, welche
CC-Meldung jeder Drehregler sendet.
15. Prog Select: Halten Sie diese Taste gedrückt und drücken Sie Pad 5, Pad 6, Pad 7 oder
Pad 8, um das Programm auszuwählen, dessen Nummer oberhalb dieses Pads
angegeben ist (Prog 1, Prog 2, Prog 3 oder Prog 4).
17
Appendix (English)
Technical Specifications
Note Keys
25 velocity-sensitive keys; 10-octave range with octave up/down buttons
Pads
8 assignable backlit pads, velocity- and pressure-sensitive; 4 banks
Knobs
8 assignable 270º knobs
X-Y Controller
1 configurable thumbstick with 3 modes
Inputs / Outputs
1 USB port
1 1/4" (6.35mm) TS input for sustain pedal
Power
USB-bus-powered
Dimensions
12.5" x 7.13" x 1.75"
31.8 cm x 18.1 cm x 4.4 cm
(width x depth x height)
Weight
1.65 lbs.
0.75 kg
Specifications are subject to change without notice.
Trademarks and Licenses
Akai Professional is a trademark of inMusic Brands, Inc., registered in the U.S. and other
countries.
All other product or company names are trademarks or registered trademarks of their
respective owners.
18
akaipro.com
Manual Version 1.0