1
Installation Instructions
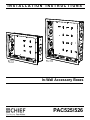
PAC525/526
PAC525/526 Site Preparation
PAC525/526 Box Preparation
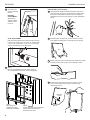
11 Remove knock-outs in box as predetermined in
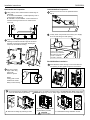
7 Using a level, draw a horizontal line at lower edge of
step 5.
install site.
A - STUD ATTACHMENT - create exploratory hole to
confirm edge of stud/studs.
B - DRYWALL ATTACHMENT - mark horizontal cut
locations ensuring a minimum 1/2” distance from
each stud.
A
B
B
12 Loosely attach components and conduit (cut to length)
to box to ease fitting into wall opening.
8 Align on lower edge drawn line (A) and horizontal
marking for inside stud location (B).Use enclosed
template or housing as a template, drawing line
around top and sides of housing.
Use four #6 screws (F)
and nuts (H) to assemble
the switch box from either
inside or outside the
PAC525 or PAC526.
PAC525/526 Box Installation
A
B
Mark the four corners.
B
13 Feed attached conduit through cut-out and insert box
A
into opening in wall. Tighten component connections.
9 Cut along outside
edge of line using
utility knife.
Remove drywall.
NOTE:
Cutting past corners
weakens the cleats’
ability to hold securely.
10 Once wall opening is completed, check stud depth. If 3.5” or greater, proceed to step 11. If less than 3.5” deep, modify depth
of box as follows before proceeding:
A - Remove box flange by removing screws.
CAUTION: Injury may occur on sharp edges. Carefully discard the removable tabs.
B - Snap off removable tabs
at perforations provided.
CAUTION:
C - Reinstall box flange. Reattach screws.
Avoid sharp edges.
7