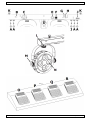
1
V
VDPLD
DJBA
AR6
M INI LED
D PAR B ATTEN – 16 X 3W
3
M INI LED
DPAR BO
OVENLIC
CHT – 16
1 X 3W
W
M INI HER
RSE À P AR LED – 16 X 3W
M INI JUE
EGO DE ILUMIN
NACIÓN PAR LE
ED – 16 X 3W
M INI-LED
DPAR-LI
ICHTEFF
FEKT-SE
ET – 16 X 3W
LE
ED PAR MINI RAMPA
R
S
SCENICZ
ZNA – 1 6 X 3W
US
SER MANUAL
GE
EBRUIKER
RSHANDL
LEIDING
NO
OTICE D’E
EMPLOI
MA
ANUAL DEL USUAR
RIO
BE
EDIENUNGSANLEIT
TUNG
IN
NSTRUKCJJA OBSŁU
UGI
4 9 15 20 25 31 VDPLDJBAR6
V. 02 – 01/06/2012
2
©Velleman nv
VDPLDJBAR6
*: not inc. – niet meegelev. – non incl. – no incl. – nicht mitgeliefert – nie zał.
terminator
eindweerstand
résistance de terminaison
terminación
Terminierung
terminator
How to turn the controller line from 3-pins into 5-pins (plug and socket).
Controller line van 3-pin naar 5-pin aanpassen (stekker en contact).
Modifier la ligne du contrôleur de 3 broches en 5 broches (fiche et contact).
Modificar la línea del controlador de 3 polos y 5 polos (conector y contacto).
Die Controller-Linie von 3-Pin nach 5-Pin anzupassen (Stecker und Kontakt).
Zamiana złącza sterownika z 3 wtykami na złącze z 5 wtykami (wtyczka i gniazdo).
V. 02 – 01/06/2012
3
©Velleman nv
V
VDPLDJBAR
R6
USER MAN
NUAL
1..
Intro
oduction
To
o all residen
nts of the European
E
Un
nion
Im
mportant en
nvironmenttal informattion about this
t
produc
ct
This symbol on th
he device orr the package indicates that
t
disposal of the device after its lifecycle coulld
harm
m the environ
nment. Do not dispose of
o the unit (o
or batteries) as unsorted
d municipal waste;
w
it
should be taken to
t a specialized company for recycling. This dev
vice should b
be returned to
t your
distributor or to a local recyc
cling service.. Respect the
e local envirronmental ru
ules.
ntact your local waste disposal authorities.
If in doubt, con
Thank you for choosing HQ
QPower™! Pllease read th
he manual th
horoughly be
efore bringin
ng this devic
ce into servic
ce.
t
device was
w damaged
d in transit, don't install or use it and contact yo
our dealer.
If the
2..
Safetty Instru
uctions
Be very ca
areful during
g the installa
ation: touching live wires
s can cause life-threaten
ning
electrosho
ocks.
Always dis
sconnect ma
ains power when
w
device not in use or when serviicing or main
ntenance
activities are
a performe
ed. Handle the power co
ord by the plug only.
se only. Kee
ep this devic
ce away form
m rain, moisture, splashing and dripping liquids..
Indoor us
Keep this device away
y from childrren and unau
uthorized users.
Caution: device heats
s up during use.
Do not sttare directly
y at the light source, as
a this may cause
•
epileptic seizure in
n sensitive people
p
•
orarily loss of sight (flash
h blindness)
tempo
•
perma
anent (irreve
ersible) eye damage.
d
There are no user-serviceable parrts inside the
e device. Reffer to an autthorized dealer for servic
ce
and/or spa
are parts.
•
This device
e falls underr protection class
c
I. It is therefore es
ssential that the device b
be earthed. Have a
qualified person carry out the elec
ctric connection.
•
ailable voltag
ge does not exceed the voltage statted in the specifications of this manu
ual.
Make sure that the ava
•
Do not crim
mp the powe
er cord and protect
p
it against damag
ge. Have an authorised d
dealer replac
ce it if
necessary..
•
Use an app
propriate saffety cable to
o fix the deviice (e.g. VDLSC7 or VD
DLSC8).
•
Install the VDPLDJBA
AR6 at a min
nimal distanc
ce of 0.5 m from
f
flamma
able and exp
plosive objec
cts or
substances
s.
•
Respect a minimum distance of 1m
m between the device’s light output and any illuminated surrface.
3..
Gene
eral Guid
delines
Refer to the Ve
elleman® Service
S
and
d Quality Warranty
W
on the last pag
ges of this m
manual.
Keep this device
d
away
y from dust and
a
extreme
e temperaturres.
Protect this device from
m shocks an
nd abuse. Av
void brute force when op
perating the device.
•
Familiarise
e yourself with the functiions of the device
d
before
e actually us
sing it. Do no
ot allow operation by
unqualified
d people. Any damage th
hat may occur will most probably be
e due to unprofessional use
u of the
device.
V. 02 – 01/06/2012
4
©Velleman
n nv
VDPLDJBAR6
•
All modifications of the device are forbidden for safety reasons. Damage caused by user modifications to
the device is not covered by the warranty.
•
Only use the device for its intended purpose. All other uses may lead to short circuits, burns, electroshocks,
lamp explosion, crash, etc. Using the device in an unauthorised way will void the warranty.
•
Damage caused by disregard of certain guidelines in this manual is not covered by the warranty and the
dealer will not accept responsibility for any ensuing defects or problems.
•
A qualified technician should install and service this device.
•
Do not switch the device on immediately after it has been exposed to changes in temperature. Protect the
device against damage by leaving it switched off until it has reached room temperature.
•
This device is designed for professional use on stage, in discos, theatres, etc. The VDPLDJBAR6 should
only be used indoors with an alternating current of 230 VAC/50 Hz.
•
Lighting effects are not designed for permanent operation: regular operation breaks will prolong their lives.
•
Keep this manual for future reference.
4.
Features
•
ultra-light weight: special for DJ and mobile use
•
movable spots, per spot there are 4 tri-colour LEDs for a smooth colour mixing
•
preprogrammed modes, with presets for colours and RGB programs
•
auto mode speed adjustable, and built-in microphone for sound activation
•
easy control via included foot pedal, with black-out function.
5.
Overview
Refer to the illustrations on pages 2 and 3 of this manual.
A
connector for LED spot (4x)
J
DIP switch
B
earth terminal
K
mounting points
C
power socket + fuse
L
horizontal fixing knob
D
tripod securing knob
M
vertical fixing knob (2 per spot)
E
DMX input
N
LEDs (4 per spot)
F
DMX output
O
program selection pedal
G
microphone
P
sound control pedal
H
microphone sensitivity control knob
Q
freeze pedal
I
connector for footswitch
R
blackout pedal
6.
Mounting instructions
6.1
Choosing a Mounting Location
The VDPLDJBAR6 batten has been designed for indoor environments at temperatures up to 40°C. For
proper operation, the unit must be operated with an unobstructed air convection to its metal housing.
Do not:
•
Operate the batten in environments with an ambient temperature higher than 40°C and a relative humidity
higher than 75%.
•
Operate the batten in a closed environment smaller than 10 m³ unless forced air convection is provided.
6.2
Secure Mounting
Risk of injury. Overhead mounting requires extensive experience: calculating workload limits,
determining the installation material to be used… Have the material and the device itself checked
regularly. Do not attempt to install the device yourself if you lack these qualifications as improper
installation may result in injuries.
The VDPLDJBAR6 batten is designed to be mounted either on a tripod (not incl.) or on a truss (not incl.) using
2 truss clamps (not incl.).
Tripod:
•
Carefully follow the instructions that came with your tripod.
•
Make sure that the diameter of the inserted tripod tube is not less than 25 mm as otherwise secure
mounting cannot be guaranteed.
V. 02 – 01/06/2012
5
©Velleman nv
VDPLDJBAR6
•
Slide the VDPLDJBAR6 over the tripod and secure it tightly by turning the knob [D] clockwise.
Truss mounting:
•
Have the batten installed by a qualified person, respecting EN 60598-2-17 and all other applicable norms.
•
The carrying construction must be able to support 10 times the weight of the batten for 1 hour without
deforming.
•
Remove both bolts [K] from the batten and replace them by 2 truss clamps (not incl.).
Note: ALWAYS mount the batten with two clamps!
•
The installation must always be secured with a secondary attachment e.g. a safety cable.
•
Never stand directly below the batten when it is being mounted, removed or serviced. Have a qualified
technician check the batten once a year and once before you bring it into service.
•
Install the batten in a location with few passers-by that is inaccessible to unauthorised persons.
•
Make sure there is no flammable material within a 0.5 m radius of the batten.
•
The installation has to be approved by an expert before the device is taken into service.
4-way footswitch:
Connect the footswitch to the light fixture [I].
6.3
DMX-512 connection
Refer to the illustrations on page 3 of this manual.
•
When applicable, connect an XLR cable to the female 3-pin XLR output of a controller (not incl.) and the
other side to the male 3-pin XLR input [E] of the VDPLDJBAR6. Multiple VDPLDJBAR6s can be linked
through serial linking. The linking cable should be a dual core, screened cable with XLR input and output
connectors.
•
A DMX terminator is recommended for installations where the DMX cable has to run a long distance or is in
an electrically noisy environment (e.g. discos). The terminator prevents corruption of the digital control
signal by electrical noise. The DMX terminator is simply an XLR plug with a 120Ω resistor between pins 2
and 3, which is then plugged into the XLR output socket [F] of the last device in the chain.
6.4
Connection to the AC Power Supply
The AC socket providing power to the VDPLDJBAR6 batten must be properly and separately
earthed. Do not use any other AC cords than the one provided or any other AC cord not
authorized by the manufacturer.
•
Have a qualified electrician carry out the electric connection.
•
Connect the batten to the mains with the power plug [C]. Make sure the used mains circuit is protected by
a 30mA Residual Current Device (RCD). Do not connect it to a dimming pack.
•
Replace a blown fuse only with an identical fuse (F2A/250V).
7.
Operation
Refer to the illustrations on page 2 of this manual.
The VDPLDJBAR6 can operate in five modes: sound controlled, automatic mode, master/slave mode,
DMX controlled mode or foot switch mode.
Sound controlled mode
1. Set DIP switch 10 to the OFF-position to enable sound controlled mode.
2. Set the microphone [G] sensitivity with the sensitivity knob [H].
Automatic mode
1. Set DIP switch 9 to the ON-position and DIP switch 10 to the OFF-position to enable automatic mode.
2. Set the program speed with switches 1 to 3.
Master/slave mode
1. Connect multiple VDPLDJBAR6’s as described in §6.
2. Set the master VDPLDJBAR6 to sound controlled or automatic mode.
3. Set DIP switch 1 and 10 on the slaves to ON to enable slave mode.
V. 02 – 01/06/2012
6
©Velleman nv
V
VDPLDJBAR
R6
DM
MX controlled mode
•
witch 10 to th
he ON-positiion to enable
e DMX contrrolled mode.
Set DIP sw
•
All DMX-co
ontrolled dev
vices need a digital startt address so that the corrrect device responds to the signals.
This digital start addre
ess is the cha
annel numbe
er from whic
ch the device
e starts to “listen” to the
e DMX
controller. The same starting addrress can be used
u
for a whole group of
o devices orr an individual address can
c
be set for every
e
device
e.
•
When all devices
d
have the same address, all the units will “listen” to the
t
control signal on one
e particular
channel. In
n other word
ds: changing
g the settings of one cha
annel will affe
ect all device
es simultane
eously. If you
set individual addresse
es, each dev
vice will “liste
en” to a sepa
arate channe
el number. C
Changing the
e settings off
one channel will only affect
a
the de
evice in ques
stion.
•
In case of the 15-chan
nnel VDPLDJ
JBAR6, you will have to
o set the starrt address off the first un
nit to 1
(CH1~15),, the second unit to 16 (1
( + 15) (CH
H16~30), the
e third to 31
1 (16 + 15) ((CH31~45), and so on.
•
Use the DIIP switches to
t set the ap
ppropriate DMX address.
•
sw
witch
1
2
3
4
5
6
7
8
9
vallue
1
2
4
8
16
32
64
128
256
2
Refer to th
he table belo
ow for an ove
erview of the
e control signals per cha
annel.
Ch
hannel
CH
H1
CH
H2
Function
autto
pro
ograms
ma
aster
dim
mmer
DMX-512 value
v
Con
ntrol Programs
000 ~ 00
09
off
010 ~ 02
29
Program 1
030 ~ 04
49
Program 2
050 ~ 06
69
Program 3
070 ~ 08
89
Program 4
090 ~ 10
09
Program 5
110 ~ 12
29
Program 6
130 ~ 14
49
Program 7
150 ~ 16
69
Program 8
170 ~ 18
89
Program 9
190 ~ 20
09
Program 10
210 ~ 22
29
Program 11
230 ~ 24
49
Autto mode, inte
ernal progra
ams
250 ~ 25
55
sou
und controlle
ed mode
hen CH1 or CH3
C
active
no function wh
000 ~ 00
00
off
001 ~ 25
55
dim
mming 0 ~ 100%
000 ~ 00
00
off
001 ~ 25
55
flas
sh from slow
w to fast
CH
H3
strobe
CH
H4
spo
ot1
000 ~25
55
red dimming fro
om 0 ~ 100%
%
CH
H5
spo
ot1
000 ~25
55
green dimming from 0 ~ 10
00%
CH
H6
spo
ot1
000 ~25
55
blue
e dimming from 0 ~ 100
0%
CH
H7
spo
ot2
000 ~25
55
red dimming fro
om 0 ~ 100%
%
CH
H8
spo
ot2
000 ~25
55
green dimming from 0 ~ 10
00%
CH
H9
spo
ot2
000 ~25
55
blue
e dimming from 0 ~ 100
0%
CH
H10
spo
ot3
000 ~25
55
red dimming fro
om 0 ~ 100%
%
CH
H11
spo
ot3
000 ~25
55
green dimming from 0 ~ 10
00%
CH
H12
spo
ot3
000 ~25
55
blue
e dimming from 0 ~ 100
0%
CH
H13
spo
ot4
000 ~25
55
red dimming fro
om 0 ~ 100%
%
CH
H14
spo
ot4
000 ~25
55
green dimming from 0 ~ 10
00%
CH
H15
spo
ot4
000 ~25
55
blue
e dimming from 0 ~ 100
0%
oot controlle
er
Fo
No
ote: the foott controller will
w only work when the VDPLDJBAR
V
R6 is set to automatic o
or sound controlled mode
e.
V. 02 – 01/06/2012
7
©Velleman
n nv
VDPLDJBAR6
Unplug the power cord from the VDPLDJBAR6 and connect the foot controller to the foot controller jack [I].
Reconnect the power cord.
Foot controller functions:
Press to select a built-in program.
1x
pedal 1
(O)
pedal 2
(P)
pedal 3
(Q)
pedal 4
(R)
8.
preset
white
2x
red
3x
green
4x
blue
5x
yellow
6x
violet
7x
cyan
8x
colour change every second, continuous loop
9x
colour fade every 3 seconds, continuous loop
sound
controlled
press to enter sound controlled mode
freeze
hold chasing programs (8 & 9)
black out
Press at any time to switch off all LEDs. Press again to return to previous setting.
Hold for strobe function.
press pedal 1 to quit sound controlled mode
Cleaning and Maintenance
•
All screws should be tightened and free of corrosion.
•
The housing, visible parts, mounting supports and the installation location (e.g. ceiling, suspension,
trussing) should not be deformed, modified or tampered with e.g. do not drill extra holes in mounting
supports, do not change the location of the connections.
•
Moving mechanic parts must not show any signs of wear and tear.
•
The electric power supply cables must not show any damage. Have a qualified technician maintain the
device.
•
Disconnect the device from the mains prior to maintenance activities.
•
Wipe the device regularly with a moist, lint-free cloth. Do not use alcohol or solvents.
•
There are no user-serviceable parts.
•
Contact your dealer for spare parts if necessary.
9.
Technical Specifications
power supply
230VAC ~ 50Hz
fuse
F2A/250V
power consumption
50W
LED
16 x 3W tri-colour LEDs
beam angle
15°
dimensions
950 x 45 x 230mm
total weight
6kg
Use this device with original accessories only. Velleman nv cannot be held responsible in the event
of damage or injury resulted from (incorrect) use of this device.
For more info concerning this product and the latest version of this manual, please visit our website
www.hqpower.eu.
The information in this manual is subject to change without prior notice.
© COPYRIGHT NOTICE
The copyright to this manual is owned by Velleman nv. All worldwide rights reserved.
No part of this manual may be copied, reproduced, translated or reduced to any electronic medium or otherwise
without the prior written consent of the copyright holder.
V. 02 – 01/06/2012
8
©Velleman nv
V
VDPLDJBAR
R6
GEBR
RUIKER
RSHAN
NDLEID
DING
1..
Inleiding
Aa
an alle inge
ezetenen va
an de Europ
pese Unie
Be
elangrijke milieu-infor
m
rmatie betrreffende ditt product
Dit sy
ymbool op het
h toestel off de verpakk
king geeft aa
an dat, als het na zijn lev
venscyclus wordt
w
wegg
geworpen, dit toestel sch
hade kan toe
ebrengen aan het milieu
u. Gooi dit to
oestel (en ev
ventuele
batte
erijen) niet bij
b het gewon
ne huishoudelijke afval; het moet bij een gespec
cialiseerd be
edrijf
terec
chtkomen vo
oor recyclage
e. U moet dit toestel naa
ar uw verdeler of naar ee
en lokaal rec
cyclagepunt
breng
gen. Respec
cteer de plaa
atselijke milie
euwetgeving
g.
He
ebt u vragen, contacte
eer dan de plaatselijke
e autoriteitten betreffe
end de verw
wijdering.
Da
ank u voor uw
w aankoop! Lees deze handleiding
h
g
grondig
voorr u het toeste
el in gebruik
k neemt. Werd het toestel
beschadigd tijd
dens het transport, insta
alleer het dan niet en raa
adpleeg uw dealer.
2..
Veilig
gheidsin
nstructies
Wees voorrzichtig bij de
d installatie: raak geen kabels aan die
d onder stroom staan om dodelijke
e
elektrosho
ocks te verm
mijden.
Trek de sttekker uit he
et stopcontac
ct (trek niet aan de kabe
el!) voordat u het toeste
el reinigt en als
a
u het niet gebruikt.
Gebruik he
et toestel en
nkel binnen
nshuis. Besc
cherm tegen
n regen, voch
htigheid en opspattende
o
e
vloeistoffe
en.
Houd buite
en het bereik van kinderren en onbev
voegden.
Let op: dit toestel wo
ordt zeer warrm tijdens het gebruik.
Kijk niet rechtstreek
ks in de lich
htbron om
•
epilepsieaanvallen
n bij gevoelig
ge personen
•
d (flitsblindhe
eid)
tijdelijjke blindheid
•
perma
anente en on
nherroepelijk
ke schade aa
an de ogen
te voorkom
men.
Er zijn gee
en door de gebruiker
g
vervangbare onderdelen in
n dit toestel. Voor onderrhoud of
reserveonderdelen, co
ontacteer uw
w dealer.
•
Dit toestel valt onder bescherming
b
gsklasse I, wat
w wil zegge
en dat het to
oestel geaard
d moet zijn. Een
geschoolde
e technicus moet
m
de elek
ktrische aansluiting verz
zorgen.
•
De beschik
kbare netspa
anning mag niet hoger zijn dan de spanning in de
d specificatiies achteraan de
handleiding
g.
•
De voeding
gskabel mag
g niet bescha
adigd zijn of ingekort wo
orden. Laat uw
u dealer zo
o nodig een nieuwe
n
kabe
el
plaatsen.
•
t
vast met een ges
schikte veilig
gheidskabel (bv. VDLSC7 of VDLSC
C8).
Maak het toestel
•
Installeer het
h toestel op
o een minim
mumafstand van 0,5 m van
v
ontvlambare en explosieve voorrwerpen of
stoffen.
•
an 1 m tusse
en de lichtuittgang van he
et toestel en
n het belichte
e oppervlak..
Zorg voor een minimumafstand va
3..
Algem
mene ric
chtlijnen
n
Raadpleeg de Velleman®
V
® service- en kwaliteitsgarantie achteraan
a
de
eze handleiding.
Bescherm tegen stof en
e extreme temperature
t
en.
Bescherm tegen schok
kken. Vermijjd brute krac
cht tijdens de
d bediening.
V. 02 – 01/06/2012
9
©Velleman
n nv
VDPLDJBAR6
•
Leer eerst de functies van het toestel kennen voor u het gaat gebruiken. Ongeschoolde personen mogen dit
toestel niet gebruiken. Meestal is beschadiging het gevolg van onprofessioneel gebruik.
•
Om veiligheidsredenen mag u geen wijzigingen aanbrengen. Schade door wijzigingen die de gebruiker heeft
aangebracht valt niet onder de garantie.
•
Gebruik het toestel enkel waarvoor het gemaakt is. Andere toepassingen kunnen leiden tot kortsluitingen,
brandwonden, elektrische schokken, enz. Bij onoordeelkundig gebruik vervalt de garantie.
•
De garantie geldt niet voor schade door het negeren van bepaalde richtlijnen in deze handleiding en uw
dealer zal de verantwoordelijkheid afwijzen voor defecten of problemen die hier rechtstreeks verband mee
houden.
•
Laat dit toestel installeren en onderhouden door een geschoolde technicus.
•
Om beschadiging te vermijden, zet u het toestel best niet aan onmiddellijk nadat het werd blootgesteld aan
temperatuurschommelingen. Wacht tot het toestel op kamertemperatuur gekomen is.
•
Dit toestel is ontworpen voor professioneel gebruik op podia, in disco's, enz. U mag dit toestel enkel
binnenshuis gebruiken en aansluiten op een wisselspanning van 230 VAC/50 Hz.
•
Lichteffecten zijn niet ontworpen voor continue werking: regelmatige onderbrekingen doen ze langer
meegaan.
•
Bewaar deze handleiding voor verdere raadpleging.
4.
Eigenschappen
•
uiterst licht: speciaal voor dj's en mobiel gebruik
•
richtbare spots, per spot zijn er 4 driekleurige LEDS voor vloeiende kleurovergangen
•
voorgeprogrammeerde modi, met ingestelde kleurwaardes en RGB programma's
•
snelheid automodus instelbaar, en ingebouwde microfoon voor geluidssturing
•
eenvoudige bediening via meegeleverde voetpedaal, met 'black out' (alles uit) functie.
5.
Omschrijving
Raadpleeg de afbeeldingen op pagina’s 2 en 3 van deze handleiding.
A
aansluiting voor led spot (4x)
J
DIP- schakelaar
B
aansluiting aarding
K
montagepunten
C
aansluiting stroomkabel + zekering
L
horizontale positieknop
D
beveiligingsknop statief
M
verticale positieknop (2 per spot)
E
DMX ingang
N
leds (4 per spot)
F
DMX uitgang
O
voetpedaal programmaselectie
G
microfoon
P
voetpedaal muzieksturing
H
gevoeligheidsregeling microfoon
Q
voetpedaal freeze
I
aansluiting voor voetpedaal
R
black-out voetpedaal (alle leds uit)
6.
Voorbereiding
6.1
Keuze van de montageplaats
De VDPLDJBAR6 werd ontworpen voor gebruik binnenshuis aan temperaturen lager dan 40°C.
Voorzie een aangepaste ventilatie en richt deze naar de metalen behuizing van de spots.
Het is niet aan te raden om:
•
De spots te gebruiken in een omgeving met een omgevingstemperatuur hoger dan 40°C en een relatieve
vochtigheid hoger dan 75%.
•
De spots te gebruiken in een ruimte kleiner dan 10 m³ tenzij er ventilatie is voorzien.
6.2
Montage
Gevaar voor verwondingen. Een degelijke praktijkervaring is vereist voor de plaatsing van dit
toestel. U moet de maximumbelasting van de draagconstructie kunnen berekenen, weten welk
constructiemateriaal u kunt gebruiken en u moet het gebruikte materiaal en het toestel af en toe laten
nakijken. Monteer het toestel niet zelf indien u er geen ervaring mee heeft. Een slechte montage kan
leiden tot verwondingen.
Monteer de VDPLDJBAR6 op een statief (niet meegelev.) of aan een draagstructuur (truss, niet meegelev.)
met behulp van twee trussklemmen (niet meegelev.).
V. 02 – 01/06/2012
10
©Velleman nv
VDPLDJBAR6
Statief:
•
Volg nauwlettend de instructies die bij het statief werden meegeleverd.
•
Zorg ervoor dat de diameter van de statiefbuis minstens 25 mm bedraagt om een goede bevestiging te
garanderen.
•
Plaats de VDPLDJBAR6 op het statief en draai de beveiligingsknop [D] stevig aan (rechtsom).
Montage aan draagstructuur:
•
Laat een geschoolde technicus dit toestel installeren conform EN 60598-2-17 en andere toepasselijke
normen.
•
De constructie waaraan het toestel wordt bevestigd, moet gedurende 1 uur 10 x het gewicht van dit toestel
kunnen dragen zonder te vervormen.
•
Verwijder beide bouten [K] uit de drager en vervang ze door twee trussklemmen (niet meegelev.).
Opmerking: monteer de VDPLDJBAR6 ALTIJD met twee klemmen.
•
Maak het toestel ook vast met een veiligheidskabel.
•
Sta nooit recht onder het toestel wanneer u het monteert, verwijdert of schoonveegt. Laat het toestel
controleren door een geschoolde technicus voor u het in gebruik neemt en laat het 1 x per jaar volledig
nakijken.
•
Installeer dit toestel op een plaats waar niemand langs moet lopen, kan neerzitten of het toestel kan
aanraken.
•
Verwijder alle brandbaar materiaal in een straal van 0,5 m rond het toestel.
•
De installatie moet voor het eerste gebruik gekeurd worden door een expert.
4-wegs voetpedaal:
Sluit de voetpedaal aan op de draagbalk [I].
6.3
DMX512-aansluiting
Raadpleeg de afbeeldingen op pagina 3 van deze handleiding.
•
Indien van toepassing, sluit een XLR-kabel aan de vrouwelijke 3-pin XLR-uitgang van een controller (niet
meegelev.) en de andere kant van de mannelijke 3-pin XLR-ingang [E] van de VDPLDJBAR6. U kunt
verscheidene VDPLDJBAR6’s aan elkaar koppelen met behulp van een seriële koppeling. Gebruik daarvoor
een 2-aderige afgeschermde kabel met XLR ingang- en uitgangsaansluitingen.
•
Een DMX eindweerstand is aanbevolen als de DMX-kabel vrij lang is of wordt gebruikt in een omgeving met
veel elektrische ruis (bv. een discotheek). De eindweerstand voorkomt corruptie van het digitale
controlesignaal door elektrische ruis. De DMX eindweerstand is niets meer dan een XLR-stekker met een
weerstand van 120 Ω van pin 2 naar 3. Deze XLR-stekker wordt dan aangesloten op de XLR-uitgang [F]
van het laatste toestel in de reeks.
6.4
Aansluiting op het voedingsnet
Koppel de spot aan een afzonderlijk geaard stopcontact. Gebruik geen andere voedingskabel
dan deze meegeleverd met de spot of een voedingskabel die niet door de fabrikant werd
goedgekeurd.
•
Een geschoolde elektricien moet het toestel aansluiten.
•
Sluit het toestel via de stekker [C] aan op het lichtnet. Zorg dat het gebruikte voedingscircuit beveiligd is
met een aardlekschakelaar van 30 mA. Sluit het niet aan op een dimmerpack.
•
Vervang een opgeblazen zekering enkel door een identieke zekering (F2A/250V).
7.
Gebruik
Raadpleeg de afbeeldingen op pagina 2 van deze handleiding.
De VDPLDJBAR6 beschikt over vijf aanstuurfuncties: muzieksturing, automatische sturing,
master/slavefunctie, DMX- of voetpedaalsturing.
Muzieksturing
1. Plaats DIP-schakelaar 10 in de OFF-stand om de muzieksturing in te schakelen.
2. Regel de gevoeligheid van de microfoon [G] met de instelknop [H].
V. 02 – 01/06/2012
11
©Velleman nv
V
VDPLDJBAR
R6
Au
utomatische
e sturing
1. Plaats DIP--schakelaar 9 in de ON-s
stand en DIP
P-schakelaarr 10 in de OFF-stand om
m de automatische sturin
ng
in te schak
kelen.
ogrammasne
elheid in mett DIP-schake
elaars 1 tot 3.
3
2. Stel de pro
aster/slave
efunctie
Ma
1. Koppel me
eerdere VDP
PLDJBAR6’s zoals omsch
hreven onde
er §6.
e muziek- off automatisch
he sturing in
n op het mas
stertoestel.
2. Schakel de
d slaves op
p ON om de slavefunctie in te schake
elen.
3. Plaats DIP--schakelaar 1 en 10 op de
MX-sturing
DM
•
Plaats DIP--schakelaar 10 op ON om
m de DMX-sturing in te schakelen.
•
Alle DMX-g
gestuurde to
oestellen heb
bben een dig
gitaal startad
dres nodig, zodat
z
het juiste toestel reageert
r
op de
d
signalen. Dit
D digitale startadres is het kanaalnummer van waarop het toestel ‘luisttert’ naar he
et signaal van
de DMX-co
ontroller. U kunt
k
één enk
kel startadre
es gebruiken voor een grroep toestellen of u kuntt per toestel
een nieuw startadres ingeven.
•
s
in
nstelt, zullen alle toestellen ‘luisteren
n’ naar hetze
elfde kanaal. Met andere
e
Wanneer u een enkel startadres
woorden: wanneer
w
u de
d instellinge
en voor 1 kanaal verandert, zullen alle toestellen
n er tegelijk op reageren
n.
Wanneer u verschillende adressen instelt, dan
n luistert elk toestel naarr een ander kanaal. Met andere
woorden: wanneer
w
u de
d instellinge
en van een kanaal
k
veran
ndert, zal enk
kel het toesttel op dat ka
anaal reageren.
•
In het geval van de 15
5-kanaals VD
DPLDJBAR6
6, zult u het startadres van
v
het eerstte toestel op
p 1 (CH1~15
5)
moeten ins
stellen, van het tweede toestel op 16 (1 + 15) (CH16~30),
(
van het derde op 31 (16
6+ 15)
(CH31~45), enz.
•
m behulp van
v
DIP-schakelaars 1 tot 9 (binair).
Stel het startadres in met
•
DIP--schakelaarr
1
2
3
4
5
6
7
8
9
waarde
1
2
4
8
16
3
32
64
128
1
256
eronder voorr een overzic
cht van de signalen per kanaal.
Raadpleeg de tabel hie
ka
anaal
CH
H1
CH
H2
fun
nctie
autto
pro
ograms
master
dim
mmer
DMX512-w
waarde
om
mschrijving
000 ~ 009
off
010 ~ 029
pro
ogramma 1
030 ~ 049
pro
ogramma 2
050 ~ 069
pro
ogramma 3
070 ~ 089
pro
ogramma 4
090 ~ 109
pro
ogramma 5
110 ~ 129
pro
ogramma 6
130 ~ 149
pro
ogramma 7
150 ~ 169
pro
ogramma 8
170 ~ 189
pro
ogramma 9
190 ~ 209
pro
ogramma 10
210 ~ 229
pro
ogramma 11
230 ~ 249
autto mode, inte
erne program
mma’s
250 ~ 255
mu
uziekgestuurd
de modus
assing als CH
H1 of CH3 geselecteerd zijn
Niet van toepa
000 ~ 000
off
001 ~ 255
dim
mmen 0 ~ 10
00%
000 ~ 000
off
001 ~ 255
flas
sh van traag naar snel
CH
H3
stro
oboscoop
CH
H4
spo
ot1
000 ~25
55
roo
od dimmen van
v
0 ~ 100%
%
CH
H5
spo
ot1
000 ~25
55
gro
oen dimmen van 0 ~ 100
0%
CH
H6
spo
ot1
000 ~25
55
blauw dimmen van 0 ~ 100
0%
CH
H7
spo
ot2
000 ~25
55
roo
od dimmen van
v
0 ~ 100%
%
CH
H8
spo
ot2
000 ~25
55
gro
oen dimmen van 0 ~ 100
0%
CH
H9
spo
ot2
000 ~25
55
blauw dimmen van 0 ~ 100
0%
CH
H10
spo
ot3
000 ~25
55
roo
od dimmen van
v
0 ~ 100%
%
V. 02 – 01/06/2012
12
©Velleman
n nv
VDPLDJBAR6
kanaal
functie
CH11
spot3
DMX512-waarde
000 ~255
omschrijving
groen dimmen van 0 ~ 100%
CH12
spot3
000 ~255
blauw dimmen van 0 ~ 100%
CH13
spot4
000 ~255
rood dimmen van 0 ~ 100%
CH14
spot4
000 ~255
groen dimmen van 0 ~ 100%
CH15
spot4
000 ~255
blauw dimmen van 0 ~ 100%
Voetpedaal
Opmerking: Het voetpedaal functioneert enkel indien de automatische of muzieksturing geselecteerd is.
Ontkoppel de voedingsstekker en koppel het voetpedaal aan de ingang [I]. Steek de voedingsstekker terug in
het stopcontact.
Functies:
Duwen om een ingebouwd programma te selecteren.
1x
pedaal 1
(O)
pedaal 2
(P)
pedaal 3
(Q)
pedaal 4
(R)
8.
vooraf ingesteld
muzieksturing
wit
2x
rood
3x
groen
4x
blauw
5x
geel
6x
violet
7x
cyaan
8x
kleurverandering om de seconde, doorlopende lus
9x
kleurenovergang om de 3 seconden, doorlopende lus
duwen om in muziekgestuurde modus te gaan
duwen op pedaal 1 om de muziekgestuurde modus te verlaten
functie ‘freeze’
stopzetten van chaser programma’s (8 & 9)
functie
‘black out’
Duwen om de leds uit te schakelen. Opnieuw duwen om terug te keren naar de
vorige instellingen. Ingedrukt houden voor stroboscoopeffect
Reiniging en onderhoud
•
Alle gebruikte schroeven moeten goed zijn aangespannen en mogen geen sporen van roest vertonen.
•
De behuizing, de lenzen, de montagebeugels en de montageplaats (bv. het plafond of het gebinte) mogen
niet vervormd zijn of aangepast worden (geen extra gaten in montagebeugels, aansluitingen niet
verplaatsen, enz.)
•
Mechanisch bewegende delen mogen geen sporen van slijtage vertonen en mogen niet onregelmatig
bewegen.
•
De voedingskabels mogen niet beschadigd zijn. Laat het toestel onderhouden door een geschoolde
technicus.
•
Ontkoppel het toestel van het lichtnet voor u aan onderhoudswerkzaamheden begint.
•
Maak het toestel geregeld schoon met een vochtige, niet pluizende doek. Gebruik geen alcohol of solvent.
•
De gebruiker mag geen onderdelen vervangen.
•
Bestel eventuele reserveonderdelen bij uw dealer.
9.
Technische specificaties
voeding
230VAC ~ 50Hz
zekering
F2A/250V
verbruik
50W
leds
16 x 3W driekleurige leds
stralingshoek
15°
afmetingen
950 x 45 x 230mm
gewicht
6kg
V. 02 – 01/06/2012
13
©Velleman nv
VDPLDJBAR6
Gebruik dit toestel enkel met originele accessoires. Velleman nv is niet aansprakelijk voor schade of
kwetsuren bij (verkeerd) gebruik van dit toestel.
Voor meer informatie over dit product en de laatste versie van deze handleiding, zie
www.hqpower.eu.
De informatie in deze handleiding kan te allen tijde worden gewijzigd zonder voorafgaande
kennisgeving.
© AUTEURSRECHT
Velleman nv heeft het auteursrecht voor deze handleiding. Alle wereldwijde rechten voorbehouden.
Het is niet toegestaan om deze handleiding of gedeelten ervan over te nemen, te kopiëren, te vertalen, te
bewerken en op te slaan op een elektronisch medium zonder voorafgaande schriftelijke toestemming van de
rechthebbende.
V. 02 – 01/06/2012
14
©Velleman nv
V
VDPLDJBAR
R6
NOTIC
CE D’EM
MPLOI
I
1..
Intro
oduction
Au
ux résidents
s de l'Union
n européen
nne
De
es informattions enviro
onnementales importa
antes conce
ernant ce produit
p
Ce sy
ymbole sur l'appareil ou l'emballage indique que l’élimination
n d’un apparreil en fin de
e vie peut
pollue
er l'environn
nement. Ne pas
p jeter un appareil éle
ectrique ou électronique
é
(et des piles
s éventuelles
s)
parmi les déchets
s municipaux
x non sujets au tri sélecttif ; une déc
chèterie traittera l’appare
eil en questio
on.
Renvo
oyer les équipements us
sagés à votre
e fournisseur ou à un se
ervice de rec
cyclage local. Il convient de
respe
ecter la régle
ementation locale relativ
ve à la protec
ction de l’environnement.
En
n cas de que
estions, con
ntacter les autorités locales pour éliminatio
on.
No
ous vous rem
mercions de votre
v
achat ! Lire la prés
sente notice attentiveme
ent avant la mise en serrvice de
l’ap
ppareil. Si l’a
appareil a étté endomma
agé pendant le transportt, ne pas l’installer et consulter votre
e revendeur.
2..
Cons
signes de
e sécuritté
Être prude
ent lors de l’’installation : toucher un
n câble sous tension peut causer des
s électrochoc
cs
mortels.
Débranche
er l’appareil s’il n’est pas
s utilisé ou pour
p
le netto
oyer. Tirer la fiche pour débrancher
d
l'appareil ; non pas le câble.
Utiliser cett appareil un
niquement à l'intérieu
ur. Protéger de la pluie, de l’humiditté et des
projections d’eau.
Garder hors de la porttée des enfants et des personnes no
on autorisées
s.
Attention
n : le boîtier du spot chauffe pendant l’usage.
Ne pas re
egarder dire
ectement dans
d
la source lumineu
use afin d’év
viter les risq
ques
•
de cris
se d’épilepsie chez les pe
ersonnes sujjettes
•
d’aveu
uglement tem
mporaire (av
veuglement par éclair)
•
d’endo
ommagemen
nt permanen
nt et irrévers
sible de l’œil.
Il n’y a au
ucune pièce maintenable
m
par l’utilisatteur. Commander des pièces de rechange
éventuelle
es chez votre
e revendeur..
•
Cet appare
eil ressort à la classe de protection I,
I ce qui implique que l’a
appareil doit être mis à la terre. Un
technicien qualifié doitt établir la co
onnexion éle
ectrique.
•
La tension réseau ne peut
p
pas dép
passer la tension mentionnée dans le
es spécifications à la fin de cette
notice.
•
n ne peut pa
as être replis
ssé ou endom
mmagé. Dem
mander à vottre revendeu
ur de
Le câble d’’alimentation
renouvelerr le câble d’a
alimentation si nécessairre.
•
Fixer l’appareil à l’aide
e d’un câble de sécurité adéquat
a
(p.e
ex. VDLSC7
7 ou VDLSC8
8).
•
e VDPLDJBA
AR6 à une distance miniimale de 0,5
5 m de tout objet
o
ou produit inflamm
mable ou
Installer le
explosif.
•
e minimum de 1 m entre
e la sortie lu
umière de l’a
appareil et la
a surface illuminée.
Respecter une distance
3..
Direc
ctives gé
énérales
Se référer à la garantie de
d service et
e de qualité
é Velleman
n® en fin de notice.
Protéger contre la pou
ussière. Proté
éger contre la chaleur ex
xtrême.
Protéger contre les chocs et le traiter avec circ
conspection pendant l’op
pération.
•
Se familiarriser avec le fonctionnem
ment de l’app
pareil avant de l’utiliser. Ne pas perm
mettre pas aux
a
personnes
non qualifiées d’opérerr cet appareil. La plupart des dégâts
s sont causés
s par un usa
age non proffessionnel.
V. 02 – 01/06/2012
15
©Velleman
n nv
VDPLDJBAR6
•
Toute modification est interdite pour des raisons de sécurité. Les dommages occasionnés par des
modifications par le client ne tombent pas sous la garantie.
•
N’utiliser le spot qu’à sa fonction prévue. Tout autre usage peut causer des courts-circuits, des brûlures,
des électrochocs, etc. Un usage impropre annule d'office la garantie.
•
La garantie ne s’applique pas aux dommages survenus en négligeant certaines directives de cette notice et
votre revendeur déclinera toute responsabilité pour les problèmes et les défauts qui en résultent.
•
Confier l’installation et l’entretien à un personnel qualifié.
•
Ne pas brancher l’appareil après exposition à des variations de température. Afin d’éviter des dommages,
attendre jusqu’à ce que l’appareil ait atteint la température ambiante avant de l’utiliser.
•
Cet appareil a été développé pour usage professionnel dans des discothèques, des théâtres, etc. Employer
cet appareil à l’intérieur et le connecter à une source de courant CA de 230 VCA/50 Hz.
•
Un effet lumineux n’est pas conçu pour une opération continue. Des pauses régulières prolongeront sa vie.
•
Garder cette notice pour toute référence ultérieure.
4.
Caractéristiques
•
très léger : conçu spécialement pour DJ et usage mobile
•
spots orientables, chaque spot est prévu de 4 LED tricolores pour une transition de couleurs aisée
•
modes préprogrammés, avec des valeurs de couleurs préprogrammées et des programmes RGB
•
vitesse du mode automatique ajustable , microphone incorporé pour le pilotage de la musique
•
utilisation facile grâce au pédalier livré, avec fonction 'black out' (tout éteint).
5.
Description
Voir illustrations page 2 et 3 de ce mode d’emploi.
A
connexion pour spot à LED (4x)
J
interrupteur DIP
B
connexion à la terre
K
points de montage
C
connexion pour câble conducteur + fusible
L
bouton de positionnement horizontal
D
bouton moleté du trépied
M
bouton de positionnement vertical (2 par spot)
E
entrée DMX
N
LED (4 par spot)
F
sortie DMX
O
pédalier sélection de programme
G
microphone
P
pédalier pour le pilotage de son
H
réglage de la sensibilité du microphone
Q
pédalier avec fonction ‘freeze’
I
connexion pour pédalier
R
pédalier avec fonction 'black out'
6.
Préparation
6.1
Choix d’un emplacement de montage
Les spots ont été conçus pour une utilisation dans un environnement à l’intérieur et avec des
températures jusqu’à 40°C. Prévoir une ventilation suffisante dirigée vers le boîtier métallique des
spots.
Ne pas :
•
utiliser les spots lors d’une température ambiante supérieure à 40°C et un taux d’humidité supérieur à 75%
•
utiliser les spots dans un environnement d’un volume inférieur à 10 m³ à moins de prévoir une ventilation
directe vers les spots.
6.2
Montage
Risque de blessures. L’installation de cet appareil exige une solide expérience pratique : le calcul de
la charge max. de la construction, les matériaux d’installation requis etc. De temps en temps, un
technicien qualifié doit vérifier la construction portante et l’appareil même. Ne pas essayer d’installer
cet appareil vous-même si vous n’avez pas les qualifications requises ; une installation incorrecte peut
entraîner des blessures.
Monter la herse VDPLDJBAR6 sur un trépied (pas livré) ou sur un ancrage (pas livré) à l’aide de deux colliers
d’ancrage (pas livrés).
Trépied :
•
Suivre soigneusement les instructions fournies avec votre trépied.
•
S’assurer que le tube du trépied a un diamètre d’au moins 25 mm pour garantir une fixation solide.
V. 02 – 01/06/2012
16
©Velleman nv
VDPLDJBAR6
•
Monter la VDPLDJBAR6 sur le trépied et serrer le bouton moleté [D] fermement (vers la droite).
Montage sur armature :
•
Un technicien qualifié doit installer l’appareil en respectant EN 60598-2-17 et toute autre norme applicable.
•
La construction portante de l’appareil doit être capable de supporter 10 x le poids de l’appareil pendant une
heure, sans qu’une déformation de la construction en résulte.
•
Enlever les deux écrous [K] de l’armature et remplacer-les par deux colliers d’ancrage (pas livrés).
Remarque : monter la VDPLDJBAR6 TOUJOURS avec deux colliers d’ancrage.
•
Fixer les spots à l’aide d’un câble de sécurité (sécurité supplémentaire).
•
Éviter de vous positionner en dessous de l’appareil pour l’enlever ou lors du montage ou du nettoyage. Un
technicien qualifié doit réviser l’appareil avant la mise en service. Organiser une révision minutieuse
annuelle.
•
Installer l’appareil à un endroit où personne ne peut passer ou s’asseoir et où personne ne peut le toucher.
•
Enlever tout matériau inflammable dans un rayon de 0,5 m autour de l’appareil.
•
Un expert doit approuver l’installation avant qu’elle puisse être prise en service.
Pédalier 4-voies :
Connecter le pédalier à l’armature d’éclairage [I].
6.3
Connexion DMX512
Voir illustrations page 3 de ce mode d’emploi.
•
Si nécessaire, connecter un câble à fiche XLR à la sortie XLR femelle à 3 broches de votre contrôleur (non
incl.) et l’autre fiche XLR mâle à 3 broches à l’entrée [E] de la VDPLDJBAR6. Il est possible de relier
plusieurs VDPLDJBAR6 à partir d’une connexion sérielle. Utiliser un câble de connexion blindé à
2 conducteurs avec des connecteurs d’entrée et de sortie XLR.
•
Une résistance de terminaison DMX est à recommander si le câble DMX doit couvrir une grande distance ou
s’il est utilisé dans un environnement avec beaucoup de bruit électrique (p.ex. une discothèque). La
résistance de terminaison prévient la corruption du signal de contrôle numérique par le bruit électrique. La
résistance de terminaison DMX n’est rien d’autre qu’une fiche XLR avec une résistance de 120 Ω de
broche 2 vers broche 3. Cette fiche XLR est connectée à la sortie XLR [F] du dernier appareil de la série.
6.4
Connexion au réseau
Veiller à ce que la prise de courant à laquelle les spots sont connectés soit séparément mise
à la terre. Ne pas utiliser un cordon d’alimentation autre que celui fourni avec les spots ou un
cordon autorisé par le fabricant.
•
Un électricien qualifié doit établir la connexion électrique.
•
Brancher l’appareil sur le réseau électrique par la fiche d’alimentation [C]. Veiller à ne brancher la
VDPLDJBAR6 que sur un circuit protégé par un disjoncteur différentiel de 30 mA. Ne pas le brancher sur
un bloc de puissance.
•
Remplacer un fusible grillé seulement par un fusible identique (F2A/250V).
7.
Emploi
Voir illustrations page 2 de ce mode d’emploi.
Le VDPLDJBAR6 intègre cinq modes de pilotage : pilotage par le son, pilotage automatique, mode
maître/esclave, pilotage DMX ou avec pédalier.
Pilotage par le son
1. Placer l’interrupteur DIP 10 en position OFF pour activer le mode de pilotage par le son.
2. Régler la sensibilité du microphone [G] avec le bouton de réglage [H].
Pilotage automatique
1. Placer l’interrupteur DIP 9 en position ON et l’interrupteur DIP 10 en position OFF pour activer le mode de
pilotage automatique.
2. Configurer la vitesse de programme avec les interrupteurs 1 à 3.
Mode maître/esclave
1. Interconnecter plusieurs VDPLDJBAR6 comme décrit sous §6.
2. Activer le mode de pilotage par le son ou automatique sur l’appareil-maître.
V. 02 – 01/06/2012
17
©Velleman nv
V
VDPLDJBAR
R6
3. Placer l’interrupteur DIIP 1 et 10 su
ur les appare
eils esclaves
s en position ON pour activer le mode esclave.
Pillotage DMX
X
•
Placer l’interrupteur DIIP 10 en pos
sition ON pour activer le mode de pilotage DMX..
•
ppareils pilottés par un signal DMX demandent une adresse de
d départ DMX pour ass
surer que les
s
Tous les ap
appareils corrects
c
réag
gissent sur le
es signaux de
d contrôle. Cette
C
adress
se de départt numérique indique le
numéro de
e canal sur le
equel l’apparreil écoute le
e contrôleur DMX. Vous avez le choix entre une seule adresse
de départ pour toute une
u
série d’a
appareils ou une adresse
e de départ par
p appareil.
•
areils « écou
uteront » les mêmes sign
naux, sur un
n seul canal.
Dans le cas d’une seule adresse, tous les appa
ppareils sero
ont donc influencés lorsq
que vous cha
angez les rég
glages d’un seul canal. Avec
A
des
Tous les ap
adresses de
d départ ind
dividuelles, chaque
c
appa
areil « écoute
era » son pro
opre canal. Par conséquent, un
ajustement des réglages d’un cana
al n’influence
e que l'appareil sur ce ca
anal.
•
DPLDJBAR6 à 15 canaux
x, l’adresse de départ du
u premier ap
ppareil est 1 (CH1~15), du deuxièm
me
Pour le VD
16 (1 + 15
5) (CH16~30
0), du troisiè
ème 31 (16 + 15) (CH31
1~45), etc.
•
Sélectionner l’adresse de départ à l’aide des in
nterrupteurs DIP 1 à 9 (mode binaire
e).
canal
CH
H1
CH
H2
fonction
prog
grammes
auto
omatiques
duateur
grad
maîître
P
interrrupteur DIP
1
2
3
4
5
6
7
8
9
valeur
1
2
4
8
16
3
32
64
128
1
256
valeur DM
MX512
de
escription
000 ~ 009
0
offf
010 ~ 029
0
pro
ogramme 1
030 ~ 049
0
pro
ogramme 2
050 ~ 069
0
pro
ogramme 3
070 ~ 089
0
pro
ogramme 4
090 ~ 109
1
pro
ogramme 5
110 ~ 129
1
pro
ogramme 6
130 ~ 149
1
pro
ogramme 7
150 ~ 169
1
pro
ogramme 8
170 ~ 189
1
pro
ogramme 9
190 ~ 209
2
pro
ogramme 10
0
210 ~ 229
2
pro
ogramme 11
1
230 ~ 249
2
mo
ode automattique, progra
ammes interrnes
250 ~ 255
2
mo
ode pilotage par le son
N s’applique
Ne
e pas si les canaux
c
CH1 ou CH3 sontt sélectionné
és
000 ~ 000
0
offf
001 ~ 255
2
variation de 0 ~ 100%
000 ~ 000
0
offf
CH
H3
stro
oboscope
001 ~ 255
2
flash de lent ve
ers rapide
CH
H4
spott1
000 ~2
255
gra
aduateur rou
uge de 0 ~ 100%
1
CH
H5
spott1
000 ~2
255
gra
aduateur verrt de 0 ~ 10
00%
CH
H6
spott1
000 ~2
255
gra
aduateur ble
eu de 0 ~ 10
00%
CH
H7
spott2
000 ~2
255
gra
aduateur rou
uge de 0 ~ 100%
1
CH
H8
spott2
000 ~2
255
gra
aduateur verrt de 0 ~ 10
00%
CH
H9
spott2
000 ~2
255
gra
aduateur ble
eu de 0 ~ 10
00%
CH
H10
spott3
000 ~2
255
gra
aduateur rou
uge de 0 ~ 100%
1
CH
H11
spott3
000 ~2
255
gra
aduateur verrt de 0 ~ 10
00%
CH
H12
spott3
000 ~2
255
gra
aduateur ble
eu de 0 ~ 10
00%
CH
H13
spott4
000 ~2
255
gra
aduateur rou
uge de 0 ~ 100%
1
CH
H14
spott4
000 ~2
255
gra
aduateur verrt de 0 ~ 10
00%
CH
H15
spott4
000 ~2
255
gra
aduateur ble
eu de 0 ~ 10
00%
V. 02 – 01/06/2012
18
©Velleman
n nv
VDPLDJBAR6
Le pédalier
Remarque : Le pédalier fonctionne uniquement en modes de pilotage automatique et par le son.
Déconnecter le câble d’alimentation de la VDPLDJBAR6 et connecter le pédalier à l’entrée [I]. Réinsérer la
fiche d’alimentation dans la prise de courant.
Fonctions :
Appuyer pour sélectionner un programme intégré.
1x blanc
2x rouge
3x vert
pédalier 1
(O)
4x bleu
préprogrammé
5x jaune
6x violet
7x cyan
8x variation de couleur chaque seconde, en boucle fermée
9x transition de couleur toutes les 3 secondes, en boucle fermée
pédalier 2
(P)
pédalier 3
(Q)
pédalier 4
(R)
8.
pilotage par le son
fonction ‘freeze’
appuyer pour entrer en mode pilotage par le son
appuyer sur pédalier 1 pour quitter le mode pilotage par le son
arrêter programmes de poursuite (8 & 9)
Appuyer n’importe quand pour éteindre toutes les LED. Appuyer de nouveau
fonction ‘black out’ pour revenir à la configuration précédente. Maintenir enfoncé pour effet
stroboscopique.
Nettoyage et entretien
•
Serrer les écrous et les vis et vérifier qu’ils ne rouillent pas.
•
Le boîtier, les lentilles, les supports de montage et la construction portante ne peuvent pas être déformés,
adaptés ou bricolés p.ex. pas de trous additionnels dans un support, ne pas déplacer les connexions etc.
•
Les parties mécaniques mobiles ne peuvent pas être usées ou bouger de manière irrégulière.
•
Les câbles d'alimentation ne peuvent pas être endommagés. Un technicien qualifié doit entretenir l’appareil.
•
Débrancher l’appareil avant de le nettoyer.
•
Essuyer l’appareil régulièrement avec un chiffon humide non pelucheux. Éviter l’usage d’alcool et de
solvants.
•
Il n’y a aucune pièce maintenable par l’utilisateur.
•
Commander des pièces de rechange éventuelles chez votre revendeur.
9.
Spécifications techniques
alimentation
230VCA ~ 50Hz
consommation
F2A/250V
fusible
50W
LED
16 LED tricolores de 3W
angle du faisceau
15°
dimensions
950 x 45 x 230mm
poids
6kg
N’employer cet appareil qu’avec des accessoires d’origine. SA Velleman ne sera aucunement
responsable de dommages ou lésions survenus à un usage (incorrect) de cet appareil. Pour plus
d’information concernant cet article et la dernière version de cette notice, visiter notre site web
www.hqpower.eu. Toutes les informations présentées dans cette notice peuvent être modifiées
sans notification préalable.
© DROITS D’AUTEUR
SA Velleman est l’ayant droit des droits d’auteur pour cette notice. Tous droits mondiaux réservés.
Toute reproduction, traduction, copie ou diffusion, intégrale ou partielle, du contenu de cette notice par quelque
procédé ou sur tout support électronique que se soit est interdite sans l’accord préalable écrit de l’ayant droit.
V. 02 – 01/06/2012
19
©Velleman nv
V
VDPLDJBAR
R6
MA
ANUAL
L DEL USUAR
U
RIO
1..
Intro
oducción
n
A los
l
ciudada
anos de la Unión
U
Europ
pea
Im
mportantes informacio
ones sobre el medio am
mbiente co
oncerniente
e a este pro
oducto
Este símbolo en este aparato
o o el embala
aje indica qu
ue, si tira las
s muestras inservibles, podrían
p
daña
ar
el me
edio ambiente.
No tire este aparrato (ni las pilas,
p
si las hubiera)
h
en la
a basura dom
méstica; deb
be ir a una empresa
e
espec
cializada en reciclaje. De
evuelva este
e aparato a su
s distribuidor o a la unidad de recic
claje local.
Respete las leyes
s locales en relación con
n el medio am
mbiente.
Si tiene duda
as, contacte
e con las au
utoridades locales par
ra residuos.
¡Gracias por ha
aber compra
ado el VDPL
LDJBAR6! Le
ea atentame
ente las instrrucciones de
el manual antes de usarlo
o.
Si el aparato ha
h sufrido alg
gún daño en
n el transportte no lo instale y póngas
se en contac
cto con su distribuidor.
2..
Instrrucciones de seg
guridad
Cuidado durante la ins
stalación: pu
uede sufrir una
u
peligrosa
a descarga e
eléctrica al to
ocar un cable
e
conectado
o a la red elé
éctrica.
Desconectte siempre el
e aparato si no va a usarlo durante un
u largo perríodo de tiem
mpo o antes de
limpiarlo. Tire siempre
e del enchufe
e para desco
onectar el ca
able de red, nunca del propio cable.
Utilice el aparato
a
sólo
o en interiores. No exponga este eq
quipo a lluvia, humedad ni a ningún
tipo de salpicadura o goteo.
g
Mantenga el aparato lejos del alca
ance de pers
sonas no cap
pacitadas y n
niños.
¡Ojo! La caja
c
del aparrato se calien
nta durante su operación
n.
No mire directamen
d
nte a la fuen
nte luminos
sa para evitar
•
un ata
aque epiléptiico en personas sensible
es
•
ceguera temporal (ceguera po
or destello)
•
es permanen
ntes e irreve
ersibles del ojo.
o
lesione
El usuario no habrá de
e efectuar ell mantenimie
ento de ning
guna pieza. C
Contacte con
n su
distribuido
or si necesita
a piezas de rrecambio.
•
Este apara
ato pertenece
e a la clase de
d protecció
ón I. Por lo ta
anto, es esencial que el aparato esté
é puesto a
tierra. La conexión
c
eléctrica debe llevarse a ca
abo por un té
écnico cualifficado.
•
Asegúrese de que la te
ensión de red no sea ma
ayor que la tensión
t
indicada en las e
especificacion
nes.
•
e el cable de alimentación y protéjalo
o contra pos
sibles daños causados po
or algún tipo
o de superfic
cie
No aplaste
afilada. Si es necesario
o, pida a su distribuidor reemplazar el cable de alimentación
a
n.
•
Fije el aparato con un cable de seg
guridad adec
cuado (p.ej. VDLSC7 o VDLSC8).
V
•
a
a un
na distancia mínima de 0,5m
0
de cualquier objeto
o o producto
o inflamable o explosivo.
Instale el aparato
•
Respete un
na distancia de mín. 1 m entre la salida de luz y el área ilum
minada.
3..
Norm
mas gene
erales
Véase la Garantía de servicio y calid
dad Vellem
man ® al fina
al de este manual del us
suario.
No expon
nga este equ
uipo a polvo. No exponga este equip
po a tempera
aturas extrem
mas.
No agite el aparato. Evite usar excesiva fuerrza durante el
e manejo y la instalació
ón.
•
Familiaríce
ese con el funcionamientto del aparatto. Sólo pers
sonas cualific
cadas puede
en manejar este
e
aparato
o.
La mayoría
a de los daño
os son causa
ados por un uso inadecu
uado.
•
Por razone
es de segurid
dad, las mod
dificaciones no
n autorizadas del apara
ato están pro
ohibidas. Los
s daños
causados por
p modificaciones no au
utorizadas, no
n están cub
biertos por la
a garantía.
V. 02 – 01/06/2012
20
©Velleman
n nv
VDPLDJBAR6
•
Utilice sólo el VDPLDJBAR6 para aplicaciones descritas en este manual a fin de evitar p.ej. cortocircuitos,
quemaduras, descargas eléctricas, etc. Un uso desautorizado puede causar daños y anula la garantía
completamente.
•
Los daños causados por descuido de las instrucciones de seguridad de este manual invalidarán su garantía
y su distribuidor no será responsable de ningún daño u otros problemas resultantes.
•
La instalación y el mantenimiento deben ser realizados por personal especializado.
•
No conecte el aparato si ha estado expuesto a grandes cambios de temperatura. Espere hasta que el
aparato llegue a la temperatura ambiente.
•
Este aparato ha sido diseñado para uso profesional en una discoteca, un teatro, etc. y es apto para un uso
sólo en interiores. Conéctelo a una fuente de corriente CA de 230VCA / 50Hz.
•
No ha sido diseñado para un uso ininterrumpido. Introduzca frecuentemente una pausa para prolongar la
vida del aparato.
•
Guarde este manual del usuario para cuando necesite consultarlo.
4.
Características
•
muy ligero: ideal para pinchadiscos y el uso móvil
•
focos orientables, cada foco incluye 4 LEDs tricolores para una transición suave de colores
•
modos preprogramados, los valores de los colores y los programas RGB están programados
•
velocidad del modo automático programable y control por la música gracias al micrófono incorporado
•
fácil de utilizar gracias al interruptor de pie (incl.), con función 'blackout' (desactivar todo).
5.
Descripción
Véase las figuras en la página 2 de este manual del usuario.
A
conexión para foco con LEDs (4x)
J
interruptor DIP
B
conexión a tierra
K
puntos de montaje
C
conexión para el cable de alimentación + fusible
L
botón de fijación horizontal
D
botón de seguridad para el pie
M
botón de fijación vertical (2 por foco)
E
entrada DMX
N
LEDs (4 por foco)
F
salida DMX
O
interruptor de pie para seleccionar el programa
G
micrófono
P
interruptor de pie para el control por la música
H
botón de ajuste para la sensibilidad del micrófono
Q
interruptor de pie para la función « freeze »
I
conexión para el interruptor de pie
R
interruptor de pie para la función « blackout »
(todos los LEDs están desactivados)
6.
Preparación
6.1
Seleccionar un lugar de montaje
El foco ha sido diseñado para un uso en interiores y con temperaturas hasta 40°C. Prevea una
ventilación suficiente dirigida hacia la caja metálica del foco.
NO:
•
Utilice el foco con una temperatura ambiente superior a 40°C y una humedad superior al 75%.
•
Utilice el foco en un lugar inferior a 10 m³ salvo al prever una ventilación directa hacia el foco.
6.2
Montaje
Riesgo de lesiones. La instalación de este aparato exige una sólida experiencia práctica: el cálculo de
la carga máx. de la construcción, los materiales de instalación requeridos, etc. De vez en cuando, un
técnico cualificado debe controlar la construcción portante y el aparato mismo. No intente instalar este
aparato usted mismo si no tiene las cualificaciones requeridas; una instalación incorrecta puede causar
lesiones.
Fije el VDPLDJBAR6 con dos abrazaderas (no incl.) al pie (no incl.) o a la barra (truss, no incl.)
Pie:
•
Siga cuidadosamente las instrucciones que acompañan al trípode.
•
Asegúrese de que el diámetro del tubo del pie sea de min. 25mm para garantizar una fijación segura.
V. 02 – 01/06/2012
21
©Velleman nv
VDPLDJBAR6
•
Fije el VDPLDJBAR6 al pie y atornille el botón de seguridad [D] firmemente (en el sentido de las agujas
del reloj).
Montar la barra:
•
Respete la directiva EN 60598-2-17 y toda norma nacional antes de instalar el aparato. La instalación debe
ser realizada por un técnico especializado.
•
El soporte donde irá el aparato, debe ser capaz de sostener 10 veces el peso de éste durante una hora, sin
que se produzca una deformación de dicho soporte.
•
Quite los dos tornillos [K] de la barra y reemplácelos por dos abrazaderas (no incl.).
Observación: monte SIEMPRE el VDPLDJBAR6 con dos abrazaderas.
•
Fije siempre el VDPLDJBAR6 con un cable de seguridad (seguridad adicional).
•
Evite ponerse debajo del aparato durante el montaje, la limpieza, etc. Un técnico especializado debe revisar
el aparato antes de la puesta en marcha. Después, debe revisarlo una vez al año.
•
Instale el aparato fuera del alcance de personas no autorizadas y en un lugar con poca gente.
•
Quite todo material inflamable en un radio de 0.5m alrededor del aparato.
•
Un experto debe probar la instalación antes de la puesta en marcha.
Interruptor de pie de 4 vías:
Conecte el interruptor de pie a la barra [I].
6.3
Conexión DMX512
Véase las figuras en la página 3 de este manual del usuario.
•
Si fuera necesario, conecte un cable con conector XLR (no incl.) a la salida XLR hembra de 3 polos del
controlador y el otro conector XLR macho de 3 polos a la entrada [E] del VDPLDJBAR6. Es posible
conectar varios VDPLDJBAR6 en serie. Use un cable blindado de doble hilo conductor con conectores XLR
de entrada y de salida VDPLDJBAR6.
•
Se recomienda una terminación si el cable DMX debe cubrir una gran distancia o si se usa en un medio
ambiente con mucho ruido eléctrico (ej. una discoteca). La terminación impide que el ruido eléctrico
corrompa la señal de control numérico. La terminación DMX no es más que un conector XLR con una
resistencia de 120Ω de polo 2 a polo 3. Este conector XLR está conectado a la salida XLR [F] del último
aparato de la serie.
6.4
Conexión a la rojo
Asegúrese de que el enchufe al que está conectado el foco esté puesto a tierra por separado.
Utilice sólo el cable de alimentación entregado con el foco o un cable autorizado por el
fabricante.
•
Pregunte a un electricista cómo hacer la conexión eléctrica.
•
Conecte el aparato a la rojo eléctrica con la conexión de alimentación [C]. Asegúrese de que sólo conecte el
VDPLDJBAR6 a un circuito protegido por un disyuntor de corriente residual (RCD) de 30mA. Normalmente,
no se conectan efectos luminosos a dimmer packs (reguladores).
•
Reemplace un fusible fundido sólo por uno del mismo tipo (F2A/250V).
7.
Uso
Véase las figuras en la página 2 de este manual del usuario.
El VDPLDJBAR6 incorpora cinco modos de control: control por la música, control automático, modo
maestro/esclavo, control DMX o modo interruptor de pie.
Control por la música
1. Ponga el interruptor DIP 10 en la posición OFF para activar el modo de control por la música.
2. Ajuste la sensibilidad del micrófono [G] con el botón de ajuste [H].
Control automático
1. Ponga el interruptor DIP 9 en la posición ON y el interruptor DIP 10 en la posición OFF.
2. Ajuste la velocidad del programa con el interruptor de 1 a 3.
Modo maestro/esclavo
1. Interconecte varios VDPLDJBAR6 (véase §6).
2. Active el modo de control por la música o el control automático en el aparato-maestro.
V. 02 – 01/06/2012
22
©Velleman nv
V
VDPLDJBAR
R6
3. Ponga el in
nterruptor DIP 1 y 10 de
e los aparato
os esclavos en
e la posición
n ON para activar el modo esclavo.
Co
ontrol DMX
•
X.
Ponga el in
nterruptor DIP 10 en la posición
p
ON para activarr el modo de
e control DMX
•
Si se usa una
u
señal DM
MX, cada apa
arato tiene su
s propia dirrección inicia
al DMX para asegurar qu
ue los aparattos
reaccionen
n a las señale
es de contro
ol correctas. Esta direcció
ón inicial dig
gital es el priimer canal en
e el cual el
aparato reaccionará a las señales DMX del con
ntrolador DM
MX. Es posible elegir entrre una sola dirección
d
inic
cial
para toda una serie de
e aparatos o una direcció
ón inicial porr aparato.
•
ola dirección
n inicial para una serie de aparatos, todos los ap
paratos reacc
cionarán
Con una so
sincronizad
damente a la
a misma señ
ñal. Por lo tanto, cambiar los ajustes
s de un solo canal afecta
a a los ajuste
es
de todos lo
os canales. Con
C
varias direcciones in
niciales, cada
a aparato reaccionará independiente
emente. Por lo
tanto, cam
mbiar los ajus
stes de un solo canal sólo afecta al canal
c
en cue
estión.
•
En el caso del VDPLDJ
JBAR6 de 15 canales, la
a dirección in
nicial del primer aparato
o es 1 (CH1~
~15), del
segundo aparato 16 (1
1 + 15) (CH1
16~30), del tercer apara
ato 31 (16 + 15) (CH31~45), etc.
•
e la dirección
n inicial con los
l interrupttores DIP de 1 a 9 (modo
o binario).
Seleccione
P
interrruptor DIP
1
2
3
4
5
6
7
8
9
valor
1
2
4
8
16
3
32
64
128
1
256
Véase la siguie
ente lista para un resum
men de las se
eñales para cada
c
canal.
Ca
anal
CH
H1
CH
H2
Fun
nción
prog
gramas
auto
omáticos
dimmer
mae
estro
Valor DMX
X-512
De
escripción
000 ~ 009
0
offf
010 ~ 029
0
Pro
ograma 1
030 ~ 049
0
Pro
ograma 2
050 ~ 069
0
Pro
ograma 3
070 ~ 089
0
Pro
ograma 4
090 ~ 109
1
Pro
ograma 5
110 ~ 129
1
Pro
ograma 6
130 ~ 149
1
Pro
ograma 7
150 ~ 169
1
Pro
ograma 8
170 ~ 189
1
Pro
ograma 9
190 ~ 209
2
Pro
ograma 10
210 ~ 229
2
Pro
ograma 11
230 ~ 249
2
mo
odo automáttico, program
mas internos
s
250 ~ 255
2
mo
odo controlado por la mú
úsica
s función si CH1 o CH3
sin
3 es activo
000 ~ 000
0
offf
001 ~ 255
2
offf
000 ~ 000
0
aju
uste de la intensidad de luz 0 ~ 100
0%
001 ~ 255
2
offf
CH
H3
estrroboscopio
CH
H4
foco
o1
000 ~2
255
destello de len
nto a rápido
CH
H5
foco
o1
000 ~2
255
aju
uste de la intensidad de luz (color ro
ojo) 0 ~ 100
0%
CH
H6
foco
o1
000 ~2
255
aju
uste de la intensidad de luz (color ve
erde) 0 ~ 10
00%
CH
H7
foco
o2
000 ~2
255
aju
uste de la intensidad de luz (color az
zul) 0 ~ 100
0%
CH
H8
foco
o2
000 ~2
255
aju
uste de la intensidad de luz (color ro
ojo) 0 ~ 100
0%
CH
H9
foco
o2
000 ~2
255
aju
uste de la intensidad de luz (color ve
erde) 0 ~ 10
00%
CH
H10
foco
o3
000 ~2
255
aju
uste de la intensidad de luz (color az
zul) 0 ~ 100
0%
CH
H11
foco
o3
000 ~2
255
aju
uste de la intensidad de luz (color ro
ojo) 0 ~ 100
0%
CH
H12
foco
o3
000 ~2
255
aju
uste de la intensidad de luz (color ve
erde) 0 ~ 10
00%
CH
H13
foco
o4
000 ~2
255
aju
uste de la intensidad de luz (color az
zul) 0 ~ 100
0%
CH
H14
foco
o4
000 ~2
255
aju
uste de la intensidad de luz (color ro
ojo) 0 ~ 100
0%
CH
H15
foco
o4
000 ~2
255
aju
uste de la intensidad de luz (color ve
erde) 0 ~ 10
00%
V. 02 – 01/06/2012
23
©Velleman
n nv
VDPLDJBAR6
Interruptor de pie
Nota: el interruptor de pie funciona sólo en el modo de control automático y el modo de control por la música .
Desconecte el cable de alimentación del VDPLDJBAR6 y conecte el interruptor de pie a la entrada [I]. Vuelva
a conectar el aparato a la red eléctrica.
Funciones:
Pulse para seleccionar un programa incorporado.
1x
interruptor de
pie 1 (O)
ajustes
preprogramados
blanco
2x
rojo
3x
verde
4x
azul
5x
amarillo
6x
violeta
7x
cian
8x
cambio de color cada segundo, bucle infinito
9x
transición de colores cada 3 segundos, bucle infinito
pulse para entrar en el modo controlado por la música
interruptor de
pie 2 (P)
control por la
música
interruptor de
pie 3 (Q)
función
« freeze »
Desactivar los programas « chase » (seguimiento) (8 & 9)
interruptor de
pie 4 (R)
función
« black out»
Pulse en cualquier momento para desactivar todos los LEDs. Vuelva a
pulsar para volver al ajuste anterior. Mantenga pulsado para la función
estroboscópica.
8.
pulse interruptor de pie 1 para salir del modo controlado por la música
Limpieza y mantenimiento
•
Apriete bien las tuercas y los tornillos y verifique que no hay señales de oxidación.
•
No modifique la caja, los soportes y las ópticas p.ej. no taladre agujeros adicionales en un soporte o no
modifique las conexiones, etc.
•
Las partes móviles no pueden mostrar ningún rastro de desgaste y deben estar bien equilibradas.
•
No dañe los cables de alimentación. Contacte con un técnico especializado para instalar el aparato.
•
Desconecte el aparato de toda fuente antes de limpiarlo.
•
Limpie el aparato regularmente con un paño húmedo. Evite el uso de alcohol y de disolventes.
•
El usuario no habrá de efectuar el mantenimiento de ninguna pieza.
•
Contacte con su distribuidor si necesita piezas de recambio.
9.
Especificaciones
alimentación
230VAC ~ 50Hz
fusible
F2A/250V
consumo
50W
LEDs
16 LEDs tricolores de 3W
ángulo del haz
15°
dimensiones
950 x 45 x 230mm
gewicht
6kg
Utilice este aparato sólo con los accesorios originales. Velleman NV no será responsable de daños ni
lesiones causados por un uso (indebido) de este aparato. Para más información sobre este producto
y la versión más reciente de este manual del usuario, visite nuestra página www.hqpower.eu. Se
pueden modificar las especificaciones y el contenido de este manual sin previo aviso.
© DERECHOS DE AUTOR
Velleman NV dispone de los derechos de autor para este manual del usuario. Todos los derechos
mundiales reservados.
Está estrictamente prohibido reproducir, traducir, copiar, editar y guardar este manual del usuario o partes de
ello sin previo permiso escrito del derecho habiente.
V. 02 – 01/06/2012
24
©Velleman nv
V
VDPLDJBAR
R6
BED
DIENUN
NGSAN
NLEITU
UNG
1..
Einfü
ührung
An
n alle Einwo
ohner der Europäische
E
en Union
Wiichtige Umw
weltinform
mationen üb
ber dieses Produkt
P
Dieses Symbol au
uf dem Produ
ukt oder der Verpackung
g zeigt an, dass die Ents
sorgung dieses Produktes
nach seinem Lebe
enszyklus de
er Umwelt Sc
chaden zufüg
gen kann. Entsorgen Sie
e die Einheit (oder
verwe
endeten Battterien) nicht als unsortie
ertes Hausmüll; die Einheit oder verw
wendeten Ba
atterien
müsse
en von einerr spezialisierrten Firma zw
wecks Recyc
cling entsorg
gt werden. D
Diese Einheit muss an den
Händller oder ein örtliches Rec
cycling-Unte
ernehmen retourniert we
erden. Respe
ektieren Sie die örtlichen
n
Umwe
eltvorschrifte
en.
Fa
alls Zweifel bestehen, wenden Sie
e sich für Entsorgung
E
srichtlinien
n an Ihre örrtliche Behörde.
Wir bedanken uns für den Kauf des VD
DPLDJBAR6
6! Lesen Sie diese Bedienungsanleitu
ung vor Inbe
etriebnahme
e
sorrgfältig durc
ch. Überprüfe
en Sie, ob Trransportschä
äden vorliegen. Sollte diies der Fall s
sein, verwenden Sie das
Ge
erät nicht und wenden Sie sich an Ih
hren Händlerr.
2..
Siche
erheitshinweise
Seien Sie während der Installation
n des Geräte
es sehr vorsiichtig: das B
Berühren von
n unter
Spannung stehenden Leitungen kö
önnte zu leb
bensgefährlic
chen elektris
schen Schläg
gen führen.
Trennen Sie
S das Gerätt bei Nichtbe
enutzung und vor jeder Reinigung vo
om Netz. Fassen Sie daz
zu
den Netzstecker an de
er Grifffläche
e an und zieh
hen Sie nie an
a der Netzleitung.
Verwenden Sie das Ge
erät nur im Innenbere
eich. Schütze
en Sie das G
Gerät vor Reg
gen und
Feuchte.
Halten Sie
e Kinder und Unbefugte vom
v
Gerät fern.
f
Achtung: Berühren Sie
S das Gehä
äuse während
d des Betriebs nicht, denn das Gehä
äuse heizt au
uf.
Blicken Sie
S nicht dirrekt in die Lichtquelle
L
, um
•
epileptische Anfällle bei empfin
ndlichen Men
nschen
•
he Blindheid (Blitzblindh
heid)
zeitlich
•
perma
anente und unwiderruflic
u
che Augenschäden
zu vermeiden.
Es gibt keine zu warte
enden Teile. Bestellen Sie eventuelle
e Ersatzteile bei Ihrem Fachhändler.
•
Der Aufbau
u des Geräte
es entsprichtt der Schutzklasse I. Gemäß den Vorschriften m
muss das Gerrät geerdet
sein. Der elektrische
e
A
Anschluss
darf nur von einer Fachkra
aft durchgefü
ührt werden.
•
Vergewisse
ern Sie sich,, dass die an
nzuschließende Netzspan
nnung nicht höher ist als
s die Netzspa
annung
beschriebe
en in dieser Bedienungsa
B
anleitung.
•
Achten Sie
e darauf, das
ss die Netzle
eitung nicht gequetscht
g
oder
o
durch scharfe
s
Kante
en beschädig
gt werden
kann. Bei Beschädigun
B
ngen soll eine Fachkraft das Kabel errsetzen.
•
Machen Sie
e das Gerät mit einem geeigneten
g
S
Sicherheitska
abel fest (z.B
B. VDLSC7 o
oder VDLSC
C8).
•
Sorgen Sie
e für einen Abstand
A
von min. 0,5 m zwischen de
em Gerät und
d entflammb
baren und ex
xplosiven
Gegenstän
nden oder Sttoffen.
•
Beachten Sie
S eine minimale Entferrnung von 1 m zwischen
n der Lichtau
usbeute und irgendeiner beleuchteten
Fläche.
3..
Allge
emeine Richtlinie
R
en
Sie
ehe Vellema
an® Service
e- und Qua
alitätsgaran
ntie am Ende
e dieser Bed
dienungsanle
eitung.
Schützen Sie das Gerä
ät vor Staub
b. Schützen Sie
S das Gerä
ät vor extrem
men Temperaturen.
V. 02 – 01/06/2012
25
©Velleman
n nv
VDPLDJBAR6
Vermeiden Sie Erschütterungen. Vermeiden Sie rohe Gewalt während der Installation und
Bedienung des Gerätes.
•
Nehmen Sie das Gerät erst in Betrieb, nachdem Sie sich mit seinen Funktionen vertraut gemacht haben.
Lassen Sie das Gerät nicht von Personen bedienen, die sich nicht mit dem Gerät auskennen. Meist ist die
Beschädigung des Gerätes das Ergebnis von unfachmännischer Bedienung.
•
Eigenmächtige Veränderungen sind aus Sicherheitsgründen verboten. Bei Schäden verursacht durch
eigenmächtige Änderungen erlischt der Garantieanspruch.
•
Verwenden Sie das Gerät nur für Anwendungen beschrieben in dieser Bedienungsanleitung sonst kann dies
zu Schäden am Produkt führen und erlischt der Garantieanspruch. Jede andere Verwendung ist mit
Gefahren wie Kurzschluss, Brandwunden, elektrischem Schlag, usw. verbunden.
•
Bei Schäden, die durch Nichtbeachtung der Bedienungsanleitung verursacht werden, erlischt der
Garantieanspruch. Für daraus resultierende Folgeschäden übernimmt der Hersteller keine Haftung.
•
Lassen Sie dieses Gerät von einem Fachmann installieren und warten.
•
Das Gerät bei Temperaturschwankungen nicht sofort einschalten. Schützen Sie das Gerät vor
Beschädigung, indem Sie es ausgeschaltet lassen bis es akklimatisiert ist (Zimmertemperatur erreicht hat).
•
Dieses Gerät wurde für den professionellen Einsatz auf Bühnen, in Discotheken, Theatern, usw. entworfen
und eignet sich nur für die Anwendung im Innenbereich. Verwenden Sie das Gerät mit einer
Wechselspannung von 230VAC / 50Hz.
•
Das Gerät eignet sich nicht für permanenten Betrieb: eine regelmäßige Pause verlängert die Lebensdauer.
•
Bewahren Sie diese Bedienungsanleitung für künftige Einsichtnahme auf.
4.
Eigenschaften
•
sehr leicht: ideal für Discjockeys und den mobilen Einsatz
•
schwenk- und neigbare Scheinwerfer, jeder Scheinwerfer hat 4 dreifarbige LEDs für fließende
Farbübergänge
•
vorprogrammierte Modi, mit eingestellten Farbwerten und RGB-Programmen
•
einstellbare Geschwindigkeit des automatischen Modus und Musiksteuerung über eingebautes Mikrofon
•
einfache Bedienung über den mitgelieferten Füßschalter, mit 'Blackout'-Funktion (alles ausschalten)
5.
Umschreibung
Siehe Abbildungen, Seite 2 dieser Bedienungsanleitung.
A
Anschluss für LED-Scheinwerfer (4x)
J
DIP-Schalter
B
Masse-Anschluss
K
Montagepunkte
C
Anschluss Stromkabel + Sicherung
L
horizontale Einstellknopf
D
Sicherheitsknopf Stativ
M
vertikale Einstellknopf (2 pro Scheinwerfer)
E
DMX-Eingang
N
LEDs (4 pro Scheinwerfer)
F
DMX-Ausgang
O
Fußschalter für die Programmauswahl
G
Mikrofon
P
Fußschalter für die Musiksteuerung
H
Einstellknopf für die Empfindlichkeit des Mikrofons
Q
Fußschalter für die Freeze-Funktion
I
Anschluss für den Fußschalter
R
Fußschalter für die Blackout-Funktion (alle
LEDs ausgeschaltet)
6.
Vorbereitung
6.1
Den Montageort auswählen
Der VDPLDJBAR6 wurde für die Anwendung im Innenbereich bei Temperaturen niedriger als 40°C
entworfen. Sorgen Sie für eine geeignete Ventilation und richten Sie diese auf das Metallgehäuse des
Scheinwerfers.
Verwenden Sie den Scheinwerfer nicht:
•
in einer Umgebung mit einer Umgebungstemperatur höher als 40°C und eine relative Feuchte höher
als 75%.
•
in einem Raum kleiner als 10 m³ wenn es keine Ventilation gibt.
V. 02 – 01/06/2012
26
©Velleman nv
VDPLDJBAR6
6.2
Montage
Gefahr vor Verletzungen. Für die Installation des Gerätes ist eine solide praktische Erfahrung
notwendig. Sie müssen die Höchstlast einer Tragkonstruktion berechnen können, wissen welches
Baumaterial Sie verwenden können und Sie müssen das verwendete Material und das Gerät ab und zu
kontrollieren lassen. Montieren Sie das Gerät nie selber wenn Sie keine Erfahrung damit haben. Eine
schlechte Montage kann zu Verletzungen führen.
Befestigen Sie den VDPLDJBAR6 am Stativ (nicht mitgeliefert) oder an der Traverse (Truss, nicht mitgeliefert)
über zwei Traversenhalter (nicht mitgeliefert).
Stativ:
•
Befolgen Sie sorgfältig die dem Stativ beiliegenden Anweisungen.
•
Der Durchmesser des Rohres muss mindestens 25mm sein, um eine sichere Befestigung zu gewährleisten.
•
Befestigen Sie den VDPLDJBAR6 am Stativ und drehen Sie den Sicherheitsknopf [D] gut fest (im
Uhrzeigersinn).
Befestigung an der Traverse:
•
Lassen Sie das Gerät von einem Fachmann und gemäß den EN 60598-2-17 und allen anderen zutreffenden
Normen installieren.
•
Die Konstruktion muss während einer Stunde eine Punktlast von maximal 10 x dem Gewicht des Geräts
tragen können, ohne dass Verformung verursacht wird.
•
Entfernen Sie beide Bolzen [K] aus der Traverse und ersetzen Sie diese durch zwei Traversenhalter (nicht
mitgeliefert).
Bemerkung: Montieren Sie den VDPLDJBAR6 IMMER mit zwei Traversenhaltern.
•
Das Gerät muss immer mit einer zweiten Befestigung z.B. mit einem Sicherheitskabel gesichert werden.
•
Stehen Sie während der Montage, Entfernung oder Wartung nie direkt unter dem Gerät. Lassen Sie das
Gerät jährlich und vor der Inbetriebnahme von einem Fachmann prüfen.
•
Montieren Sie das Gerät an einem Ort, an dem es wenig Vorübergehende gibt und der unzugänglich ist für
Unbefugte.
•
Achten Sie darauf, dass sich kein entflammbares Material in einem Umkreis von 50 cm befindet.
•
Die Installation muss vor Inbetriebnahme von einem Experten genehmigt werden.
4-Wege-Fußschalter:
Verbinden Sie den Fußschalter mit der Traverse [I].
6.3
DMX512-Anschluss
Siehe Abbildungen, Seite 3 dieser Bedienungsanleitung.
•
Wenn nötig, so verbinden Sie ein XLR-Kabel mit dem 3-Pin XLR-Ausgang der Steuerung (nicht mitgeliefert)
und die andere Seite mit dem 3-Pin XLR-Eingang [E] des VDPLDJBAR6. Sie können verschiedene
VDPLDJBAR6 in Serie schalten. Verwenden Sie ein zweipoliges abgeschirmtes Kabel mit XLR Ein- und
Ausgangsanschlüssen.
•
Ein DMX-Abschlusswiderstand ist empfehlenswert für Installationen, bei denen das DMX-Kabel lang ist oder
in einer Umgebung mit vielem elektrischem Rauschen (z.B. Discos). Der Abschlusswiderstand verhindert
Störung des digitalen Steuersignals durch elektrisches Rauschen. Der DMX-Abschlusswiderstand ist nur eine
XLR-Buchse mit einem 120Ω Widerstand zwischen 2 und 3, die den XLR-Ausgang [F] des letzten Geräts in
der Kette angeschlossen wird.
6.4
Anschluss an das Netz
Verbinden Sie den Scheinwerfer mit einer separat geerdeten Steckdose. Verwenden Sie nur
das mit dem Scheinwerfer mitgelieferten Netzkabel oder ein Netzkabel, das vom Hersteller
genehmigt worden ist.
•
Lassen Sie das Gerät von einem qualifizierten Elektriker anschließen.
•
Schließen Sie das Gerät an das Hauptnetz [C] und nicht an einen Dimmer an. Beachten Sie, dass der
verwendete Kreis mit einem mit einem Fehlerstrom-Schutzschalter (RCD) von 30 mA geschützt ist.
•
Ersetzen Sie eine durchgebrannte Sicherung nur durch eine des gleichen Typs (F2A/250V).
7.
Anwendung
Siehe Abbildungen, Seite 2 dieser Bedienungsanleitung.
Das Gerät verfügt über fünf Ansteuerfunktionen: Musiksteuerung, automatische Steuerung, Master/Slave-Funktion, DMX-Steuerung oder Fußschalter-Modus.
V. 02 – 01/06/2012
27
©Velleman nv
V
VDPLDJBAR
R6
Mu
usiksteueru
ung
1. Stellen Sie
e DIP-Schalte
er 10 auf OF
FF um die Mu
usiksteuerun
ng einzuscha
alten.
2. Regeln Sie
e die Empfind
dlichkeit des
s Mikrofons [G]
[
mit dem
m Einstellknopf [H].
Au
utomatische
e Steuerung
1. Stellen Sie
e DIP-Schalte
er 9 auf ON und DIP-Sch
halter 10 auff OFF um die
e automatisc
che Steuerun
ng
einzuschalten.
2. Stellen Sie
e die Geschw
windigkeit de
es Programs mit den DIP
P-Schaltern 1 bis 3 ein.
aster-/Slav
ve-Funktion
n
Ma
1. Verbinden Sie mehrere
e VDPLDJBA
AR6. Siehe §6.
S die Musik
k- oder autom
matische Ste
euerung auf dem Masterrgerät ein.
2. Schalten Sie
e DIP-Schalte
er 1 der Slav
ve-Geräte au
uf ON um die
e Slave-Funktion einzuschalten.
3. Stellen Sie
MX-Steueru
ung
DM
•
Stellen Sie
e DIP-Schalte
er 10 auf ON
N um de DMX
X-Steuerung
g einzuschaltten.
•
Alle DMX-g
gesteuerten Geräte brau
uchen eine digitale Starta
adresse, sod
dass das rich
htige Gerät auf
a die Signa
ale
reagieren kann.
k
Diese digitale Startadresse istt die Kanalnu
ummer, von der das Gerrät die Befeh
hle der DMX-Steuerung empfängt und
u
ausführt. Sie können
n dieselbe Sttartadresse für
f eine ganze Gruppe von
v
Geräten
verwenden
n oder eine separate
s
Sta
artadresse fü
ür jedes Gerä
ät eingeben..
•
Wenn alle Geräte diese
elbe Startadresse haben
n, werden sie
e auf einem spezifischen
n Kanal das Steuersignal
S
empfangen
n. Mit andere
en Worten, wenn
w
Sie die
e Einstellung
gen von eine
em Kanal änd
dern, werden
n alle Geräte
e
zur gleiche
en Zeit beein
nflusst. Wenn Sie versch
hiedene Adre
essen einstellen, wird jed
des Gerät au
uf einem
anderen Ka
anal Signale
e empfangen
n. Wenn Sie die Einstellungen ändern
n, wird nur d
das besagte Gerät
beeinflusstt.
•
Im Falle de
es 7-Kanal VDPLDJBAR
V
R6, werden Sie
S die Startadresse des ersten Gerä
ätes auf 1 (C
CH1~15), de
er
zweiten Ein
nheit auf 16 (1 + 15) (C
CH16~30), der
d dritten Eiinheit auf 31
1 (16 + 15) (CH31~45) usw. einstellen
müssen.
•
e die Startadresse mit de
en DIP-Schaltern 1 bis 9 ein (binär)..
Stellen Sie
•
DIP--Schalter
1
2
3
4
5
6
7
8
9
Wert
1
2
4
8
16
32
64
128
256
2
Siehe nach
hfolgende Lis
ste für eine Übersicht de
er Signale prro Kanal.
Ka
anal
CH
H1
CH
H2
CH
H3
Fun
nktion
auto
omatische
Prog
gramme
sterMas
Dim
mmer
Stro
oboskop
V. 02 – 01/06/2012
2-Wert
DMX-512
Be
eschreibung
g
000 ~ 009
offf
010 ~ 029
Pro
ogram 1
030 ~ 049
Pro
ogram 2
050 ~ 069
Pro
ogram 3
070 ~ 089
Pro
ogram 4
090 ~ 109
Pro
ogram 5
110 ~ 129
Pro
ogram 6
130 ~ 149
Pro
ogram 7
150 ~ 169
Pro
ogram 8
170 ~ 189
Pro
ogram 9
190 ~ 209
Pro
ogram 10
210 ~ 229
Pro
ogram 11
230 ~ 249
Automatischerr Modus, inte
erne Program
mme
250 ~ 255
Mu
usikgesteuerrter Modus
ohne Funkttion wenn CH
H1 oder CH3
3 aktiv ist
000 ~ 000
Offf
001 ~ 255
Dim
mmen 0 ~ 100%
1
000 ~ 000
Offf
001 ~ 255
Blitzen von lan
ngsam auf sc
chnell
28
©Velleman
n nv
VDPLDJBAR6
Kanal
Funktion
CH4
Scheinwerfer 1
DMX-512-Wert
CH5
Scheinwerfer 1
000 ~255
Grün dimmen von 0 ~ 100%
CH6
Scheinwerfer 1
000 ~255
Blau dimmen von 0 ~ 100%
CH7
Scheinwerfer 2
000 ~255
Rot dimmen von 0 ~ 100%
CH8
Scheinwerfer 2
000 ~255
Grün dimmen von 0 ~ 100%
CH9
Scheinwerfer 2
000 ~255
Blau dimmen von 0 ~ 100%
CH10
Scheinwerfer 3
000 ~255
Rot dimmen von 0 ~ 100%
CH11
Scheinwerfer 3
000 ~255
Grün dimmen von 0 ~ 100%
CH12
Scheinwerfer 3
000 ~255
Blau dimmen von 0 ~ 100%
CH13
Scheinwerfer 4
000 ~255
Rot dimmen von 0 ~ 100%
CH14
Scheinwerfer 4
000 ~255
Grün dimmen von 0 ~ 100%
CH15
Scheinwerfer 4
000 ~255
Blau dimmen von 0 ~ 100%
000 ~255
Beschreibung
Rot dimmen von 0 ~ 100%
Fußschalter
Bemerkung: Der Fußschalter funktioniert nur wenn Sie den automatischen Modus oder Musiksteuerung
ausgewählt haben.
Trennen Sie den Netzstecker und verbinden Sie den Fußschalter mit dem Eingang [I]. Verbinden Sie das Gerät
wieder mit dem Netz.
Funktionen:
Drücken Sie, um ein eingebautes Programm auszuwählen.
Fußschalter 1
(O)
Fußschalter 2
(P)
Fußschalter 3
(Q)
Fußschalter 4
(R)
8.
1x
Weiß
2x
Rot
3x
Grün
vorprogrammi 4x
erte
Einstellungen 5x
6x
Blau
Gelb
Violett
7x
Cyan
8x
Farbwechsel jede Sekunde, Endlosschleife
9x
Farbübergang alle 3 Sekunden, Endlosschleife
musikgesteuer Drücken Sie, um in den musikgesteuerten Modus zu gelangen
ter Modus
Drücken Sie Fußschalter 1 um den musikgesteuerten Modus zu verlassen
FreezeFunktion
Die Chase-Programme ausschalten (8 & 9)
Black outFunktion
Drücken Sie egal wann, um alle LEDs auszuschalten. Drücken Sie wieder, um
zur vorigen Einstellung zurückzukehren. Halten Sie gedrückt für die
Stroboskop-Funktion.
Reinigung und Wartung
•
Alle verwendeten Schrauben müssen fest angespannt werden und dürfen keine Rostspuren zeigen.
•
Das Gehäuse, die Linsen, die Montagebügel und der Montageort (z.B. Decke oder Gebinde) dürfen nicht
angepasst werden, z.B. bohren Sie keine zusätzlichen Löcher in Montagebügel, verändern Sie die
Anschlüsse nicht, usw.)
•
Mechanische bewegende Teile dürfen keine Spuren von Verschleiß aufweisen.
•
Sorgen Sie dafür, dass die Netzkabel nicht beschädigt sind. Lassen Sie das Gerät von einer Fachkraft
warten.
•
Trennen Sie das Gerät vom Netz ehe Sie mit den Servicearbeiten anfangen.
•
Verwenden Sie zur Reinigung ein feuchtes, fusselfreies Tuch. Verwenden Sie auf keinen Fall Alkohol oder
irgendwelche Lösungsmittel.
•
Die Teile dürfen nicht eigenmächtig ersetzt werden.
•
Bestellen Sie eventuelle Ersatzteile bei Ihrem Fachhändler.
V. 02 – 01/06/2012
29
©Velleman nv
VDPLDJBAR6
9.
Technische Daten
Stromversorgung
230VAC ~ 50Hz
Sicherung
F2A/250V
Stromverbrauch
50W
LEDs
16 dreifarbige LEDs von 3W
Abstrahlwinkel
15°
Abmessungen
950 x 45 x 230mm
Gewicht
6kg
Verwenden Sie dieses Gerät nur mit originellen Zubehörteilen. Velleman NV übernimmt keine
Haftung für Schaden oder Verletzungen bei (falscher) Anwendung dieses Gerätes. Für mehr
Informationen zu diesem Produkt und die neueste Version dieser Bedienungsanleitung, siehe
www.hqpower.eu. Alle Änderungen ohne vorherige Ankündigung vorbehalten.
© URHEBERRECHT
Velleman NV besitzt das Urheberrecht für diese Bedienungsanleitung. Alle weltweiten Rechte
vorbehalten.
Ohne vorherige schriftliche Genehmigung des Urhebers ist es nicht gestattet, diese Bedienungsanleitung ganz
oder in Teilen zu reproduzieren, zu kopieren, zu übersetzen, zu bearbeiten oder zu speichern.
V. 02 – 01/06/2012
30
©Velleman nv
V
VDPLDJBAR
R6
IN
NSTRUK
KCJA OBSŁU
O
GI
1..
Wstę
ęp
Niniejsza insttrukcja prz
zeznaczona jest dla uż
żytkownikó
ów w krajac
ch Unii Euro
opejskiej
Wa
ażne inform
macje dotyc
czące ochro
ony środow
wiska
Ninie
ejszy symbol umieszczon
ny na urządz
zeniu bądź opakowaniu oznacza,
o
że w
wyrzucenie zużytego
z
produ
uktu może być
b szkodliwe
e dla środow
wiska. Nie um
mieszczać zu
użytych urzą
ądzeń (bądź baterii) w
zwyk
kłych pojemn
nikach na odpady. W tym
m celu należy
y skontaktow
wać się z firm
mą zajmując
cą się
recyk
klingiem. Urz
ządzenie mo
ożna przekaz
zać dystrybutorowi lub lo
okalnej firmie zajmujące
ej się
recyk
klingiem. Należy przestrz
zegać lokaln
nych przepisó
ów dotyczących ochrony
y środowiska
a.
W razie wątp
pliwości nalleży skonta
aktować się
ę z lokalnym
mi władzam
mi zajmując
cymi się uty
ylizacją
od
dpadów.
Dz
ziękujemy za
a wybór prod
duktu firmy HQPower™!
H
Przed rozpo
oczęciem uży
ytkowania na
ależy dokładnie zapoznać
się
ę z instrukcją
ą obsługi. Je
eśli urządzenie zostało us
szkodzone podczas
p
trans
sportu, nie n
należy monto
ować ani
uży
ywać urządz
zenia oraz na
ależy skonta
aktować się ze
z sprzedawcą.
2..
Instrrukcje be
ezpiecze
eństwa
Podczas in
nstalacji nale
eży zachować szczególną
ą ostrożność
ć: dotknięcie
e przewodów
w pod
napięciem
m może prowadzić do zag
grażającego życiu poraże
enia prądem
m elektryczny
ym.
Kiedy urzą
ądzenie nie jest
j
używane
e lub gdy prz
zeprowadzan
ne są prace serwisowe lub
konserwac
cyjne należy
y odłączyć urrządzenie od
d zasilania sieciowego. K
Kabel zasilają
ący należy
trzymać wyłącznie
w
za wtyczkę.
Wyłącznie do użytku
u wewnątrz
z pomieszc
czeń. Chroniić urządzenie
e przed desz
zczem,
wilgocią, rozpryskami
r
i ściekający
ymi cieczami.
Chronić urrządzenie prrzed dziećmi i nieupoważ
żnionymi uży
ytkownikamii.
Uwaga: urządzenie
u
nagrzewa się podczas pra
acy.
Nie kiero
ować wzrok
ku bezpośre
ednio na źró
ódło światłła, gdyż moż
że to wywoła
ać:
•
atak epilepsji
e
u os
sób podatnyc
ch
•
przejściową utratę
ę wzroku (śle
epota olśnieniowa)
•
e (nieodwrac
calne) uszkod
dzenie oczu
trwałe
W urządze
eniu nie znajjdują się czę
ęści, które wy
ymagają obs
sługi przez u
użytkownika. W celu
uzyskania części serwisowych i/lub zamiennyc
ch należy sk
kontaktować się z autory
yzowanym
sprzedawc
cą.
•
Urządzenie
e podlega kla
asie ochronn
ności I, dlate
ego też niezb
będne jest za
apewnienie u
uziemienia. Połączenia
elektryczne
e powinien wykonywać
w
s
specjalista.
•
Należy upe
ewnić się, że
e napięcie nie
e przekracza
a wartości ok
kreślonej w specyfikacja
ach niniejsze
ej instrukcji.
•
Nie zaginać kabla zasillającego i ch
hronić go prz
zed uszkodze
eniem. W razie konieczn
ności, wymianę kabla
powinien przeprowadz
p
ać autoryzow
wany sprzed
dawca.
•
Do montaż
żu urządzenia należy sto
osować odpo
owiedni przew
wód zabezpieczający (np
p. VDLSC7 lub
l
VDLSC8
8).
•
Zainstalow
wać VDPLDJBAR6 w odlległości min..0,5 m od łattwopalnych i wybuchowy
ych obiektów
w lub
substancji..
•
Należy zac
chować minim
malną odległość o warto
ości 1 m między strumien
niem świetln
nym urządze
enia, a każdą
ą
podświetla
aną powierzc
chnią.
3..
Inforrmacje ogólne
o
Pro
oszę zapozna
ać się z informacjami w części Velle
eman® Usłu
ugi i gwara
ancja jakośc
ci na końcu niniejszej
ins
strukcji.
Chronić urrządzenie prz
zed kurzem i wysokimi temperatura
t
mi.
V. 02 – 01/06/2012
31
©Velleman
n nv
VDPLDJBAR6
Chronić urządzenie przed wstrząsami i użytkować wyłącznie zgodnie z przeznaczeniem. Podczas
obsługi urządzenia unikać używania siły.
•
Przed rozpoczęciem pracy z urządzeniem należy zapoznać się z jego funkcjami. Zabrania się użytkowania
urządzenia przez niewykwalifikowane osoby. Wszelkie możliwe uszkodzenia są zazwyczaj spowodowane
nieprofesjonalną obsługą urządzenia.
•
Wprowadzanie zmian w urządzeniu jest zabronione ze względów bezpieczeństwa. Należy pamiętać, że
uszkodzenia spowodowane przez zmiany wprowadzone przez użytkownika nie są objęte gwarancją.
•
Urządzenia należy używać jedynie zgodnie z przeznaczeniem. Jakiekolwiek użytkowanie niezgodnie z
przeznaczeniem może prowadzić do zwarcia, poparzeń, porażenia prądem, wybuchu lampy, wypadku itd. i
spowoduje unieważnienie gwarancji.
•
Gwarancja nie obejmuje uszkodzeń powstałych w wyniku nieprzestrzegania niniejszej instrukcji, a
sprzedawca nie ponosi odpowiedzialności za wynikłe uszkodzenia lub problemy.
•
Urządzenie powinien instalować i serwisować wykwalifikowany technik.
•
Nie włączać urządzenia bezpośrednio po wystąpieniu zmiany temperatury. Chronić urządzenie przed
uszkodzeniem wyłączając je dopóki nie osiągnie temperatury pokojowej.
•
Urządzenie jest przeznaczone do profesjonalnego zastosowania wewnątrz pomieszczeń na scenach, w
dyskotekach, teatrach itp., przy zasilaniu prądem przemiennym 230 VAC/ 50 Hz.
•
Efekty świetlne nie są przystosowane do ciągłej pracy: regularne przerwy w pracy wydłużą żywotność
urządzenia.
•
Niniejszą instrukcję należy zachować na przyszłość.
4.
Właściwości
•
niezwykle niska masa: urządzenie przenośne, zaprojektowane specjalnie dla DJ-ów
•
ruchome reflektory, każdy reflektor został wyposażony w 4 trójkolorowe diody LED, zapewniające doskonałe
efekty świetlne
•
wstępnie zaprogramowane tryby pracy z ustawieniami kolorów i programów RGB
•
automatyczny tryb pracy z ustawieniami szybkości oraz wbudowany mikrofon do aktywacji dźwiękiem
•
łatwe sterowanie dzięki przełącznikowi podłogowemu, funkcja wygaszenia
5.
Opis
Patrz rysunki na stronie 2 i 3 niniejszej instrukcji.
A
złącze do reflektorów LED (4x)
J
segmentowy przełącznik dwustanowy
B
zacisk uziomowy
K
śruby montażowe
C
gniazdko sieciowe + bezpiecznik
L
poziome pokrętło nastawcze
D
pokrętło zabezpieczające statyw
M
pionowe pokrętło nastawcze (2 na reflektor)
E
wejście DMX
N
diody LED (4 na reflektor)
F
wyjście DMX
O
przełącznik podłogowy do wyboru programów
G
mikrofon
P
przełącznik podłogowy do regulacji dźwiękiem
H
pokrętło do regulacji czułości mikrofonu
Q
przełącznik podłogowy do funkcji zatrzymania
I
gniazdko przełącznika podłogowego
R
przełącznik podłogowy do funkcji zaciemniania
6.
Instrukcje montażu
6.1
Wybór miejsca montażu
Rampa sceniczna VDPLDJBAR6 została zaprojektowana z myślą o zastosowaniach wewnętrznych, w
temperaturach nieprzekraczających 40°C. W celu zapewnienia bezawaryjnej pracy podczas obsługi
należy zapewnić niezakłócony dostęp powietrza do metalowej obudowy urządzenia.
Nie należy:
•
używać rampy w miejscach o temperaturze otoczenia przekraczającej 40°C i o wilgotności względnej
ponad 75%.
•
używać rampy w zamkniętych pomieszczeniach o powierzchni poniżej 10m3, o ile nie zapewniono
wymuszonego obiegu powietrza.
V. 02 – 01/06/2012
32
©Velleman nv
VDPLDJBAR6
6.2
Bezpieczny montaż
Ryzyko obrażeń ciała. Montaż nadziemny wymaga dużego doświadczenia: obliczanie limitów
obciążenia, wybór materiałów montażowych ... Urządzenie oraz materiały należy regularnie
kontrolować. Bez wymaganego doświadczenia nie należy próbować samodzielnie instalować
urządzenia, gdyż może to prowadzić do obrażeń ciała.
Rampa VDPLDJBAR6 została zaprojektowana z myślą o montażu na statywie (nie załączono) lub belce
kratowej (nie załączono) przy pomocy dwóch zacisków (nie załączono).
Statyw:
•
Należy dokładnie przestrzegać instrukcji obsługi statywu.
•
Upewnić się, że średnica włożonej rurki statywu jest nie mniejsza niż 25 mm; w przeciwnym wypadku
bezpieczny montaż nie może być zapewniony.
•
Przymocować urządzenie do statywu i zabezpieczyć je mocno dokręcając pokrętło [D] w kierunku
przeciwnym do ruchu wskazówek zegara.
Montaż na belce kratowej:
•
Instalację rampy powinna przeprowadzić wykwalifikowana osoba, zgodnie z normą EN 60598-2-17 i innymi
odnośnymi normami.
•
Konstrukcja nośna musi utrzymać przez godzinę bez odkształcania obciążenie 10 razy większe niż masa
rampy.
•
Wyjąć obie śruby [K] z rampy i zastąpić je 2 zaciskami belki kratowej (nie załączone).
Uwaga: ZAWSZE należy mocować rampę z zastosowaniem 2 zacisków!
•
Instalacja musi być zawsze zabezpieczona dodatkowym elementem, np. przewodem bezpieczeństwa.
•
Podczas montażu, zdejmowania lub serwisowania nigdy nie stawać bezpośrednio pod rampą. Raz do roku
oraz przed rozpoczęciem użytkowania rampę należy poddać kontroli przeprowadzanej przez
wykwalifikowanego technika.
•
Rampę należy zamontować w mało uczęszczanym miejscu oraz w taki sposób, aby była niedostępna dla
nieupoważnionych użytkowników.
•
Należy upewnić się, że w promieniu 0,5 m od urządzenia nie znajduje się materiał łatwopalny.
•
Przed rozpoczęciem użytkowania urządzenia instalacja musi zostać zatwierdzona przez eksperta.
4-drożny przełącznik podłogowy:
Podłączyć przełącznik podłogowy do oprawy oświetleniowej [I].
6.3
Złącze DMX-512
Patrz rysunek na stronie 3 niniejszej instrukcji.
•
O ile dotyczy, podłączyć przewód XLR do wyjścia żeńskiego XLR z trzema wtykami sterownika (nie
załączono), a drugi koniec kabla do wejścia XLR z trzema wtykami [E] urządzenia VDPLDJBAR6.
Urządzenia VDPLDJBAR6 mogą być połączone ze sobą za pomocą łącza szeregowego. Jako łącza należy
używać kabla dwurdzeniowego ekranowanego z wejściem XLR i złączami wyjściowymi.
•
Do instalacji wymagających zastosowania przewodu DMX na długich odcinkach lub instalacji w miejscach, w
których występują szumy elektryczne (np. w dyskotekach), zaleca się używanie terminatora DMX.
Terminator zapobiega przekłamaniu cyfrowego sygnału sterującego wywołanemu szumem elektrycznym.
Terminator DMX to wtyczka XLR z opornikiem 120Ω zainstalowanym między wtykiem 2 i 3, wkładana do
gniazda wyjściowego XLR [F] ostatniego urządzenia w szeregu.
6.4
Podłączenie do źródła zasilania prądem przemiennym (AC)
Gniazdo AC zapewniające zasilanie rampy VDPLDJBAR6 musi być odpowiednio i oddzielnie
uziemione. Nie używać przewodu AC innego niż dołączony ani żadnego innego przewodu AC,
który nie jest zatwierdzony przez producenta.
•
Połączenia przewodów elektrycznych powinny być wykonane przez wykwalifikowanego elektryka.
•
Podłączyć wtyczkę zasilającą rampy [C] do zasilania sieciowego. Należy upewnić się, że stosowany obwód
zasilający jest zabezpieczony wyłącznikiem różnicowoprądowym (RCD) 30mA. Nie podłączać urządzenia do
dimmera.
•
Stopiony bezpiecznik należy zastąpić wyłącznie identycznym bezpiecznikiem (F1A/250V).
7.
Obsługa
Patrz rysunek na stronie 2 niniejszej instrukcji.
Rampa VDPLDJBAR6 może działać w pięciu trybach: sterowania dźwiękiem, automatycznym,
uprzywilejowanym / zależnym, DMX oraz podłogowym.
V. 02 – 01/06/2012
33
©Velleman nv
V
VDPLDJBAR
R6
Try
yb sterowa
ania dźwięk
kiem
1. Aby urucho
omić tryb regulacji dźwię
ękiem, ustaw
wić segmenttowy przełąc
cznik dwusta
anowy 10 w pozycji OFF
(wył.).
2. Wyregulow
wać czułość mikrofonu
m
[G
G] używając
c pokrętła do
o regulacji cz
zułości mikro
ofonu [H].
Try
yb automattyczny
1. Aby urucho
omić tryb au
utomatyczny
y, ustawić se
egmentowy przełącznik
p
d
dwustanowy
9 w pozycji ON (wł.), a
segmentow
wy przełączn
nik dwustano
owy 10 w po
ozycji OFF (w
wył.).
gramu używa
ając przełącz
zników 1-3.
2. Ustawić prrędkość prog
yb uprzywiilejowany / zależny
Try
1. Urządzenia
a VDPLDJBA
AR6 połączy
yć jak opisan
no w punkcie
e 6.
2. Ustawić up
przywilejowa
ane urządzen
nie VDPLDJBAR6 w tryb
bie sterowan
nia dźwiękiem lub trybie
e
automatyc
cznym.
3. Aby urucho
omić tryb za
ależny, ustaw
wić segmentowy przełącz
znik dwustanowy 1 i 10 w urządzeniach zależny
ych
w pozycji ON
O (wł.).
Try
yb DMX
•
omić tryb DM
MX, ustawić segmentowy
y przełącznik dwustanow
wy 10 w poz
zycji ON (wł.).
Aby urucho
•
Wszystkie urządzenia sterowane za pomocą DMX
D
wymaga
ają zastosow
wania cyfrowe
ego adresu startowego
s
w
celu poprawnego reago
owania na sy
ygnały. Cyfrrowy adres startowy
s
to numer
n
kanałłu, za pomoc
cą którego
urządzenie
e zaczyna „słłuchać" stero
ownika DMX
X. Jeden adre
es startowy może być stosowany dla
a całej grupy
y
urządzeń lub można us
stawić oddzielny adres dla
d każdego urządzenia.
•
Jeżeli wszy
ystkie urządz
zenia posiad
dają ten sam
m adres, wów
wczas wszysttkie jednostk
ki będą „słuc
chać” sygnałów
sterowania
a za pomocą
ą jednego określonego ka
anału. Innym
mi słowy: zm
miana ustawień jednego kanału będz
zie
miała wpły
yw jednocześ
śnie na wszy
ystkie urządz
zenia. Jeżeli ustawione zostaną
z
oddz
zielne adresy
y, wówczas
każde urzą
ądzenie będz
zie „słuchało” sygnałów za
z pomocą oddzielnego
o
kanału. Zmiana ustawie
eń jednego
kanału będ
dzie więc mia
ała wpływ ty
ylko na odno
ośne urządze
enie.
•
W przypad
dku 15-kanałłowej rampy
y VDPLDJBA
AR6, należy ustawić adres startowy pierwszego urządzenia na
1 (CH1~15
5), drugiego urządzenia na 16 (1 +1
15) (CH16~3
30), trzecieg
go urządzenia na 31 (16 + 15)
(CH31~45) itd.
•
X, użyć segm
mentowych przełącznikó
p
ów dwustano
owych.
Aby ustawić odpowiedni adres DMX
•
zełącznik
prz
1
2
3
4
5
6
7
8
9
wartość
1
2
4
8
16
32
64
128
256
2
W celu sprrawdzenia sy
ygnałów sterrowania dane
ego kanału należy
n
skorzystać z poniższej tabeli.
Ka
anał
CH
H1
funk
kcja
Wartość DMX-512
D
Program ste
erowania
000 ~ 009
w
wył.
010 ~ 029
Prrogram 1
030 ~ 049
Prrogram 2
050 ~ 069
Prrogram 3
070 ~ 089
Prrogram 4
090 ~ 109
Prrogram 5
programy
110 ~ 129
Prrogram 6
automatyczne
130 ~ 149
Prrogram 7
150 ~ 169
Prrogram 8
170 ~ 189
Prrogram 9
190 ~ 209
Prrogram 10
V. 02 – 01/06/2012
210 ~ 229
Prrogram 11
230 ~ 249
Trryb automattyczny, programy wewnę
ętrzne
250 ~ 255
Trryb sterowan
nia dźwiękie
em
34
©Velleman
n nv
VDPLDJBAR6
Kanał
CH2
funkcja
Wartość DMX-512 Program sterowania
uprzywilejowany
funkcja wył. przy uruchomionym CH1 lub CH3
dimmer
000 ~ 000
wył.
001 ~ 255
sterowanie światłem 0 ~ 100%
wył.
CH3
efekt
stroboskopowy
000 ~ 000
001 ~ 255
miganie: wolno/szybko
CH4
reflektor 1
000 ~255
światło czerwone ściemniające się od 0 ~ 100%
CH5
reflektor 1
000 ~255
światło zielone ściemniające się od 0 ~ 100%
CH6
reflektor 1
000 ~255
światło niebieskie ściemniające się od 0 ~ 100%
CH7
reflektor 2
000 ~255
światło czerwone ściemniające się od 0 ~ 100%
CH8
reflektor 2
000 ~255
światło zielone ściemniające się od 0 ~ 100%
CH9
reflektor 2
000 ~255
światło niebieskie ściemniające się od 0 ~ 100%
CH10
reflektor 3
000 ~255
światło czerwone ściemniające się od 0 ~ 100%
CH11
reflektor 3
000 ~255
światło zielone ściemniające się od 0 ~ 100%
CH12
reflektor 3
000 ~255
światło niebieskie ściemniające się od 0 ~ 100%
CH13
reflektor 4
000 ~255
światło czerwone ściemniające się od 0 ~ 100%
CH14
reflektor 4
000 ~255
światło zielone ściemniające się od 0 ~ 100%
CH15
reflektor 4
000 ~255
światło niebieskie ściemniające się od 0 ~ 100%
Przełącznik podłogowy
Uwaga: Przełącznik podłogowy działa jedynie wtedy, gdy rampa VDPLDJBAR6 pracuje w trybie
automatycznym lub trybie regulacji dźwiękiem.
Odłączyć przewód zasilający od VDPLDJBAR6 i podłączyć przełącznik podłogowy do gniazdka przełącznika
podłogowego [I]. Ponownie podłączyć przewód zasilający.
Funkcje przełącznika podłogowego:
Wcisnąć, aby wybrać program wbudowany
1x białe
2x czerwone
3x zielone
przełącznik 1
(O)
4x niebieskie
ustawienia
zaprogramowane 5x żółte
6x fioletowe
7x niebiesko-zielone
8x zmiana koloru co sekundę; cykl ciągły
9x zmiana koloru co 3 sekundy; cykl ciągły
przełącznik 2
(P)
przełącznik 3
(Q)
przełącznik 4
(R)
8.
sterowanie
dźwiękiem:
wcisnąć, aby włączyć tryb sterowania dźwiękiem
wcisnąć przełącznik 1, aby wyłączyć tryb sterowania dźwiękiem
funkcja
zatrzymania
zatrzymuje programy (8 i 9)
funkcja
zaciemnienia
Wcisnąć w dowolnym momencie, aby wyłączyć wszystkie diody LED.
Wcisnąć ponownie, aby powrócić do poprzednich ustawień. Przytrzymać,
aby wybrać funkcję stroboskopu.
Czyszczenie i konserwacja
•
Należy upewnić się, że wszystkie śruby są dokręcone i bez śladów korozji.
•
Obudowa, widoczne części, podpory montażowe oraz miejsce instalacji (np. sufit, podwieszenie, belka
kratowa) nie powinny być odkształcone, modyfikowane oraz nie można wprowadzać w nich zmian (np.
wiercąc dodatkowe otwory w podporach montażowych) ani zmieniać położenia podłączeń.
•
Ruchome części mechaniczne nie mogą nosić śladów zużycia.
•
Przewody zasilające nie mogą być uszkodzone. Montaż urządzenia powinien przeprowadzić wykwalifikowany
technik.
•
Przed rozpoczęciem konserwacji należy odłączyć urządzenie od zasilania sieciowego.
•
Regularnie przecierać urządzenie wilgotną, niepozostawiającą śladów ściereczką. Nie stosować alkoholu ani
rozpuszczalników.
V. 02 – 01/06/2012
35
©Velleman nv
VDPLDJBAR6
•
W urządzeniu nie ma części, które wymagają prac serwisowych wykonywanych przez użytkownika.
•
W celu uzyskania części zamiennych należy skontaktować się ze sprzedawcą
9.
Specyfikacja techniczna
zasilanie
230VAC ~ 50Hz
bezpiecznik
F2A/250V
zużycie mocy
50W
diody LED
Trójkolorowe diody LED 16x 3W
kąt padania wiązki światła
15°
wymiary
950 x 45 x 230mm
masa całkowita
6kg
Urządzenie może być używane wyłącznie z oryginalnymi akcesoriami. Firma Velleman nv nie ponosi
odpowiedzialności w przypadku uszkodzeń lub obrażeń ciała powstałych w wyniku (nieprawidłowej)
obsługi urządzenia.
Więcej informacji o produkcie oraz najnowsza wersja niniejszej instrukcji obsługi znajdują się na
stronie www.hqpower.eu.
Informacje zawarte w niniejszej instrukcji obsługi mogą ulec zmianie bez wcześniejszego
powiadomienia.
© PRAWA AUTORSKIE ZASTRZEŻONE
Firma Velleman nv. posiada prawa autorskie do niniejszej instrukcji. Wszelkie prawa zastrzeżone.
Żadna część niniejszej instrukcji nie może być kopiowana, powielana, tłumaczona lub przenoszona na nośniki
elektroniczne lub modyfikowana w inny sposób bez wcześniejszej pisemnej zgody właściciela praw autorskich.
V. 02 – 01/06/2012
36
©Velleman nv
Velleman® Service and Quality Warranty
Since its foundation in 1972, Velleman® acquired extensive
experience in the electronics world and currently distributes its
products in over 85 countries.
All our products fulfil strict quality requirements and legal stipulations
in the EU. In order to ensure the quality, our products regularly go
through an extra quality check, both by an internal quality
department and by specialized external organisations. If, all
precautionary measures notwithstanding, problems should occur,
please make appeal to our warranty (see guarantee conditions).
General Warranty Conditions Concerning Consumer Products
(for EU):
• All consumer products are subject to a 24-month warranty on
production flaws and defective material as from the original date of
purchase.
• Velleman® can decide to replace an article with an equivalent
article, or to refund the retail value totally or partially when the
complaint is valid and a free repair or replacement of the article is
impossible, or if the expenses are out of proportion.
You will be delivered a replacing article or a refund at the value of
100% of the purchase price in case of a flaw occurred in the first
year after the date of purchase and delivery, or a replacing article at
50% of the purchase price or a refund at the value of 50% of the
retail value in case of a flaw occurred in the second year after the
date of purchase and delivery.
• Not covered by warranty:
- all direct or indirect damage caused after delivery to the article
(e.g. by oxidation, shocks, falls, dust, dirt, humidity...), and by the
article, as well as its contents (e.g. data loss), compensation for loss
of profits;
- consumable goods, parts or accessories that are subject to an aging
process during normal use, such as batteries (rechargeable, nonrechargeable, built-in or replaceable), lamps, rubber parts, drive
belts... (unlimited list);
- flaws resulting from fire, water damage, lightning, accident, natural
disaster, etc.…;
- flaws caused deliberately, negligently or resulting from improper
handling, negligent maintenance, abusive use or use contrary to the
manufacturer’s instructions;
- damage caused by a commercial, professional or collective use of
the article (the warranty validity will be reduced to six (6) months
when the article is used professionally);
- damage resulting from an inappropriate packing and shipping of the
article;
- all damage caused by modification, repair or alteration performed
by a third party without written permission by Velleman®.
• Articles to be repaired must be delivered to your Velleman® dealer,
solidly packed (preferably in the original packaging), and be
completed with the original receipt of purchase and a clear flaw
description.
• Hint: In order to save on cost and time, please reread the manual
and check if the flaw is caused by obvious causes prior to presenting
the article for repair. Note that returning a non-defective article can
also involve handling costs.
• Repairs occurring after warranty expiration are subject to shipping
costs.
• The above conditions are without prejudice to all commercial
warranties.
The above enumeration is subject to modification according to
the article (see article’s manual).
Velleman® service- en kwaliteitsgarantie
Velleman® heeft sinds zijn oprichting in 1972 een ruime ervaring
opgebouwd in de elektronicawereld en verdeelt op dit moment
producten in meer dan 85 landen. Al onze producten beantwoorden
aan strikte kwaliteitseisen en aan de wettelijke bepalingen geldig in
de EU. Om de kwaliteit te waarborgen, ondergaan onze producten op
regelmatige tijdstippen een extra kwaliteitscontrole, zowel door onze
eigen kwaliteitsafdeling als door externe gespecialiseerde
organisaties. Mocht er ondanks deze voorzorgen toch een probleem
optreden, dan kunt u steeds een beroep doen op onze waarborg (zie
waarborgvoorwaarden).
Algemene waarborgvoorwaarden consumentengoederen
(voor Europese Unie):
• Op alle consumentengoederen geldt een garantieperiode van 24
maanden op productie- en materiaalfouten en dit vanaf de
oorspronkelijke aankoopdatum.
• Indien de klacht gegrond is en een gratis reparatie of vervanging
van een artikel onmogelijk is of indien de kosten hiervoor buiten
verhouding zijn, kan Velleman® beslissen het desbetreffende artikel
te vervangen door een gelijkwaardig artikel of de aankoopsom van
het artikel gedeeltelijk of volledig terug te betalen. In dat geval krijgt
u een vervangend product of terugbetaling ter waarde van 100% van
de aankoopsom bij ontdekking van een gebrek tot één jaar na
aankoop en levering, of een vervangend product tegen 50% van de
kostprijs of terugbetaling van 50 % bij ontdekking na één jaar tot 2
jaar.
• Valt niet onder waarborg:
- alle rechtstreekse of onrechtstreekse schade na de levering
veroorzaakt aan het toestel (bv. door oxidatie, schokken, val, stof,
vuil, vocht...), en door het toestel, alsook zijn inhoud (bv. verlies van
data), vergoeding voor eventuele winstderving.
- verbruiksgoederen, onderdelen of hulpstukken die onderhevig zijn
aan veroudering door normaal gebruik zoals bv. batterijen (zowel
oplaadbare als niet-oplaadbare, ingebouwd of vervangbaar), lampen,
rubberen onderdelen, aandrijfriemen... (onbeperkte lijst).
- defecten ten gevolge van brand, waterschade, bliksem, ongevallen,
natuurrampen, enz.
- defecten veroorzaakt door opzet, nalatigheid of door een
onoordeelkundige behandeling, slecht onderhoud of abnormaal
gebruik of gebruik van het toestel strijdig met de voorschriften van
de fabrikant.
- schade ten gevolge van een commercieel, professioneel of collectief
gebruik van het apparaat (bij professioneel gebruik wordt de
garantieperiode herleid tot 6 maand).
- schade veroorzaakt door onvoldoende bescherming bij transport
van het apparaat.
- alle schade door wijzigingen, reparaties of modificaties uitgevoerd
door derden zonder toestemming van Velleman®.
• Toestellen dienen ter reparatie aangeboden te worden bij uw
Velleman®-verdeler. Het toestel dient vergezeld te zijn van het
oorspronkelijke aankoopbewijs. Zorg voor een degelijke verpakking
(bij voorkeur de originele verpakking) en voeg een duidelijke
foutomschrijving bij.
• Tip: alvorens het toestel voor reparatie aan te bieden, kijk nog
eens na of er geen voor de hand liggende reden is waarom het
toestel niet naar behoren werkt (zie handleiding). Op deze wijze kunt
u kosten en tijd besparen. Denk eraan dat er ook voor niet-defecte
toestellen een kost voor controle aangerekend kan worden.
• Bij reparaties buiten de waarborgperiode zullen transportkosten
aangerekend worden.
• Elke commerciële garantie laat deze rechten onverminderd.
Bovenstaande opsomming kan eventueel aangepast worden
naargelang de aard van het product (zie handleiding van het
betreffende product).
Garantie de service et de qualité Velleman®
Depuis 1972, Velleman® a gagné une vaste expérience dans le
secteur de l’électronique et est actuellement distributeur dans plus de
85 pays.
Tous nos produits répondent à des exigences de qualité rigoureuses
et à des dispositions légales en vigueur dans l’UE. Afin de garantir la
qualité, nous soumettons régulièrement nos produits à des contrôles
de qualité supplémentaires, tant par notre propre service qualité que
par un service qualité externe. Dans le cas improbable d’un défaut
malgré toutes les précautions, il est possible d’invoquer notre
garantie (voir les conditions de garantie).
Conditions générales concernant la garantie sur les produits
grand public (pour l’UE) :
• tout produit grand public est garanti 24 mois contre tout vice de
production ou de matériaux à dater du jour d’acquisition effective ;
• si la plainte est justifiée et que la réparation ou le remplacement
d’un article est jugé impossible, ou lorsque les coûts s’avèrent
disproportionnés, Velleman® s’autorise à remplacer ledit article par
un article équivalent ou à rembourser la totalité ou une partie du prix
d’achat. Le cas échéant, il vous sera consenti un article de
remplacement ou le remboursement complet du prix d’achat lors
d’un défaut dans un délai de 1 an après l’achat et la livraison, ou un
article de remplacement moyennant 50% du prix d’achat ou le
remboursement de 50% du prix d’achat lors d’un défaut après 1 à 2
ans.
• sont par conséquent exclus :
- tout dommage direct ou indirect survenu à l’article après livraison
(p.ex. dommage lié à l’oxydation, choc, chute, poussière, sable,
impureté…) et provoqué par l’appareil, ainsi que son contenu (p.ex.
perte de données) et une indemnisation éventuelle pour perte de
revenus ;
- toute pièce ou accessoire nécessitant un remplacement causé par
un usage normal comme p.ex. piles (rechargeables comme non
rechargeables, intégrées ou remplaçables), ampoules, pièces en
caoutchouc, courroies… (liste illimitée) ;
- tout dommage qui résulte d’un incendie, de la foudre, d’un
accident, d’une catastrophe naturelle, etc. ;
- out dommage provoqué par une négligence, volontaire ou non, une
utilisation ou un entretien incorrect, ou une utilisation de l’appareil
contraire aux prescriptions du fabricant ;
- tout dommage à cause d’une utilisation commerciale,
professionnelle ou collective de l’appareil (la période de garantie sera
réduite à 6 mois lors d’une utilisation professionnelle) ;
- tout dommage à l’appareil qui résulte d’une utilisation incorrecte ou
différente que celle pour laquelle il a été initialement prévu comme
décrit dans la notice ;
- tout dommage engendré par un retour de l’appareil emballé dans
un conditionnement non ou insuffisamment protégé.
- toute réparation ou modification effectuée par une tierce personne
sans l’autorisation explicite de SA Velleman® ; - frais de transport de
et vers Velleman® si l’appareil n’est plus couvert sous la garantie.
• toute réparation sera fournie par l’endroit de l’achat. L’appareil doit
nécessairement être accompagné du bon d’achat d’origine et être
dûment conditionné (de préférence dans l’emballage d’origine avec
mention du défaut) ;
• tuyau : il est conseillé de consulter la notice et de contrôler câbles,
piles, etc. avant de retourner l’appareil. Un appareil retourné jugé
défectueux qui s’avère en bon état de marche pourra faire l’objet
d’une note de frais à charge du consommateur ;
• une réparation effectuée en-dehors de la période de garantie fera
l’objet de frais de transport ;
• toute garantie commerciale ne porte pas atteinte aux conditions
susmentionnées.
La liste susmentionnée peut être sujette à une
complémentation selon le type de l’article et être mentionnée
dans la notice d’emploi.
Garantía de servicio y calidad Velleman®
Desde su fundación en 1972 Velleman® ha adquirido una amplia
experiencia como distribuidor en el sector de la electrónica en más de
85 países. Todos nuestros productos responden a normas de calidad
rigurosas y disposiciones legales vigentes en la UE. Para garantizar la
calidad, sometemos nuestros productos regularmente a controles de
calidad adicionales, tanto a través de nuestro propio servicio de
calidad como de un servicio de calidad externo. En el caso
improbable de que surgieran problemas a pesar de todas las
precauciones, es posible recurrir a nuestra garantía (véase las
condiciones de garantía).
Condiciones generales referentes a la garantía sobre
productos de venta al público (para la Unión Europea):
• Todos los productos de venta al público tienen un período de
garantía de 24 meses contra errores de producción o errores en
materiales desde la adquisición original;
• Si la queja está fundada y si la reparación o sustitución de un
artículo no es posible, o si los gastos son desproporcionados,
Velleman® autoriza reemplazar el artículo por un artículo equivalente
o reembolsar la totalidad o una parte del precio de compra. En este
caso, usted recibirá un artículo de recambio o el reembolso completo
del precio de compra si encuentra algún fallo hasta un año después
de la compra y entrega, o un artículo de recambio al 50% del precio
de compra o el reembolso del 50% del precio de compra si encuentra
un fallo después de 1 año y hasta los 2 años después de la compra y
entrega.
Por consiguiente, están excluidos entre otras cosas:
- todos los daños causados directa o indirectamente al aparato (p.ej.
por oxidación, choques, caída,...) y a su contenido (p.ej. pérdida de
datos) después de la entrega y causados por el aparato, y cualquier
indemnización por posible pérdida de ganancias;
- partes o accesorios, que estén expuestos al desgaste causado por
un uso normal, como por ejemplo baterías (tanto recargables como
no recargables, incorporadas o reemplazables), bombillas, partes de
goma, etc. (lista ilimitada);
- defectos causados por un incendio, daños causados por el agua,
rayos, accidentes, catástrofes naturales, etc.;
- defectos causados a conciencia, descuido o por malos tratos, un
mantenimiento inapropiado o un uso anormal del aparato contrario a
las instrucciones del fabricante;
- daños causados por un uso comercial, profesional o colectivo del
aparato (el período de garantía se reducirá a 6 meses con uso
profesional);
- daños causados por un uso incorrecto o un uso ajeno al que está
previsto el producto inicialmente como está descrito en el manual del
usuario;
- daños causados por una protección insuficiente al transportar el
aparato.
- daños causados por reparaciones o modificaciones efectuadas por
una tercera persona sin la autorización explícita de Velleman®;
- se calcula gastos de transporte de y a Velleman® si el aparato ya
no está cubierto por la garantía.
• Cualquier artículo que tenga que ser reparado tendrá que ser
devuelto a su distribuidor Velleman®. Devuelva el aparato con la
factura de compra original y transpórtelo en un embalaje sólido
(preferentemente el embalaje original). Incluya también una buena
descripción del fallo;
• Consejo: Lea el manual del usuario y controle los cables, las pilas,
etc. antes de devolver el aparato. Si no se encuentra un defecto en el
artículo los gastos podrían correr a cargo del cliente;
• Los gastos de transporte correrán a carga del cliente para una
reparación efectuada fuera del período de garantía.
• Cualquier gesto comercial no disminuye estos derechos.
La lista previamente mencionada puede ser adaptada según el
tipo de artículo (véase el manual del usuario del artículo en
cuestión).
Velleman® Service- und Qualitätsgarantie
Seit der Gründung in 1972 hat Velleman® sehr viel Erfahrung als
Verteiler in der Elektronikwelt in über 85 Ländern aufgebaut.
Alle Produkte entsprechen den strengen Qualitätsforderungen und
gesetzlichen Anforderungen in der EU. Um die Qualität zu
gewährleisten werden unsere Produkte regelmäßig einer zusätzlichen
Qualitätskontrolle unterworfen, sowohl von unserer eigenen
Qualitätsabteilung als auch von externen spezialisierten
Organisationen. Sollten, trotz aller Vorsichtsmaßnahmen, Probleme
auftreten, nehmen Sie bitte die Garantie in Anspruch (siehe
Garantiebedingungen).
Allgemeine Garantiebedingungen in Bezug auf Konsumgüter
(für die Europäische Union):
• Alle Produkte haben für Material- oder Herstellungsfehler eine
Garantieperiode von 24 Monaten ab Verkaufsdatum.
• Wenn die Klage berechtigt ist und falls eine kostenlose Reparatur
oder ein Austausch des Gerätes unmöglich ist, oder wenn die Kosten
dafür unverhältnismäßig sind, kann Velleman® sich darüber
entscheiden, dieses Produkt durch ein gleiches Produkt zu ersetzen
oder die Kaufsumme ganz oder teilweise zurückzuzahlen. In diesem
Fall erhalten Sie ein Ersatzprodukt oder eine Rückzahlung im Werte
von 100% der Kaufsumme im Falle eines Defektes bis zu 1 Jahr nach
Kauf oder Lieferung, oder Sie bekommen ein Ersatzprodukt im Werte
von 50% der Kaufsumme oder eine Rückzahlung im Werte von 50 %
im Falle eines Defektes im zweiten Jahr.
• Von der Garantie ausgeschlossen sind:
- alle direkten oder indirekten Schäden, die nach Lieferung am Gerät
und durch das Gerät verursacht werden (z.B. Oxidation, Stöße, Fall,
Staub, Schmutz, Feuchtigkeit, ...), sowie auch der Inhalt (z.B.
Datenverlust), Entschädigung für eventuellen Gewinnausfall.
- Verbrauchsgüter, Teile oder Zubehörteile, die durch normalen
Gebrauch dem Verschleiß ausgesetzt sind, wie z.B. Batterien (nicht
nur aufladbare, sondern auch nicht aufladbare, eingebaute oder
ersetzbare), Lampen, Gummiteile, Treibriemen, usw. (unbeschränkte
Liste).
- Schäden verursacht durch Brandschaden, Wasserschaden, Blitz,
Unfälle, Naturkatastrophen, usw.
- Schäden verursacht durch absichtliche, nachlässige oder
unsachgemäße Anwendung, schlechte Wartung, zweckentfremdete
Anwendung oder Nichtbeachtung von Benutzerhinweisen in der
Bedienungsanleitung.
- Schäden infolge einer kommerziellen, professionellen oder
kollektiven Anwendung des Gerätes (bei gewerblicher Anwendung
wird die Garantieperiode auf 6 Monate zurückgeführt).
- Schäden verursacht durch eine unsachgemäße Verpackung und
unsachgemäßen Transport des Gerätes.
- alle Schäden verursacht durch unautorisierte Änderungen,
Reparaturen oder Modifikationen, die von einem Dritten ohne
Erlaubnis von Velleman® vorgenommen werden.
• Im Fall einer Reparatur, wenden Sie sich an Ihren Velleman®Verteiler. Legen Sie das Produkt ordnungsgemäß verpackt
(vorzugsweise die Originalverpackung) und mit dem OriginalKaufbeleg vor. Fügen Sie eine deutliche Fehlerbeschreibung hinzu.
• Hinweis: Um Kosten und Zeit zu sparen, lesen Sie die
Bedienungsanleitung nochmals und überprüfen Sie, ob es keinen auf
de Hand liegenden Grund gibt, ehe Sie das Gerät zur Reparatur
zurückschicken. Stellt sich bei der Überprüfung des Gerätes heraus,
dass kein Geräteschaden vorliegt, könnte dem Kunden eine
Untersuchungspauschale berechnet.
• Für Reparaturen nach Ablauf der Garantiefrist werden
Transportkosten berechnet.
• Jede kommerzielle Garantie lässt diese Rechte unberührt.
Die oben stehende Aufzählung kann eventuell angepasst
werden gemäß der Art des Produktes (siehe
Bedienungsanleitung des Gerätes).
Velleman ® usługi i gwarancja jakości
Od czasu założenia w 1972, Velleman® zdobył bogate doświadczenie
w dziedzinie światowej elektroniki. Obecnie firma dystrybuuje swoje
produkty w ponad 85 krajach.
Wszystkie nasze produkty spełniają surowe wymagania jakościowe
oraz wypełniają normy i dyrektywy obowiązujące w krajach UE. W
celu zapewnienia najwyższej jakości naszych produktów, przechodzą
one regularne oraz dodatkowo wyrywkowe badania kontroli jakości,
zarówno naszego wewnętrznego działu jakości jak również
wyspecjalizowanych firm zewnętrznych. Pomimo dołożenia wszelkich
starań czasem mogą pojawić się problemy techniczne, prosimy
odwołać się do gwarancji (patrz warunki gwarancji).
Ogólne Warunki dotyczące gwarancji:
• Wszystkie produkty konsumenckie podlegają 24-miesięcznej
gwarancji na wady produkcyjne i materiałowe od daty zakupu.
• W przypadku, gdy usterka jest niemożliwa do usunięcia lub koszt
usunięcia jest nadmiernie wysoki Velleman ® może zdecydować o
wymianie artykułu na nowy, wolny od wad lub zwrócić zapłaconą
kwotę. Zwrot gotówki może jednak nastąpić z uwzględnieniem
poniższych warunków:
- zwrot 100% ceny zakupu w przypadku, gdy wada wystąpiła w ciągu
pierwszego roku od daty zakupu i dostawy
- wymiana wadliwego artykułu na nowy, wolny od wad z odpłatnością
50% ceny detalicznej lub zwrot 50% kwoty ceny nabycia w
przypadku gdy wada wystąpiła w drugim roku od daty zakupu i
dostawy.
• Produkt nie podlega naprawie gwarancyjnej:
- gdy wszystkie bezpośrednie lub pośrednie szkody spowodowane są
działaniem czynników środowiskowych lub losowych (np. przez
utlenianie, wstrząsy, upadki, kurz, brud, ...), wilgotności;
- gwarant nie ponosi odpowiedzialności za szkody wynikających z
utraty danych;
- produkty konsumenckie, części zamienne lub akcesoria podatne na
process starzenia, wynikającego z normalnego użytkowania, np:
baterie (ładowalne, nieładowalne, wbudowane lub wymienne),
żarówki, paski napędowe, gumowe elementy napędowe...
(nieograniczona lista);
- usterka wynika z działania pożaru, zalania wszelkimi cieczami,
uderzenia pioruna, upadku lub klęski żywiołowej, itp.;
- usterka wynika z zaniedbań eksploatacyjnych tj. umyślne bądź
nieumyślne zaniechanie czyszczenia, konserwacji, wymiany
materiałów ekspolatacyjnych, niedbalstwa lub z niewłaściwego
obchodzenia się lub niezgodnego użytkowania z instrukcją
producenta;
- szkody wynikające z nadmiernego użytkowania gdy nie jest do tego
celu przeznaczony tj. działalność komerycjna, zawodowa lub wspólne
użytkowanie przez wiele osób - okres obowiązywania gwarancji
zostanie obniżony do 6 (sześć) miesięcy;
- Szkody wynikające ze źle zabezpieczonej wysyłki produktu;
- Wszelkie szkody spowodowane przez nieautoryzowaną naprawę,
modyfikację, przeróbkę produktu przez osoby trzecie jak również bez
pisemnej zgody firmy Velleman ®.
• Uszkodzony produkt musi zostać dostarczony do sprzedawcy ®
Velleman, solidnie zapakowany (najlepiej w oryginalnym
opakowaniu), wraz z wyposażeniem z jakim produkt został
sprzedany. W przypadku wysyłki towaru w opakowaniu innym niż
oryginalnym ryzyko usterki produktu oraz tego skutki przechodzą na
właściciela produktu. Wraz z niesprawnym produktem należy
dołączyć jasny i szczegółowy opis jego usterki, wady;
• Wskazówka: Aby zaoszczędzić na kosztach i czasie, proszę
szczegółowo zapoznać się z instrukcja obsługi; czy przyczyną wady
są okoliczności techniczne czy też wynikaja wyłącznie z
nieznajomości obsługi produktu. W przypadku wysyłki sprawnego
produktu do serwisu nabywca może zostać obciążony kosztmi obsługi
oraz transportu.
• W przypadku napraw pogwarancyjnych lub odpłatnych klient ponosi
dodatkowo koszt wysyłki produktu do i z serwisu.
wymienione wyżej warunki są bez uszczerbku dla wszystkich
komercyjnych gwarancji.
Powyższe postanowienia mogą podlegać modyfikacji w
zależności od wyrobu (patrz art obsługi).