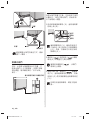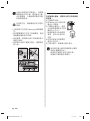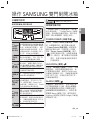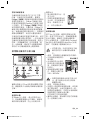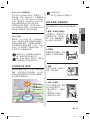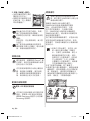
1
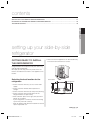
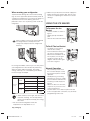
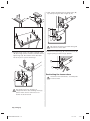
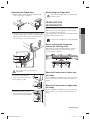
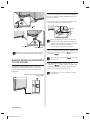
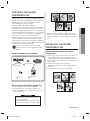
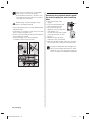
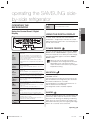
Refrigerator
user manual
This manual is made with 100 % recycled paper.
English
imagine the possibilities
Thank you for purchasing a Samsung product.
To receive a more complete service,
please register your product at
www.samsung.com/register
Free Standing Appliance
DA68-02924A-03.indb 01
14. 1. 20.
11:31
safety information
SAFETY INFORMATION
WARNING
WARNING
• Before operating the
appliance, please read
this manual thoroughly
and retain it for your
reference.
• Because these following
operating instructions
cover various models,
the characteristics of
your refrigerator may
differ slightly from those
described in this manual.
CAUTION/WARNING
SYMBOLS USED
WARNING
CAUTION
Indicates that a danger
of death or serious injury
exists.
Indicates that a risk of
personal injury or material
damage exists.
OTHER SYMBOLS USED
Represents something you
must NOT do.
Represents something you
must NOT disassemble.
Represents something you
must NOT touch.
Represents something you
must follow.
Indicates that you must
disconnect the power plug
from the socket.
Represents a ground is
needed to prevent electric
shock.
It is recommended that
this symbol be handled by
service man.
These warning signs are here to
prevent injury to you and others.
Please follow them explicitly.
After reading this section, keep
it in a safe place for future
reference.
CE Notice
This product has been
determined to be in
compliance with the Low
Voltage Directive(2006/95/
EC), the Electromagnetic
Compatibility Directive
(2004/108/EC), RoHS Directive
(2011/65/EU), Commission
Delegated Regulation (EU)
02_ safety information
DA68-02924A-03.indb 02
14. 1. 20.
11:31
No 1060/2010 and the EcoDesign Directive(2009/125/EC)
implemented by Regulation (EC)
No 643/2009 of the European
Union. (For products sold in
European Countries only)
•
•
When transporting and
installing the appliance,
care should be taken to
ensure that no parts of
the refrigerating circuit
are damaged.
• Refrigerant squirting out of the
pipes could ignite or cause an
This refrigerator must be
eye injury. If a leak is detected,
properly installed and located
avoid any naked flames or
in accordance with the manual
potential sources of ignition
before it is used.
and air the room in which
the appliance is standing for
Use this appliance only for
several minutes.
its intended purpose as
described in this instruction
manual.
• In order to avoid the
creation of a flammable
We strongly recommend that
gas-air mixture if a
any servicing be performed by
leak in the refrigerating
a qualified individual.
circuit occurs, the size
R-600a or R-134a can be
of the room in which the
used as a refrigerant.
appliance may be sited
Check the compressor label
depends on the amount
on the rear of the appliance
of refrigerant used.
and the rating label inside the
fridge to see which refrigerant • Never start up an appliance
showing any signs of damage.
is used for the refrigerator.
If in doubt, consult your dealer.
• The room must be 1 m³
• In case of R-600a
in size for every 8 g of
refrigerant, this gas
R-600a refrigerant inside the
is natural gas with
appliance.
high environmental
• The amount of refrigerant in
compatibility that
your particular appliance is
is, however, also
shown on the identification
combustible.
WARNING
•
•
safety information _03
DA68-02924A-03.indb 03
14. 1. 20.
11:31
plate inside the appliance.
• Please dispose of the
packaging material for this
product in an environmentally
friendly manner.
• This appliance is not
intended for use by persons
(including children) with
reduced physical, sensory
or mental capabilities, or
lack of experience and
knowledge, unless they have
been given supervision or
instruction concerning use
of the appliance by a person
responsible for their safety.
• Children should be supervised
to ensure that they do not play
with the appliance.
SEVERE WARNING SIGNS
• Do not install the
refrigerator in a damp
place or place where it
may come in contact
with water.
- Deteriorated insulation of
electrical parts may cause an
electric shock or fire.
• Do not place this refrigerator
in direct sunlight or expose to
the heat from stoves, room
•
-
•
•
•
WARNING
•
•
heaters or other appliance.
Do not plug several appliances
into the same power socket.
The refrigerator should always
be plugged into its own
individual electrical which has
a voltage rating that matched
the rating plate.
This provides the best
performance and also
prevents overloading house
wiring circuits, which could
cause a fire hazard from
overheated wires.
Make sure that the power plug
is not squashed or damaged
by the back of the refrigerator.
Do not bend the power cord
excessively or place heavy
articles on it.
This constitutes a fire hazard.
Have the power cord repaired
or replaced immediately by
the manufacturer or its service
agent if power cord has
become frayed or damaged.
Do not use a cord that shows
cracks or abrasion damage
along its length or at either
end.
If the power cord is damaged,
have it replaced immediately
by the manufacturer or its
service agent.
04_ safety information
DA68-02924A-03.indb 04
14. 1. 20.
11:31
• When moving the refrigerator,
be careful not to roll over or
damage the power cord.
• Do not insert the power plug
with wet hands.
• Unplug the refrigerator before
cleaning and making repairs.
• Do not use a wet or damp
cloth when cleaning the plug.
• Remove any foreign matter
or dust from the power plug
pins.
- Otherwise there is a risk of
fire.
• If the refrigerator is
disconnected from the power
supply, you should wait for
at least ten minutes before
plugging it back.
• If the wall socket is loose, do
not insert the power plug.
- There is a risk of electric
shock or fire.
• The appliance must be
positioned so that the plug is
accessible after installation.
• The refrigerator must be
grounded.
- You must ground the
refrigerator to prevent any
power leakages or electric
shocks caused by current
leakage from the refrigerator.
-
•
-
•
•
•
•
•
• Never use gas pipes,
telephone lines or other
potential lightening rods
as ground.
Improper use of the ground
plug can result in electric
shock.
Do not dissemble or repair the
refrigerator by yourself.
You run risk of causing a fire,
malfunction and/or personal
injury.
If you smell pharmaceutical or
smoke, pull out power plug
immediately and contact your
Samsung electronics service
center.
Keep ventilation opening in
the appliance enclosure or
mounting structure clear of
obstruction.
Do not use mechanical
devices or any other means
to accelerate the defrosting
process, other than those
recommended by the
manufacturer.
Do not damage the refrigerant
circuit.
Do not place or use electrical
appliance inside the
refrigerator/freezer, unless they
are of a type recommended
by the manufacturer.
safety information _05
DA68-02924A-03.indb 05
14. 1. 20.
11:31
• Before changing the interior
light, unplug the appliance
from the power supply.
• If you experience difficulty
when changing the light,
contact your service center.
• The appliance is not
intended for use by persons
(including children) with
reduced physical, sensory
or mental capabilities, or
lack of experience and
knowledge, unless they have
been given supervision or
instruction concerning use
of the appliance by a person
responsible for their safety.
• Children should be supervised
to ensure that they do not play
with the appliance.
• Do not let children hang on
the door.
If not, a serious injury may
occur.
• Do not touch the inside walls
of the freezer or products
stored in the freezer with wet
hands.
- This may cause frostbite.
• If the refrigerator is not to be
used for a long period of time,
pull out the power plug.
- Deterioration in the power
cord insulation may cause fire.
• Do not store articles on the
top of the appliance.
- When you open or close the
door, the articles may fall and
cause personal injury and/or
material damage.
CAUTION SIGNS
• This product is intended
only for the storage
of food in a domestic
environment.
Manufacturer’s recommended
storage times and expiry dates
of frozen foods should be
adhered to. Refer to relevant
instructions.
Bottles should be stored
tightly together so that they do
not fall out.
Do not place carbonated
or fizzy drinks in the freezer
compartment
Do not overfill the refrigerator
with food.
When you open the door, an
item may fall out and cause
personal injury or material
damage.
Do not put bottles or glass
containers in the freezer.
CAUTION
•
•
•
•
-
•
06_ safety information
DA68-02924A-03.indb 06
14. 1. 20.
11:31
• When the contents freeze, the
glass may break and cause
personal injury.
• Do not spray inflammable gas
near the refrigerator.
- There is a risk of explosion or
fire.
• Do not directly spray
water inside or outside the
refrigerator.
- There is a risk of fire or electric
shock.
• Do not store volatile or
flammable substances in the
refrigerator.
- The storage of benzene,
thinner, alcohol, ether, LP gas
and other such products may
cause explosions.
• If you have a long vacation
planned, it is advisable to
empty the appliance or use
the vacation function.
• Do not store pharmaceuticals
products, scientific materials
or temperature-sensitive
products in the refrigerator.
- Products that require strict
temperature controls must not
be stored in the refrigerator.
• Do not put a container filled
with water on the refrigerator.
- If spilled, there is a risk of fire
or electric shock.
• Do not apply strong shock
or excessive force onto the
surface of glass.
- Broken glass may result in a
personal injury and/or property
damage.
CAUTION SIGNS FOR
CLEANING
• Never put fingers or
other objects into the
dispenser hole and ice
chute.
- It may cause personal injury or
material damage.
• Do not use a wet or damp
cloth when cleaning the plug,
remove any foreign material
or dust from the power plug
pins.
- Otherwise there is a risk of
fire.
CAUTION
WARNING SIGNS FOR
DISPOSAL
• When disposing of this or
other refrigerators, remove the
door/door seals, door latch so
that small children or animals
cannot become trapped
inside.
safety information _07
DA68-02924A-03.indb 07
14. 1. 20.
11:31
• Leave the shelves in place so
that children may not easily
climb inside.
• R-600a or R-134a is used
as a refrigerant. Check the
compressor label on the rear
of the appliance or the rating
label inside the fridge to see
which refrigerant is used for
your refrigerator.
When this product contains
flammable gas (Refrigerant
R-600a) contact your local
authority in regard to safe
disposal of this product.
• Cyclopentane is used as a
insulation blowing gas.
The gases in insulation
material require special
disposal procedure.
Please contact your local
authorities in regard to the
environmentally safe disposal
of this product.
Ensure that none of the pipes
on the back of the appliances
are damaged prior to disposal.
The pipes shall be broke in the
open space.
CAUTION
• In the event of a power
failure, call the local
office of your Electricity
Company and ask how
long it is going to last.
- Most power failures that are
corrected within an hour
or two will not affect your
refrigerator temperatures.
However, you should minimize
the number of door openings
while the power is off.
- Should the power failure last
more than 2 hours, remove all
ice in the Ice Bucket.
- Should the power failure last
more than 24 hours, remove
all frozen food.
For doors or lids fitted with locks
and keys, the keys be kept out
of the reach of children and not
in the vicinity of the refrigerating
appliance, in order to prevent
children from being locked
inside.
ADDITIONAL TIPS FOR
PROPER USAGE
• Allow the appliance to
stand for 2 hours after
installation.
• To get best performance of
product,
- Do not place foods too closely
in front of the vents at the
rear of the appliance as it can
obstruct free air circulation in
08_ safety information
DA68-02924A-03.indb 08
14. 1. 20.
11:31
-
-
•
•
•
•
the freezer compartment.
Wrap the food up properly or
place it in airtight containers
before put it into the fridge
freezer.
Do not put any newly
introduced food for freezing
near to already frozen food.
There is no need to disconnect
the refrigerator from the power
supply if you will be away for
less than three weeks.
But, remove all the food if you
are going away for the three
weeks or more. Unplug the
refrigerator and clean it, rinse
and dry.
The appliance might
not operate consistently
(possibility of defrosting of
contents or temperature
becoming too warm in the
frozen food compartment)
when sited for an extended
period of time below the
cold end of the range of
temperatures for which the
refrigerating appliance is
designed.
Do not store food which goes
bad easily at low temperature,
such as bananas, melons.
Place the ice tray at the
originally provided position
•
•
•
•
•
by manufacturer in order to
achieve optimal ice-freezing.
Your appliance is frost free,
which means there is no
need to manually defrost
your appliance, as this will be
carried out automatically.
Temperature rising during the
defrost can comply with ISO
requirement.
But If you want to prevent an
undue rise in the temperature
of the frozen food while
defrosting the appliance,
please wrap the frozen food
in several layers of paper such
as newspaper.
Any increase in temperature of
frozen food during defrosting
can shorten its storage life.
Contains fluorinated
greenhouse gases covered by
the Kyoto Protocol.
Foam blown with fluorinated
greenhouse gases.
Foam blown additive:
Perfluorohexane Global
Warming Potential (GWP) =
9000
safety information _09
DA68-02924A-03.indb 09
14. 1. 20.
11:31
SAVING ENERGY TIPS
- Install the appliance in a
cool, dry room with adequate
ventilation.
Ensure that it is not exposed
to direct sunlight and never
put it near a direct source of
heat (radiator, for example).
- Never block any vents or
grilles on the appliance.
- Allow warm food to cool
down before placing it in the
appliance.
- Put frozen food in the
refrigerator to thaw.
You can then use the low
temperatures of the frozen
products to cool food in the
refrigerator.
- Do not keep the door of the
appliance open for too long
when putting food in or taking
food out.
The shorter time for which the
door is open, the less ice will
form in the freezer.
- Clean the rear of the
refrigerator regularly.
Dust increases energy
consumption.
- Do not set temperature colder
than necessary.
- Ensure sufficient air exhaust
at the refrigerator base
and at the back wall of the
refrigerator. Do not cover air
vent openings.
- Allow clearance to the right,
left, back and top when
installing.
This will help reduce power
consumption and keep your
energy bills lower.
10_ safety information
DA68-02924A-03.indb 10
14. 1. 20.
11:31
contents
SETTING UP YOUR SIDE-BY-SIDE REFRIGERATOR ……………………………………………………… 11
OPERATING THE SAMSUNG SIDE-BY-SIDE REFRIGERATOR …………………………………………… 19
TROUBLESHOOTING …………………………………………………………………………………………… 26
01 SETTING UP
setting up your side-by-side
refrigerator
GETTING READY TO INSTALL
THE REFRIGERATOR
• Please ensure that appliance can be moved freely
in the event of maintenance & service.
Congratulations on the purchase of your Samsung
Side-By-Side Refrigerator.
We hope you will enjoy the many state-of-the-art
features and efficiencies that this new appliance has
to offer.
Selecting the best location for the
refrigerator
at least 6 mm
at least 6 mm
• Select a location with easy access to the water
supply.
• Select a location without direct exposure to
sunlight.
• Select a location with level (or nearly level) flooring.
• Select a location with enough space for the
refrigerator doors to open easily.
• Allow sufficient space to the right, left, back and
top for air circulation.
- If your refrigerator is not level, the internal cooling
system may not work correctly.
- Refer to drawing and dimensions below for overall
space required for use.
setting up _11
DA68-02924A-03.indb 11
14. 1. 20.
11:31
When moving your refrigerator
To prevent floor damage be sure the front levelling
legs are in the up position (above the floor). Refer to
‘Levelling the refrigerator’ in the manual (at page 15).
To protect the finish of the flooring, place the
protection sheet such as packing carton under the
refrigerator.
• Make sure you disconnect the water supply line
before removing the freezer door. See the next
section on “separating the water line” to avoid
damage.
USING THE ICE MAKER
To Remove the Ice
Bucket
- Hold the handle as shown in
figure1.
- Slightly pull up the bottom
part.
- Take out the ice bucket slowly.
Leg
Screw Driver
CAUTION
When installing, servicing or cleaning behind
the refrigerator, be sure to pull the unit
straight out and push back in straight after
finishing.
Figure1
To Refit The Ice Bucket
- Assemble it in the reverse
order of disassembly.
- Push the bucket in firmly until
you hear a clicking sound.
- When the bucket does not fit
into its place, turn the gear
handle on its back by 90
degrees and reinstall it again
as shown in figure 2.
First things first! Make sure that you can easily move
your refrigerator to its final location by measuring
doorways (both width and height), thresholds,
ceilings, stairways, etc. The following chart details
the exact height and depth.
Model
RS61*
Without Door
908
With Door
912
Only Cabinet
600
Width
Dimension
(mm)
Depth
Without Handle
718
Without Door
1745
With Door
1780
Height
Figure2
Normal Operation
- Any sounds you hear when
the ice maker dumps ice into
the bucket are part of normal
operation.
- Not dispensing ice for long
periods may cause ice clumps
in the ice bucket. Remove the
remaining ice and empty the
bucket.
Ice Chute
- When ice does not come out,
check for any ice stuck in the
chute and remove it.
- The first batch of ice cubes may be small due
to air in the pipe after connection, any air will be
purged during normal use.
• Allow clearance to the right, left, back and
top when installing. This will help reduce
power consumption and keep your energy
bills lower.
• Do not install the refrigerator where the
temperature can drop below 10 °C.
12_ setting up
DA68-02924A-03.indb 12
14. 1. 20.
11:31
- When ICE OFF blinks on the display panel,
reinsert the bucket and/or make sure it’s
installed properly.
When the door is open, the Ice and water
dispenser do not work.
If you close the door hard, it may cause water
spilling over the ice maker.
To prevent dropping the ice bucket, use both
hands when removing it.
To prevent injury, be sure to clean up any ice or
water that may have dropped on the floor.
Do not let the children hang on the ice dispenser
or on the bucket. They may get hurt.
Be sure not to put your hand or any object into the
ice chute. It may cause personal injury or damage
mechanical parts.
CAUTION
-
-
1
2
Reattaching the Water Supply Line
SETTING UP THE
REFRIGERATOR DOORS
01 SETTING UP
-
1. The Water Line must be fully Inserted to the center
of transparent coupler to prevent water leakage
from the dispenser.
center of transparent coupler
If your entrance won’t allow the refrigerator to pass
easily through it, you can remove the doors.
Removing the Front Leg Cover
First, open both the freezer and refrigerator doors,
and then take off the front leg cover by turning the
three screws counter-clockwise.
2. Insert the 2 clips in the install pack and check that
each clip holds the line firmly.
clip A (1/4”)
(6.35 mm)
Do not cut the water line. Gently separate it
from the coupler.
Removing the freezer door
A few things to mention first.
Separating the Water Supply Line
from the Refrigerator
1. Remove two water lines (gray one is for ice and
the other one is for water) by pressing the coupler
( 1 ) and pulling the water line ( 2 ) away.
Be careful that the water tube match same
color.
• Make sure that you lift the door straight up so the
hinges are not bent or broken.
• Be careful not to pinch the water tubing and wire
harness on the door.
• Place doors on a protected surface to prevent
scratching or damage.
1. With the Freezer door closed, remove the upper
hinge cover ( 1 ) using a screwdriver, and then
disconnect the wires by gently pulling them apart
( 2 ).
setting up _13
DA68-02924A-03.indb 13
14. 1. 20.
11:31
3. Next, remove the door from the lower hinge ( 6 )
by carefully lifting the door straight up ( 7 ).
1
2
- on some models
7
6
Be careful not to pinch the water tubing and
wire harness on the door.
2. Remove hinge screws ( 3 ) and the ground screw
( 4 ) by turning counter-clockwise, and take off the
upper hinge ( 5 ). Be careful that the door does
not fall on you as you are removing it.
4. Remove the lower hinge ( 8 ) from the bracket ( 9 )
by gently lifting the lower hinge upwards.
8
9
4
3
Reattaching the freezer doors
To reattach the freezer doors, assemble parts
in reverse order.
5
Be careful not to miss the parts of
refrigerator. When disassembling the hinge,
please make sure the earth wire is not
broken or disconnected.
14_ setting up
DA68-02924A-03.indb 14
14. 1. 20.
11:31
Removing the Fridge Door
1. With the door closed, remove the upper hinge
cover ( 1 ) using a screwdriver.
Reattaching the Fridge door
To reattach the fridge doors, assemble parts
in reverse order.
1
LEVELLING THE
REFRIGERATOR
The front of the refrigerator is also adjustable.
01 SETTING UP
2. Remove hinge screws ( 2 ) and the ground screw
( 3 ) by turning counter-clockwise, and take off the
upper hinge ( 4 ). Be careful that the door does
not fall on you as you are removing it.
Now that the doors are back on the refrigerator, you
want to make sure the refrigerator is level so that
you can make final adjustments.
If the refrigerator is not level, it will not be possible to
get the doors perfectly even.
Before levelling the refrigerator,
remove the front leg cover
Open both the freezer and fridge doors, and then
take off the front leg cover by turning the three
screws counter-clockwise.
2
3
4
Be careful not to miss the parts of
refrigerator.
3. Remove the door from the
lower hinge ( 5 ) by lifting the
door straight up ( 6 ).
6
5
4. Remove the lower hinge ( 7 )
from the bracket ( 8 ) by gently
lifting the lower hinge upwards.
7
When the Freezer door is lower than
the fridge
Insert a flat-blade screwdriver into a slot on the Leg,
turn it clockwise or counter clockwise to level the
freezer.
When the Freezer door is higher than
the fridge
Insert a flat-blade screwdriver into a slot on the Leg,
turn it clockwise or counter clockwise to level the
fridge.
8
setting up _15
DA68-02924A-03.indb 15
14. 1. 20.
11:31
In the case of the process to correct the imbalance
is the same. Open the doors and adjust them, one
at a time, as follows:
1. Unscrew the nut ( 1 ) from the lower hinge until it
reaches the upper end of the bolt ( 2 ) .
Screw Driver
Leg
3 Wrench
2 Bolt
1 Nut
Leg
Screw Driver
Refer to the next section for the best way to
make very minor adjustments to the doors.
MAKING MINOR ADJUSTMENTS
TO THE DOORS
Remember, a levelling refrigerator is necessary
for getting the doors perfectly even. If you need
help, review the previous section on levelling the
refrigerator.
When you release the nut ( 1 ), make sure
that you use the Allen wrench provided ( 3 )
to loosen the bolt ( 2 ) in a counter-clockwise
direction. You should then be able to
unscrew the nut ( 1 ) with your fingers.
2. Adjust the height difference between the doors by
turning the bolt ( 2 ) clockwise ( ) or counter
clockwise ( ).
When you turn clockwise ( will move up.
), the door
3. After adjusting the doors, turn the nut ( 1 )
clockwise ( ) until it reaches the lower end
of the bolt, then tighten the bolt again with the
wrench ( 3 ) to fix the nut in place ( 1 ) .
If you do not secure the nut firmly, the bolt
may release.
When the door of the freezer is higher
than the fridge
Adjustment part
16_ setting up
DA68-02924A-03.indb 16
14. 1. 20.
11:31
CHECKING THE WATER
DISPENSER LINE
Water Line installation Kits are included
with unit. You can find it in freezer(or fridge)
drawer.
Parts for water line Installation
1 Water line fixer
and screws
2 Pipe connector
3 Water line
Close Main
Water pipe
No gap
4. After connecting the water supply to the water
filter, turn your main water supply back on and
Dispense about 3 L to clear and prime the water
filter.
01 SETTING UP
A water dispenser is just one of the helpful features
on your new Samsung refrigerator. To help promote
better health, the Samsung water filter removes
unwanted particles from your water.
However, it does not sterilize or destroy
microorganisms. You will need to purchase a water
purifying system to do that. In order for the icemaker
to operate properly, water pressure of 138 ~862 kPa
is required. Under normal conditions, a 170 cc paper
cup can be filled in 10 seconds. If the refrigerator
is installed in an area with low water pressure
(below 138 kPa), you can install a booster pump to
compensate for the low pressure. Make sure the
water storage tank inside the refrigerator is properly
filled. To do this, press the water dispenser lever until
the water runs from the water outlet.
Close Main
Water pipe
INSTALLING THE WATER
DISPENSER LINE
Connecting the water line to the
refrigerator
1. Remove the cap from water line on the unit and
insert compression nut to the water line on the
unit after disassembling from provided water line.
2. Connect both water line from the unit and water
line in the kit
3. Tighten the compression nut onto the
compression fitting. Be careful no gap between
two items.
4. Turn water on and check for any leakage.
Remove cap
4 Clip
5 Water Filter
Loosen a
Water Line from
unit
Connecting to the water supply line
1. First, shut off the main water supply line.
2. Locate the nearest cold, drinking water line.
3. Follow the Water Line Installation Instructions in
the installation kit.
No gap
Water Line from
Kit
CAUTION
The water line must be connected to
the cold water pipe.
If it is connected to the hot water pipe,
it may cause the purifier to malfunction.
setting up _17
DA68-02924A-03.indb 17
14. 1. 20.
11:31
Only connect the water line to a drinkable
water source. If you have to repair or
disassemble the water line, cut off 6.5 mm
of the plastic tubing to make sure you get a
snug, leak-free connection.
CAUTION
Before being used, the leakage in these
places should be examined
• Samsung Warranty does not cover WATER LINE
INSTALLATION.
• It’ll be done at customer’s charge unless the retail
price includes installation cost.
• Please contact Plumber or Authorized Installer for
the installation if needed.
• If Water leakage occurs due to improper
installation, Please contact installer.
Removing any residual matter inside
the water supply line after installing
filter.
1. Turn ON the main water
supply.
Water
Ice
2. Press the Water button and
push the dispenser pad.
3. Run water through the
dispenser until the water runs
clear (approx. 3 L).
This will clean the water supply
system and remove air from
the lines.
4. Additional flushing may be
required in some households.
5. Open the refrigerator door and make sure there
are no water leaks coming from the water filter.
A newly installed water filter cartridge may
cause water to briefly spurt from the water
dispenser. This is due to air getting into the
line. It should pose no problem to operation.
18_ setting up
DA68-02924A-03.indb 18
14. 1. 20.
11:31
operating the SAMSUNG sideby-side refrigerator
8
Water
Button
Using the Control Panel / Digital
Display
USING THE DIGITAL DISPLAY
1
4
2
5
3
6
7
1
Power
Freeze
Button
2
Freezer
Button
3
Ice Off
Button
4
Lighting
Button
5
Fridge
Button
6
Child Lock
Button
7
Ice Button
Press the Water button for water.
8
Speeds up the time needed to freeze products in
the freezer.
This can be helpful if you need to quickly freeze
items that spoil easily or if the temperature in the
freezer has warmed dramatically (For example, if
the door was left open).
This Function must be activated before putting
large stuff in freezer compartment at least 20 hours
before.
Press the Freezer button to set the freezer to your
desired temperature.
You can set the temperature between -15 °C and
-23 ºC.
Press the Ice Off button to turn the ice making
function off.
When Ice Off blinks on the display panel, reinsert
the bucket and/or make sure it’s installed properly.
When you change the filter, press and hold this
button for 3 seconds to reset the filter schedule.
Press the Lighting button for the dispenser LED
lamp to stay on.
Press the Fridge button to set the fridge to your
desired temperature.
You can set temperature between 1 °C ~ 7 °C and
Power cool.
Power cool will be on the display after 1 °C
By pressing this button, all buttons will be locked.
The Ice button and the dispenser pad will not work
either.
To cancel this function, press this button again.
If you are going on vacation or business trip or you
do not need to use the refrigerator, press and hold
this button for 3 seconds.
The temperature in the fridge will be around 15 °C
and the freezer will work normally.
Press the Ice button to choose cubed or crushed
ice.
“ Freezer Temp.” indicates the current Freezer
temperature. “ Fridge Temp.” indicates the current
Fridge temperature. When not in use the Display will
turn off, this is normal.
02 OPERATING
OPERATING THE
REFRIGERATOR
POWER FREEZE
This icon will light up when you activate the “Power
Freeze” feature. “Power Freeze” is great for times
when you need a lot of ice. When you have enough,
just press the button again to cancel the “Power
Freeze” mode.
When you use this function the energy
consumption of the refrigerator will increase.
Remember to turn it off when you don’t
need it and return the freezer to your original
temperature setting.
VACATION
This icon will light up when you activate the
“Vacation” feature.
If you are going on vacation or business trip or you
do not need to use the refrigerator, press and hold
the Child Lock button for 3 seconds.
The temperature in the fridge will be around 15 °C
and the freezer will work normally.
The refrigerator section should be emptied.
ALARM
This icon will light up all the time. The door alarm will
sound if any door is open for more than 2 minutes.
(Also alarm icon blinking) The beeping and blinking
stops when you close the door. If you need to turn
off the Alarm function, press the Lighting and Fridge
buttons for 3 seconds at the same time.
operating _19
DA68-02924A-03.indb 19
14. 1. 20.
11:31
LIGHTING
CHILD LOCK
This icon will light up when you activate the
“Lighting” feature. In this case, the dispenser light
(under the display) will be on constantly. If you would
like the dispenser light to come on only when using
the dispenser, turn the “Lighting” feature off.
This icon will light up when you activate the Child
Lock function by pressing Child Lock button.
Press this button again to reactivate.
Use this function to prevent children from tampering
with temperature and filter settings.
POWER COOL
This icon will light up when you activate the “Power
Cool” feature. For a quick fridge cool down, use
“Power Cool”. If you select “Power Cool”, the inside
temperature of the Fridge will decrease for about
two and a half hours.
Canceling Exhibition Mode
CAUTION
In case of Exhibition Mode, It seems working
but doesn’t make cool air. To cancel this
mode, press the Power Freeze and Freezer
buttons at the same time for 8 seconds until
“Ding-dong” sounds.
Exhibition
mode
FILTER INDICATOR
When the filter indicator light changes to red, it is
time to change the filter.
Typically this happens about every 6 months.
The filter Indicator will be Blue when you initially
insert the water filter. The filter Indicator will be purple
when you have used your water filter for 5 months.
The filter Indicator will be Red when you have used
your water filter for 6 months.
After removing the old water filter and installing a
new one (see page 17 for instructions on how to do
this), reset the indicator status light by pressing the
Ice off button for about 3 seconds.
CUBED ICE
, CRUSHED ICE
Enjoy cubed or crushed ice by selecting your
preference from the digital control panel. The ice
type light indicates the type of ice that is currently
chosen.
WATER
This icon will light up when you activate the “Water”
feature.
ICE OFF
This icon will light up when you activate the “Ice Off”
feature. In this case, the ice will not be produced.
When Ice Off blinks on the display panel, reinsert the
bucket and/or make sure it’s installed properly.
CONTROLLING THE
TEMPERATURE
Basic Temperature of Freezer and
Fridge
The basic and recommended temperature of Freezer
and Fridge compartments are -19 ºC / 3 ºC.
If the temperature of Freezer and Fridge
compartments are too high or low, adjust the
temperature manually.
Controlling the Freezer temperature
The freezer temperature can be set between -15 °C
and -23 ºC to suit your particular needs.
Press the Freezer button repeatedly until the
desired temperature is shown in the temperature
display. Keep in mind that foods like ice cream may
melt at -16 ºC.
The temperature display will move sequentially
from -15 °C and -23 ºC. When the display reaches
-15 ºC, it will begin again at -23 ºC.
Five seconds after the new temperature is set the
display will again show the actual current freezer
temperature. However, this number will change as
the Freezer adjusts to the new temperature.
20_ operating
DA68-02924A-03.indb 20
14. 1. 20.
11:31
Controlling the Fridge temperature
USING THE ICE AND COLD
WATER DISPENSER
Using the Ice Dispenser
Press the Ice button to select the type of ice you
want.
Place your cup the ice outlet and push gently
against the dispenser pad.
Make sure the glass is in line with the dispenser to
prevent the ice from bouncing out.
When Cubed Ice is selected after using the Crushed
Ice feature, a small amount of residual crushed ice
might be produced.
• Do not put your fingers, hands or any
other unsuitable objects in the chute or
ice-maker bucket.
It may result in personal injury or material damage.
Use only the ice maker provided with the
refrigerator.
The water supply to this
Ice-Maker Cover
refrigerator must only be
installed/connected by a
suitably qualified person
and connect to a potable
water supply only.
In order to operate the
ice maker properly, water
Ice Chute
pressure of 138 ~ 862 kPa
Ice Bucket
is required.
WARNING
•
•
•
No Ice
Select this if you want to
turn the ice maker off.
Push
02 OPERATING
The refrigerator temperature can be set between
7 ºC and 1 ºC to suit your particular needs. Press
the Fridge button repeatedly until the desired
temperature is shown in the temperature display.
The temperature control process for the Fridge
works just like the Freezer process. Press the Fridge
button to set your desired temperature. After a few
seconds, the Fridge will begin tracking towards the
newly set temperature. This will be reflected in the
digital display. The temperature of the freezer or the
refrigerator may rise from opening the doors too
frequently, or if a large amount of warm or hot food
is placed in either side. This may cause the digital
display to blink. Once the freezer and refrigerator
return to their normal set temperatures the blinking
will stop. If the blinking continues, you may need to
“reset” the refrigerator. Try unplugging the appliance,
wait about 10 minutes and then plug back in.
To get cooler water
- The dispensed water is cool,
not icy cold
- When you want colder water
with ice, dispense ice to your
drink glass first before filling
it with water to prevent water
from splashing out.
• If you have a long vacation or business trip
and won’t use water or ice dispensers,
close the water valve.
- Otherwise, water leakage may occur.
• When you have not used the Ice maker for a while,
or you have opened the Freezer door frequently,
the Ice may stick together. If this has occurred,
empty the ice container or break up the ice with a
wood kitchen tool.
Do not use sharp items such as knives or forks.
• When the bucket is removed, there may still be
some residual ice in the ice maker that will be
produced.
CAUTION
When Ice Off blinks on the display panel, reinsert
the bucket and/or make sure it’s installed properly.
Using the Water Dispenser
Press the Water button. Place your cup the water
outlet and push gently against the dispenser pad.
Make sure the glass is in line with the dispenser to
prevent the water from splashing out.
operating _21
DA68-02924A-03.indb 21
14. 1. 20.
11:31
USING THE COOLSELECT
ZONE™ DRAWER (OPTIONAL)
1
The CoolSelect Zone™ Drawer is designed to make
your busy life just a little bit easier.
Soft Freeze
When “Soft Freeze” is selected on the CoolSelect
Zone™ Drawer, the temperature on the drawer
digital panel displays -5 °C, regardless
of the overall temperature setting of the
refrigerator. This feature helps keep meat
and fish fresh for longer.
For more space, you can
store food with Guard
FRE-UPP instead of the
ice bucket ( 1 ). If you
remove the ice bucket,
ICE OFF will blink on the
display panel.
Chill
GUARD FRE-UPP
(Optional)
To get more space, you
can remove the freezer
upper and lower drawers
since it does not affect
thermal and mechanical
characteristics. But, put SHELF FRE- BOTTOM
(Optional)
the “Shelf Fre Bottom”
on the bottom of the
freezer compartment. A declared storage
volume of frozen food storage compartment
is calculated with the drawer(s) removed.
The door guards in the freezer of this
model are the two star sections except the
top guard, so the temperature in two star
sections are slightly higher than other freezer
compartment.
When “Chill” is selected, the temperature
of the CoolSelect Zone™ Drawer is
kept at -1 °C, regardless of the overall
temperature setting of the refrigerator.
This feature also helps keep meat or fish
fresh for longer.
Thaw
When “Thaw” is selected, warm and cold air is
alternately blown into the CoolSelect Zone™ Drawer.
Depending on the weight of the frozen food, you
can select a 4 hrs, 6 hrs, 10 hrs, and 12 hrs thawing
time.
When “Thaw” ends, food is in a half-frozen state,
making it easy to cut for cooking. In addition, when
“Thaw” ends, the CoolSelect Zone™ Drawer returns
to the original “Chill” condition. To cancel this
function mid-cycle, just press any button besides
Thaw.
Here are the approximate thawing times of meat
and fish by weight (and based on a 25.4 mm (1in.)
thickness). This chart represents the total weight of
food in the CoolSelect Zone™ Drawer.
THAW TIME
WEIGHT
4 hours
363 g (0.8 Ib)
6 hours
590 g (1.3 Ib)
10 hours
771 g (1.7 Ib)
12 hours
1000 g (2.2 Ib)
22_ operating
DA68-02924A-03.indb 22
14. 1. 20.
11:31
Quick Cool
What’s the LED?
You can use the “Quick Cool” operation with the
CoolSelect Zone™ Drawer to quickly cool 1~3
canned beverages in about an hour. When the
“Quick Cool” process ends, the CoolSelect Zone™
Drawer automatically returns to the previously set
temperature.
To cancel this operation, press the Quick Cool
button again and the CoolSelect Zone™ Drawer
returns to the previously set temperature.
The LED is a semiconductor light emitting
element.
REMOVING THE FREEZER/
FRIDGE ACCESSORIES
Cool
1. Shelves (Freezer/Fridge)
When “Cool” is selected, the temperature in the
CoolSelect Zone™ Drawer will be the same as the
overall temperature setting of the refrigerator. The
drawer digital panel shows the same temperature
as that of the refrigerator display panel. Since the
“Cool” function mimics the refrigerator temperature,
you have extra general storage space.
Remove the shelf by pulling the
shelf out to the hole point as
shown at the right figure. And
then remove it by turning and
lifting it up.
Depending on the size and thickness of the
meat or fish, thawing times may vary.
When “Thaw” is in operation, any items that
you do not want affected should be moved
out of the drawer.
NATURAL FRESH-KEEPING
FEATURES (OPTION)
After consumers washed fruits and vegetables, there
are still residual pesticides.
If you save fruits and vegetables in the natural
fresh-keeping compartment, UV-LED (Ultraviolet
Sunlight Energy Efficiency Principle) can decompose
pesticides and reduce residual pesticide ingredients.
UV
·To be directly removed
by the ultraviolet
·To be removed by Effect
of Hydroxyl Radical
Oxidation
hv(λ=365)
hv(λ
Accelerate
decomposition
Remove residual
pesticides and
bacteria
02 OPERATING
Cleaning and rearranging the interior of the freezer
is a snap.
2. Door Bin
Remove the Door Bin by
holding the door bin with both
hands and then gently lift it up.
3. Drawer
Remove the Drawer by pulling it
out and slightly lifting it up.
4. Ice Bucket (Freezer)
Remove the Icemaker Bucket
by lifting up and pulling it out
slowly.
• Grip the handle as shown in
the figure
• Lift the low part slightly
• Take the ice bucket out
slowly
CO2,H2O
operating _23
DA68-02924A-03.indb 23
14. 1. 20.
11:31
5. Beverage Station (Fridge) (optional)
• Lift up the upper bin at the
top of the fridge and pull it
out.
• After pressing the cover
wrapped with both hands,
remove the beverage station
cover by pulling toward up.
Do not use excessive force when removing
the cover. Otherwise, the cover may break
and cause injury.
Before removing any accessories, make sure
that no food is in the way.
When possible, remove the food altogether
to reduce the risk of accidents.
To get the best energy efficiency of this
product, please leave all selves, drawers
and baskets on their original position like as
illustration in page 22.
CLEANING THE REFRIGERATOR
WARNING
CAUTION
Do not use Benzene, Thinner or Clorox™ for
cleaning. They may damage the surface of
the appliance and can create a risk of fire.
Do not spray the refrigerator with water while
it is plugged in, as it may cause an electric
shock. Do not clean the refrigerator with
benzene, thinner or car detergent for risk of
fire.
CHANGING THE WATER FILTER
WARNING
To reduce risk of water damage to your
property DO NOT use generic brands of
water filers in your SAMSUNG Refrigerator.
USE ONLY SAMSUNG BRAND WATER FILTERS.
SAMSUNG will not be legally responsible for any
damage, including, but not limited to property
damage caused by water leakage from use of a
generic water filter. SAMSUNG Refrigerators are
designed to work ONLY WITH SAMSUNG Water
Filter. The “Filter Indicator” light lets you know when
it is time to change your water filter cartridge.
To give you preparation time to get a new filter, the
red light will come on just before the capacity of the
current filter runs out. Changing the filter on time
provides you with the freshest, cleanest water from
your fridge.
1. Remove the water filter from the box and
put a month indicator sticker on the filter
as shown. Place a sticker on the filter
that dates six months in the future. For
example, if you are replacing the water
filter in March, put the “SEP” (September)
sticker on the filter to remind you to
replace in September. Normal filter life is
about every 6 months.
2. Remove the new filter’s protective cap and remove
the old filter.
3. Position and insert the new filter into the filter
housing. Slowly turn the water filter clockwise to
align with the printing mark on the cover, locking
the filter in position. Make sure to align the water
filter label mark with the center of cover filter
printing as illustrated. Remember, do not overtighten.
CHANGING THE INTERIOR
LIGHTS
Changing the LED Type Lighting
Cover filter
1
CAUTION
Do not disassemble or replace the LED type
Lighting. To change the LED Type Lighting
contact Samsung service center or your
authorized Samsung dealer.
2
Sticker
(month indicator)
3
Turn until the label
aligned.
24_ operating
DA68-02924A-03.indb 24
14. 1. 20.
11:31
4. Once you have completed this process, hold the
Ice Off button simultaneously for 3 seconds to
reset the filter schedule.
02 OPERATING
5. Lastly, run about 3 L of water through water
dispenser and throw away. Make sure that water
flows clearly again before drinking.
6. See installing the water filter instructions page 17.
A newly installed water filter cartridge may cause
water to briefly spurt from the water dispenser.
This is due to air getting into the line. It should pose
no problem to operation.
Ordering replacement filters
To order more water filter cartridges, contact your
authorized Samsung dealer.
USING THE DOORS
The refrigerator doors are equipped with a door
opening and closing feature that ensures that the
doors close all the way and are securely sealed.
After opening beyond a certain point, the door will
“catch” and remain open. When the door is ajar
ahead of the catch that allows it to stay open, it will
close automatically.
operating _25
DA68-02924A-03.indb 25
14. 1. 20.
11:31
troubleshooting
PROBLEM
SOLUTION
The refrigerator does not
work at all or it does not
chill sufficiently.
• Check that the power plug is properly connected.
• Is the temperature control on the display panel set to the correct
temperature? Try setting it to a lower temperature.
• Is the refrigerator in direct sunlight or located too near a heat source?
• Is the back of the refrigerator too close to the wall and therefore keeping
air from circulating?
• Is the temperature control on the display panel set to the correct
temperature? Try setting it to a warmer temperature.
• Is the temperature in the room very low?
• Did you store the food with a high water content in the coldest part of
the fridge? Try moving those items into the body of the fridge instead of
keeping them in the CoolSelect Zone™ drawer.
• Check that the refrigerator is level and stable.
• Is the back of the refrigerator too close to the wall and therefore keeping
air from circulating?
• Was anything dropped behind or under the refrigerator?
• A “ticking” sound is heard from inside the refrigerator. This is normal and
occurs because various accessories are contracting or expanding in
relation to the temperature of the refrigerator interior.
• Some heat is normal as anti-condensators are installed in the front corners
of the refrigerator to prevent condensation.
• Is the refrigerator door ajar? Condensation can occur when you leave the
door open for a long time.
• Water condensation in the drawer may occur when storing vegetables and
it will be removed naturally as time passes.
• Did you wait for 12 hours after installation of the water supply line before
making ice?
• Is the water line connected and the shut-off valve open?
• Did you manually stop the ice making function? Make sure Ice is set to
Cubed or Crushed.
• Is there any ice blocked within the ice maker bucket?
• Is the freezer temperature too warm? Try setting the freezer temperature
lower.
The food in the fridge is
frozen.
You hear unusual noises
or sounds.
The front corners of
the appliance are hot
and condensation is
occurring.
Ice is not dispensing.
You can hear water
• This is normal. The bubbling comes from the refrigerant coolant liquid
bubbling in the
circulating through the refrigerator.
refrigerator.
There is a bad smell in the • Has a food item spoiled?
refrigerator.
• Make sure that strong smelling food (for example, fish) is wrapped so that
it is airtight.
• Clean out your freezer periodically and throw away any spoiled or suspect
food.
Frost forms on the walls
• Is the air vent blocked? Remove any obstructions so air can circulate
of the freezer.
freely.
• Allow sufficient space between the foods stored for efficient air circulation.
• Is the freezer door closed properly?
Water dispenser is not
• Is the water line connected and the shut-off valve open?
functioning.
• Has the water supply line tubing been crushed or kinked?
Make sure the tubing is free and clear of any obstruction.
• Is the water tank frozen because the refrigerator temperature is too low?
Try selecting a warmer setting on the main display panel.
26_ troubleshooting
DA68-02924A-03.indb 26
14. 1. 20.
11:31
memo
DA68-02924A-03.indb 27
14. 1. 20.
11:31
Ambient Room Temperature Limits
This fridge/freezer is designed to operate in ambient temperatures specified by its temperature class marked
on the rating plate.
Class
Symbol
Extended Temperate
SN
Ambient Temperature range (°C)
IEC 62552 (ISO 15502)
ISO 8561
+10 to +32
+10 to +32
Temperate
N
+16 to +32
+16 to +32
Subtropical
ST
+16 to +38
+18 to +38
Tropical
T
+16 to +43
+18 to +43
Internal temperatures may be affected by such factors as the location of the fridge/freezer, ambient
temperature and the frequency with which you open the door. Adjust the temperature as required to
compensate for these factors.
English
DA68-02924A-03.indb 28
Correct Disposal of This Product
(Waste Electrical & Electronic Equipment)
(Applicable in countries with separate collection systems)
This marking on the product, accessories or literature indicates that the product and its electronic
accessories (e.g. charger, headset, USB cable) should not be disposed of with other household
waste at the end of their working life. To prevent possible harm to the environment or human
health from uncontrolled waste disposal, please separate these items from other types of waste
and recycle them responsibly to promote the sustainable reuse of material resources.
Household users should contact either the retailer where they purchased this product, or their local
government office, for details of where and how they can take these items for environmentally
safe recycling.
Business users should contact their supplier and check the terms and conditions of the purchase
contract. This product and its electronic accessories should not be mixed with other commercial
wastes for disposal.
14. 1. 20.
11:31
冰箱
使用者手冊
本手冊是採用 100 % 再生紙印製。
繁體中文
想像無限可能
感謝您購買此 Samsung 產品。
若要獲得更完善的服務,
請到以下網站註冊您的產品
www.samsung.com/register
獨立式電器
DA68-02924A-03.indb 01
14. 1. 20.
11:31
安全資訊
安全資訊
警告
警告
• 在使用本設備之前,請
表示絕不允許觸摸的東
西。
通讀此手冊,並將其存
表示您必須照做的事
放,以備將來參考。
情。
• 因為以下這些操作說明
涵蓋了各種不同的型
號,因此冰箱的特性可
能與本手冊中所述之特
性略有不同。
表示必須從插座上拔下
電源插頭。
表示需要接地以防止漏
電。
此符號是建議由服務人
員來處理。
使用的注意/警告符號
表示有死亡危險或嚴重
警告
的傷害存在。
表示可能存在人身傷害
注意
風險或物件損壞。
這些警告標誌用於防止您和其
他人受到傷害。
請嚴格遵照執行。
閱讀本部分之後,請將其妥善
保管,以備將來參考。
其他使用的符號
表示絕不允許做的事
情。
表示絕不允許拆卸的東
西。
02_ 安全資訊
DA68-02924A-03.indb 02
14. 1. 20.
11:31
CE 通告
本產品經認定符合「低電壓指
• 如果使用 R-600a 雪種,
令 (2006/95/EC)」、「電磁
容的天然氣體,但也是
這是一種與環境高度相
相容指令 (2004/108/EC)」、
易燃的。
「RoHS 指令 (2011/65/
在運輸和安裝冰箱時,
EU)」、委員會授權法規 (EU)
請小心搬運以免損壞冷
No 1060/2010 和根據歐盟法
規 (EC) No 643/2009 實施的
「生態化設計指令 (2009/125/
EC)」。 (針對僅在歐洲國家或
地區銷售的產品)
凍迴路的任何部件。
• 從製冷管中噴出的雪種可能著
火或造成眼睛受傷。
如果發現洩漏,請避免使用任
何明火或潛在的火源,並使設
備所在的室內通風數分鐘。
• 在使用本冰箱之前,必須按照
此手冊前述內容選擇適當位置
進行正確安裝。
• 僅按照本說明手冊中描述的用
途使用此設備。
• 我們極力建議任何維修服務均
由合格的人員執行。
• 可以使用 R-600a 或 R-134a
警告
• 如果冷凍迴路發生洩
漏,請避免產生可燃氣
體-空氣的混合物,安裝
冰箱的室內空間需求取
決於所用的雪種量。
• 切勿在有任何損壞跡象的情況
下啟動冰箱。
作為雪種。
若有任何疑問,請諮詢您的經
檢查冰箱後面的壓縮機標籤和
銷商。
冷藏室內的銘版,以查看您冰 • 冰箱內每 8 克 R-600a 雪種需
箱使用哪種雪種。
要 1 立方米的空間。
安全資訊 _03
DA68-02924A-03.indb 03
14. 1. 20.
11:31
• 在設備內部的標示牌上會標示 • 切勿將多個設備連接到同一個
設備的雪種量。
• 請以環保方式處理本產品的包
裝材料。
• 本設備不適合供下列人士 (包
括兒童) 使用:身體官能或心
電源插座上。
本冰箱應該始終連接到具有與
標牌上的額定電壓相符的自帶
獨立電源上。
- 此插座可提供最佳效能,並可
智能力退化者,或是經驗與使
防止室內佈線電路過載,以免
用知識缺乏者。
過熱線路引起火災危險。
他們需要有負責其安全的人員 • 確保電源插頭不會被冰箱背面
在旁看護,或指示產品的使用
方法,方可使用。
• 應該看護好兒童,確保他們不
要玩耍設備。
擠扁或損壞。
• 切勿過度彎折電源線或在上面
放置重物。
- 否則會有引起火災的危險。
• 如果電源線磨損或損壞,請立
即讓製造商或其服務代理修理
嚴重警告標誌
警告
• 切勿將本冰箱安裝在濕
處或可能與水接觸的地
方。
- 電氣部件的絕緣層損壞可能引
起觸電或火災。
• 切勿將本冰箱置於陽光直射之
或更換。
• 切勿使用中間或末端出現破裂
或損壞的電源線。
• 如果電源線損壞,請立即讓製
造商或其服務代理進行更換。
• 在移動本冰箱時,小心不要碾
壓或損壞電源線。
下,或暴露於火爐、室內取暖 • 切勿用濕手插接電源插頭。
• 在清潔和修理之前,請拔下冰
器或其他設備的熱源之下。
04_ 安全資訊
DA68-02924A-03.indb 04
14. 1. 20.
11:31
箱電源線。
• 清潔插頭時請勿使用濕布。
電。
• 切勿自行拆裝或維修冰箱。
• 清除電源插頭插腳上的所有異 - 否則會有引起火災、故障和/
物或灰塵。
或人身傷害的危險。
- 否則,會有引起火災的危險。 • 如果冰箱中有任何灰塵或水
• 如果中斷連接冰箱的電源線,
漬,請拔下電源插頭並與
在重新連接電源之前,您應該
Samsung Electronics 服務中
至少等待十分鐘。
心聯絡。
• 如果牆壁式插座鬆動,請勿插 • 確保設備外殼或固定架構上的
入電源插頭。
通風孔暢通無阻。
- 否則,會有引起觸電或火災的 • 除製造商建議的方式外,切勿
危險。
• 本冰箱必須安置到適當的位
使用機械裝置或任何其他方式
加快除霜程序。
置,以便在安裝後可以連接到 • 切勿損壞冷凍迴路。
電源插座。
• 切勿在冰箱內放置或使用電氣
器具,除非它們是製造商建議
• 本冰箱必須接地。
使用的類型。
- 您必須將冰箱接地以防止任何 • 在更換內部照明燈之前,請拔
因冰箱電流洩漏引起的功耗洩
漏或觸電。
• 切勿利用煤氣管、電話
線或其他電位避雷針接
地。
- 錯誤使用接地插頭可能導致觸
下冰箱電源插頭。
• 如果您在更換照明燈時遇到困
難,請與服務代理聯絡。
• 本冰箱不適合供下列人士 (包
括小孩) 使用:身體官能或心
智能力退化者,或是經驗與使
安全資訊 _05
DA68-02924A-03.indb 05
14. 1. 20.
11:31
用知識缺乏者。
注意標誌
他們需要有負責其安全的人員
在旁看護,或指示產品的使用
方法,方可使用。
• 應該看護好兒童,確保他們不
要玩耍設備。
• 切勿讓兒童吊掛在櫃門上。
否則,可能會發生嚴重的人身
傷害。
• 切勿用濕手觸摸冷凍室內壁或
儲藏在冷凍室內的製品。
- 否則可能引起凍傷。
注意
• 本產品僅用於在家庭環
境中儲藏食物。
• 應該遵守製造商所建議冷凍食
物的儲藏時間和過期日期。
請參閱相關說明。
• 瓶裝物品應該緊密地放置在一
起以免它們傾倒。
• 請勿將碳酸或氣泡飲料放入冷
凍室
• 切勿使冰箱內存放的食物過
滿。
• 如果長時間不使用冰箱,請拔 - 否則打開冰箱門時,食物可能
下電源插頭。
從中掉出並造成人身傷害或物
- 電源線絕緣層損壞可能導致火
件損壞。
災。
• 切勿在冰箱頂部存放物品。
• 請勿在冷凍室內放置瓶子或玻
璃容器。
- 在開關門時,上面放置的物品 • 如果其中的物品凍結,玻璃可
可能掉落並引起人身傷害和/
能破裂並造成人身傷害。
或物件損壞。
• 請勿在冰箱附近噴射易燃氣
體。
- 否則,會有爆炸或引起火災的
危險。
• 請勿向冰箱的內部或外部直接
06_ 安全資訊
DA68-02924A-03.indb 06
14. 1. 20.
11:31
噴水。
有關清潔的注意標誌
- 否則,會有引起火災或觸電的
危險。
注意
• 切勿將手指或其他物件
伸入分配器孔和冰槽。
• 切勿在冰箱內儲藏揮發性或易 - 可能引起人身傷害或物件損
燃性物質。
壞。
- 苯、稀釋劑、乙醇、乙醚或液 • 在清潔插頭時請勿使用濕布,
化石油氣等類似產品可能引起
並從插頭插腳上移除所有異物
爆炸。
或灰塵。
• 如果您打算去度長假,建議清 - 否則,會有引起火災的危險。
空冰箱或使用假期功能。
• 切勿在冰箱內儲藏藥用物品、
科學材料或其他對溫度敏感的
產品。
- 不得在冰箱內儲藏要求嚴格控
制溫度的產品。
• 切勿在冰箱上放置裝有水的容
器。
- 如果水濺溢,則有引起火災或
觸電的危險。
• 請勿強烈撞擊或過度用力推壓
玻璃表面。
- 否則玻璃破碎可能會導致人身
傷害和/或財產損失。
有關處理的警告標誌
• 在處理本產品或其他冰箱時,
請拆除冰箱門/冰箱門密封
條、門扣,以防止將幼兒或動
物困入其中。
• 將層板固定到位,以免兒童輕
易爬入其中。
• 使用 R-600a 或 R-134a 作為
雪種。 檢查冰箱後面的壓縮
機標籤或冷藏室內的銘版,以
查看您冰箱使用哪種雪種。
如果本產品包含易燃氣體
(R-600a 雪種),請諮詢您地
安全資訊 _07
DA68-02924A-03.indb 07
14. 1. 20.
11:31
方當局以瞭解如何安全地處理 對於裝有鎖和鑰匙的冰箱門或
本產品。
• 使用環戊烷作為絕緣吹氣。
蓋板,請將鑰匙放置在兒童接
觸不到的地方,不要放在冰箱
絕緣材料中的氣體需要特殊的 附近,以防止兒童被反鎖在冰
處理程序。
箱內。
請諮詢您所在地方當局,以瞭
解如何以環保方式安全地處理
本產品。
在處理之前,確保冰箱背面的
所有管道均完好無損。 這些
管道應該在空曠的地方弄破。
注意
• 如果停電,請致電當地
的電力公司並瞭解將停
電多長時間。
- 大多數停電故障將在一兩個小
時內得到解決,因此將不會影
響冰箱的溫度。
但是,您應該在停電期間儘量
減少打開冰箱門的次數。
- 如果停电持续超过 2 小时,请
取出冰桶内的所有冰块。
- 如果停電超過 24 個小時,請
取出所有凍結的食物。
其他正確使用貼士
• 在安裝設備之後,靜置 2
小時後再開始使用。
• 為了獲得最佳產品效能,
- 切勿在設備後面的通風孔前面
過於密集地擺放食物,否則可
能影響冰箱儲藏室內空氣循環
的自由流通。
- 在將食物放入冰箱之前,適當
地包裹食物或將食物放入密閉
的容器內。
- 請勿將準備冷凍的新放入食物
靠近已經凍結的食物。
• 如果外出少於三個星期,則無
需斷開冰箱電源。
但是,如果外出時間達三個星
期或更長,則須清除冰箱內所
08_ 安全資訊
DA68-02924A-03.indb 08
14. 1. 20.
11:31
有食物。
度升高都會縮短其儲藏期限。
請拔下冰箱電源線,再進行清 • 包含「京都議定書」所涵蓋的
潔、沖洗和乾燥。
氟化溫室氣體。
• 如果冰箱所在地點的溫度長期 • 氟化溫室氣體吹起泡沫。
低於為冷凍冰箱設計的溫度範
圍的最低溫度,則冰箱可能無 泡沫吹制添加劑: 全氟乙烷全
法始終正常運作 (可能出現食 球變暖潛能 (GWP) = 9000
物融化或冷凍室內的溫度變得
過熱)。
• 請勿儲藏在低溫下容易變質的
食物,例如香蕉、甜瓜。
• 請將冰盒放置在製造商提供的
原位置,以達到最佳的結冰效
果。
• 您的設備是無霜型,這表示您
無需手動除霜,它會自動進行
除霜。
• 除霜期間的溫度升高符合 ISO
要求。
但如果您要防止凍結食物在冰
箱除霜期間溫度過度升高,請
使用多層紙張如報紙包裹凍結
食物。
• 凍結食物在除霜期間的任何溫
節能小貼士
- 將本設備安裝在陰涼乾燥、有
足夠通風的房間。
確保它不直接暴露在陽光下,
絕不靠近直接的熱源 (例如散
熱器)。
- 設備上絕不能堵塞任何通風孔
或格柵。
- 較熱的食物降溫後再放入冰
箱。
- 將冷凍食品放入冷藏櫃中解
凍。
這樣,您可以使用冷凍產品的
低溫來冷卻冷藏室內的食物。
- 當取放食物時,請勿將冰箱門
安全資訊 _09
DA68-02924A-03.indb 09
14. 1. 20.
11:31
開得太久。
冰箱門敞開的時間越短,冷凍
室形成的冰霜越少。
- 定期清潔冰箱的後面。
灰塵會增加能量的消耗。
- 請勿將溫度設定為低於所需溫
度。
- 確保在冰箱底座和冰箱後面的
牆之間有足夠的空氣流通。
請勿覆蓋氣孔開口。
- 安裝時確保在左、右、上、後
各個方向均留有間隙。
這將有助於減少耗電量並節省
電費。
10_ 安全資訊
DA68-02924A-03.indb 10
14. 1. 20.
11:31
目錄
設定雙門對開冰箱 …………………………………………………………………………………………… 11
操作 SAMSUNG 雙門對開冰箱 ………………………………………………………………………… 19
疑難排解 ………………………………………………………………………………………………………… 26
01 安裝
設定雙門對開冰箱
準備安裝冰箱
恭喜您購買此 Samsung 雙門對開冰箱。
希望您能樂享此款新冰箱提供的眾多先進
功能和高效體驗。
• 請確保設備在需要維修和保養時可以自
由地搬動。
選擇安裝冰箱的最佳位置
• 選擇一個供應水方便的位置。
• 選擇一個沒有陽光直射的位置。
• 選擇一個地面平坦 (或接近平坦) 的位
置。
• 選擇一個具有足夠空間以方便打開冰箱
門的位置。
• 在冰箱的左、右、上、後側均有足夠的
空間以便空氣流通。
- 如果您的冰箱未平穩放置,內部冷卻系
統可能無法正常工作。
- 請參考以下使用所需總空間的圖示和尺
寸。
至少 6 毫米
至少 6 毫米
安裝 _11
DA68-02924A-03.indb 11
14. 1. 20.
11:31
移動冰箱時
為防止損壞地面,請確保前水平支腳處於
較高位置 (地面以上)。 請參閱手册中的
「校平冰箱」(第15頁)。為了保護地板的磨
光面,請在冰箱下面放置保護板,如包裝
紙板箱。
螺絲起子
在安裝、維修或清潔冰箱背面時,
注意 請筆直向外拉出冰箱,完成工作後
再將其筆直推回原位。
首先最重要的事情! 測量門 (寬度和高度)
、門檻、天花板、樓梯等的尺寸,確保能
輕鬆將冰箱移至最終位置。下表詳細介紹
了精確的高度和深度。
RS61*
寬度
尺寸
深度
(mm)
高度
使用冰盒推杆
卸下冰桶
- 握住把手,如圖 1 中所
示。
- 略微向上提起底部。
- 緩慢地取出冰桶。
支腳
型號
• 在拆卸冷凍室門前,請確保斷開供水
管。 請參閱下一章節「分離冰箱供水
管」以避免損壞。
不含櫃門
908
含櫃門
912
僅指櫃體
600
不含把手
718
不含櫃門
1745
含櫃門
1780
• 安裝時確保在左、右、上、後各
個方向均留有間隙。 這將有助於
減少耗電量並節省電費。
• 請勿將冰箱安裝在溫度可能會降低到
10 °C 的地方。
圖1
重新安裝冰桶
- 按拆卸時相反的順序重
新裝配。
- 將冰桶穩固地推回原
位,直到聽見卡嗒聲為
止。
- 如果冰桶不能安裝到原
圖2
位,請將冰桶後面的把
手轉動 90 度,然後再重新安裝,如圖
2 中所示。
正常作業
- 當製冰機將冰塊倒入冰
桶時會發出一些聲音,
這是正常現象。
- 如果長時間不取出冰
塊,冰桶中的冰塊可能
會堆在一起。 取出剩餘
冰塊,清空冰桶。
冰槽
- 如果不出冰,請檢查是
否有冰塊卡在了冰槽
中,並將卡住的冰塊取出。
- 首批冰塊可能會比較小,這是由於管路
連接之後存留了空氣,正常使用期間所
有空氣都將會被清除。
12_ 安裝
DA68-02924A-03.indb 12
14. 1. 20.
11:31
- 當顯示面板上的 Ice Off (製冰關
閉) 閃爍時,請重新插入冰桶與/
或確保冰桶安裝正確。
當冰箱門打開時,製冰機和飲水機將停
止使用。
如果很用力地關閉冰箱門,可能會導致
有水從製冰機中濺出來。
爲了防止冰桶掉落,在拆卸冰桶時請用
雙手持握。
爲了防止引起人身傷害,請務必清除可
能掉落到地板上的任何冰或水。
切勿讓兒童吊掛在製冰機或冰桶上。
這可能會導致受傷。
切勿將手或任何物件放入冰槽中。 這可
能會引起人身傷害或機械部件損壞。
注意
-
-
1
2
01 安裝
-
重新安裝供水管
1. 水管必須完全插入透明聯結器的中心位
置,以防從飲水機漏水。
透明聯結器的中心位置
設定冰箱門
如果進門口無法讓冰箱順利通過,可以先
卸下冰箱門。
拆卸前腿蓋
首先,打開冰箱的冷凍室和冷藏室門,然
後逆時針轉動三個螺釘卸下前腿蓋。
2. 將 2 個卡子插到安裝接頭處,並檢查各
個卡子是否牢固地卡住水管。
卡子 A (1/4 英寸)
(6.35 毫米)
請勿切割水管。
輕輕地將水管從聯結器分離。
拆卸冷凍室門
必須首先注意的幾件事情。
分離冰箱供水管
1. 透過按壓聯結器 ( 1 ) 並分離水管 ( 2 )
卸下兩根水管 (灰色水管用於製冰機,
另一根用於飲水機)。
請注意要保持相同色彩的水管相匹
配。
• 請確保往上垂直舉起冰箱門,以使鉸鏈
不會彎曲或折斷。
• 小心不要夾住冰箱門上的水管和線束。
• 將門放置在一個受保護的平面上,以防
止表面劃傷或損壞。
1. 關閉冷凍室門,使用螺絲起子,卸除上
部的鉸鏈蓋 ( 1 ),然後輕輕拉動電線以
使其斷開 ( 2 )。
安裝 _13
DA68-02924A-03.indb 13
14. 1. 20.
11:31
3. 接著,輕輕向上舉起櫃門 ( 7 ),從底部
的鉸鏈 ( 6 ) 上卸下櫃門。
1
2
- 對於某些型號
7
6
小心不要夾住冰箱門上的水管和線
束。
2. 逆時針轉動螺絲起子,以卸除鉸鏈螺釘
( 3 ) 和接地螺釘 ( 4 ),然後取下上部的
鉸鏈 ( 5 )。 在卸下鉸鏈時,小心不要讓
櫃門砸到您身上。
4. 輕輕往上提起底部鉸鏈,從托座 ( 9 ) 上
卸下底部鉸鏈 ( 8 )。
8
9
4
3
重新安裝冷凍室門
若要重新安裝冷凍室門,以相反的
順序安裝部件。
5
小心不要丟失冰箱部件。
在拆卸鉸鏈時,請確保不要損壞地
線或斷開地線。
14_ 安裝
DA68-02924A-03.indb 14
14. 1. 20.
11:31
拆卸冷藏室門
1. 關閉冷藏室門,使用螺絲起子,卸除上
部的鉸鏈蓋 ( 1 )。
重新裝配冷藏室門
若要重新安裝冷藏室門,以相反的
順序安裝部件。
1
校平冰箱
01 安裝
2. 逆時針轉動螺絲起子,以卸除鉸鏈螺釘
( 2 ) 和接地螺釘 ( 3 ),然後取下上部的
鉸鏈 ( 4 )。 在卸下鉸鏈時,小心不要讓
櫃門砸到您身上。
現在櫃門已經重新安裝到冰箱上,須確保
冰箱保持水平,以便進行最後調整。
如果冰箱未放置水平,將不可能使冰箱門
完全平整對稱。
冰箱的前面也可以調整。
調整冰箱水平前,請先卸下前腿蓋
打開冰箱的冷凍室和冷藏室門,然後逆時
針轉動三顆螺釘卸下前腳蓋。
2
3
4
小心不要丟失冰箱部件。
3. 輕輕向上舉起櫃門
( 6 ),從底部鉸鏈 ( 5 )
上卸下櫃門。
6
5
4. 輕輕往上提起底部鉸
鏈,從托座 ( 8 ) 上卸下
底部鉸鏈 ( 7 )。
當冷凍室門低於冷藏室門時
將平頭螺絲起子插入前腳的槽孔中,然後
順時針或逆時針轉動,以將冷凍室調整到
水平。
當冷凍室門高於冷藏室門時
將平頭螺絲起子插入前腳的槽孔中,然後
順時針或逆時針轉動,以將冷藏室調整到
水平。
7
8
安裝 _15
DA68-02924A-03.indb 15
14. 1. 20.
11:32
如果冰箱門放置不平衡,可採用如下相同
步驟糾正。 首先打開冰箱門,然後按照
以下說明逐一調整:
螺絲起子
支腳
1. 從底部鉸鏈擰鬆螺母 ( 1 ),直到達到螺
栓最上端 ( 2 )。
支腳
螺絲起子
輕微調整冰箱門的最佳方式,請參
閱下一章節。
3
扳手
2
螺栓
1
螺母
當鬆開螺母時 ( 1 ),確保您使用內
六角扳手 ( 3 ) 逆時針方向鬆開螺栓
( 2 )。 然後,您應該可以用手指鬆
開螺母 ( 1 )。
2. 順時針 (
) 或逆時針 (
) 轉動
螺母 ( 2 ) 來調整門之間的高度。
微調冰箱門
切記,必須將冰箱調整到水平位置,才
能使冰箱門十分平整對稱。 如果不知道
如何調整,請回顧前面的「校平冰箱」
部份。
當冷凍室門高於冷藏室門時
當順時針轉動時 (
將會向上移動。
),冰箱門
3. 調整冰箱門後,順時針 (
) 轉動螺
母 ( 1 ),直到達到螺母的最底端,然後
用扳手 ( 3 ) 再次擰緊螺栓直到螺母到位
( 1 )。
如果您沒有緊固螺母,螺栓可能鬆
動。
調節部件
16_ 安裝
DA68-02924A-03.indb 16
14. 1. 20.
11:32
檢查飲水機水管
用於安裝水管的零部件
1
水管固定
部件和螺
釘
2
管接頭
3
水管
關閉總供 沒有間隙
水管
4. 在將供水管連接到濾水器後,重新打開
總供水管,排出大約 3 升水,將濾水器
清洗乾淨。
01 安裝
飲水機是新 Samsung 冰箱的很有用的功
能之一。
為有助於提升您的健康,Samsung 飲水
機從水內過濾了雜質。
但是,它並不殺菌或破壞水中的微生物。
要想殺菌消毒,您需要購買淨水系統。
為保證製冰機正常運作,需要的水壓力為
138 ~ 862 kPa。 正常條件下,170 cc 的
紙杯可以在 10 秒鐘內裝滿。 如果冰箱安
裝在水壓低的地方 (低於 138 kPa),您可
以安裝一個增壓泵提高水壓。 確保冰箱
內的水箱的水量適當。 為保證此標準,
按下飲水機的控制杆,直到水從出水口處
流出。
水管安裝套件隨冰箱附帶。 您可以
在冷凍室 (冷藏室) 抽屜中找到。
關閉總供
水管
安裝供水管路
將水管連接至冰箱
1. 從與設備相連的水管上卸下螺母,在將
設備從供水管上卸下後將壓縮螺母套在
水管上。
2. 連接供水設備和冰箱之間的水管。
3. 擰緊壓縮螺母直至實現壓縮擬合。 請注
意不要在兩個部件之間留有間隙。
4. 打開進水開關,檢查是否存在任何洩
漏。
卸除蓋子
4
卡子
5
濾水器
鬆開 a
冰箱的水管
連接供水管
1. 首先,關閉總供水管。
2. 找到最近的冷飲用水管。
3. 按照安裝套件中的水管安裝說明進行安
裝。
沒有間隙
水管安裝套
件的水管
注意
該水管必須連接至冷水管。
如果將其連接至熱水管,可能
導致淨化器發生故障。
安裝 _17
DA68-02924A-03.indb 17
14. 1. 20.
11:32
水管必須連接至可飲用水。 如果需
要維修或拆卸水管,請切斷 6.5 毫
米的塑膠管,以確保實現緊密牢靠
的無洩漏連接。
在使用之前,應檢查這些地方是否
注意 洩漏。
• 水管安裝不包括在 Samsung 保固範圍
內。
• 除非零售價格中包含了安裝費用,否則
相應費用應由客戶承擔。
• 如有需要,請聯絡水管工或授權安裝人
員進行安裝。
• 如果由於安裝不當發生漏水,請聯絡安
裝人員。
在安裝濾水器後,清除供水管內所有殘留
的物質。
1. 打開總供水管。
2. 按 Water (水) 按鈕並按
水
冰
壓出水口推板。
3. 打開飲水機放水,直到
水流變得清澈乾淨 (約持
續放出 3 升水)。
這樣將使供水系統得到
清潔,並排出水管中的
空氣。
4. 在某些家庭可能需要放
更多水來沖洗。
5. 打開冰箱門,確保濾水器不漏水。
新安裝的濾水器可能會導致水暫時
從飲水機噴射而出。
這是由於管路中存在空氣所致。
這應該不會影響正常運作。
18_ 安裝
DA68-02924A-03.indb 18
14. 1. 20.
11:32
操作 SAMSUNG 雙門對開冰箱
冰箱操作說明
8 Water
按 Water (水) 按鈕可取水。
(水) 按鈕
使用控制面板/數字顯示屏
使用數字顯示屏
4
2
5
3
6
7
8
縮短在冷凍室內冷凍食物的時間。
如果您需要迅速冷凍容易腐壞的食
1 Power
物,或如果冷凍室的溫度非常高時
Freeze
(例如,如果冰箱門沒關上),此時
(快速冷
快速冷凍功能將非常有用。 在把
凍) 按鈕
大量的食物放入冷凍室最少 20 小
時之前,此功能必須被激活。
2 Freezer 按 Freezer (冷凍室) 按鈕可設定所
(冷凍室) 需的冷凍室溫度。 可在 -15ºC 到
-23ºC 的溫度範圍內進行調節。
按鈕
按 Ice Off (製冰關閉) 按鈕以關閉
製冰功能。 當顯示面板上的 Ice
3 Ice Off
Off (製冰關閉) 閃爍時,請重新插
(製冰關
入冰桶與/或確保冰桶安裝正確。
閉) 按鈕
當您更換濾芯時,按住此按鈕 3 秒
以重設濾芯更換日期。
4 Lighting
按下 Lighting (照明燈) 按鈕使飲
(照明燈) 按
水機 LED 燈持續點亮。
鈕
按 Fridge (冷藏室) 按鈕可設定所需
5 Fridge 的冷藏室溫度。 您可以在 1°C 至
(冷藏室) 7°C 之間設定溫度。Power Cool
(快速冷藏)。 如果低於 1°C,Power
按鈕
Cool (快速冷藏) 圖示將亮起。
只要按下此按鈕,所有按鈕都將被
鎖定。 Ice (冰) 按鈕與分配器推板
6 Child 也將無法使用。 若要取消此功能,
Lock (兒 再次按此按鈕即可。
童鎖) 按 如果您將要度假或出差,或不需要
鈕
使用冰箱時,請按住此按鈕保持 3
秒。 冷藏室溫度將保持在 15°C 左
右,冷凍室仍將正常工作。
7 Ice
按下 Ice (冰) 按鈕,選擇冰塊或碎
(冰) 按鈕 冰。
「Freezer Temp. (冷凍室溫度)」指示當
前冷凍室溫度。 「Fridge Temp. (冷藏室
溫度)」指示當前冷藏室溫度。 當不用冰
箱時,顯示屏將關閉,這是正常的。
02 運作
1
POWER FREEZE (快速冷凍)
在啟動「Power Freeze (快速冷凍)」功能
時,此圖標將亮起。當您需要大量冰時,
「Power Freeze (快速冷凍)」極其有用。
當您有足夠的冰時,只要再按一次按鈕,
取消「Power Freeze (快速冷凍)」模式。
如果您使用此功能,冰箱能耗將增
加。 請記住,當不需要此功能時關
閉它,並將冷凍室溫度返回到原來
的溫度設定。
VACATION (度假)
在啟動「Vacation (假期)」功能時,此圖
標將亮起。 如果您將要度假或出差,或
不需要使用冰箱時,請按住 Child Lock (
兒童鎖) 按鈕保持 3 秒。 冷藏室溫度將保
持在 15°C 左右,冷凍室仍將正常工作。
冷藏室應該清空。
ALARM (報警)
此圖標將一直保持點亮。 如果冰箱門保
持打開狀態超過 2 分鐘,將發出報警聲。
(而且報警圖標保持閃爍) 在關閉冰箱門
後嘟嘟聲和閃爍報警將停止。 如果您需
要關閉 Alarm (報警) 功能,請同時按住
Lighting (照明燈) 按鈕和 Fridge (冷藏室)
按鈕保持 3 秒。
運作 _19
DA68-02924A-03.indb 19
14. 1. 20.
11:32
LIGHTING (照明燈)
在啟動「Lighting (照明燈)」功能時,此
圖標將亮起。 在這種情況下,冰水分配
器指示燈 (位於顯示屏下面) 將一直保持亮
起。 如果您希望只有在使用冰水分配器
時該指示燈才亮起,請關閉「Lighting (
照明燈)」功能。
POWER COOL (快速冷藏)
在啟動「Power Cool (快速冷藏)」功能
時,此圖標將亮起。 如欲使冷藏室快速
冷卻,請使用「Power Cool (快速冷藏)
」功能。 如果您選擇「Power Cool (快
速冷藏)」功能,冷藏室內部溫度將在大
約兩個半小時內降下來。
濾水器指示燈
當濾水器指示燈轉變為紅色時,則表示
應該更換濾水器濾芯了。 通常濾芯約每
6 個月更換一次。 當您插入新的濾芯之
後,濾水器指示燈將變為藍色。 當濾芯
使用 5 個月之後,濾水器指示燈將變為紫
色。 當濾芯使用 6 個月之後,濾水器指
示燈將變為紅色。 在拆下舊濾芯並安裝
新濾芯后 (請參見第 17 頁瞭解如何更換濾
芯),按下 Ice Off (製冰關閉) 按鈕保持約
3 秒復位指示燈狀態。
CUBED ICE (冰塊) ,
CRUSHED ICE (碎冰)
從數字控制面板選擇您偏愛的選項,即可
享用冰塊或碎冰。 製冰類型指示燈會指
示目前選擇的製冰類型。
WATER (水)
在啟動「Water (水)」功能時,此圖標將
亮起。
ICE OFF (製冰關閉)
在啟動「Ice Off (製冰關閉)」功能時,此
圖標將亮起。 在這種情況下,將停止製
冰。 當顯示面板上的 Ice Off (製冰關閉)
閃爍時,請重新插入冰桶與/或確保冰桶
安裝正確。
CHILD LOCK (兒童鎖)
當按下 Child Lock (兒童鎖) 按鈕激活
Child Lock (兒童鎖) 功能時,此圖標將亮
起。 再次按此按鈕,可再次激活。
使用此功能,可防止兒童更改溫度和濾水
器設定。
取消展示模式
如果使用展示模式,冰箱工作但不
注意
會使空氣製冷。 若要取消這種模
式,同時按住 Power Freeze (快速
冷凍) 和 Freezer (冷凍室) 按鈕 8 秒
鐘,直至發出叮咚聲。
展示模
式 (可選)
控制溫度
冷凍室和冷藏室的基本溫度
冰箱冷凍室和冷藏室的建議基本溫度分
別為 -19 °C 和 3 °C。 如果冰箱冷凍室和
冷藏室的溫度過高或過低,請手動調整
溫度。
控制冷凍室溫度
冷凍室溫度可設定為 -15 °C 至 -23 °C 之
間的值,以適合您的特定需要。
按 Freezer (冷凍室) 按鈕直到溫度顯示屏
顯示希望的溫度為止。 請記住諸如冰淇
淋等食品可能會在 -16 °C 時融化。
溫度顯示值將在 -15 °C 至 -23 °C 的範圍
內順序移動。 當溫度顯示值到達 -15 °C
時,將從 -23 °C 重新開始。
在顯示新設定的溫度值 5 秒後,將重新
顯示冷凍室目前的實際溫度。 但是,當
冷凍室調整到新的溫度時,該數值將隨之
變更。
20_ 運作
DA68-02924A-03.indb 20
14. 1. 20.
11:32
使用製冰機和冷水飲水機
獲取冰水
- 飲水機可提供冷水,但
並不冰冷
- 如果您希望獲得帶冰的
冷水時,可先用飲料杯
取冰,然後再注入冷
水,以防水濺出來。
使用製冰機
按下 Ice (冰) 按鈕,選擇您想製冰的類
型。 將杯子放在出冰口,然後輕輕推壓
出冰口推板。 確保杯子與製冰機對齊,
防止冰彈到外面。 如果在使用 Crushed
Ice (碎冰) 模式後選擇 Cubed Ice (冰塊)
模式,可能會有少量殘留的碎冰。
•
•
當顯示面板上的 Ice Off (製冰關閉) 閃爍
時,請重新插入冰桶與/或確保冰桶安裝
正確。
使用飲水機
按 Water (水) 按鈕。 將水杯放在出水
口,然後輕輕推壓出水口推板。 確保玻
璃杯與飲水機對齊,防止水流到外面。
• 切勿將手指、手或任何其他不適
當的物件放入冰槽或製冰機桶
中。
否則,可能導致人身傷害或物件損壞。
只能使用冰箱提供的
製冰機蓋子
製冰機。
此冰箱的供水必須只
能由合格人員安裝/連
接,並連接到可飲用
的供水。
為保證製冰機正常運
冰槽
作,需要的水壓力為
冰桶
138 ~ 862 kPa。
警告
•
沒有冰
如果您希望關閉製冰機,請
選擇此項。
推壓
02 運作
控制冷藏室溫度
冷藏室溫度可設定為 7ºC 至 1ºC 之間
的值,以適合您的特定需要。 重複按
Fridge (冷藏室) 按鈕直到溫度顯示屏顯示
希望的溫度為止。 Fridge (冷藏室) 按鈕
的溫度控制過程與 Freezer (冷凍室) 按鈕
十分相似。 按下 Fridge (冷藏室) 按鈕設
定您需要的溫度。 在數秒後,Fridge (冷
藏室) 顯示值將開始向新設定溫度逐漸靠
近。 這將反映在數字顯示屏上。 如果過於
頻繁地開關櫃門,或存放大量溫熱食物,
冷凍室或冷藏室的溫度可能會升高。 這可
能會導致數字顯示屏閃爍。 一旦冷凍室和
冷藏室的溫度返回到正常設定值,將停止
閃爍。 如果繼續閃爍,則可能需要「復
位」冰箱設置。 嘗試拔下冰箱電源插頭,
等待約 10 分鐘後重新插上電源插頭。
• 如果您因長假或出差而不用水或
注意 冰,將不使用水或冰的分配器,
請關閉水閥。
- 否則,可能會出現漏水。
• 如果您一段時間未使用製冰機,或您頻
繁打開冰箱門,冰塊可能會粘在一起。
如果發生這種情況,可清空冰塊容器或
用廚房用的木鏟使冰塊分離。
切勿使用刀叉等尖銳物體。
• 當取出冰桶時,製冰機內可能仍然會產
生一些殘留的冰塊。
運作 _21
DA68-02924A-03.indb 21
14. 1. 20.
11:32
使用 COOLSELECT ZONE™ (變溫
室) 抽屜 (可選)
1
CoolSelect Zone™ (變溫室) 抽屜的設計
可讓您忙碌的生活變得更輕鬆。
Soft Freeze (軟冷凍)
當 CoolSelect Zone™ 抽屜選擇「軟
冷凍」模式,不管冰箱整體溫度設置如
何,冰箱在抽屜的數字面板顯示的溫度為
-5 °C。 此功能有助於讓肉和魚保持更長
時間的新鮮度。
若需更多空間,您
可以將食物儲藏在
冰箱上面的儲物格
中,而不要放在冰
冰箱上面的儲物
桶中 ( 1 )。 如果您
格 (選用)
取出冰桶,顯示面
板上的 Ice Off (製冰關閉) 指示燈將
會閃爍。
為了獲得更多的空
間,您可以移除頂
部和底部冷凍抽
屜,因為它不影響
冰箱底部層板
熱特性和機械特
(選用)
性。 但是,要將「
冰箱底部層板」置
於冷凍室底部。 冷凍室的標稱儲
藏容量是根據取出抽屜後計算而來
的。
除了頂層櫃門儲物格之外,此型號
的冰箱的櫃門儲物格為二星級部
分,因此二星級部分的溫度要比其
他冰箱儲藏室略高。
Chill (冰凍)
當選擇「Chill (冰凍)」時,不管冰
箱整體溫度設置如何,CoolSelect
Zone™ (變溫室) 抽屜的溫度保持
-1 °C。 此功能有助於讓肉或魚更
長時間保持新鮮度。
Thaw (解凍)
當選擇「Thaw (解凍)」,冷暖
空氣交替吹入 CoolSelect Zone™ 抽屜。
根據冷凍食品的重量,您可以選擇 4 小
時、6 小時、10 小時和 12 小時的解凍時
間。 當「Thaw (解凍)」結束時,食物處
於半凍狀態,很利於切割烹飪。 另外,
當「Thaw (解凍)」結束,CoolSelect
Zone™ 抽屜返回初始的「Chill (冰凍)」
狀態。 若要中途取消此功能,只要按一
下除「Thaw (解凍)」以外的任意按鈕即
可。 下面是根據肉類和魚類重量所需的
大約解凍時間 (25.4 毫米 (1 英寸) 厚度)。
此表表示 CoolSelectZone™ (變溫室) 抽
屜的食物總重量。
解凍時間
4 小時
6 小時
10 小時
12 小時
重量
363 克 (0.8 磅)
590 克 (1.3 磅)
771 克 (1.7 磅)
1000 克 (2.2 磅)
22_ 運作
DA68-02924A-03.indb 22
14. 1. 20.
11:32
Cool (冷卻)
當選擇「Cool (冷卻)」時,CoolSelect
Zone™ (變溫室) 抽屜的溫度與冷藏室的
溫度設定保持相同。 抽屜數字面板顯示
與冰箱顯示屏相同的溫度。 由於「Cool (
冷卻)」的功能模擬了冷藏室的溫度,您
有了額外的冷藏儲藏空間。
根據不同大小和厚度的肉類或魚
類,解凍時間可能有所不同。
當「Thaw (解凍)」運行時,請將您
不想解凍的食物從抽屜取出。
天然保鮮功能 (選用)
使用者所購買的蔬果,洗淨后仍會有農藥
殘留。 如果存放在天然保鮮室,UV-LED
(太陽光紫外線能效作用) 能夠分解農藥,
減少殘留的農藥成份。
UV
hv(λ=365)
hv(
λ=365)
加快分解
去除殘留的農藥與
細菌
·可由紫外線直
接去除
·可由氫氧自由
基氧化功能去
除
CO2、H2O
什麽是 LED?
LED 是一種發光半導體元件。
拆卸冷凍室/冷藏室附件
清洗和重新安排冷凍室內部是很簡單的
事。
1. 層板 (冷凍室/冷藏室)
如右圖所示,將層板向外
拖動到缺口處,取出層
板。 然後,轉動層板並
向上抬起以將其移除。
02 運作
Quick Cool (快速冷卻)
您可以對 CoolSelect Zone™ 抽屜進行「
快速冷卻」操作,迅速冷卻 1〜3 聽罐裝飲
料大約需 1 小時。 當「Quick Cool (快速
冷卻)」過程結束,CoolSelect Zone™ (變
溫室) 抽屜自動返回之前的設定溫度。
若要取消快速冷卻操作,再次按 Quick
Cool (快速冷卻) 按鈕,CoolSelect Zone™
(變溫室) 抽屜返回之前的設定溫度。
2. 門擱架
用雙手握住門擱架,然後
輕輕往上抬起移除擱架。
3. 抽屜
往外拉出抽屜,輕輕向上
抬起,取出抽屜。
4. 冰桶 (冷凍室)
往外拉出製機冰桶,輕輕
向上抬起然後卸下。
• 雙手握住把手,如圖中
所示。
• 輕輕提起下面部分
• 緩慢地取出冰桶
運作 _23
DA68-02924A-03.indb 23
14. 1. 20.
11:32
5. 吧檯 (冷藏室) (選用)
• 抬起冷藏室頂部上面的
擱架並向外拉出。
• 用雙手按住籠罩在外面
的蓋子後,向上推動並
取出吧檯蓋子。
取出蓋子時切勿用力過度。 否則,
蓋子可能會破損並造成傷害。
在移除任何配件前,確保沒有食物
阻礙。
如果可能,完全清除食物,減少意
外發生。
爲了使本產品達到最佳能源效率,
請按照第 22頁上的圖示,將所有層
板、抽屜和籃筐放回原位。
清潔冰箱
請勿使用苯、稀釋劑或 Clorox™ 進
警告 行清潔。 否則可能破壞設備外表面
並有引起火災的危險。
切勿在連接電源時向冰箱上噴射液
注意 體,否則會引起觸電。 請勿使用
苯、稀釋劑或車用清潔劑清潔冰
箱,否則會有引起火災的危險。
更換濾芯
為減少漏水對您的財產造成的危
警告 險,請不要在 SAMSUNG 冰箱上用
普通品牌的濾芯。
僅使用 SAMSUNG 品牌的濾芯。
SAMSUNG 對因使用普通濾芯導致
漏水,從而給您帶來的損失,包括
但不限於財產損失,不承擔法律責
任。 SAMSUNG 冰箱的設計僅適用於
SAMSUNG 濾芯。 濾水器指示燈讓您知
道何時需更換濾芯。
為了讓您有時間準備新濾芯,紅色指示燈
將在現有濾芯容量耗盡之前亮起。 按時
更換濾芯,可保證冷藏室的出水是最新鮮
乾淨的水。
1. 從箱子中取出濾芯,並在其上粘
貼一個月份提示標籤,如圖所
示。 在濾芯上粘貼標籤,標注 6
個月後更換濾芯的日期。 例如,
如果您在 3 月更換濾芯,則在濾
芯上粘貼標注「9 月」的標籤,
以提醒您 9 月更換濾芯。 通常濾
芯的使用壽命約為 6 個月。
2. 取下新濾芯保護蓋,卸下舊濾芯。
3. 將濾芯插入濾水器殼體中。 順時針緩慢
轉動濾芯,將其與殼體上的列印標記對
齊,固定鎖牢。 請按照列印標籤所示,
確保將濾芯標籤標記與濾水器殼體中心
對齊。 請記住,不要擰得過緊。
更換內部照明燈
更換 LED 類型的照明燈
濾水器蓋
1
切勿自行拆裝或維修 LED 類型的照
注意 明燈。 要更換 LED 類型的照明燈,
請聯絡 Samsung 服務中心或授權
Samsung 經銷商。
2
標籤
(月份提示標籤)
3
旋轉至與標
籤對齊
24_ 運作
DA68-02924A-03.indb 24
14. 1. 20.
11:32
4. 在您完成此過程後,按住 Ice Off (製冰
關閉) 按鈕保持 3 秒,復位濾芯更換日
期。
02 運作
5. 最後,透過飲水機排出 3 升水倒掉。
在飲用前,再次確保水流乾淨。
6. 請參閱第 17頁上的濾芯安裝說明。
新安裝的濾芯可能會導致水暫時從飲水機
噴射而出。
這是由於管路中存在空氣所致。 這應該
不會影響正常運作。
訂購備用濾芯
如要訂購更多濾芯,請聯絡授權
Samsung 經銷商。
使用冰箱門
冰箱門具有特別的開啟和關閉功能,可確
保冰箱門完全關閉和安全密封。
冰箱門具有特別的開啟和關閉功能,可確
保冰箱門完全關閉和安全密封。
如果冰箱門半開著,但未到達該特定點,
它將自動關閉。
運作 _25
DA68-02924A-03.indb 25
14. 1. 20.
11:32
疑難排解
問題
冰箱根本不工作或製
冷不充分。
解決方案
• 檢查電源插頭是否正確連接。
• 顯示面板上的溫度控制是否設定為正確溫度? 請嘗試調低
溫度。
• 冰箱是否受陽光直射或太靠近熱源?
• 冰箱背面是否太接近牆導致空氣不能保持流通?
冷藏室內的食物凍
• 顯示面板上的溫度控制是否設定為正確溫度? 請嘗試調高
結。
溫度。
• 房間溫度是否太低?
• 在冷藏室最冷的區域,您是否儲存了富含水分的食物?
嘗試將這些東西移到冷藏室中間,不要放在 CoolSelect
Zone™ (變溫室) 抽屜中。
聽到異常的噪音或聲 • 檢查冰箱是否放置平穩。
音。
• 冰箱背面是否太接近牆導致空氣不能保持流通?
• 是否有東西掉在冰箱後面或下面?
• 從冰箱裡面聽到「滴答」聲。 這是正常現象,因為各種配
件會根據冰箱內部的溫度收縮或膨脹。
冰箱的前角和水平鉸 • 有些熱是正常的,因為防冷凝器安裝在冰箱的前角處,以
鏈的溫度較高並且會
防止冰箱結露。
形成冷凝。
• 冰箱門是否半開著? 當冰箱門打開了很長時間可能會發生
凝結。
• 當抽屜中儲藏蔬菜時,可能會發生冷凝現象,隨著時間的
推移,凝結的水將會自然消失。
不製冰。
• 安裝供水管後,您是否等待了 12 小時才製冰?
• 水管是否連接,進水閥是否打開?
• 您是否手動停止了製冰功能? 確保 Ice (冰) 設置為 Cubed
Ice (冰塊) 或 Crushed Ice (碎冰)。
• 是否有冰塊堵住了製冰機冰桶?
• 冷凍室溫度是否過熱? 請嘗試將冷凍室溫度調低。
聽到冰箱的水冒泡聲。 • 這是正常現象。 冒泡聲來自於在冰箱內循環的冰箱冷卻液。
冰箱內有異味。
• 是否有食物變質?
• 務必包裹氣味大的食物 (例如,魚),使其密封不透氣。
• 定期清潔冷凍室並扔掉所有變質或可能變質的食物。
冷凍室壁上結霜。
• 空氣通風口是否堵塞? 移除障礙物使空氣可以自由流通。
• 存放食品之間有足夠的空間可保持高效空氣流通。
• 冷凍室門是否正確關閉?
飲水機不工作。
• 水管是否連接,進水閥是否打開?
• 供水管是否被壓或扭結? 確保供水管順暢無任何障礙。
• 是否因為冰箱溫度過低使水箱結冰?
嘗試在總顯示面板上調高設定溫度。
26_ 疑難排解
DA68-02924A-03.indb 26
14. 1. 20.
11:32
備忘錄
DA68-02924A-03.indb 27
14. 1. 20.
11:32
環境室溫限制
本冷藏室/冷凍室設計為在標牌上標記的溫度等級所指定的環境溫度下使用。
類別
符号
亞溫帶
環境溫度範圍 (°C)
IEC 62552 (ISO 15502)
ISO 8561
SN
+10 至 +32
+10 至 +32
+16 至 +32
溫帶
N
+16 至 +32
亞熱帶
ST
+16 至 +38
+18 至 +38
熱帶
T
+16 至 +43
+18 至 +43
冷藏室/冷凍室的內部溫度受冰箱所在位置、環境溫度和打開櫃門的頻率等因素
的影響。 根據對這些因素的補償調節所需的溫度。
繁體中文
正確棄置本產品
(廢棄電子和電器設備)
(適用於採用獨立回收系統的國家)
產品、配件或技術資料上的本標誌表示產品及其配件(例如:充電
器、耳機、USB 傳輸線)在其使用壽命結束後不得與其他家庭廢品
一起棄置。為避免環境或人類健康因廢棄物不受管控而可能受到傷
害,請將這些項目與其他類型的廢品分開處置,並負責任地進行回
收,以促進材料資源的永續利用。
家庭使用者應聯絡購買本產品的零售店,或相關的當地政府機構,
以取得出於保護環境的目的,可在何處和如何回收這些項目的詳細
資訊。
商業使用者應聯絡其供應商並參考購買合同的條款和條件。本產品
及其電子配件不得與其他商業垃圾混在一起棄置。
三星全球服务网
如果您对三星产品有任何咨询或建议, 请联系三星客服中心
100102 中北京朝阳区望京利泽中二路望京科技创业园B座2层
400-810-5858
www.samsung.com
Customer Service Center
11/F, Phase 2, MTL warehouse Building, Berth One,
Kwai Chung, N.T., Hong Kong
Tel : (852) 3698 4698, Fax : (852) 3698 4666
www.samsung.com/hk (Chinese)
www.samsung.com/hk_en (English)
DA68-02924A-03
DA68-02924A-03.indb 28
14. 1. 20.
11:32