1
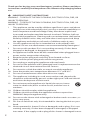
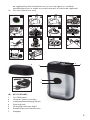
R95
le
u m ro
ry
us duc
t r tre
e g
of gist ister
pu er w .co
rch it .uk
as hin /re
e. 2 min
8d g
ay ton
s
.
Re
g
£1 iste
0 r
EX ,0 o
TR 0 nl
FR A y 0 p ine
EE ea r
re r g ize fo
r
w ua
ar ra d
Vis
ds n ra
it w
ga tee w
w
Yo w.p
l
ROTARY SHAVER
Thank you for buying your new Remington® product. Please read these
instructions carefully and keep them safe. Remove all packaging before
use.
F IMPORTANT SAFETY INSTRUCTIONS
WARNING – TO REDUCE THE RISK OF BURNS, ELECTROCUTION, FIRE, OR
INJURY TO PERSONS:
WARNING – TO REDUCE THE RISK OF BURNS, ELECTROCUTION, FIRE, OR
INJURY TO PERSONS:
1 This appliance can be used by children aged from 8 years and above and persons with reduced physical, sensory or mental capabilities or lack of experience and knowledge if they have been supervised/
instructed and understand the hazards involved. Children shall not play with the appliance. Cleaning and user maintenance shall not be done by children unless they are older than 8 and supervised. Keep the appliance and cable out of reach of children under 8 years.
2 Use this appliance only for its intended use as described in this manual. Do not use attachments not recommended by Remington®
3 Do not use this product if it is not working correctly, if it has been dropped or damaged, or dropped in water.
4 An appliance should never be left unattended when plugged into a power outlet, except when charging.
5 Keep the power plug and cord away from heated surfaces.
6 Make sure the power plug and cord do not get wet.
7 Do not plug or unplug the appliance with wet hands.
8 Do not use the product with a damaged cord. A replacement can be obtained via our International Service Centres.
9 Do not twist or kink the cable, or wrap it round the appliance.
10 Store the product at a temperature between 15°C and 35°C.
11 Do not use attachments other than those we supply.
12 The appliance, including its cord, must not be used, played with, cleaned or maintained by persons under eight years old and should at all times be kept out of their reach.
13 Do not immerse the appliance in liquid; do not use it near water in a bath-tub, basin or other vessel; and don’t use it outdoors.
14 Children should not play with the appliance.
15 Children should not clean the appliance without supervision
WARNING: Keep the appliance dry.
16 Do not use the shaver with a damaged or broken tracks or cutters, as injury may occur.
17 For use on facial hair only. Not intended for shaving the hair on your head.
18 Never operate this shaver if it has a damaged cord or plug, if it is not working correctly, if it has been dropped or damaged, or dropped into water. If the supply cord or plug of this shaver is damaged it must 2
be replaced by the manufacturer, its service agent or similarly
qualified persons in order to avoid a hazard. It cannot be repaired.
19 For household use only.
A
B
C
E
I
M
D
F
G
H
J
K
L
N
6
7
3
4
2
1
5
C KEY FEATURES
1 On/Off Switch
2 Head & Cutter assembly
3 Independent floating heads
4 Shaving unit
5 Charging indicator light
6 Protective travel head cover
7Adaptor
3
C
•
•
•
•
•
•
•
•
GETTING STARTED
Ensure the appliance is turned off.
Connect the shaver to the adapter and then to the mains.
Ensure the shaver is switched off. Connect the shaver to the power cord, then to the mains and charge for at least 24 hours when using for the first time.
The charging indicator light will glow steadily while charging. Your shaver cannot be overcharged.
Use product until the battery is low. You can use the shaver cordless for up to 30 minutes.
To preserve the life of your batteries, let them run out every 6 months then recharge for 24 hours.
When empty, the battery will be charged within 8 hours.
The shaver can be attached to a mains voltage of 100V – 240V.
F
,
,
1
2
3
4
5
INSTRUCTIONS FOR USE
SHAVING
Note: This shaver is for cordless use only.
Make sure your shaver is properly charged.
Switch the shaver on.
Stretch the skin with your free hand so the hairs stand upright (Diagram C).
Only apply light pressure on the shaving head while shaving (pressing too hard can damage the heads and make them vulnerable to breakage).
Use short, circular strokes (Diagram B).
C CARE FOR YOUR SHAVER
Care for your product to ensure a long lasting performance. We
recommend you clean your shaver after each use. Using the brush
supplied clean the internal part of the head assembly and shaver body.
Always keep the protective cap on the shaving head when the shaver is
not in use.
,
1
2
3
4
5
6
4
CLEANING CAUTIONS
Ensure the appliance is switched off and unplugged from the mains before cleaning.
Pull the head and remove the shaving unit from the shaver
(Diagram E).
Turn the switch on the frame to the left and lift the frame out of the
shaving unit (Diagram H).
Take the 2 shaving heads (cutters and guards) carefully out of the shaving unit.
Clean the cutters and guards with the supplied brush. (Diagram I
and J)
Place the shaving heads back into the shaving unit.
,
7
8
,
,
Note: Please do not mix up the cutters and guards. If you mix them up it may take weeks until the optimal shaver performance is restored.
Put the frame back onto the shaving unit and lock it by turning the switch to the right (DIAGRAM K).
Place the shaving unit back onto the shaver.
Note: If you clean the shaving unit with alcohol or another degreasing agent you need to lubricate the guards with one drop of sewing machine oil after cleaning. It helps to increase the lifespan of the shaving heads.
Caution: Product is not washable or water resistant. Do not clean or
use under running water.
, BATTERY REMOVAL
•
The battery must be removed from the appliance before it is scrapped.
, DANGER: Once the shaver has been dismantled for disposal, do not attempt to reassemble and/or use.
•
Unplug the shaver.
•
Run the shaver until the motor stops.
•
Pull the head release button and remove the shaving unit from the shaver (Diagram E).
•
Using a small cross head screwdriver remove the screws on the hairpocket (Diagram L).
•
Pull or gently pry apart the shaver halves to expose the battery.
•
Remove the front panel.
•
Remove the 2 screws on the front panel (Diagram M).
•
Cut the connection plate on both ends of the battery (Diagram N).
•
Dispose of battery properly.
H ENVIRONMENTAL PROTECTION
To avoid environmental and health problems due to hazardous
substances in electrical and electronic goods, appliances marked
with this symbol must not be disposed of with unsorted municipal
waste, but recovered, reused or recycled.
E SERVICE AND GUARANTEE
Defects affecting product functionality appearing within the guarantee
period will be corrected by replacement or repair at our option provided the
product is used and maintained in accordance with the instructions.
Defects from repair by an unauthorized dealer are not covered.
Consumables are excluded.
Your statutory rights are not affected.
If you call the Service Centre, please have the Model No. to hand, as we won’t
be able to help you without it. The Model No. can be found on the rating
plate of the appliance.
Replacement parts and accessories are available to buy at
www.remington.co.uk/parts-accessories
5
E SERVICE CENTRE
United Kingdom
G Tel 0800 212 438 (free call mainland UK)
G +44 161 947 3111 (call outside the UK)
Spectrum Brands (UK) Ltd
Fir Street, Failsworth, Manchester
M35 0HS, UK
www.remington.co.uk
Ireland
G Tel 142 951 40
Remington Consumer Products,
Unit B12, Ballymount Corporate Park,
Ballymount, Dublin 12.
www.remington.co.uk
I REGISTER ONLINE FOR
£10,000 prize draw, EXTRA year guarantee, FREE rewards gallery.
Visit www.productregister.co.uk/remington. You must register within 28
days of purchase.
Model No R95
Bakanlıkça tespit ve ilan edilen kullanım ömrü 7 yıldır.
ÜRETİCİ FİRMA BİLGİSİ: VARTA Consumer Batteries GmbH & Co. KGaA,
Alfred-Krupp-Str. 9, 73479 Ellwangen, Germany.
13/UK/ R95 T22-0001784 Version 09/13
Remington® is a Registered Trade Mark of Spectrum Brands,Inc.,
or one of its subsidiaries
VARTA Consumer Batteries GmbH & Co. KGaA, Alfred-Krupp-Str. 9, 73479
Ellwangen, Germany
www.remington-europe.com
© 2013 SBI