1
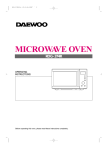
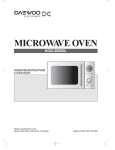
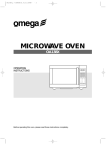
MICROWAVE OVEN
KOR-3000DSL
OPERATING
INSTRUCTIONS
Helpline number: 0870 100 2525
Before operating this oven, please read
these instructions completely.
PRECAUTIONS TO AVOID POSSIBLE EXPOSURE TO
EXCESSIVE MICROWAVE ENERGY
(a) Do not attempt to operate this oven with the door open since open-door operation can result in harmful
exposure to microwave energy. It is important not to defeat or tamper with the safety interlocks.
(b) Do not place any object between the oven front face and the door or allow soil or cleaner residue to
accumulate on sealing surfaces.
(c) WARNING : If the door or door seals are damaged, the oven must not be operated until it has been repaired
by a competent person : (1) door (bent), (2) hinges and latches(broken or loosened), (3) door seals and sealing
surfaces.
(d) WARNING : It is hazardous for anyone other than a competent person to carry out any service or repair
operation which involves the removal of a cover which gives protection against exposure to microwave energy.
(e) WARNING : Liquids and other foods must not be heated in sealed containers since they are liable to explode.
(f) The appliance is not intended for use by young children or infirm person without supervision. Young children
should be supervised to ensure that they do not play with the appliance.
(g) WARNING : Only allow children to use the oven without supervision when adequate instructions have been
given so that the child is able to use the oven in a safe way and understands the hazards of improper use.
(h) WARNING : When the appliance is operated in the combination mode, children should only use the oven
under adult supervision due to the temperature generated. (if provided)
TABLE OF CONTENTS
PRECAUTIONS ..................................................................................................................................1
IMPORTANT SAFETY INSTRUCTIONS ..........................................................................................2
EARTHING INSTRUCTIONS .............................................................................................................3
INSTALLATION ...................................................................................................................................3
SPECIFICATIONS ..............................................................................................................................4
IMPORTANT........................................................................................................................................4
FEATURES DIAGRAM .......................................................................................................................5
OPERATION PROCEDURE ..............................................................................................................7
CONTROLS .........................................................................................................................................8
SETTING THE CLOCK .................................................................................................................8
WEIGHT DEFROSTING ...............................................................................................................8
TIME DEFROSTING .....................................................................................................................9
COOKING IN ONE STAGE ........................................................................................................10
COOKING IN TWO STAGES .....................................................................................................10
EASY COOK ................................................................................................................................11
AUTO COOK ...............................................................................................................................11
CHILD SAFETY LOCK................................................................................................................12
TO STOP THE OVEN WHILE THE OVEN IS OPERATING ...................................................12
COOKING UTENSILS ......................................................................................................................13
CARE AND CLEANING ....................................................................................................................13
OVEN SHELF....................................................................................................................................13
DEFROSTING FROZEN FOODS CHART .....................................................................................14
COOKING CHART ............................................................................................................................15
REHEATING CHART........................................................................................................................16
BEFORE YOU CALL FOR SERVICE..............................................................................................18
QUESTIONS AND ANSWERS ........................................................................................................18
1
IMPORTANT SAFETY INSTRUCTIONS
READ CAREFULLY AND KEEP FOR FUTURE REFERENCE.
WARNING : To prevent fire, burns, electric shock and other warnings:
Listed below are, as with all appliances, certain rules to follow and safeguards to assure high
performance from this oven:
11. Do not use the oven for any reason other than
food preparation, such as for drying clothes,
paper, or any other nonfood items or for
sterilizing purposes.
Also, the cooking tray can become too hot to
handle or may break.
11. If smoke is observed, switch off or unplug the
appliance and keep the door closed in order to
stifle any flames.
12. Do not use the oven when empty, this could
damage the oven.
12. When heating food in plastic or paper
containers, keep an eye on the oven due to
the possibility of ignition.
13. Do not use the oven cavity for any type of
storage, such as papers, cookbook, cookware,
etc.
13. The contents of feeding bottles and baby food
jars shall be stirred or shaken and the
temperature checked before consumption, in
order to avoid burns.
14. Do not operate the oven without the glass tray
in place. Be sure it is properly sitting on the
rotating base.
15. Make sure you remove caps or lids prior to
cooking when you cook food sealed in bottles.
14. Always test the temperature of food or drink
which has been heated in a microwave oven
before you give it to somebody, especially to
children or elderly people. This is important
because things which have been heated in a
microwave oven carry on getting hotter even
though the microwave oven cooking has
stopped.
16. Do not put foreign material between the oven
surface and door. It could result in excessive
leakage of microwave energy.
17. Do not use recycled paper products for
cooking. They may contain impurities which
could cause sparks and/or fires when used
during cooking.
15. Eggs in their shell and whole hard-boiled eggs
should not be heated in microwave ovens
since they may explode, even after microwave
heating has ended.
18. Do not pop popcorn unless popped in a
microwave approved popcorn popper or
unless it's commercially packaged and
recommended especially for microwave
ovens. Microwave popped corn produces a
lower yield than conventional popping; there
will be a number of unpopped kernels. Do not
use oil unless specified by the manufacturer.
16. Keep the waveguide cover clean at all times.
Wipe the oven interior with a soft damp cloth
after each use. If you leave grease or fat
anywhere in the cavity it may overheat, smoke
or even catch fire when next using the oven.
17. Never heat oil or fat for deep frying as you
cannot control the temperature and doing so
may lead to overheating and fire.
19. Do not cook any food surrounded by a
membrane, such as egg yolks, potatoes,
chicken livers, etc., without first piercing them
several times with a fork.
18. Microwave heating of beverages can result in
delayed eruptive boiling, therefore care must
be taken when handling the container.
10. Do not pop popcorn longer than the
manufacturer's directions. (popping time is
generally below 3 minutes). Longer cooking
does not yield more popped corn, it can cause
scorchings and fire.
SAVE THESE INSTRUCTIONS
2
EARTHING INSTRUCTIONS
This appliance must be earthed. In the event of an electrical short circuit, earthing reduces the risk of electric
shock by providing an escape wire for the electric current. This appliance is equipped with a cord having a
earthing wire with a earthing plug. The plug must be plugged into an outlet that is properly installed and earthed.
WARNING :
Improper use of the earthing plug can result in a risk of electric shock. Consult a qualified electrician or
serviceman if the earthing instructions are not completely understood, or if doubt exists as to whether the
appliance is properly earthed. If it is necessary to use an extension cord, use only a 3-wire extension
cord that has a 3-blade earthing plug, and a 3-slot receptacle that will accept the plug on the appliance.
The marked rating of the extension cord should be equal to or greater than the electrical rating of the
appliance.
INSTALLATION
1 Steady, flat location
This oven should be set on a steady, flat surface. This oven is designed for counter top use only.
The microwave oven shall not be placed in a cabinet unless it has been tested in a cabinet.
2 Leave space behind and side
All air vents should be kept a clearance. If all vents are covered during operation, the oven may overheat
and, eventually, oven failure.
3 Away from radio and TV sets
Poor television reception and radio interference may result if the oven is located close to a TV, Radio
antenna, feeder and so on. Position the oven as far from them as possible.
4 Away from heating appliance and water taps
Keep the oven away from hot air, steam or splash when choosing a place to position it, or the insulation
might be adversely affected and breakdowns occur.
5
Power supply
• Check your local power source. This oven requires a current of approximately 6 amperes, 230V 50Hz.
• Power supply cord is about 0.8 meters long.
• The voltage used must be the same as specified on this oven. Using a higher voltage may result in a fire
or other accident causing oven damage. Using low voltage will cause slow cooking. We are not
responsible for damage resulting from use of this oven with a voltage of ampere fuse other than those
specified.
• If the supply cord is damaged, it must be replaced by the manufacturer or its service agent or a similarly
qualified person in order to avoid a hazard.
6 Examine the oven after unpacking for any damage such as:
A misaligned door, Broken door, A dent in cavity. If any of the above are visible, DO NOT INSTALL, and
notify dealer immediately.
7 Do not operate the oven if it is colder than room temperature.
(This may occur during delivery in cold weather.) Allow the oven to become room temperature before
operating.
8 The minimum height of free space necessary above the top surface of the oven is 100mm.
3
SPECIFICATIONS
POWER SUPPLY
MICROWAVE
230V~ / 50Hz, SINGLE PHASE WITH EARTHING
POWER CONSUMPTION
1200 W
OUTPUT POWER
800 W
FREQUENCY
2450 MHz
OUTSIDE DIMENSIONS (W X H X D)
465 X 279 X 360 mm
CAVITY DIMENSIONS (W X H X D)
290 X 220 X 306 mm
NET WEIGHT
APPROX. 13KG
TIMER
59 min. 00sec.
POWER LEVELS
5 LEVELS
* Specifications are subject to change without notice.
Microwave oven is a Group 2 ISM equipment in which radiofrequency energy is intentionally
generated and used in the form of electromagnetic radiation for the treatment of material. This
oven is a Class B equipment suitable for use in domestic establishments and in establishments
directly connected to a low voltage power supply network which supplies buildings used for
domestic purposes.
IMPORTANT
The wires in this mains lead fitted to this appliance are coloured in
accordance with the following code.
E
Green-and-yellow
: Earth
L
Blue
: Neutral
Brown
: Live
N
As the colours of the wires in the mains lead of this appliance may not
correspond with the coloured markings identifying the terminals in your plug,
proceed as follows: the wire which is coloured green-and-yellow must be connected to the terminal in
the plug which is marked with the letter 'E', the earth symbol or coloured green-and-yellow. The wire
which is coloured blue must be connected to the terminal which is marked with the letter ‘N’ or coloured
black.
The wire which is coloured brown must be connected to the terminal which is marked with the letter 'L'
or coloured red.
GREEN/YELLOW
Earth
BROWN
Live
BLUE
Neutral
FUSE
13 Amps
Cord Clamp
WARNING: This appliance must be earthed.
4
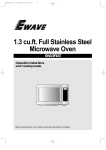
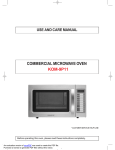
FEATURES DIAGRAM
1 Door latch-When the door is closed it will
automatically shut off. If the door is opened
while the oven is operating, the magnetron will
automatically shut off.
6 Glass cooking tray-Made of special heat
resistant glass. The tray can be easily removed
for cleaning. Make sure it is correctly positioned
(indentation) before operating. Place food in a
suitable container (dish) on the tray.
2 Door seal-The door seal surfaces prevent
microwaves escaping from the oven cavity.
7 Roller guide-Supports the glass cooking tray.
3 Oven cavity
8 Door screen-Allows viewing of food.
The screen is transparent to light, but prevents
microwaves escaping.
4 Spatter shield-Protects the microwave outlet
from splashes of cooking foods.
5 Safety interlock system-Prevents the oven
from operating while the door is opened.
The oven will only operate with the door fully
closed. When the door is open, the oven turns
off and will only start again after the door is
closed.
5
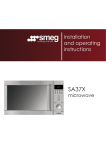
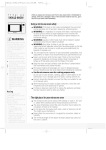
FEATURES DIAGRAM ( continued )
0
M/W DEF. LOCK
POWER
CLOCK
g
DEFROST
q
e
w
AUTO COOK
1. Dinner Plate
2. Soup
3. Beverage
4. Fresh Vegetable
r
Time/Weight
Quantity
t
STOP/CLEAR
START/EASY COOK
u
y
0 DISPLAY- Cooking time, power level,
indicators and present time are displayed.
r AUTO COOK- Used to cook using a program
or to reheat.
q POWER- Used to set power level.
t DIAL KNOB- Used to set the time and weight.
w CLOCK- Used to set clock.
y STOP/CLEAR- Used to stop the oven
operation or to erase all entries.
e DEFROST- Used to defrost foods by weight or
time.
u START/EASY COOK-Used to start the oven
operation and also increase the reheat time by
30 seconds.
6
OPERATION PROCEDURE
This section includes useful information about oven operation.
1. Plug power supply cord into a 230V 50Hz power outlet.
2. After placing the food in a suitable container, open the oven door and put it on the glass tray.
The glass tray and roller guide must always be in place during cooking.
3. Shut the door. Make sure that it is firmly closed.
oven light is on only when the microwave
1 The
oven is operating.
2
the STOP/CLEAR button is pressed during
7 When
the oven operation, the oven stops cooking and all
information retained. To erase all
information(except the present time), press the
STOP/CLEAR button once more. If the oven door
is opened during the oven operation, all
information is retained.
The oven door can be opened at any time during
operation by pressing the door release button on
the control panel. The oven will automatically
shut off.
time a button is pressed, a BEEP will
3 Each
sound to acknowledge the touch.
START button is pressed and the oven does
8 Ifnottheoperate,
check the area between the door and
oven automatically cooks on full power
4 The
unless set to a lower power level.
door seal for obstructions and make sure the door
is closed securely. The oven will not start cooking
until the door is completely closed or the program
has been reset.
display will show “ : 0” when the oven is
5 The
plugged in.
Make sure the oven is properly installed and
plugged into the electrical outlet.
clock returns to the present time when the
6 Time
cooking time ends.
WATTAGE OUTPUT CHART
• The power-level is set by pressing the POWER button. The chart shows the display, the power level and
the percentage of power.
Press POWER button
Power level (Display)
Approximate Percentage of Power
once
P-HI
100%
twice
P-80
80%
3 times
P-60
60%
4 times
P-40
40%
5 times
P-20
20%
7
CONTROLS
SETTING THE CLOCK
When the oven is first plugged in, the display will flash “ :0” and a tone will sound. If the AC power
ever turns off, the display shows “ :0” when the power comes back on.
CLOCK
1. Press CLOCK button.
This is a 12 hour clock system.
2. Press CLOCK button once more.
This is a 24 hour clock system.
NOTE : This oven has multiple clock
systems. If you want 12 hour
clock system, omit this step.
3. Turn the DIAL KNOB to adjust hour.
If you selected 12 hour system, the display will
show the hours from “1” to “12”.
If you selected 24 hour system, the display will
show the hours from “0” to “23”.
The adjusted hour starts blinking.
4. Press CLOCK button.
The hour stops blinking and “00” starts blinking.
5. Turn the DIAL KNOB to adjust minute.
The display will show the minutes from “0” to “59”.
The adjusted minute starts blinking.
CLOCK
6. Press CLOCK button.
CLOCK
When you press CLOCK button, the minute stops blinking, and the colon starts blinking. If you selected 12 hour
clock system, this digital clock allows you to set from 1:00 to 12:59. If you selected 24 hour clock system, this digital
clock allows you to set from 0:00 to 23:59.
WEIGHT DEFROSTING
WEIGHT DEFROST lets you easily defrost food by eliminating guesswork in determining defrosting
time. The minimum weight for WEIGHT DEFROST is 200 gram and the maximum weight is 3,000
gram. Follow the steps below for easy defrosting.
1. Press DEFROST button.
The DEF. indicator & “0” appear and the g
indicator starts blinking.
2. Turn the DIAL KNOB to adjust the
defrosting weight.
The display will show what you selected.
DEFROST
3. Press START button.
START
When you press START button, the g indicator disappears and the DEF. indicator starts blinking to show the
oven is in the DEFROST mode. The display counts down the time to show you how much defrosting time is
left in the DEFROST mode. The oven beeps during the defrosting cycle to signal that the food needs to be
turned or rearranged. When the defrosting time ends, you will hear 3 beeps.
8
TIME DEFROSTING
When TIME DEFROST is selected, the automatic cycle divides the defrosting time into periods of
alternating defrost and stand times by cycling on and off.
1. Press DEFROST button.
The DEF. indicator & “0” appear and the g
indicator starts blinking.
2. Press DEFROST button once
more.
The g indicator disappears and “:0” is displayed.
3. Turn the DIAL KNOB to adjust the
defrosting time.
The display will show what you selected.
DEFROST
NOTE: Your oven can be programmed for
59 miutes 00 seconds. (59:00)
4. Press START button.
START
When you press START button, the DEF. indicator starts blinking to show the oven is the DEFROST mode.
The display counts down the time to show you how much defrosting time is left in the DEFROST mode. The
oven beeps during the defrosting cycle to signal that the food needs to be turned or rearranged.
When the defrosting time ends, you will hear 3 beeps.
9
COOKING IN ONE STAGE
POWER
1. Press POWER button.
(Select the desired power level.)
The M/W indicator appears and the display will
show what you selected.
NOTE: If step 1 is omitted, the oven will
cook at full power.
2. Turn the DIAL KNOB to adjust
the cooking time.
The display will show what you selected.
NOTE: Your oven can be programmed for
59 minutes 00 seconds.(59:00)
3. Press START button.
START
When you press START pad, the M/W indicator starts blinking to show the oven is cooking.
The display counts down the time to show how much cooking time is left. When the cooking time ends, you
will hear 3 beeps.
NOTE: Using lower power levels increases the cooking time which is recommended for foods such as
cheese, milk and slow cooking of meats.
COOKING IN TWO STAGES
All recipes require frozen foods to be defrosted fully before cooking.
This oven can be programmed to automatically defrost foods before cooking.
1. Press DEFROST button.
The DEF. indicator & “0” appear and the g
indicator starts blinking.
2. Turn the DIAL KNOB to adjust
the defrosting weight.
The display will show what you selected.
3. Press POWER button.
(Select the desired power level.)
The M/W indicator appears and the display will
show what you selected.
4. Turn the DIAL KNOB to adjust
the cooking time.
The display will show what you selected.
DEFROST
POWER
5. Press START button.
START
When you press START button, the DEF. and M/W indicators come on to confirm the power levels selected.
The DEF. indicator starts blinking to show you that the oven is in DEFROST mode. The display counts down
the time remaining in DEFROST mode. When the oven beeps, turn over, break apart and/or redistribute the
food. At the end of DEFROST mode, the oven will beep and start M/W cook. The DEF. indicator disappears
and the M/W indicator starts blinking. The display counts down the time remaining in M/W mode.
When M/W cook ends, you will hear 3 beeps.
10
EASY COOKING
EASY COOK allows you to reheat for 30 seconds at 100% (full power) by simply pressing the
Easy cook button.
By repeatedly pressing the EASY COOK button, you can also extend reheating time to 5 minutes by
30 seconds.
EASY
COOK
1. Press EASY COOK button.
When you press EASY COOK button, ":30"
appears.
After 1.5 seconds, the oven starts reheating.
When the cooking time ends, you will hear 3
beeps.
AUTO COOK
AUTO COOK allows you to cook or reheat many of your favorite foods by repeatedly pressing AUTO COOK
button.
AUTO
COOK
1. Press AUTO COOK button.
When you press AUTO COOK button once,
“AC-1” is displayed. By repeatedly pressing this
button, you can select one of the four menu
programs as shown in the chart below.
2. Turn the DIAL KNOB to adjust the
desired quantity.
The display will show what you selected.
Food
Press
Autocook
button
Display
Dinner Plate
once
AC-1
Soup
twice
AC-2
Weight
350g
450g
350g
450g
Directions
Put foods on the microwave plate and cover
with vented plastic wrap.
Pour soup in microwave bowl or mug.
Stir before serving.
Pour beverage in microwave mug and place
it on the turntable. Do not cover.
2 CUPS (200mlx2)
Stir before serving.
3 CUPS (200mlx3)
1 CUP (200ml)
Beverage
three times
AC-3
200g
Fresh
vegetable
four times
AC-4
400g
3. Press START button.
Wash and put in casserole. Add no water if
vegetables have just been washed. Cover
tender vegetables with lid and stir after
cooking.
When you press START button, the display
changed into cooking time and the oven starts
cooking.
When the cooking time ends, you will hear 3
beeps.
START
11
CHILD SAFETY LOCK
The safety lock prevents unwanted oven operation such as by small children.
To set, press and hold STOP/CLEAR button for 3 seconds, LOCK indicator appears and a beep sounds.
To cancel, press and hold STOP/CLEAR button for 3 seconds, LOCK indicator disappears and a beep
sounds.
TO STOP THE OVEN WHILE THE OVEN IS OPERATING
1. Press STOP/CLEAR button.
• You can restart the oven by pressing START button.
• Press STOP/CLEAR button once more to erase all instructions.
• You must enter in new instructions.
2. Open the door.
• You can restart the oven by closing the door and pressing START button.
NOTE: Oven stops operating when door is opened.
WARNING - If you see arcing, press STOP/CLEAR button and correct the problem.
Arcing is the microwave term for sparks in the oven. Arcing is caused by :
a) Metal or foil touching the side of the oven.
b) Foil not molded to food (upturned edges act like antennas).
c) Metal such as twist-ties, poultry pins, or gold rimmed dishes in the microwave.
d) Recycled paper towels containing small metal pieces being used in the microwave.
12
COOKING UTENSILS
Utensils should be checked to ensure that they are suitable for use in microwave ovens.
Microwave energy is produced by high frequency radio waves.
They are reflected from metal, but will pass through most cooking utensils without heating them.
As the waves come into contact with the food, they are converted into heat energy.
Listed below are the suggested cooking utensils for this microwave oven and when to use them.
1. Dishes with metal trim of any type-should not be used. This will cause sparking.
2. Glass or ceramic heat proof dishes-excellent for microwave cooking.
3. China dishes and plates-without metal trim may be used to cook and heat individual portions of food.
4. Wood or straw-use only for short period, wood contains some moisture and the microwave energy may
cause the wood to dry out and crack.
5. Aluminum foil-may be used in very small pieces for shielding only.
Any aluminum foil used should never be closer than 2.5cm from side walls of oven.
6. Plastic-most heat resistant plastic dinnerware may be used for heating food. However polyethylene,
melamine, phenol are unsuitable for use in the oven. They become hot in the microwave.
7. Wax paper-use as a cover to avoid spatters.
8. Metal-in general, metal utensils should not be used in microwave oven.
CARE AND CLEANING
Although your oven is provided with safety features, it is important to observe the following:
1. It is important not to defeat or tamper with safety interlocks.
2. Do not place any object between the oven front face and the door or allow residue to accumulate on
sealing surfaces. Wipe the sealing area frequently with a mild detergent, rinse and dry.
Never use abrasive powders or pads.
3. When opened, the door must not be subjected to strain, for example, a child hanging on an opened door
or any load could cause the oven to fall forward to cause injury and also damage to the door. Do not
operate the oven if it is damaged, until it has been repaired by a trained service technician. It is particularly
important that the oven closes properly and that there is no damage to the:
i) Door(bent)
ii) Hinges and Hookes(broken or loosened)
iii) Door seals and sealing surfaces.
4. The oven should not be adjusted or repaired by anyone except a properly trained service technician.
5. The oven should be cleaned regularly and any food deposits removed.
6. Failure to maintain the oven in a clean condition could lead to deterioration of the surface that could
adversely affect the life of the appliance and possibly result in a hazardous situation.
OVEN SHELF
The oven shelf gives you extra space when cooking in more than one container at the same time. (See illustrations below.)
OVEN SHELF
1. Do not cook with the shelf on the microwave floor. This could damage the
microwave.
2. Do not use a microwave browning dish on the shelf. The shelf could overheat.
3. Use a potholder when handling the shelf after cooking. It may be hot.
4. Do not use the shelf when you cook popcorn or the thin food like a pizza and
pie.
5. If you would like to cook two pieces at the same time, you'd better cook them
once more as the indicated cook time. At the time, change their place with
each other after the first cooking is over.
6. Before having food, stir well.
13
DEFROSTING FROZEN FOODS CHART
Item and Weight
Defrosting Time
Standing Time
BEEF
Mineed beef
454g (1 lb.)
10-12 min.
5-7 min.
Break apart and remove thawed
portions with fork.
Stew Meat
681 (11/2 lbs.)
9-11 min.
5-7 min.
Separate and rearrange once.
Loin Roast
907g (2 lbs.)
15-18 min.
7-10 min.
Turn over after half the time.
Shield as needed.
7-8 min.
5-7 min.
Turn over after half the time.
PORK
Loin Roast
907g (2 lbs.)
15-16 min.
7-10 min.
Turn over after half the time.
Shield as needed.
Spareibs
454g (1 lb.)
6-7 min.
5-7 min.
Separate and rearrange once.
Chops
4 (142g (5 oz.))
7-8 min.
5-7 min.
Separate and turn over once.
Minced
454g (1 lb.)
9-10 min.
5-7 min.
POULTRY
Whole Chicken
1134g (21/2 lbs.)
20-22 min.
10-15 min.
Chicken Breasts
454g (1 lb.)
9-10 min.
5-7 min.
Separate and rearrange once.
Fryer Chicken
(cut up) 907g (2 lbs.)
12-14 min.
7-10 min.
Separate and rearrange once.
Chicken Thighs
681g (11/2 lbs.)
12-14 min.
5-7 min.
Separate and rearrange once.
6-7 min.
5-7 min.
Turn over after half the time.
Shield as needed.
Fish Fillets
681g (11/2 lb.)
7-8 min.
5-7 min.
Separate and turn over once.
Shrimp
227g (1/2 lb.)
3-4 min.
5-7 min.
Separate and rearrange once.
Patties
4 (113g (4 oz.))
FISH & SEAFOOD
Whole Fish
454g (1 lb.)
* The times are approximate because freezer temperatures vary.
14
Special Techniques
Break apart and remove thawed
portions with fork.
Breat side down. Turn over after half
the time.
Shield as needed.
COOKING CHART
MEAT
ITEM
POWER LEVEL
COOKING TIMER PER 500g
Beef
Standing/rolled Rib - Rare
P-80
9-11 min.
- Medium
P-80
10-12 min.
- well done
P-80
12-14 min.
Ground Beef(to brown for casserole)
P-HI
5-7 min.
Hamburgers, Fresh or defrosted
(4 oz. Each)
2 patties
P-HI
3-5 min.
4 patties
P-HI
4-6 min.
Pork
Loin, Leg
P-80
13-16 min.
Bacon
4 slices
P-HI
2-3 min.
6 slices
P-HI
3-4 min.
NOTE: The above times should be regarded only as a guide. Allow for difference in individual tastes
and preferences. The times may vary due to the shape, cut, and composition of the meat.
POULTRY
ITEM
POWER LEVEL
COOKING TIMER PER 500g
Chicken
Whole
P-HI
8-10 min.
Breast(boned)
P-80
6-8 min.
portions
P-80
7-9 min.
Turkey
Whole
P-HI
10-12 min.
NOTE: The above times should be regarded only as a guide. Allow for difference in individual tastes
and preferences. The times may vary due to the shape and composition of the food.
FRESH FISH
POWER
COOKING TIME
STANDING
ITEM
METHOD
LEVEL
PER 500G
TIME
Fish Fillets
P-HI
4~6 min.
Add 15-30 ml(1-2 Tbsp)
2-3 min.
Whole Mackerel,
P-HI
4~6 min.
3-4 min.
Cleaned and Prepared
Whole Trout, Cleaned
P-HI
5~7 min.
3-4 min.
and Prepared
Salmon Steaks
P-HI
5~7 min.
Add 15~30 ml(1~2 Tbsp)
3-4 min.
VEGETABLE
ITEM
artichokes, fresh
artichokes, frozen
POWER LEVEL PREPARATION
P-HI
Whole
P-HI
Hearts
15
QUANTITY
4(8 oz. each)
250g(9 oz. pkg)
COOKING TIME STANDING TIME
10-12 min.
5 min.
8-9 min.
5 min.
VEGETABLE
ITEM
asparagus, fresh
asparagus, frozen
broccoli, fresh
broccoli, frozen
brussels sprouts, fresh
brussels sprouts, frozen
carrots, fresh
carrots, frozen
cauliflower, frozen
celery, fresh
corn, fresh
POWER LEVEL PREPARATION
QUANTITY
COOKING TIME STANDING TIME
P-HI
11/2-in.pieces
500g(1 lb.)
7-9 min.
3 min.
P-HI
Whole spears 280g(10 oz. pkg)
7-9 min.
3 min.
P-HI
Spears
500g(1 lb.)
7-9 min.
P-HI
Whole or cut
280g(10 oz. pkg)
7-9 min.
3 min.
P-HI
Whole
280g(10 oz. tub)
7-9 min.
P-HI
Whole
280g(10 oz. pkg)
7-9 min.
3 min.
P-HI
1/2-in.slices
500g(1 lb.)
8-10 min.
3 min.
P-HI
Sliced
280g(10 oz. pkg)
6-8 min.
3 min.
P-HI
florets
280g(10 oz. pkg)
6-8 min.
3 min.
P-HI
1/2-in.slices
500g(1 lb.)
7-9 min.
5 min.
P-HI
on cob, husked
4 ears
10-12 min.
5 min.
P-HI
on cob, husked
4 ears
10-12 min.
5 min.
corn, frozen
P-HI
whole kernel
280g(10 oz. pkg)
7-9 min.
3 min.
P-HI
cubed
500g(1 lb.)
7-9 min.
3 min.
eggplant, fresh
P-HI
whole, pierced 500~700g(1-11/2 lb.)
8-10 min.
5 min.
leeks fresh
P-HI
whole, ends
500g(1 lb.)
8-10 min.
5 min.
lima beans, frozen
P-HI
whole
280g(10 oz. pkg)
7-9 min.
3 min.
mixed vegetables frozen
P-HI
280g(10 oz. pkg)
7-9 min.
3 min.
mushrooms, fresh
P-HI
sliced
500g(1 lb.)
4-6 min.
3 min.
okra, frozen
P-HI
sliced
280g(10 oz. pkg)
7-9 min.
5 min.
onions, fresh
P-HI
whole, peeled
8-10 small
10-12 min.
5 min.
pea pods(snow peas), frozen
P-HI
whole
170g(6 oz. pkg)
6-7 min.
3 min.
peas and carrots
P-HI
280g(10 oz. pkg)
6-7 min.
3 min.
parsnips, fresh
P-HI
cubed
500g(1 lb.)
8-10 min.
5 min.
potatoes, white or sweet,
P-HI
whole
4(6 oz. eash)
12-14 min.
3 min.
fresh
P-HI
whole
8(6 oz. eash)
16-18 min.
5 min.
squash, summer, fresh
P-HI
1/2-in.slices
500g(1 lb.)
6-8 min.
3 min.
squash, summer, frozen
P-HI
sliced
280g(10 oz. pkg)
6-8 min.
3 min.
squash, winter, fresh
P-HI
whole, pierced
700g(11/2lbs.)
12-14 min.
5 min.
squash, winter, frozen
P-HI
whipped
340g(12 oz. pkg)
8-10 min.
3 min.
succotash, frozen
P-HI
280g(10 oz. pkg)
8-10 min.
3 min.
turnips
P-HI
cubed
4 cups
10-12 min.
3 min.
REHEATING CHART
ITEM
QUANTITY
Appetizers
(bite size)
2 servings
P-HI
4-6 min.
110~140g(4-5 oz.)
250g(8-9 oz.)
P-HI
P-HI
3-5 min.
8-10 min.
600g(21 oz.)
P-HI
14-17 min.
300g(11 oz.)
P-HI
7-9 min.
480g(17 oz.)
P-HI
9-12 min.
Breakfast entrée
Entrée
Regular TV-style
dinner
Hearty TV-style
dinner
POWER LEVEL COOKING TIME
16
SPECIAL INSTRUCTION
Heat 12 at time on paper towel
lined paper plate or microwave
oven roasting rack
If containers is 3/4-inch deep,
remove foil cover and replace foil
tray in original box.
For containers more then 3/4inch deep, remove food to similar
size glass container; heat,
covered. If no top crust stir
occasionally.
ITEM
Fried chicken
Fried fresh fillets
Pizzas (sliced)
Pouch dinners
Bagels
Danish
Dinner rolls
Hard rolls
Frozen Juice
Concentrates
Non-Dairy creamer
Pancake
Frozen vegetables
QUANTITY POWER LEVEL COOKING TIME
SPECIAL INSTRUCTION
2 pieces
P-HI
3-5 min.
Arrange, on paper tower lined
4 pieces
P-HI
4-6 min.
paper plate, covered with paper
6 pieces
P-HI
5-7 min.
tower.
2 fillets
P-HI
3-4 min.
4 fillets
P-HI
4-6 min.
1
P-HI
2-4 min.
Arrange on microwave oven
2
P-HI
3-5 min.
roasting rack.
4
P-HI
5-7 min.
Pierce pouch. Set on plate. Turn
140~160g(5-6 oz.)
P-HI
5-6 min.
over halfway through cooking.
280~300g(10-11 oz.)
P-HI
9-11 min.
2
P-80
3-4 min.
4
P-80
4-6 min.
1
P-80
1-2 min.
Each individually wrapped in paper
2
P-80
2-3 min.
toweling (for1-2) or arrange on
4(6 oz. pkg)
P-80
3-4 min.
paper plate, cover with paper
6(13 oz. pkg)
P-80
4-5 min.
toweling.
6
P-80
2-3 min.
1(1-11/4 oz.)
P-80
1-2 min.
2
P-80
11/2-21/2 min.
4
P-80
2-3 min.
170g(6 oz.)
P-HI
1-2 min.
Remove lid. If container is foil lined
340g(12 oz.)
P-HI
2-5 min.
transfer to a pitcher or open carton.
450g(16 oz.)
P-80
10-12 min.
Let stand after defrosting.
280g(10 oz.)
P-80
5-6 min.
Pierce box, set on plate. If box is foil
160g(6 oz.)
P-80
8-12 min.
wrapped, remove foil. If vegetables are in
280g(10 oz.)
P-80
10-14 min.
pouch, pierce pouch. Let stand 5 min.
Cheese cake
500g(17 oz.)
P-80
4-5 min.
Brownies
360g(13 oz.)
P-80
2-4 min.
Pound cake
300g(103/4 oz.)
P-80
11/2-3 min.
Coffee cake
300~340g(11-12 oz.)
P-80
3-5 min.
17
Remove from original container.
Arrange on a serving plate. Let stadn 5
minutes after cooking(to defrost). Add
an additional 1-2 minutes to serve
warm.
BEFORE YOU CALL FOR SERVICE
Refer to the following checklist, you may prevent an unnecessary service call.
* The oven doesn't work;
1. Check that the power cord is securely plugged in.
2. Check that the door is firmly closed.
3. Check that the cooking time is set.
4. Check for a blown circuit fuse or tripped main circuit breaker in your house.
* Sparking in the cavity;
1. Check utensils. Metal containers or dishes with metal trim should not be used.
2. Check that metal skewers or foil does not touch the interior walls.
If there is still a problem, contact the service station.
A list of these stations is included in the oven.
DO NOT ATTEMPT TO SERVICE THE OVEN YOURSELF !
QUESTIONS AND ANSWERS
* Q : I accidentally ran my microwave oven without any food in it. Is it damaged?
* A : Running the oven empty for a short time will not damage the oven. However, it is not
recommended.
* Q : Can the oven be used with the glass tray or roller guide removed?
* A : No. Both the glass tray and roller guide must always be used in the oven before cooking.
* Q : Can I open the door when the oven is operating?
* A : The door can be opened anytime during the cooking operation. Then microwave energy will be
instantly switched off and the time setting will maintain until the door is closed and START is
touched.
* Q : Why do I have moisture in my microwave oven after cooking?
* A : The moisture on the side of your microwave oven is normal. It is caused by steam from cooking
food hitting the cool oven surface.
* Q : Dose microwave energy pass through the viewing screen in the door?
* A : No. The metal screen bounces back the energy to the oven cavity. The holes are made to allow
light to pass through. They do not let microwave energy pass through.
* Q : Why do eggs sometimes pop?
* A : When baking or poaching eggs, the yolk may pop due to steam build-up inside the yolk
membrane. To prevent this, simply pierce the yolk with a toothpick before cooking. Never cook
eggs without piercing their shells.
18
QUESTIONS AND ANSWERS ( continued )
* Q : Why this standing time recommended after the cooking operation has been completed?
* A : Standing time is very important.
With microwave cooking, the heat is in the food, not in the oven. Many foods build up enough
internal heat to allow the cooking process to continue, even after the food is removed from the
oven. Standing time for joints of meat, large vegetables and cakes is to allow the inside to cook
completely, without overcooking the outside.
* Q : What does “standing time” mean?
* A : “Standing time” means that food should be removed from the oven and covered for additional
time to allow it to finish cooking. This frees the oven for other cooking.
* Q : Why does my oven not always cook as fast as the microwave cooking guide says?
* A : Check your cooking guide again, to make sure you’ve followed directions exactly ; and to see
what might cause variations in cooking time. Cooking guide times and heat settings are
suggestions, to help prevent over-cooking... the most common problem in getting used to a
microwave oven.
Variations in the size, shape and weights and dimensions could require longer cooking time. Use
your own judgement along with the cooking guide suggestions to check whether the food has
been properly cooked just as you would do with a conventional cooker.
* Q : Will the microwave oven be damaged if it operates while empty?
* A : Yes. Never run it empty.
* Q : Can I operate my microwave oven without the turntable or turn the turntable over to hold a large
dish?
* A : No. If you remove or turn over the turntable, you will get poor cooking results. Dishes used in
your oven must fit on the turntable.
* Q : Is it normal for the turntable to turn in either direction?
* A : Yes. The turntable rotates clockwise or counterclockwise, depending on the rotation of the motor
when the cooking cycle begins.
* Q : Can I pop popcorn in my microwave oven? How do I get the best results?
* A : Yes. Pop packaged microwave popcorn following manufactures guidelines or use the preset
POPCORN pad. Do not use regular paper bags. Use the “listening test” by stopping the oven as
soon as the popping slows to a “pop” every 1 or 2 seconds. Do not repop unpopped kernels. Do
not pop popcorn in glass cookware.
19
DISPOSAL OF USED ELECTRICAL &
ELECTRONIC EQUIPMENT
The meaning of the symbol on the product, its accessory or packaging indicates that
this product shall not be treated as household waste. Please, dispose of this
equipment at your applicable collection point for the recycling of electrical & electronic
equipments waste. In the European Union and Other European countries which there
are separate collection systems for used electrical and electronic product. By ensuring
the correct disposal of this product, you will help prevent potentially hazardous to the
environment and to human health, which could otherwise be caused by unsuitable
waste handling of this product. The recycling of materials will help conserve natural
resources. Please do not therefore dispose of your old electrical and electronic
equipment with your household waste. For more detailed information about recycling of
this product, please contact your local city office, your household waste disposal
service or the shop where you purchased the product.
DAEWOO ELECTRONICS SALES UK LIMITED
YOUR PRODUCT GUARANTEE
Dear Customer,
Thank you for buying this Daewoo product. In the unlikely event of a failure all repair work will be carried out by your retailer or Daewoo
approved service centre, for a period of 12 months from date of sale.
Daewoo Electronics Sales UK Ltd., will provide the following services in order to expedite this guarantee.
During this period should a fault occur due to improper materials or workmanship, the retailer, authorised service centre, or authorised
service dealer will carry out repairs at no cost to yourself. Replacement products will be offered at the discretion of your supplying dealer.
This guarantee will be honoured by Daewoo service networks in other E.C. members states, in accordance with the terms and conditions
which prevail in the member state at the time service is requested.
CONDITIONS
Any claims made under the terms of the guarantee must be supported by the original invoice/bill of sale issued at the time of sale. Daewoo
reserve the right to refuse guarantee should any of the information on the bill of sale be removed or changed in any way after the original
purchase of the product by the consumer from the retailer.
Modifications or adjustments made to the product which enable it to conform to local technical or safety standards in force in any country
other than the one for which the product was originally designed and manufactured, are not included in this guarantee. Failures arising from
such modifications, whether performed properly or not, will not be covered by this guarantee.
THIS GUARANTEE DOES NOT COVER ANY OF THE FOLLOWING:1) Periodic maintenance, the repair or replacement of parts due to normal wear and tear.
2) Home service transport cost, and other costs and risks of transport relating directly or indirectly to the guarantee of the product.
3) Damage to this product resulting from: the above and misuse, including but not limited to the failure to use this product for its normal
purpose or in accordance with the instructions on the proper use and maintenance of this product, and the installation or the use of this
product in a manner inconsistent with the technical or safety standards in force in the country where the product is used.
4) Repairs carried out by non-authorised service centres.
5) Accidents, acts of God, or any cause beyond the control of Daewoo including but not limited to lightning, water, fire and improper
ventilation.
6) Aerial alignment and consumer control adjustments
7) Batteries whether supplied by Daewoo or not which become worn or exhausted in use.
8) Loss or damage caused to any item or article used with this product. This includes (but not limited to)discs, tapes, records, and films.
This guarantee does not affect your statutory rights as a consumer, nor your rights against the retailer, arising from their sales or purchase
contract.
In the absence of applicable legislation, this guarantee will be the consumers sole and exclusive remedy, and neither Daewoo nor its
subsidiary, or distributor shall be liable for any incidental or consequential damages for breach of any express or implied guarantee of this
product.
For further information regarding this or any other query you may have about Daewoo products or its services please write to:Daewoo Electronics Sales UK Limited
Daewoo Building
Wharfdale Road
Winnersh Triangle
Workingham
Berkshire RG11 5TP
IN ALL CASES OF DIFFICULTY-CONSULT YOUR DAEWOO
DEALER FROM WHOM THE PRODUCT WAS PURCHASED
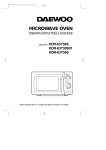
ABOUT THIS MANUAL
ef3f,1!m-:9ife:`!f1m\
no pqr stu
/v^ wxyz I{
"
#
$%&
'()*
+,-./01-2304
567
<=>:-
8:3=?
@
<=>:-)*
+,-.0CCC83D
A
89:;,,
BA
EF
4F
G
H
0F
IF
2F
J
K
O
P
M
L
N
Q:Q,!RST!UV44WXYZ[
C/\CI\CI.]^SH.U_OEW[
C/\CI\C/.E`E0WSH.U_O4W[
Ca\CI\4I.]^SH.U_OEW[
bcd
ef3f,1 " #
g ^ h
i:DT a0C.C//C!j9kT a0C.0all