Transcript
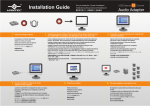
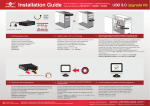
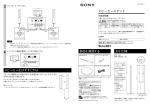
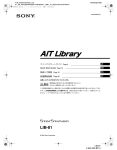
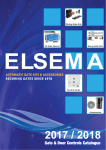
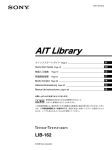
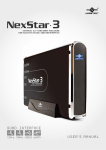
Installation Guide
Guía de instalación
Guide d'installation
Installationsanleitung Guida all’installazione
取り付けガイド 安裝指南
安装指南
LED Light
USB 3.0
DC Jack
USB 3.0
SATA/Power Connector
*USB 3.0 does not contain Y-Cable
1.
Verify the package contents.
Compruebe el contenido del paquete.
Vérifiez le contenu de la boîte.
Verifica del contenuto della confezione
Überprüfen Sie den Kartoninhalt.
パッケージコンテンツを確認します
檢查包裝內容。
检查包装内的物品。
2.
Carefully connect the 2.5” hard drive to the connector.
Instale con cuidado la unidad de disco
duro de 2,5”.
Installez soigneusement votre disque dur
de 2,5”.
Installieren Sie Ihre 2,5 Zoll-Festplatte
vorsichtig im NexStar RX.
Installare con delicatezza il disco rigido
da 2,5”.
2.5 インチハードドライブを丁寧に取り付け
ます。
小心安裝2.5”硬碟驅動器。
小心地安装2.5”硬盘驱动器。
Information in this document is subject to change without notice.
Reproduction of these materials in any manner whatsoever without written permission is strictly forbidden.
Printed in China
Printed on Recycled Paper.
3.
Insert the hard drive caddy back into the NexStar RX
housing as the picture below. Be sure to align the
caddy with the guides within the housing.
4.
Inserte el armazón de la unidad de disco
duro en su NexStar RX y asegúrese de
orientar dicho armazón correctamente.
Insérez le plateau à disque dur dans le
NexStar RX en veillant bien à orienter le
plateau correctement.
Achten Sie darauf, die Festplatte richtig
herum in das NexStar RX einzusetzen.
Inserire il supporto disco rigido
all’interno di NexStar RX ed assicurarsi
che sia orientato in modo appropriato nel
supporto.
ハードドライブキャディを NexStar RX に差し
込んで、
キャディの方向が正しいことを確認
します。
將硬碟驅動器盒插入 NexStar RX, 並確保
盒體正確走向。
将硬盘驱动器盒插入NexStar RX,并确保盒
体正确定向。
Secure the caddy to the housing using the screws
provided.
Asegure el armazón en la carcasa con
los tornillos proporcionados.
Fixez le plateau au logement avec les vis
fournies.
Befestigen Sie das NexStar RX mit den
mitgelieferten Schrauben im
PC-Gehäuse.
Fissare il supporto alla struttura usando
le viti fornite in dotazione.
付属のネジを使って、
キャディをハウジング
に固定します。
利用隨附的螺絲將合體固定到外殼。
利用随附的螺丝将盒体固定到外壳。
NST-240S3-BK
v1.01
Copyright © 2012 Vantec Thermal Technologies. All Right Reserved.
|
All Registered Trademarks Belong To Their Respective Companies.