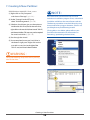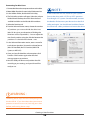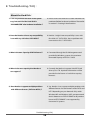
1
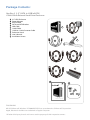
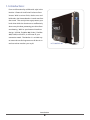
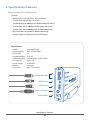
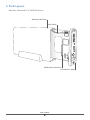
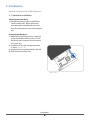
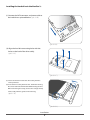
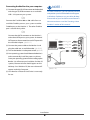
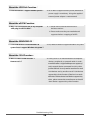
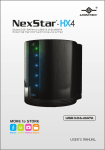
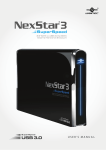
QUAD
INTERFACE
USER’S MANUAL
Package Contents:
NexStar 3 3.5” SATA to USB/ eSATA/
1394a/ 1394b External Hard Drive Enclosure
1
2
3
4
5
6
7
8
9
10
3.5" HDD Enclosure
Power Adapter
eSATA Cable
SATA to eSATA Bracket
USB Cable
1394b Cable
1394b to 1394a Converter Cable
Enclosure Stand
User’s Manual
Installation Screws
1
SATA
2
SATA
4
3
6
5
8
7
9
10
EXTERNAL 3.5” HARD DRIVE ENCLOSURE
USB 2.0/eSATA/FireWire 800/400 INTERFACE
USER’S MANUAL
TRADEMARKS
MS-DOS,Microsoft, Windows NT/2000/ME/XP/Vista are trademarks of Microsoft Corporation.
Apple, Macintosh and Mac are trademarks of apple Computer
*All other third-party brands and names are the property of their respective owners.
Table of Contents:
1. Introduction ................................................................................................................02
2. Specifications/Features
NexStar 3 External 3.5” HDD Enclosure ......................................................................... 03
3. System Requirements ......................................................................................04
4. Parts Layout
NexStar 3 External 3.5” HDD Enclosure ..........................................................................05
5. Installation
NexStar 3 External 3.5” HDD Enclosure
5.1 Hardware Installation ..................................................................................................06
5.2 System Set Up ................................................................................................................09
5.3 USB Mode....................................................................................................................... ..09
5.4 eSATA Mode ................................................................................................................. ...10
5.5 FireWire 800/400(1394b/1394a) Mode ...................................................................10
6. Disconnecting the NexStar 3
NexStar 3 External 3.5” HDD Enclosure ..........................................................................11
7. Creating A New Partition ..............................................................................12
8. Troubleshooting/FAQ
NexStar 3 External 3.5” HDD Enclosure ..........................................................................15
9. Warranty .........................................................................................................................17
10. Contact ...........................................................................................................................17
Table of Contents
1
1. Introduction:
Form and functionality collide with style in the
NexStar 3 External Hard Drive Enclosure from
Vantec. With its mirror finish, sleek curves and
bold colors, the Vantec NexStar 3 stands out from
the crowd. The sturdy drive cage protects your
hard drive while the aluminum case effectively
draws away the heat, protecting your drive from
overheating. With its quad external interface
design: USB 2.0, FireWire 400(1394a), FireWire
800(1394b) and eSATA, it will meet all your
connection needs. The NexStar 3 is an ideal way
to store and transfer large amounts of data in an
enclosure that matches your style!
NST-360FBSU-BK
Introduction
2
2. Specifications/Features:
NexStar 3 External 3.5” HDD Enclosure:
Features:
• Aluminum Casing Cools Down Your Hard Drive
• Transfer Rates Up to 3Gbps W/ eSATA
• Transfer Rates Up to 480Mbps W/ USB 2.0 (12Mbps W/ USB1.1)
• Transfer Rates Up To 400Mbps With FireWire 400(1394a)
• Transfer Rates Up to 800Mbps With FireWire 800(1394b)
• Hot-Swappable: Plug And Play Without Rebooting
• Attractive Blue LED Indicates Power/HDD Activity
Specifications:
•
•
•
•
•
•
•
•
•
Model:
Device Support:
Device Size:
Internal Interface:
External Interface:
HD Capacity:
Power Supply:
Material:
Dimension:
NST-360FBSU-BK
SATA I/II Hard Drive
3.5”
SATA I/II
USB 2.0/eSATA/1394a/1394b
Up to 1 TB
AC Adapter
Aluminum
206 x 123 x 33mm
IEEE
1394
FireWire 800 / 400
USB 2.0 port
SATA
eSATA port
Power connection
Power switch
Specifications / Features
3
3. System Requirements:
Intel Pentium II 350 MHz-compatible
Mac G3 processor & greater(G4 for 1394b)
Microsoft Windows 2000/XP/Vista
Mac OS 10.2 & greater
1. USB port, internal SATA port, eSATA
1. USB port, internal SATA port, eSATA
port, FireWire 400(1394a) port, or
port, FireWire 400(1394a) port, or
Fire Wire 800 (1394b) port.
Fire Wire 800 (1394b) port.
2. For USB 2.0 speeds, the system must
2. For USB 2.0 speeds, the system must
support USB 2.0 specifications
support USB 2.0 specifications
3. For SATA speeds , the system must
3. For SATA speeds , the system must
support SATA specifications
support SATA specifications
4. For FireWire 800(1394b) speeds, the
4. For FireWire 800(1394b) speeds, the
system must support 1394b specifications.
system must support 1394b specifications.
5. For FireWire 400(1394a) speeds, the
5. For FireWire 400(1394a) speeds, the
system must support 1394a specifications.
system must support 1394a specifications.
System Requirements
4
4. Parts Layout:
NexStar 3 External 3.5” HDD Enclosure
Aluminum Housing
LED Cable
SATA/Power connector
Hard Drive Caddy
Parts Layout
5
5. Installation:
NexStar 3 External 3.5” HDD Enclosure:
5.1. Hardware Installation:
Preparing the hard drive:
(1) Set the hard drive jumpers to MASTER or
SINGLE DRIVE ONLY. Please refer to the
documentation included with your hard
drive for information on how to accomplish
this.
Preparing the NexStar 3:
(1) Remove the side of the NexStar 3 with the
power and USB connection ports. If it has
previously been screwed in place, remove
the screws first.
(2) Carefully slide out the side approximately
3 inches. ( pic 5.1-A )
(3) Unplug the red and white cable for the LED.
(4) Slide out the rest of the side.
( pic 5.1-A )
Installation
6
Installing the hard drive in the NexStar 3:
(1) Connect the SATA connector and power cable to
the hard drive as pictured below. ( pic 5.1-B )
( pic 5.1-B )
(2) Align the hard drive mounting holes with the
holes on the back of the drive caddy.
( pic 5.1-C )
( pic 5.1-C )
(3) Secure the hard drive onto the drive caddy with the
screws provided.
(4) Insert the drive caddy back into the aluminum housing.
Be sure to reconnect the LED cable before closing the unit.
When reinserting the caddy, also be sure to align the top
of the caddy with the guides on the housing.
( pic 5.1-D )
( pic 5.1-D )
Installation
7
Connecting the NexStar 3 to your computer:
NOTE :
(1) Connect the type (B) USB connector to the NexStar3
and the type (A) USB connector to an available
For new hard drives, you will need to initialize
USB 1.1/2.0 port on your system.
and partition your hard drive before it will appear
in Windows Explorer or on your Mac desktop.
Or
Please refer to your hard drive manufacturer's
Connect the Fire Wire 800 or 400 cable from an
documentation or read the"Creating a New
available FireWire port on your system to either
Partition" section of this manual.
FireWire port on the NexStar 3. The other FireWire
port is used for daisy chain.
Or
Connect the eSATA connector to the NexStar 3
and to the eSATA port on your system. An internal
(1)
IEEE
1394
Firewire Cable
IEEE
1394
SATA port can be converted to an eSATA port with
or
the included adapter. ( pic 5.1-E )
USB 2.0 Cable
(2) Connect the power cable to the NexStar 3 and
eSATA Cable
SATA
SATA
or
plug the cable into an available outlet. ( pic 5.1-E )
(3) Turn on the NexStar 3 via the power switch.( pic 5.1-E )
(4) Your operating system should detect the NexStar 3
(2)
and automatically install the necessary drivers
(3)
Once your operating system finishes setting up the
NexStar 3, it will mount your hard drive. On Mac OS
systems, the new volume should appear on the
desktop. On a Windows PC,the new volume will
( pic 5.1-E )
appear under My Computer.
(5) Your NexStar 3 External Hard Drive is now ready
for use.
Installation
8
5.2 System Set Up
Some tips before connecting your
NOTE :
external storage enclosure :
• Please confirm that your system supports SATA.
If you can see the USB icon in the system tray ,
• If your system does not support SATA, please
but there is no any disk appear in your computer,
please confirm your hard disk is partitioned.
install a SATA host card.
• To enable auto mount for SATA, your system
must support Plug and Play.
WARNING :
• If required, update your OS or BIOS.
• Only one interface can be used at the time.
Please be careful & plug the power adapter
• Only one computer can access the drive at the time.
to your enclosure properly.
• Firewire can be daisy chained.
See below figures. ( pic 5.2-A , pic 5.2-B )
• All devices in a daisy chain have to be switched
on to permit the hub/daisy chain function.
• Do not cover the device and leave enough
space around it for better heat dissipation.
• Do not expose the product to
water or humid conditions.
( pic 5.2-A )
• If possible , arrange the cables well to
avoid the cross by one another.
• Using the supplied cables and
adapter is always recommended.
5.3 USB Mode
Use in Vista X86、Vista 64 bit、Windows XP、
Windows 2000 and MAC OS
1. USB 1.1 Mode:
No driver is required for Vista X86, Vista 64-bit,
Windows XP, Windows 2000 and Mac OS 9.1,
9.2, 10.1.5 or higher. NexStar 3 does not support
Windows 98, Windows ME and Mac OS 9 or older
in USB 1.1 mode.
2. USB 2.0 Mode:
No driver is required for Vista X86, Vista 64-bit,
Windows XP, Windows 2000 and MAC OS 10.2
or higher. NexStar 3 does not support Windows 98,
Windows ME and Mac OS 10.1 or older in USB 2.0
mode.
Installation
9
( pic 5.2-B )
5.4 eSATA Mode
Use in Vista X86、Vista 64 bit、Windows XP、
NOTE :
Windows 2000 and MAC OS
No driver is required for Vista X86, Vista 64-bit,
Because some motherboard does not support
Windows XP, Windows 2000 and Mac OS 10.2
eSATA hot-plug and play function, if you meet this
or higher. NexStar 3 does not support Windows 98,
situation, please follow below steps to setup NexStar 3.
Windows ME and Mac OS 10.1 or older in eSATA
1. Shut down your computer.
mode.
2. Turn on NextStar 3 then connect it to your computer.
3. Power on your computer.
5.5 FireWire 800/400(1394b/1394a) Mode
Use in Vista X86、Vista 64 bit、Windows XP、
Windows 2000 and MAC OS
No driver is required for Vista X86, Vista 64-bit,
Windows XP, Windows 2000 and Mac OS 10.2
or higher. NexStar 3 does not support Windows 98,
Windows ME and Mac OS 10.1 or older in
FireWire 800/400 mode.
Installation
10
6. Disconnecting the NexStar 3:
NexStar 3 External3.5" HDD Enclosure:
Windows 2000/ XP/Vista:
MacOS:
(1) Make sure all operations using the hard
(1) Make sure all operations using the hard
drive within the NexStar 3 has ceased.
drive with in the NexStar 3 has ceased.
(2) Close any windows and programs
(2) Close any windows and programs
pertaining to the NexStar 3 .
pertaining to the NexStar 3.
(3) Double click the green "Unplug or EJect
(3) From the Desktop, drag the
Hardware " icon in the system tray and
I\lexStar 3 hard drive to the trash.
select [ Safely Remove Hardware ].
(4) Turn off the NexStar 3.
Select the device you wish to remove and
(5) Unplug the USB cable or Firewaire
click on [Stop]. The system should prompt,
cable from the system.
"lt is now safe to remove the USB device.
" If not, wait for any programs still using
the device to f in ish and tryagain."
(4) Turn off the NexStar 3.
(5) Unplug the USB cable or Firewire cable
from the system.
WARNING :
NEVER remove the NexStar 3 while the hard drive
is in use. Doing so may corrupt the data on the hard
drive or damage the hard drive, I\lexStar 3, or computer.
Disconnecting the NexStar 3
11
7. Creating A New Partition:
FOR Windows 2000/XP/ Vista : users
NOTE :
(1) Right click on "My Computer"
and choose "Manage". ( pic 7-A )
Most hard drives should come with a CD that
includes on installation program. If not, a download
should be available on the manufcturers website.
The best way to partition a new hard drive is by using
the manufacturers program. However, if that is not
possible,please try the following instead
(if using Mac as 9 or below, please refer to your
hard drive documentation for information on
formatting / partitioning the hard drive):
(2) Under "Storage" on the LEFT pane,
select "Disk Management" ( pic 7-B )
(3) Windows should now give you the option to
initialize the disk. lf not,locate the new drive,
right click on the new disk (where it reads "Disk #")
and choose Initialize. (This step may not be required
for some hard drives.) ( pic 7-B )
(4) Go through the wizard.
(5) Once complete,locate your hard drive in
the bottom right pane. Right click on the
area with a status bar (to the right of the
1
"Disk #" area) and choose New Partition.
WARNING :
Doing the following setup will erase any existing
data on the drive.
( pic 7-A )
2
3
( pic 7-B )
Creating a New Partition
12
(6) Follow the directions of the wizard.
The recommended partition type is "primary"
1
and the recommended ( pic 7-C )
VANTEC
file system is "NTFS." Please note that
Windows 2000/XP/Vista limits FAT32
partitions to only 32GB.
2
(7) Windows Disk Management will format
and parti-tion the disk according to your
settings, and your drive will appear
3
in My Computer, ready to use. ( pic 7-D )
( pic 7-C )
(8) Once complete,you should now be able to
see the drive in Windows Explorer.
1
VANTEC(E:)
( pic 7-D )
Creating a New Partition
13
2
Formatting for Mac Users
1. Connect the drive to the computer and turn on the drive.
NOTE :
2. Select Utilities from the Go menu in the Finder menu bar.
3. In the Utilities folder, double-click Disk Utility.
If the hard drive will not mount on your system,
4. The Disk Utility window will open. Select the volume
format the drive with a FAT32 or NTFS partition
labeled Vantec Desktop Hard Disk from the list of
first through a PC system. Once formatted, connect
available hard disks on thw left side of the window.
the NexStar Enclosure to your Mac and run the Disk
5. Select the Partition tab.
Utility tool again. You should now be able to format
6. From the Volume Scheme: menu, choose the mumber
the drive into a Mac partition and mount the drive
of partitions you want to divide the drive into
(Mac OS 10.x gives you the option of dividing the
drive into at most 16 partitions ) . You can adjust the
size of each partition using the slide bar between the
partitions in the Volume Scheme : area.
7. In the Volume Information section, enter a name for
each volume (partition), choose the volume format
(Mac OS Extended, Mac OS Standard, UNIX File
System, or MS-DOS).
8. Once you have finalized the volume options,click
Partition. Click Partition again when the alert
message appears to continue.
9. Mac Disk Utility will format and partition the disk
according to your settings, and your drive will be
( pic 7-E )
ready to use.
WARNING :
Following these steps will erase everything from
the Hard Disk. If you have data that you want to
protect or continue to use, back up your data
before performing these steps.
Creating a New Partition
14
8. Troubleshooting / FAQ :
About the Hard Disk:
A: Please make sure the HDD has been initialized and
1. I can only find the USB icon in the system
tray, but can’t find the hard disk in
partitioned before hardware installation. Please refer
“MY COMPUTER” after hardware installation ?
to section 7. Creating A New Partition.
2. Does the NexStar 3 have any compatibility
A: NexStar 3 might have compatibility issues with
issue with any 3.5 inches SATA HDD ?
few older 3.5” SATA HDDs, but no problem with
new versions of 3.5” SATA HDDs.
A: Formatted through the Disk Management tool
3. What is the max. Capacity of FAT32 format ?
provided by Windows systems, the maximum
formatted capacity of FAT32 is 32GB.
A: Currently, the NexStar 3 supports Serial ATA hard
4. What is the max. capacity that NexStar 3
drive up to 1TB. Updated information will be
can support ?
provided in the future as hard drive capacity
increases.
A: Yes. NexStar 3 can support multiple partitions with
5. Does NexStar 3 supports multiple partitions
different formats. You can format it under FAT32 and
with different formats (FAT32 or NTFS) ?
NTFS depending on your demand. Only under
Windows ME and Windows 98SE, we recommend
that it’s better to use FAT32 FORMAT to all partitions
because NTFS FORMAT is not supported by
these two OS systems.
Troubleshooting / FAQ
15
About the USB Disk Function:
1. Does the NexStar 3 support USB bus-power ?
A: No. It doesn’t support USB bus-power, the external
power supply is mandatory. Using the supplied
external power adapter is recommened.
About the eSATA Function :
2. Why I can not find the disk in my computer
A: 1. Please make sure that the firmware is
after plug in eSATA cable ?
the latest version.
2. Please make sure that your motherboard
supports the hot swapping of eSATA.
About the WINDOWS OS:
3. I can’t find NexStar 3 under Windows 98
A: No, NexStar3 doesn’t support Windows 98 system.
system. Does it support Windows 98 system ?
About the 1394 Function :
4. What is DAISY CHAIN function ?
A: A daisy chain is an interconnection of computer
How to use it ?
devices, peripherals, or network nodes in series,
one after another. A single FireWire port can support up
to 63 external devices connected in a daisy chain,
just like USB hub. You only need to attach two or more
1394 devices one by one. But not all 1394 devices
support daisy chain function. If NexStar 3 co-works
with other Firewire devices but failed to support daisy
chain , please contact the manufacturers to check if
their devices support daisy chain function.
Troubleshooting / FAQ
16
9. Warranty:
The NexStar 3 comes with a 1 year limited
warranty ( 90 day parts ) . If your unit should
become defective within that time frame, please
go to http://www.vantecusa.com for information
on how to receive warranty exchange or repair.
Cosmetic defects and missing parts are not
covered under this warranty. Please check
the contents of the unit to make sure you received
all parts. Also, check for any cosmetic flaws.
If any parts are missing or if there are cosmetic
defects, please contact the retailer from which
you purchased the unit immediately and ask for
a replacement.
10. Contact :
Vantec Thermal Technologies
43951 Boscell Rd.
Fremont, CA 94538
tel: 510-668-0368
fax: 510-668-0367
website: www.vantecusa.com
Copyright © 2008 Vantec Thermal Technologies. All Right Reserved.
All Registered Trademarks Belong To Their Respective Companies.
Warranty / Contact
17