1
Model H3634LL/A
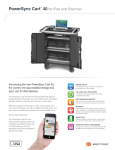
PowerSync Tray for iPad
QUICK START GUIDE
Welcome!
Congratulations on purchasing your new PowerSync Tray for iPad!
This Quick Start Guide is intended to guide you through the initial setup and basic use of the Bretford PowerSync Tray
for Apple iPad. Additional information available at :
www.bretford.com/apple
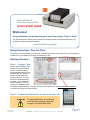
Using PowerSync Tray for iPad
The PowerSync Tray for iPad enables you to take music, videos, podcasts, photos and other content files in your iTunes library on
your Mac and sync your selected content across 10 iPad devices at a time.
Getting Started …
Step 1 Configure iTunes
for use with PowerSync Tray
By default, iTunes will automatically
check for new software updates,
including available updates for iTunes
& any attached iPads. This feature,
however, can often interfere with
syncing multiple iPads. To prevent
iTunes from automatically checking
for updates, Choose “Preferences…”
from the iTunes menu, and on the
“General” pane, deselect “Check for
new software updates automatically”. Also, open “Devices” from this “General” pane, and be sure no boxes are checked,
nor are there any listings under “Device backups”.
Step 2
Configure each iPad Device for use with the PowerSync Tray
ATTENTION:
Part # 031-8632
JAF 05.13.11
For optimal performance, you must set-up
your iPad devices using the configuration
on pages 3 of this Quick Start Guide.
Bretford 11000 Seymour Avenue Franklin Park, Illinois USA
iPad 2
800 521 9614
Page 1
Step 3
1.
Sync iPad devices using the PowerSync Tray
Once you have created the content & organized your
playlists within iTunes, and set-up each individual iPad
Device per the instructions on pages 3 please start
with the following configuration:
• Each iPad Device is connected in the tray
• Mac is “ON” with no applications running
• PowerSync Tray is plugged into wall and
Switch is in “OFF” position.
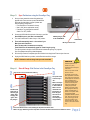
BACK VIEW
2.
Connect the USB Cable from the back of the tray to your Mac
Note: USB 2.0 port on your Mac is recommended
3.
Turn main Power Switch on back of tray to “ON” position.
4.
iTunes will automatically launch – then wait until your
IEC Plug for Power Cord
Mac shows each iPad device
Note: This may take a few moments to complete.
Each iPad device will automatically appear in iTunes & begin syncing.
The spinning wheel to the right of each iPad device indicates that syncing is in progress.
Sync is complete when spinning wheel disappears.
5.
Once the Sync Process is complete, eject each iPad device or simply close iTunes to eject all at once.
6.
Unplug the USB Cable from your Mac, and the iPad devices will then charge.
USB Plug B-Type, cable
to the Host MacBook
On/Off Switch
NOTE: iPad devices will not charge and sync at the same time!
CAUTION:
Ambient temperature not to
exceed 35°C ( 95°F ).
Step 4
2
Store & Charge iPad Devices in the PowerSync Tray
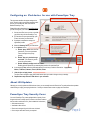
Plug in Power Cord on the left back of the tray
3
Turn power switch
on back of tray to
“On”.
NOTE: PowerSync
Tray will charge up
to 10 iPad devices
4
Individual LED
Lights (one for
each slot) glow
“amber” while
charging, then
“green” when
fully charged.
1
NOTE: For best
results with new
iPad devices, let
them charge for
about 4 hours or
until the iPad
device displays a
charged battery.
PowerSync Tray should only be
used indoors
User can only connect 10 iPad
devices at one time
Input Power Cord must meet
these specifications: A certified
power supply cord must be used
with this equipment. The relevant
national installation and/or
equipment regulations shall be
considered. A certified power
supply cord not lighter than
ordinary polyvinyl chloride
flexible cord according to IEC
60227 (designation H03 VV-F)
shall be used. Alternatively, a
flexible cord of synthetic rubber
according to IEC 60245
(designation H05 RR-F) shall be
used. The power cord set shall
have a power supply cord with
conductors providing a crosssectional area of 3G, 1.00mm2
minimum, and shall have an IEC
plug.
Insert each iPad device into a slot, attaching the 30-pin dock connector cable.
NOTE: The gray Bretford logo on the 30-pin dock connector should face the same side as iPad device screen.
Page 2
Configuring an iPad device for use with PowerSync Tray
This document describes the proper settings to be
set in iTunes in order to get the best experience with
each of your iPad devices, when used with the
Bretford PowerSync Tray.
Please follow these instructions for each iPad device
you will be using with your PowerSync Tray.
1. Connect each iPad, one at a time, to the Mac
you will be using with the PowerSync Tray.
2. If iTunes does not open automatically, open
iTunes, and select your iPad device.
3. If prompted, complete the naming and
registration process.
4. Select the Summary Tab for your iPad device.
5. In the Options section:
a. Enable “Open iTunes when this iPad
is attached” (This not only activates
iTunes, but begins the syncing
process.)
b. Enable “Sync only checked songs
and videos” (This allows for greater
control of synced media.)
c. Disable “Manually manage music and videos”
Enabling this will require that you manually drag media to this particular iPad.
6. In the remaining Tabs, select the media and playlists you wish to sync with this iPad device ... Apps, Music,
Movies, TV Shows, Podcasts, iTunes U, Books, Photos
7. Click the Sync or Apply button.
The Sync button changes to Apply and Cancel buttons when you make a change to the sync settings.
8. Repeat these steps with each iPad device in your collection.
About iOS Updates
Although you can only update one iOS device at a time, you can actually leave the iPads in the Tray and perform those updates
without having to unplug, and replug the devices. Saves you time and wear an tear on plugs and connectors.
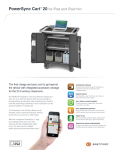
PowerSync Tray Security Cover
Your new PowerSync Tray comes equipped with a Security Cover.
Hinged at the back to easily open for access to the iPads, locked at
the front with a combination lock. (See included lock instructions.)
•  Solid steel construction
•  Ventilated to allow air flow
•  iPads can be charged & sync’d while cover is locked
•  Cover may be removed if security not required
Page 3