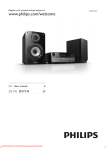
1
Register your product and get support at
www.philips.com/welcome
MCD183
EN User manual
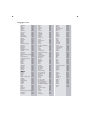
Language Code
Abkhazian
6566
Afar
6565
Afrikaans
6570
Amharic
6577
Arabic
6582
Armenian
7289
Assamese
6583
Avestan
6569
Aymara
6589
Azerhaijani
6590
Bahasa Melayu
7783
Bashkir
6665
Belarusian
6669
Bengali
6678
Bihari
6672
Bislama
6673
Bokmål, Norwegian
7866
Bosanski
6683
Brezhoneg
6682
Bulgarian
6671
Burmese
7789
Castellano, Español
6983
Catalán
6765
Chamorro
6772
Chechen
6769
Chewa; Chichewa; Nyanja 7889
9072
Ё᭛
Chuang; Zhuang
9065
Church Slavic; Slavonic 6785
Chuvash
6786
Corsican
6779
Česky
6783
Dansk
6865
Deutsch
6869
Dzongkha
6890
English
6978
Esperanto
6979
Estonian
6984
Euskara
6985
6976
Faroese
7079
Français
7082
Frysk
7089
Fijian
7074
Gaelic; Scottish Gaelic 7168
Gallegan
7176
Georgian
7565
Gikuyu; Kikuyu
7573
Guarani
7178
Gujarati
7185
Hausa
7265
Herero
7290
Hindi
7273
Hiri Motu
7279
Hrwatski
6779
Ido
7379
Interlingua (International)7365
Interlingue
7365
Inuktitut
7385
Inupiaq
Irish
Íslenska
Italiano
Ivrit
Japanese
Javanese
Kalaallisut
Kannada
Kashmiri
Kazakh
Kernewek
Khmer
Kinyarwanda
Kirghiz
Komi
Korean
Kuanyama; Kwanyama
Kurdish
Lao
Latina
Latvian
Letzeburgesch;
Limburgan; Limburger
Lingala
Lithuanian
Luxembourgish;
Macedonian
Malagasy
Magyar
Malayalam
Maltese
Manx
Maori
Marathi
Marshallese
Moldavian
Mongolian
Nauru
Navaho; Navajo
Ndebele, North
Ndebele, South
Ndonga
Nederlands
Nepali
Norsk
Northern Sami
North Ndebele
Norwegian Nynorsk;
Occitan; Provencal
Old Bulgarian; Old Slavonic
Oriya
Oromo
Ossetian; Ossetic
Pali
Panjabi
Persian
Polski
Português
7375
7165
7383
7384
7269
7465
7486
7576
7578
7583
7575
7587
7577
8287
7589
7586
7579
7574
7585
7679
7665
7686
7666
7673
7678
7684
7666
7775
7771
7285
7776
7784
7186
7773
7782
7772
7779
7778
7865
7886
7868
7882
7871
7876
7869
7879
8369
7868
7878
7967
6785
7982
7977
7983
8073
8065
7065
8076
8084
Pushto
Russian
Quechua
Raeto-Romance
Romanian
Rundi
Samoan
Sango
Sanskrit
Sardinian
Serbian
Shona
Shqip
Sindhi
Sinhalese
Slovensky
Slovenian
Somali
Sotho; Southern
South Ndebele
Sundanese
Suomi
Swahili
Swati
Svenska
Tagalog
Tahitian
Tajik
Tamil
Tatar
Telugu
Thai
Tibetan
Tigrinya
Tonga (Tonga Islands)
Tsonga
Tswana
Türkçe
Turkmen
Twi
Uighur
Ukrainian
Urdu
Uzbek
Vietnamese
Volapuk
Walloon
Welsh
Wolof
Xhosa
Yiddish
Yoruba
Zulu
8083
8285
8185
8277
8279
8278
8377
8371
8365
8367
8382
8378
8381
8368
8373
8373
8376
8379
8384
7882
8385
7073
8387
8383
8386
8476
8489
8471
8465
8484
8469
8472
6679
8473
8479
8483
8478
8482
8475
8487
8571
8575
8582
8590
8673
8679
8765
6789
8779
8872
8973
8979
9085
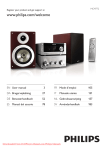
English
Contents
1
2
3
4
5
6
7
Important
4
Safety
Notice
4
5
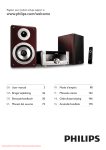
Your DVD Micro Theater
7
Introduction
What’s in the box
Overview of the main unit
Overview of the remote control
7
7
8
9
Connect
11
Place the unit
Connect speakers and subwoofer
Connect FM antenna
Connect TV
Connect power
11
11
11
12
13
Get started
14
Prepare the remote control
Set clock
Turn on
Find the correct viewing channel
Select the correct TV system
Change system menu language
Turn on Progressive Scan
14
14
14
14
15
15
15
Play
16
Play a disc
Play from USB
Play DivX video
Play control
Play options
Picture view options
16
17
17
18
18
19
Adjust settings
20
General setup
Audio setup
Video setup
Preference setup
20
20
21
21
Tune to FM radio stations
22
Program radio stations automatically
Program radio stations manually
Tune to a preset radio station
22
23
23
8
9
Adjust volume level and sound effect
23
Adjust volume level
Select a sound effect
Mute sound
Listen through headphone
23
23
24
24
Other features
24
Activate demonstration mode
Adjust brightness of display panel
Set the alarm timer
Set the sleep timer
Connect other devices
24
24
24
25
25
10 Product information
Supported disc formats
USB playability information
11 Troubleshooting
26
27
27
28
3
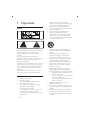
1 Important
Safety
This ‘bolt of lightning’ indicates uninsulated
material within your unit may cause an electrical
shock. For the safety of everyone in your
household, please do not remove product
covering.
The ‘exclamation point’ calls attention to
features for which you should read the enclosed
literature closely to prevent operating and
maintenance problems.
%?@?HJ K ! # & shock, this apparatus should not be exposed to
! "> ! Q )! $
such as vases, should not be placed on this
apparatus.
CAUTION: To prevent electric shock, match
wide blade of plug to wide slot, fully insert.
Important Safety Instructions
4
Follow all instructions.
Heed all warnings.
Do not use this apparatus near water.
Clean only with dry cloth.
Do not block any ventilation openings.
Install in accordance with the
manufacturer’s instructions.
Do not install near any heat sources such
as radiators, heat registers, stoves, or
< ! ( Z produce heat.
EN
Protect the power cord from being
walked on or pinched, particularly at plugs,
convenience receptacles, and the point
where they exit from the apparatus.
!
by the manufacturer.
Use only with the cart, stand, tripod,
"# $ " ! " manufacturer or sold with the apparatus.
When a cart is used, use caution when
moving the cart/apparatus combination to
avoid injury from tip-over.
Unplug this apparatus during lightning
storms or when unused for long periods
of time.
%& ' ( )! '
personnel. Servicing is required when
the apparatus has been damaged in any
way, such as power-supply cord or plug
is damaged, liquid has been spilled or
objects have fallen into the apparatus, the
apparatus has been exposed to rain or
moisture, does not operate normally, or
has been dropped.
Battery usage CAUTION – To prevent
battery leakage which may result in bodily
injury, property damage, or damage to the unit:
Install all batteries correctly, + and - as
marked on the unit.
Do not mix batteries (old and new or
carbon and alkaline, etc.).
Remove batteries when the unit is not
used for a long time.
Apparatus shall not be exposed to
dripping or splashing.
Do not place any sources of danger on the
<=(= )! ! "> $ ( !
candles).
Where the MAINS plug or an appliance
coupler is used as the disconnect device,
the disconnect device shall remain readily
operable.
Use of controls or adjustments or performance of
procedures other than herein may result in hazardous
radiation exposure or other unsafe operation.
Warning
Where the MAINS plug or an appliance coupler is used
as the disconnect device, the disconnect device shall
remain readily operable.
Warning
Never remove the casing of this unit.
Never lubricate any part of this unit.
] $ ! ! " &=
Never place this unit on other electrical equipment.
Only use this unit indoors. Keep this unit away from
Q $ ! )!_! "> =
` Q & ! ( $ #! ]
or heat.
Never look into the laser beam inside the unit.
Hearing safety
Listen at a moderate volume.
Using headphones at a high volume can
impair your hearing. This product can
produce sounds in decibel ranges that may
cause hearing loss for a normal person,
even for exposure less than a minute. The
higher decibel ranges are offered for those
that may have already experienced some
hearing loss.
Sound can be deceiving. Over time your
hearing ‘comfort level’ adapts to higher
volumes of sound. So after prolonged
listening, what sounds ‘normal’ can actually
be loud and harmful to your hearing. To
guard against this, set your volume to a safe
level before your hearing adapts and leave
it there.
To establish a safe volume level:
Set your volume control at a low setting.
Slowly increase the sound until you can
hear it comfortably and clearly, without
distortion.
Listen for reasonable periods of time:
Prolonged exposure to sound, even at
normally ‘safe’ levels, can also cause hearing
loss.
Be sure to use your equipment reasonably
and take appropriate breaks.
Be sure to observe the following guidelines
when using your headphones.
Listen at reasonable volumes for
reasonable periods of time.
Be careful not to adjust the volume as your
hearing adapts.
Do not turn up the volume so high that
you can’t hear what’s around you.
You should use caution or temporarily
discontinue use in potentially hazardous
situations. Do not use headphones while
operating a motorized vehicle, cycling,
# " ! ($ =\ &
hazard and is illegal in many areas.
Notice
This product complies with the radio
interference requirements of the European
Community.
( ! !
device that are not expressly approved by
Philips Consumer Lifestyle may void the user’s
authority to operate the equipment.
Care of the environment
Your product is designed and manufactured
with high quality materials and components,
which can be recycled and reused.
EN
5
English
Caution
Never dispose of your product with other
household waste. Please inform yourself about
the local rules on the separate collection of
electrical and electronic products and batteries.
The correct disposal of these products helps
prevent potentially negative consequences on
the environment and human health.
Your product contains batteries, which cannot
be disposed of with normal household waste.
Please inform yourself about the local rules on
separate collection of batteries. The correct
disposal of batteries helps prevent potentially
negative consequences on the environment and
human health.
Please visit www.recycle.philips.com for
additional information on a recycling center in
your area.
Environmental information
All unnecessary packaging has been omitted.
We have tried to make the packaging easy to
separate into three materials: cardboard (box),
polystyrene foam (buffer) and polyethylene
(bags, protective foam sheet.)
Your system consists of materials which can
be recycled and reused if disassembled by a
specialized company. Please observe the local
regulations regarding the disposal of packaging
materials, exhausted batteries and old equipment.
The making of unauthorized copies of copyprotected material, including computer
( $ $ " ! ! !
recordings, may be an infringement of
copyrights and constitute a criminal offence.
This equipment should not be used for such
purposes.
Manufactured under license from Dolby
Laboratories. Dolby and the double-D symbol
are trademarks of Dolby Laboratories.
{'|}$ {'| ~ !} ! ! (
are registered trademarks of DivX, Inc. and are
used under license.
ABOUT DIVX VIDEO: DivX® is a digital video
& ! " {'|$ @ =K & {'|
~ ! !' {'| '! = QQQ=
divx.com for more information and software tools
' {'| '! =
ABOUT DIVX VIDEO-ON-DEMAND: This
{'| ~ !} !' " ( ! order to play DivX Video-on-Demand (VOD)
content. To generate the registration code,
locate the DivX VOD section in the device
setup menu. Go to vod.divx.com with this code
to complete the registration process and learn
more about DivX VOD.
The USB-IF Logos are trademarks of Universal
Serial Bus Implementers Forum, inc.
This apparatus includes this label:
Note
The type plate is located on the bottom of the apparatus.
‘DVD Video’ is a trademark of DVD Format/
Logo Licensing Corporation.
6
EN
Congratulations on your purchase, and
Q K & " & support that Philips offers, register your product
at www.philips.com/welcome.
Introduction
With this unit, you can:
watch video from DVD/VCD/SVCD or
USB devices
enjoy audio from discs or USB devices
view pictures from discs or USB devices
Listen to FM radio
You can enrich sound output with these
sound effects:
Digital Sound Control (DSC)
Dynamic Bass Boost (DBB)
DVD region code
Countries
Australia, New Zealand
English
2 Your DVD
Micro Theater
What’s in the box
Check and identify the contents of your
package:
Main unit
2 speakers
Subwoofer
Remote control with battery
Composite video cable (yellow)
Power cord
FM wire antenna
MP3 Link cable
User manual
Quick start guide
The unit supports these media/disc formats:
Recordable
ReWritable
You can play DVD discs with the following
region codes:
EN
7
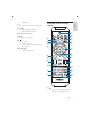
Overview of the main unit
m
n
a b
c
d
Turn on the apparatus or switch to
the Eco Power standby mode.
b SOURCE
Select a source.
c VOL -/+
Adjust volume.
Adjust time.
d
/
8
EN
Skip to the previous/next track.
j
g
h
f
e
a
l k
Skip to the previous/next title or
chapter.
Select a preset radio station.
e Disc compartment
f
Headphone socket.
g MP3-LINK
Jack for an external audio device.
h USB DIRECT
i
USB socket.
Open or close the disc compartment.
i
Overview of the remote
control
English
j MODE
Select repeat play modes.
&] ! =
a
k Remote control sensor
b
l
Start or pause play.
Stop play.
Erase a program.
In demo mode, activate or deactivate
demonstration.
m
x
c
w
v
d
e
u
n Display panel
Display current status.
f
g
t
s
h
r
i
q
j
k
p
l
m
n
o
a
Turn on the apparatus or switch to
the Eco Power standby mode.
EN
9
b Source selection keys
Select a source.
m SUBTITLE
Select a subtitle language.
c DISPLAY/RDS (RDS is unavailable for this
version.)
Display play information on a
connected TV.
n GOTO
During disc play, specify a position to
start play.
d DISC MENU
For video discs: access or exit the disc
menu.
For video discs with playback
control(PBC): turn on/off PBC.
e AUDIO
For VCD, select stereo, mono-left or
mono-right channel.
For DVD/DivX video, select an audio
language.
f
g
q
SLOW/ ZOOM
For menus, navigate up/down.
Rotate or invert pictures.
( SLOW) For video discs: select a
slow play mode.
( ZOOM) For video: zoom in/out.
i VOL +/ Adjust volume.
Adjust time.
j MUTE
Mute or restore volume.
k CLOCK
Set the clock.
l SLEEP/TIMER
Set the sleep timer.
Set the alarm timer.
EN
Stop play.
Erase a program.
/
Search within a track.
Tune to a radio station.
For menus, navigate left/right.
Move an enlarged picture left/right.
h LOUD/DBB
Turn on or off automatic loudness
adjustment.
Turn on or off dynamic bass
enhancement.
10
p Numeric keypad
Select a title/chapter/track directly.
r
/
o ANGLE/PROG
Select a DVD camera angle.
Program tracks.
Program titles/chapters for DVD play.
Program radio stations.
Skip to the previous/next track.
Skip to the previous/next title or
chapter.
Select a preset radio station.
Start or pause play.
s
t DSC
Select a preset sound setting.
u OK
~
=
v A-B
% track/disc.
Q w SYSTEM MENU
Access or exit the system setup menu.
x MODE/DIM
Select repeat play modes.
&] ! =
Select a brightness level for the display
screen.
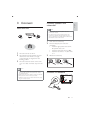
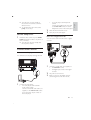
Connect speakers and
subwoofer
Place the unit
English
3 Connect
Note
Ensure that the colors of the speaker wires and
terminals are matched.
For optimal sound, use the supplied speakers only.
Connect only speakers with impedance that is the
same or higher than the supplied speakers. Refer to the
& =
1
2
Place the unit near to the TV.
3
Place the subwoofer at the corner of the
room or at least one meter away from the
TV.
Place the left and right speakers at equal
distance from the TV and at an angle
of approximately 45 degrees from the
listening position.
1
2
! ! Q
3
% # ]=
Insert the stripped part of the wire
completely.
Insert the right speaker wires to “R”,
left speaker wires to “L”.
Insert the subwoofer wires to “SW”.
Insert the red wires to “+”, black wires
to “-”.
a
# ]=
b
c
Note
To avoid magnetic interference or unwanted noise,
never place this apparatus and speakers too close to
any radiation devices.
Place this unit on top of a table or mount it on the wall.
Never place this unit in an enclosed cabinet.
Install this unit near the AC outlet where the AC power
plug can be easily reached.
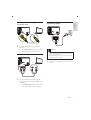
Connect FM antenna
EN
11
Tip
Note
For optimal reception, fully extend and adjust the
position of the antenna.
For better FM stereo reception, connect an outdoor
FM antenna to the FM AERIAL jack.
The unit does not support MW radio reception.
The progressive scan video quality is only available
when a progressive scan TV is connected.
If your TV does not support progressive scan, you
cannot view the picture.
For how to activate progressive scan on your TV, refer
to the TV user manual.
1
Connect the supplied FM wire antenna to
the FM AERIAL socket on the unit.
Connect a progressive scan TV through
component video for higher quality video.
1
Connect TV
Connect video cables
With this connection, you can watch video from
the unit on the TV screen.
You can select the best video connection that
your TV supports.
Option 1: connect through component
video (for a standard TV or Progressive
Scan TV).
Option 2: connect through S-Video (for a
standard TV).
Option 3: connect through composite
video (CVBS) (for a standard TV).
Connect component video cables (red/
blue/green - not supplied) to:
the VIDEO OUT (Pr/Cr Pb/Cb Y)
sockets on this unit.
the component input sockets on the
TV.
Option 2: Connect through S-Video
TV
S-VIDEO IN
Option 1: Connect through
component video
Connect a progressive scan TV through
component video for higher quality video.
1
TV
Pr/Cr
Pb/Cb
Y
COMPONENT VIDEO IN PUT
12
EN
Connect an S-video cable (not supplied)
to:
the S-Video socket on this unit.
the S-Video socket on the TV.
Option 3: Connect through
composite video
English
Connect power
TV
1
Connect the supplied composite video
cable to:
the VIDEO OUT socket on this unit.
the video input socket on the TV.
Caution
Risk of product damage! Ensure that the power supply
Connect audio cables
TV
1
voltage corresponds to the voltage printed on the back
or the underside of the unit.
Before connecting the AC power cord, ensure you have
completed all other connections.
Connect the AC power cord to the wall
socket.
L LINE IN R
1
To play sound from the TV through this
unit, connect audio cables (red/white - not
supplied) to:
the AUX IN L/R sockets on this unit.
the audio output sockets on the TV.
EN
13
4 Get started
Set clock
1
In the Eco Power standby mode, press and
hold CLOCK to activate the clock setting
mode.
» The hour digits are displayed and begin
to blink.
2
Press + VOL - to set the hour.
» The minute digits are displayed and
begin to blink.
3
4
5
Press CLOCK
Caution
Use of controls or adjustments or performance of
procedures other than herein may result in hazardous
radiation exposure or other unsafe operation.
Always follow the instructions in this chapter in
sequence.
If you contact Philips, you will be asked for the
model and serial number of this apparatus. The
model number and serial number are on the
bottom of the apparatus. Write the numbers
here:
Model No. __________________________
Serial No. ___________________________
# (=
Press + VOL - to set the minute.
Press CLOCK
# (=
Turn on
1
Prepare the remote control
Press .
» The unit switches to the last selected
source.
Caution
Risk of explosion! Keep batteries away from heat,
= ?' ! ! " =
Switch to Eco Power standby mode
1
1
Remove the protective tab to activate the
remote control battery.
To replace the remote control batteries:
Press to switch the unit to Eco Power
Standby mode.
» The backlight on the display panel
turns off.
» The blue Eco Power indicator turns on.
1
2
Open the battery compartment.
Insert one lithium CR2025 battery with
correct polarity (+/-) as indicated.
In the Eco Power mode, you can press CLOCK to
3
Close the battery compartment.
If the system remains in the standby mode for more
Tip
switch to the standby mode and view the clock (if set).
than 90 seconds, it switches to the Eco Power mode
automatically.
Note
Before you press any function button on the remote
$ Q control.
If you are not going to use the remote control for a
long time, remove the battery.
Find the correct viewing
channel
1
14
EN
Press
to turn on the unit.
Press DISC to switch to disc mode.
Turn on the TV and switch to the correct
video-in channel in one of the following
ways:
Go to the lowest channel on your TV,
then press the Channel Down button
until you see the Philips screen.
Press the source button repeatedly on
the remote control of your TV.
Tip
The video-in channel is between the lowest and highest
channels and may be called FRONT, A/V IN, VIDEO etc.
See the TV user manual on how to select the correct
input on the TV.
Select the correct TV system
Change this setting if the video does not appear
correctly. By default, this setting matches the
most common setting for TVs in your country.
1
2
3
4
5
Progressive scan displays twice the number of
frames per seconds than interlaced scanning
(ordinary TV system). With nearly double the
number of lines, progressive scan offers higher
picture resolution and quality.
Before you turn on this feature, ensure that:
The TV supports progressive scan
signals.
You have connected this unit with the
TV through component video.
1
2
Turn on the TV.
3
Switch the TV to the correct viewing
channel for this unit.
4
5
6
Press DISC.
7
Select [Component] > [Pr/Cr Pb/Cb Y],
then press OK.
8
Select [TV Mode] > [Progressive], then
press OK.
9
To proceed, select [OK] and press OK.
» The progressive setup is complete.
Press SYSTEM MENU.
Select [Preference Page].
Select [TV Type] and then press
.
Select a setting and then press OK.
[PAL] - For TV with PAL color system.
[Auto] - For TV that is compatible
with both PAL and NTSC.
[NTSC] - For TV with NTSC color
system.
Ensure that the TV progressive scan mode
is deactivated (see the TV user manual).
Press SYSTEM MENU.
Press
/
to select [Video Setup
Page] in the menu, then press .
Note
If a blank/distorted screen is displayed, wait for 15
seconds for auto recovery or turn off progressive scan
manually.
To exit the menu, press SYSTEM MENU.
10 Turn on the progressive scan mode on the
Change system menu
language
1
2
3
4
5
Turn on Progressive Scan
TV.
Press SYSTEM MENU.
Select [General Setup Page].
Select [OSD Language] and then press
.
Select a setting and then press OK.
To exit the menu, press SYSTEM MENU.
EN
15
English
2
3
5 Play
Note
! $ !&&=
To access or exit the menu manually:
1 Press DISC MENU.
For VCD with PlayBack Control (PBC) feature
(version 2.0 only):
With the PBC feature, you can play VCD
interactively according to the menu screen.
1
During play, press DISC MENU to enable/
disable PBC.
» When PBC is enabled, the menu
screen is displayed.
» When PBC is disabled, normal play is
resumed.
Play a disc
Caution
Never look at the laser beam inside the unit.
Risk of product damage! Never play discs with
accessories such as disc stabilizer rings or disc
treatment sheets.
Never put any objects other than discs into the disc
compartment.
1
2
Press DISC to select the DISC source.
3
Place a disc onto the tray and press .
» Ensure that the label faces up.
4
Press on the front panel.
» The disc tray opens.
Play starts automatically.
To stop play, press .
To pause or resume play, press
.
To skip to the previous/next title/
chapter/track, press / .
If play does not start automatically:
Select a title/chapter/track and then press
.
Tip
To play a locked DVD, enter the 4-digit parental control
password.
Use the disc menu
When you load a DVD/(S)VCD disc, a menu
may be displayed on the TV screen.
16
EN
Select an audio language
You can select an audio language on DVDs or
DiVx video.
1
During disc play, press AUDIO.
» The language options appear. If the
selected audio channels is unavailable,
the default disc audio channel is used.
Note
For some DVDs, the language can only be changed
from the disc menu. Press DISC MENU to access the
menu.
Select a subtitle language
You can select a subtitle language on DVDs or
DivX® Ultra discs.
During play, press SUBTITLE.
Tip
For some DVDs, the language can only be changed
from the disc menu. Press DISC MENU to access the
menu.
1
2
Insert a disc or connect a USB device.
3
! .
To stop play, press .
To pause or resume play, press
.
To change a subtitle language, press
SUBTITLE.
Note
Ensure that the USB device contains playable music,
pictures or video.
1
Insert the USB device.
Select a source:
For discs, press DISC.
For USB devices, press USB.
English
Play from USB
Note
You can only play DivX videos rented or purchased
through the DivX registration code of this unit.
" Q & Q ( <= $
.smi, .sub, .ssa, .ass) are supported but do not appear on
'( =
K " " name of the video.
!
onto a CD-R/RW, recordable DVD or USB
device.
2
3
Press USB to select the USB source.
4
5
Press
Press / to select a folder, then press
OK =
/
1
2
Insert a disc or connect a USB device.
3
Press / to select a folder, then press
OK =
4
5
Press
& & !=
Press
to start play.
To stop play, press .
To pause or resume play, press
.
K #
' $ / .
To return to the upper-level menu,
press DISC MENU, then press OK to
=
Play DivX video
Select a source:
For discs, press DISC.
For USB devices, press USB.
/
& & !=
Press
to start play.
To stop play, press .
To pause or resume play, press
.
K #
' $ / .
To return to the upper-level menu,
press DISC MENU, then press OK to
=
{'| !
~{_%
RW, recordable DVD or USB device.
EN
17
Play control
!" #
1
During play, press MODE/DIM repeatedly
&] mode.
To resume normal play, press MODE/
DIM repeatedly until no option is
displayed.
Repeat A-B (DVD/VCD/CD/MP3/
WMA)
Play starts automatically at your
selected point.
Resume video play from last stopped
point
Note
This feature is only available for DVD/VCD play.
1
In stop mode and when the disc has not
been removed, press
.
To cancel resume mode and stop play
completely:
1
During music or video play, press A-B at
the start point.
1
2
Press A-B at the end point.
» The selected section starts to play
repeatedly.
Play options
To cancel repeat play, press A-B again.
Note
In stop mode, press .
Display play information
1
The section A and B can be set only within the same
During play, press DISPLAY/RDS
repeatedly to display play information.
track/title.
Program
For video discs/audio CDs:
Search forward/backward
1
During play, press
/
repeatedly to
select a search speed.
To resume play at normal speed, press
.
Search by time or chapter/track
number
1
18
During video/audio play, press GOTO
! # ! displayed.
!$ position in hours, minutes and
seconds.
# !$ chapter/track.
EN
1
In stop mode, press ANGLE/PROG to
access the program menu.
2
Enter the tracks/chapters to add to the
program.
3
Repeat step 2 until the program is
complete.
4
Select [Start] to play the program.
1
During play mode, press DISC MENU until
! !=
2
$ ANGLE/PROG to
!! ( =
3
Repeat steps 2 until the program is
complete.
4
Press DISC MENU until the program list is
displayed.
1
Press DISC MENU until the program list is
displayed.
2
$ ANGLE/PROG to
! & ( =
1
During play, press ANGLE/PROG
repeatedly to select a camera angle.
English
5 Press to play the program.
$% ! [Program List]:
Picture view options
Preview pictures
Zoom in/out image
1
During video play, press (ZOOM)
repeatedly to zoom in/out the image.
When the image is zoomed in, you
can press
/
to pan through the
image.
Slow-motion play
1
During video play, press (SLOW)
repeatedly to select a slow play option.
» The sound is muted.
1
During play, press .
» The thumbnails of 12 pictures are
displayed.
2
Select one of the following:
a picture
the slide show option
the menu option
the next/previous page (if available)
3
Press OK to:
play the selected picture
start slide show of all pictures
enter the menu where each remote
key function is explained
turn to the next/previous page (if
available)
» To resume play at normal speed, press
.
Change the audio channel
Note
Select a slide show play mode
1
This feature is only available for VCD/DivX play.
1
During play, press AUDIO repeatedly to
select an audio channel available on the
disc:
Mono Left
Mono Right
Stereo
During play, press ANGLE/PROG
repeatedly to select a slide-show play
mode.
Rotate picture
1
During play, press / to rotate the
picture anti-clockwise/clockwise.
Select a camera angle
Note
This feature is only available for DVDs recorded with
multiple camera angles.
EN
19
6 Adjust settings
1
2
3
4
[DIVX (R) VOD]
Display the DivX® registration code.
Tip
Press SYSTEM MENU.
Enter this DivX registration code when you rent or
Select a setup page.
Select an option and then press
.
Select a setting and then press OK.
To return to the previous menu, press
.
To exit the menu, press SYSTEM
MENU.
purchase video from http://vod.divx.com/. The DivX
videos rented or purchased through the DivX® VOD
(Video On Demand) service can be played only on the
device to which it is registered.
Audio setup
General setup
On [Audio Setup Page], you can set the
following options:
On [General Setup Page], you can set the
following options:
[TV Display]
The TV format determines the aspect ratio of
display according to the type of TV you have
connected.
[DOLBY DIGITAL SETUP]
Select audio signals output to speakers.
[L-Mono] – To apply the left mono mode,
select this option.
[Stereo] –If the sound is delivered from
the two front speakers only, select this
option.
[R-MONO] – To apply the right mono
mode, select this option.
4:3 Pan Scan (PS)
4:3 Letter Box (LB)
16:9 (Wide Screen)
[4:3 Pan Scan] – For 4:3 screen TV: fullheight display with the trimmed sides.
[4:3 Letter Box] – For 4:3 screen TV:
wide-screen display with black bars on the
top and bottom of the screen.
[16:9] – For wide-screen TV: display ratio
16:9.
[OSD Language]
Select the preferred language for on-screen
display.
[Screen Saver]
The screen saver protects the TV screen
damage due to prolonged exposure to a static
image.
[On] – Enable the screen saver.
[Off] – Disable the screen saver.
20
EN
[Digital Output]
Select audio formats supported by the
connected device.
[OFF] – Turn off the digital output.
[All] – If the connected device supports
multi-channel audio formats, select this
option.
[PCM ONLY] – If the connected device
cannot decode multichannel audio, select
this option.
[3D] >[3D Processing Page] > [Reverb Mode]
Select a virtual surround sound mode.
[HDCD] > [HDCD Setup Page] > [Filter]
{~{ <( { Compatible Digital) disc, select the audio output
cutoff frequency.
[Night Mode]
Make loud sound level softer and soft sound
level louder so that you can watch the DVD
Video setup
On [Video Setup Page], you can set the
following options:
[Component]
Set the video output according to the video
connection. If the composite connection is used,
this setting is not required.
[CVBS] – If the S-Video connection is
used, select this option.
[Pr/Cr Pb/Cb Y] – If the component
connection is used, select this option.
[S-VIDEO]– If the S-Video connection is
used, select this option.
[TV Mode]
Select the video output mode. To select the
progressive scan mode, ensure that you have
connected a progressive scan TV and set
[Component] to [Pr/Cr Pb/Cb Y].
[Progressive] – For progressive scan TV:
turn on the progressive scan mode.
[Interlace] – For ordinary TV: turn on the
interlace mode.
[Picture Setting] > [Picture Setting Setup]
Customize picture color settings.
[Auto] - For TV that is compatible with
both PAL and NTSC.
[NTSC] - For TV with NTSC color system.
[Audio]
Select the preferred audio language for disc play.
[Subtitle]
Select the preferred subtitle language for disc
play.
[Disc Menu]
Select the preferred disc menu language.
Note
If the language you have set is not available on the disc,
the disc uses its own default language.
For some discs, the subtitle/audio language can only be
changed from the disc menu.
[Parental]
Restricts access to discs that are unsuitable for
children. These types of discs must be recorded
with ratings.
Press OK.
Select a rating level, then press OK.
Press the numeric keys to enter the password.
Note
Rated discs above the level you set in [Parental]
require a password to be played.
The ratings are country-dependent. To allow all discs to
play, select [8 ADULT].
Some discs have ratings printed on them but are not
recorded with ratings. This function has no effect on
such discs.
Preference setup
Tip
On [Preference Page], you can set the following
options:
[TV Type]
Change this setting if the video does not appear
correctly. By default, this setting matches the
most common setting for TVs in your country.
[PAL] - For TV with PAL color system.
You can set or change the password. (See “Preference
setup - Password setup”.)
[Default]
Resets all the settings of this unit to factory
default, except for the password and parental
settings.
EN
21
English
movies at a low volume, without disturbing
others.
[On] – enjoy quiet viewing at night (DVDs
only).
[Off] – enjoy surround sound with its full
dynamic range.
[Password Setup] > [Password Setup Page] >
[Password Mode]
This setting allows you to enable/disable the
password for parental control. If the password
is enabled, when you play a prohibited disc, this
4-digit password is required.
[On] - Enable the password for parental
control.
[Off] - Disable the password for parental
control.
[Password Setup] > [Password Setup
Page] > [Password]
You can change password here. The default
password is 1234.
[Change]
1) Press the numeric keys to enter ‘1234’ or
your last set password at [Old Password] !=
2) Enter the new password at [New
Password] !=
3) Enter the new password again at &'# PWD] !=
4) Press OK to exit the menu.
7 Tune to FM
radio stations
1
Ensure that you have connected and fully
extended the supplied FM antenna.
2
3
4
Press TUNER.
5
Repeat steps 3-4 to tune to more stations.
Press and hold
/
.
When the frequency indication starts to
change, release the button.
» The FM tuner tunes to a station with
strong reception automatically.
To tune to a weak station:
Press
/
! ! reception.
Program radio stations
automatically
Note
Note
If you forget the password, enter ‘1234’ before you set
a new password.
You can program a maximum of 20 preset radio
stations.
1
Press and hold ANGLE/PROG for
2 seconds to activate automatic
programming.
» [AUTO] < Z ! ! "]=
» All available stations are programmed
in the order of waveband reception
strength.
» K (! !
broadcast automatically.
22
EN
Note
8 Adjust volume
level and sound
effect
English
Program radio stations
manually
You can program a maximum of 20 preset radio
stations.
1
2
3
4
Tune to a radio station.
Adjust volume level
1
Press ANGLE/PROG to activate
programming.
Press / to allocate a number from
1 to 20 to this radio station, then press
ANGLE/PROG =
» The preset number and the frequency
of the preset station are displayed.
Repeat the above steps to program other
stations.
During play, press VOL +/- to increase/
decrease the volume level.
Select a sound effect
Note
You cannot use different sound effects at the same
time.
Note
To overwrite a programmed station, store another
station in its place.
Select a preset sound effect
1
Tune to a preset radio station
1
Press / to select a preset number
that you want.
During play, press DSC repeatedly to
select:
[ROCK] (rock)
[JAZZ] (jazz)
[POP] (pop)
[CLASSIC] (classic)
[FLAT] <] Z
Enhance bass
1
To turn on bass enhancement, press
LOUD/DBB repeatedly during play until
the DBB logo is displayed.
To turn off bass enhancement, press
LOUD/DBB repeatedly until the DBB
logo disappears.
EN
23
Select automatic loudness control
Automatic loudness control increases the treble
and bass effect at low volume levels (the higher
the volume, the lower the treble and bass
levels).
1
To turn on automatic loudness control,
press LOUD/DBB during play until the
loudness icon is displayed.
To turn off automatic loudness
control, press LOUD/DBB until the
loudness icon disappears.
9 Other features
Activate demonstration mode
You can see an overview of all features.
1
In the standby mode with clock display (if
set), press on the main unit to activate
the demonstration mode.
» A demonstration of major available
features starts.
To deactivate the demonstration mode:
1
Mute sound
1
During play, press MUTE to mute/unmute
sound.
Listen through headphone
1
Plug a headphone into the
unit.
Press
on the main unit again.
Adjust brightness of display
panel
1
socket on the
In standby mode, press MODE/DIM
repeatedly to select different levels of
brightness for the display panel.
Set the alarm timer
24
EN
1
Ensure that you have set the clock
correctly.
2
In standby mode, press and hold SLEEP/
TIMER.
» The hour digits are displayed and begin
to blink.
3
Press + VOL - to set the hour.
» The minute digits are displayed and
begin to blink.
4
5
6
7
Press SLEEP/TIMER
=
Press + VOL - to set the minute.
Press SLEEP/TIMER
=
To activate the wake-up timer, press + VOL
- to select [ON] (on).
» A clock icon appears on the display.
» To deactivate the alarm timer, select
[OFF] (off) at step 7.
2
3
For audio players with headphone
sockets:
Connect the supplied MP3 Link cable
to the MP3 LINK socket and to the
headphone socket on the audio player.
Select the MP3 Link/AUX source.
Start play on the audio player.
Set the sleep timer
1
Record to a digital recorder
When the unit is turned on, press SLEEP/
TIMER repeatedly to select a set period of
time (in minutes).
» The unit turns off automatically after
the set period of time.
You can record audio from this unit to a digital
recorder.
Connect other devices
Listen to an audio player
You can listen to audio player through this unit.
1
1
Connect a coaxial cable (not supplied) to:
the COAXIAL socket
the digital input socket on the digital
recorder
2
3
Play audio to be recorded.
Begin to record on the digital recorder
(see the digital recorder user manual).
Connect the audio player.
For audio players with red/white
audio output sockets:
Connect a red/white audio cable (not
supplied) to the AUX IN L/R sockets
and to the audio output sockets on
the audio player.
EN
25
English
» The unit turns on automatically at
the set time and switches to the last
selected source.
10 Product
information
Note
Product information is subject to change without prior
notice.
Tuner (FM)
Tuning Range
Tuning grid
Sensitivity - Mono, 26dB
S/N Ratio
Sensitivity - Stereo, 46dB
S/N Ratio
Search Selectivity
Total Harmonic Distortion
Signal to Noise Ratio
87.5 - 108MHz
50KHz
<22 dBf
>43 dBf
>28dBf
<3%
>55dB
#
Speakers
Rated Output Power
Frequency Response
Signal to Noise Ratio
Aux Input
2X25 + 50W RMS
20 -20000 Hz, ±3dB
>65dB
0.5 V RMS 20kohm
Speaker Impedance 2X4ohm + 8ohm
Speaker Driver
4”
Sensitivity
>80dB/m/W±4dB/m/W
General information
Disc
Laser Type
Disc Diameter
Video Decoding
Video DAC
Signal System
Video Format
Video S/N
Audio DAC
Total Harmonic
Distortion
Frequency
Response
S/N Ratio
26
EN
Semiconductor
12cm/8cm
MPEG-1 / MPEG-2 /
DivX
12Bits
PAL / NTSC
4:3 / 16:9
>48dB
24Bits / 96kHz
<0.1% (1 kHz)
4Hz - 20kHz (44.1kHz)
4Hz - 22kHz (48kHz)
4Hz - 24kHz (96kHz)
>65dBA
AC power
Operation Power
Consumption
Eco Standby Power
Consumption
Composite Video
Output
Coaxial Output
Headphone Output
USB Direct
Dimensions
- Main Unit
(W x H x D)
- Speaker Box
(W x H x D)
- Subwoofer
(W x H x D)
Weight
- With Packing
- Main Unit
- Speaker Box
- Subwoofer
230 - 240 V, 50 Hz
30W
<1W
1.0Vp-p, 75ohm
0.5Vpp ± 0.1Vpp
75ohm
2X15mW 32ohm
Version 2.0
200 x 125 x 270mm
135 x 255 x 150 mm
160 x 245 x 260 mm
9.25 kg
2.05 kg
2 x 1.25 kg
2.7 kg
Digital Video Discs (DVDs)
Video CDs (VCDs)
Super Video CDs (SVCDs)
Digital Video Discs + Rewritable
(DVD+RW)
Compact Discs (CDs)
<` !#$ HZ ~{%<Z
DivX(R) disc on CD-R(W):
DivX 3.11, 4.x and 5.x
WMA
Supported MP3-CD formats:
ISO 9660
Max. title/album name: 12 characters
Max. title number plus album: 255.
Max. nested directory: 8 levels.
Max. album number: 32.
Max. MP3 track number: 999.
Supported sampling frequencies for MP3
disc: 32 kHz, 44.1 kHz, 48 kHz.
Supported Bit-rates of MP3 disc are: 32, 64,
96, 128, 192, 256 (kbps).
The following formats are not supported:
Files like *.VMA, *.AAC, *.DLF, *.M3U,
*.PLS, *.WAV
Non-English Album/Title name
Discs recorded in Joliet format
MP3 Pro and MP3 with ID3 tag
Directory nesting up to a maximum of 8
levels
Number of albums/ folders: maximum 99
Number of tracks/titles: maximum 999
ID3 tag v2.0 or later
File name in Unicode UTF8 (maximum
length: 128 bytes)
Unsupported formats:
Empty albums: an empty album is an album
! $ !
is not be shown in the display.
! & #!= example, Word documents (.doc) or MP3
Q =!& ( ! !
not played.
~$ $ ~ ! {% ! <=Q'$ =$
.m4p, .mp4, .aac)
& USB playability information
Compatible USB devices:
] < = =Z
] < = =Z
memory cards (requires an additional card
reader to work with this apparatus)
Supported formats:
& K$ K$
FAT32 (sector size: 512 bytes)
MP3 bit rate (data rate): 32-320 Kbps and
variable bit rate
WMA v9 or earlier
EN
27
English
Supported disc formats
11 Troubleshooting
Caution
Never remove the casing of this unit.
To keep the warranty valid, never try to repair
the system yourself.
If you encounter problems when using this unit,
check the following points before requesting
service. If the problem remains unsolved, go to
the Philips web site (www.philips.com/support).
When you contact Philips, ensure that your
unit is nearby and the model number and serial
number are available.
No power
*
Ensure that the AC cord of the apparatus
is connected properly.
*
Ensure that there is power at the AC
outlet.
*
As a power-saving feature, the system
switches off automatically 15 minutes after
track play reaches the end and no control
is operated.
No disc detected
*
Insert a disc.
*
Check if the disc is inserted upside down.
*
Wait until the moisture condensation at
the lens has cleared.
*
Replace or clean the disc.
*
! ~{ & ! =
No picture
*
Check the video connection.
*
Turn on the TV to the correct Video-In
channel.
*
Progressive scan is activated but the TV
does not support progressive scan.
Black and white or distorted picture
*
The disc does not match the TV color
system standard (PAL/NTSC).
*
Sometimes a slight picture distortion may
appear. This is not a malfunction.
28
EN
*
*
Clean the disc.
A distorted picture may appear during
progressive scan setup.
The aspect ratio of the TV screen cannot be
changed even though you have set the TV
display format.
*
K !
!!
DVD disc.
*
The aspect ratio may not be changed for
some TV systems.
No sound or poor sound
*
Adjust the volume.
*
Disconnect the headphones.
*
Check that the speakers are connected
correctly.
*
Check if the stripped speaker wires are
clamped.
Remote control does not work
*
& & "
$ select the correct source with the remote
control instead of the main unit.
*
Reduce the distance between the remote
control and the unit.
*
Insert the battery with its polarities
(+/– signs) aligned as indicated.
*
Replace the battery.
*
Aim the remote control directly at the
sensor on the front of the unit.
Disc does not play
*
Insert a readable disc and ensure that the
label side faces up.
*
Check the disc type, color system and
regional code. Check for any scratches or
smudges on the disc.
*
Press SYSTEM MENU to exit the system
setup menu.
*
Disable the password for parental control
or change the rating level.
*
Moisture has condensed inside the system.
Remove the disc and leave the system
turned on for about an hour. Disconnect
and reconnect the AC power plug, and
then turn on the system again.
As a power-saving feature, the system
turns off automatically 15 minutes after
disc play reaches the end and no control is
operated.
English
*
Poor radio reception
*
Increase the distance between the unit and
your TV or VCR.
*
Fully extend the FM antenna.
*
Connect an outdoor FM antenna instead.
Unable to select Progressive Scan
*
Ensure the video output mode is set to
[Pr/Cr Pb/Cb Y].
Audio or subtitle languages cannot be set
*
The disc is not recorded with sound or
subtitles in multiple languages.
*
The audio or subtitle language setting is
prohibited on the disc.
'## % #;<% *
K " & & !
device has exceeded a certain limit. This
phenomenon is not a malfunction.
*
K & & supported.
USB device not supported
The USB device is incompatible with the unit.
Try another one.
Timer does not work
*
Set the clock correctly.
*
Switch on the timer.
Clock/timer setting erased
*
Power has been interrupted or the power
cord has been disconnected.
*
Reset the clock/timer.
EN
29
30
31
English
© 2011 Koninklijke Philips Electronics N.V.
All rights reserved.
MCD183_79_UM_V1.1_1129