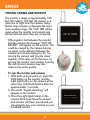
1
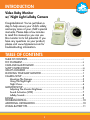
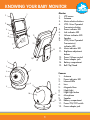
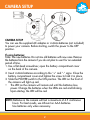
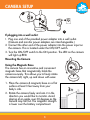
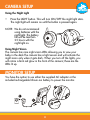
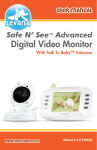
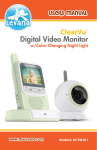
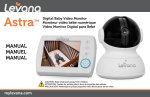
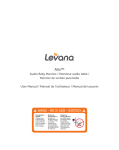
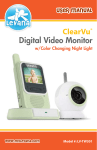
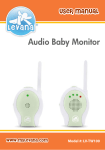
USeR MANUAL
Digital Wireless
Video Baby Monitor
with Night Light Lullaby Camera
www.myLevana.com
Model #: BABYVIEW20
PRODUCT WARRANTY INFORMATION
Please visit our web site at www.MyLevana.com
for information about your product’s warranty.
We take quality very seriously. This is why all of our products come with a one year warranty from the original
purchase date against defects in workmanship and materials. If you have warranty or support issues please
contact us using any of the following methods:
Support: www.mylevana.com/contact
Web site: www.myLevana.com
LEVANA Canada
4080 Montrose Road
Niagara Falls, ON
Canada, L2H 1J9
LEVANA USA
60 Industrial Parkway #Z64
Cheektowaga NY
USA 14227
Warranty Terms
1. LEVANA products are guaranteed for a period of one year from the date of purchase against defects in workmanship and materials. This warranty is limited to the repair, replacement or refund of the purchase price at LEVANA’s option.
2. This warranty becomes void if the product shows evidence of having been misused, mishandled or
tampered with contrary to the applicable instruction manual.
3. Routine cleaning, normal cosmetic and mechanical wear and tear are not covered under the terms of this
warranty.
4. The warranty expressly provided for herein is the sole warranty provided in connection with the product
itself and no other warranty, expressed or implied is provided. LEVANA assumes no responsibilities for any
other claims not specifically mentioned in this warranty.
5. This warranty does not cover the shipping cost, insurance or any other incidental charges.
6. You MUST contact LEVANA before sending any product back for repair. You will be sent a Return
Authorization form with return instructions. When returning the product for warranty service, please pack
it carefully in the original box with all supplied accessories, and enclose your original receipt or copy, and a
brief explanation of the problem (include RA #).
7. This warranty is valid only in Canada and the continental U.S.
8. This warranty cannot be re-issued.
INTRODUCTION
Video Baby Monitor
w/ Night Light Lullaby Camera
Congratulations! You’ve just taken a
step to help ensure your child’s safety
and enjoy more of your child’s special
moments. Please take a few minutes
to read this manual so you can use
this monitor to its full potential. If you
have any questions on your product,
please visit www.MyLevana.com for
troubleshooting information.
TABLE OF CONTENTS
TABLE OF CONTENTS..................................................................................i
FCC STATEMENT..........................................................................................ii
CARE AND MAINTENANCE........................................................................ii
SAFETY INSTRUCTIONS ..............................................................................iii
WHAT’S INCLUDED ....................................................................................iv
KNOWING YOUR BABY MONITOR..............................................................1
CAMERA SETUP..........................................................................................2
Mounting The Camera...........................................................................3
Using The Night Light.............................................................................4
Night Vision..........................................................................................4
MONITOR SETUP.........................................................................................4
Adjusting The Monitor Brightness............................................................7
Sound Activation (VOX) ........................................................................7
Lullaby Sounds......................................................................................8
RANGE.......................................................................................................9
TROUBLESHOOTING....................................................................................10
ADDITIONAL INFORMATION.......................................................................10
LITHIUM BATTERY TIPS..................................................................................11
i
FCC STATEMENT
This equipment has been tested and found to comply with the limits
for a Class B digital device, pursuant to Part 15 of the FCC Rules. These
limits are designed to provide reasonable protection against harmful
interference in a residential installation. This equipment generates, uses
and can radiate radio frequency energy and, if not installed and used in
accordance with the instructions, may cause harmful interference to radio communications.
However, there is no guarantee that interference will not occur in a particular installation. If
this equipment does cause harmful interference to radio or television reception, which can be
determined by turning the equipment off and on, the user is encouraged to try to correct the
interference by one or more of the following measures:
• Reorient or relocate the receiving antenna
• Increase the separation between the equipment and receiver
• Connect the equipment into an outlet on a circuit different from that to which the receiver
is connected
• Consult the dealer or an experienced radio/TV technician for help
• FCC Label Compliance Statement:
• This device complies with Part 15 of the FCC Rules. Operation is subject to the following
two conditions:
(1) This device may not cause harmful interference
(2)This device must accept any interference received, including interference that
may cause undesired operation
The manufacturer is not responsible for any radio or TV interference caused by unauthorized
modifications to this equipment. Such modifications could void the user's authority to operate
the equipment.
GENERAL CARE AND MAINTENANCE
CARE AND MAINTENANCE
•
•
•
•
•
Do not store in very cold areas. When the system warms up (to its
normal temperature), moisture can form inside the case, which may
damage electronic circuit boards.
Do not attempt to open the case. Non-expert handling of the internal
components may damage the system.
Avoid dropping or strong shocks.
Operate this product using only the power supply included or provided
as an accessory.
Do not overload electrical outlets or extension cords this can result in
fire or electric shocks.
ii
SAFETY INSTRUCTIONS
Read and Keep Instructions: All the safety and operating instructions should be
read before the video baby monitor is operated.
This product cannot replace responsible adult supervision.
Strangulation Hazard: Children can become entangled in cords. Power cords
should be kept more than 3 feet away from the crib and baby’s reach at all
times. Baby monitors with power cords should never be hung on or near the crib.
Water and Moisture: This product is designed for indoor use only. The unit
should not be exposed to rain, moisture, dripping or splashing. No objects filled
with liquid should be placed on top of, or beside the product, such as a glass or
vase. This item should not be used near water.
Non-Use Periods: Always unplug the AC adapters from the wall outlets during
long periods of non-use.
Ventilation: This baby monitor should not be used on a bed, sofa, rug or similar
surface that may block the ventilation openings, or be placed in an enclosed
area, such as a bookcase or drawer that may impede air flow.
Keep Away from Sources of Heat: This unit should not be exposed to direct
heat sources such as a candle, fireplace, radiator, heat register, stove or other
appliance that emits heat. The unit should not be left in direct sunlight.
Power Source: This unit should only be used with the AC power adapters
included in this package (rated 6V 800mA)
Damage Requiring Service: This unit should be serviced by qualified personnel
only when:
a. Objects have fallen or liquid has been spilled into the product
b. The units have been exposed to rain
c.The units do not appear to operate normally or exhibits a distinct change in
performance
d. The units have been dropped or the enclosure damaged
Caution: This product cannot replace responsible adult supervision of a child.
iii
SAFETY INSTRUCTIONS
STATEMENT ON REGULATION
These units are designed to provide reasonable protection against harmful
interference in a residential installation. This equipment generates, uses and
can radiate radio frequency energy and if not installed and used in accordance
with the instructions, may cause harmful interference to radio communications.
However, there is no guarantee that interference will not occur in a particular
installation. If this equipment does cause harmful interference to radio or
television reception, which can be determined by turning the equipment off and
on, the user is encouraged to try to correct the interference by one or more of the
following measures:
•
•
•
•
Reorient or relocate the receiving antenna
Increase the separation between the equipment and receiver
Connect the equipment into an outlet on a circuit different from that to
which the receiver is connected
Consult the dealer or an experienced radio/TV technician for help
Operation with non-approved equipment or unshielded cables is likely to result
in interference to radio or TV reception. The user is cautioned that changes and
modifications made to the equipment without the approval of manufacturer could
void the user’s authority to operate this equipment.
WHAT’S INCLUDED
•
•
•
•
Wireless Monitor
Wireless Camera
Rechargeable Lithium-ion Battery
2 Power Adapters
•
•
•
•
Magnetic Base for Camera
Instruction Manual
1 Year Warranty
Lifetime Live Customer Support AVOIDING SIGNAL DISRUPTION
Your BABYVIEW20 uses digital transmission to ensure a clear and consistent
picture. The signal also passes easily through interior walls. However,
buildings with metal frames or placing the camera near large metal objects
may cause signal degradation. If reception is poor, moving the camera or
receiver may fix this problem.
iv
KNOWING YOUR BABY MONITOR
Monitor:
1. LCD screen
2. Antenna
3. Music selection buttons
4. VOX: Voice Operated
Transmission button
5. Power indicator LED
6. Link indicator LED
7. Volume indicator LED
8. Speaker
9. VOX (Voice Operated
Transmission)
indicator LED
10. Music indicator LED
11. Brightness adjustment
buttons
12. Power/Volume control
13. Power adapter jack
14. Battery compartment
15. Belt Clip/Stand
1
2
3
9
4
5
6
11
10
12
7
8
15
13
1
14
6
2
7
3
4
8
5
9
10
11
12
1
Camera:
1. Antenna
2. Power indicator LED
3. Infrared LEDs
4. Lens
5. Magnetic Base
6. Night Light
7. Night Light button
8. Microphone
9. Speaker
10. Battery compartment
11. Power ON/OFF switch
12. Power adapter jack
CAMERA SETUP
CAMERA SETUP
You can use the supplied AC adapter or 4 AAA-batteries (not included)
to power your camera. Before starting, switch the power to the OFF
position.
If using batteries:
Note: Use new batteries. Do not mix old batteries with new ones. Remove
the batteries from the camera if you do not plan to use it for an extended
period of time.
1.Use a flat-head screwdriver, open the battery compartment cover
on the back of the camera.
2. Insert 4 AAA batteries according to the "+" and "-" signs. Close the
battery compartment cover and tighten the screw to hold it in place.
3.Slide the power switch to the ON position. The LED on the front of
the camera will light up red.
• The LED on the camera will remain red until the batteries lose
power. Change the batteries when the LEDs are red and blinking.
Upon startup, the LED will be red.
NOTE: Batteries in the camera will last a maximum of 4.5 continuous
hours. For best results, use Lithium Ion AAA batteries.
Use batteries only when necessary.
2
CAMERA SETUP
3
2
1
If plugging into a wall outlet:
1. Plug one end of the provided power adapter into a wall outlet.
(Camera and monitor power adapters are interchangeable.)
2. Connect the other end of the power adapter into the power input on
the camera. This is located under the ON/OFF switch.
3.Turn the ON/OFF switch to the ON position. The LED on the camera
will light up RED.
Mounting the Camera
Using the Magnetic Base
The camera has an innovative and convenient
magnetic base that magnetically holds the
camera securely. This allows you to freely rotate
the camera left, right, up and down with ease:
1. Place the camera & magnetic base on a flat
surface at least 3 feet away from your
baby’s crib.
2. Rotate the camera freely and aim it in the
direction you would like to monitor. Avoid
placing at an angle over 30 degrees as the
camera may fall out. The magnetic strength
is lower over the battery compartment.
3
CAMERA SETUP
Using the Night Light
•
Press the light button. This will turn on/off the night light stars.
The night light will remain on until the button is pressed again.
NOTE: We do not recommend
using batteries with the
night light. The battery
life will be less than
2.5 hours with the
night light on.
Using Night Vision
The camera has nine night vision LEDs allowing you to view your
baby in the dark.The camera has a light sensor and will activate the
night vision only when it gets dark. When you turn off the lights, you
will notice a faint red glow in the front of the camera; these are the
LEDs lit up.
MONITOR SETUP
You have the option to use either the supplied AC adapter or the
included rechargeable lithium-ion battery to power the monitor.
3
1
2
4
MONITOR SETUP
If using the included rechargeable battery:
1. Turn the monitor OFF.
2. Rotate the clip on the back of the monitor to an upright position.
3. Slide open the battery compartment cover on the back of the
monitor. Insert the battery with its connections matching the
connections in the monitor.
4. Close the battery compartment cover, and make sure it is
locked securely.
5. Your battery will need to be charged for initial use. Plug the AC
adapter into a wall outlet, and the other end into the monitor (both
camera and monitor power adapters are interchangeable).
6. If the monitor is off the power LED will turn BLUE to indicate that
charging is in progress. If the monitor is on and charging, the
power LED will be purple.
7. The power LED will turn OFF when charging is complete. Charging
time is approximately 3 hours.
8. When charging is complete, unplug the monitor from the AC
adapter. Turn on the monitor by turning the volume knob on the
side of the unit. You will feel a slight click when it turns on.
9. When the monitor is on, the POWER LED on the monitor will light
up RED. The POWER LED will blink when the battery needs to
be charged. Follow the above steps to recharge the battery.
1
2
5
3
MONITOR SETUP
If using with AC adapter:
1.Plug one end of the provided power adapter into a wall outlet (both
camera and monitor power adapters are interchangeable).
2.Connect the other end of the power adapter into the power input on
the monitor.
3.Turn on the monitor by turning the volume knob on the side of the
unit. You will feel a slight click when it turns on.
4.When the monitor is on, the POWER LED on the monitor will light
up RED.
Note: The battery does not need to be inserted to operate the monitor
from a wall outlet. However, keeping the battery in the unit will
ensure that it is charged when you need to unplug it from
the wall.
Note: It takes approximately 3 hours to fully charge your monitor battery.
6
MONITOR SETUP
Adjusting Monitor Brightness
1.If the image on the LCD screen is too bright , press the
(lower button) to darken the screen.
2.If the image on the LCD screen is too dark, press the
(higher button) to brighten the screen.
button
button
Sound Activation (VOX)
The BABYVIEW20 system lets you turn off the monitor while you are
sleeping, and will automatically turn back on if your child starts to cry
or make noise.
1.Press the “VOX” button on the left side of the monitor. This will turn
off the screen but the “VOX” LED on the front of the monitor will
glow blue.
2.When the sound from the camera reaches the set level, the screen will
turn on automatically. It will turn off again after 30 seconds.
NOTE: The preset noise level is preset to a level comparable to a casual conversation.
7
MONITOR SETUP
Lullaby Sounds
The camera plays a selection of lullabies that you can control with the
monitor. With a push of a button you can start playing music, change
the song, and stop the music remotely when your baby is asleep. There
are 3 different chiming melodies that can sooth your baby to sleep.
on the top left hand side of the monitor.
1.Press the play button
This will activate the music on the camera. If you turn up the volume
on your monitor you will hear it. The music note LED on the front of the monitor will glow RED when a lullaby is turned on.
2. Press the play button
3.Press the next button
again and the music will stop.
to skip to a different song.
• You can see the music you choose on the LCD screen, the music you
have to choose from includes:
1. Twinkle Twinkle little star
2. Hush a Bye
3. Rock-a-bye Baby
8
RANGE
SYNCING CAMERA AND MONITOR
The monitor`s range is approximately 100
feet (30 meters); 150 feet (46 meters) in a
clear line of sight from the camera. Many
factors may increase or decrease the maximum wireless range. The “link” LED will be
green when the monitor and camera are
paired and red when they are not paired.
• If the signal is lost between the monitor
and the camera the message “OUT OF
RANGE” will appear on the monitor. This
could be caused by the camera having
no power or the distance between the
camera and monitor being too far. Try
moving the camera and monitor closer
together, if this does not fix the issue, try
syncing the monitor and camera. Syncing
the monitor and camera may also
improve the audio quality.
• To sync the monitor and camera:
1.With both units powered on, press the
VOX button on the monitor and the
night light button on the camera at the
same time. Hold both buttons down for
approximately 5 seconds.
2.The words “Signal Searching” will
appear on the monitor.
3.Once the night lights (stars) on the
camera blink three times the camera
and monitor will been synced and you
can properly view your camera on your
handheld monitor.
9
SIGNAL SEARCHING
TROUBLESHOOTING
If you are not getting any signal at all:
• Make sure the camera and the monitor are turned on
• Make sure the power plugs are pushed all the way in
• If the camera/monitor is powered by batteries, replace all batteries
with new ones
If the signal is poor, or there is interference:
• If there is a microwave oven in use in the path between the camera
and monitor, turn off the microwave
• Make sure the camera and the monitor are within range of each
other (optimal range of approximately 100 ft; 150 ft in a clear line
of sight)
ADDITIONAL INFORMATION
• Keep all parts and accessories out of young children’s reach
• Fingerprints or dirt on the lens surface can adversely affect camera
performances. Avoid touching the lens surface with your fingers
• Should the lens become dirty, use a blower to blow off dirt and dust,
or a soft, dry cloth to wipe off the lens
• Keep the camera dry. Precipitation, humidity, and other liquids
contain minerals which will corrode electronic circuits
• Do not use or store in dusty, dirty areas
• Do not store in hot areas. High temperatures can shorten the life of
electronic devices and warp or melt certain plastics
• If the power LED is on but only voice signal input is detected, the
monitor may be in voice-activated mode. Press the VOX button OFF
to turn on the screen
• The VOX LED should be off to indicate the unit is in normal operation
mode. If this does not work try to sync the camera and monitor again
10
LITHIUM BATTERY TIPS
The rechargeable battery of the handheld monitor is a built-in lithiumpolymer battery. Before using the monitor with battery power, please read
the following in order to use the battery properly.
1. Under normal temperatures the battery can be recharged at least
300 times.
2. If the battery is not already full, make sure that the battery is
charged before use.
3. When the device is not in use, switch the unit off to maintain
battery power.
4. Unplug the power adapter when not in use.
5. In colder environments, the unit will consume more power. Please
keep this device at room temperature to increase the usable
power. In environments with low temperatures it will take longer to
recharge than in normal temperature environments.
6. To avoid danger, do not use the power adapter in high temperature
and high humidity locations.
7. It is normal for the unit’s battery to feel slightly warm while the
monitor is in use or is charging. Do not leave the power adapter
connected for an extended period of time.
8. For your own safety, the battery is set to stop charging when
the battery temperature is higher than 45°C or lower than 5°C.
Charging will automatically resume once temperatures are back
to normal.
9. In order to avoid damaging the battery, do not expose the monitor
to high temperature environments (45°C or above).
10. Even if the battery is fully charged, power will gradually be lost
if the monitor is not used for an extended period. Make sure to
recharge if the unit has not been in use for a long period of time.
11. Always use the supplied power adapter only to recharge the
monitor’s battery. Using any other power adapter could ruin the
monitor or cause extreme burns.
11