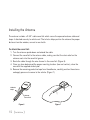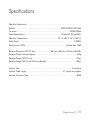
1
SC-C1
SiriusConnectTM Vehicle Tuner
Installation Guide
Congratulations on the Purchase of your new SIRIUS SC-C1
SiriusConnect Vehicle Tuner.
The SC-C1 SiriusConnect Vehicle Tuner is designed to work with any Sirius-Ready or SAT
Radio Ready headunit. Some headunits will require the use of a SiriusConnect Interface
Translator. Please consult your headunit manufacturer for more details concerning compatibility and interface availability. The SC-C1 can also be integrated in select factory audio systems.
Please consult your retailer for interface compatibility options. For the latest information about
this and other SIRIUS products and accessories, visit http://www.sirius.com.
Compatible with Sirius-Ready or
SAT-Radio Ready Headunits
May require a SiriusConnect Interface cable or translator
Table of Contents
Table of Contents. . . . . . . . . . . . . . . . . . . . . . . . . . . . . . 3
Warning and Safety Information. . . . . . . . . . . . . . . . . . . . . . 4
Safety Precautions. . . . . . . . . . . . . . . . . . . . . . . . . . . . . . . . 4
FCC Warning. . . . . . . . . . . . . . . . . . . . . . . . . . . . . . . . . . 5
FCC Compliance. . . . . . . . . . . . . . . . . . . . . . . . . . . . . . . . 5
Canadian Compliance . . . . . . . . . . . . . . . . . . . . . . . . . . . . . . 5
Copyrights & Trademarks . . . . . . . . . . . . . . . . . . . . . . . . . . 6
Package Contents. . . . . . . . . . . . . . . . . . . . . . . . . . . . . . 7
Connections. . . . . . . . . . . . . . . . . . . . . . . . . . . . . . . . . 8
Connector Information. . . . . . . . . . . . . . . . . . . . . . . . . . . . . . 8
Basic system wiring options. . . . . . . . . . . . . . . . . . . . . . . . . . . . 9
Installation. . . . . . . . . . . . . . . . . . . . . . . . . . . . . . . . .
Installing the SC-C1 Vehicle Tuner. . . . . . . . . . . . . . . . . . . . . . . . .
Alternate Mounting Methods. . . . . . . . . . . . . . . . . . . . . . . . . . . Installing the Antenna . . . . . . . . . . . . . . . . . . . . . . . . . . . . . .
Optimum Antenna Mounting Locations . . . . . . . . . . . . . . . . . . . . . . .
10
10
11
12
13
Operation . . . . . . . . . . . . . . . . . . . . . . . . . . . . . . . . . . 14
Activating Your SC-C1 Tuner . . . . . . . . . . . . . . . . . . . . . . . . . . . 14
Specifications. . . . . . . . . . . . . . . . . . . . . . . . . . . . . . . . 15
Warranty. . . . . . . . . . . . . . . . . . . . . . . . . . . . . . . . . . 16
SIRIUS ID. . . . . . . . . . . . . . . . . . . . . . . . . . . . . . . . . . . 17
[ Table of Contents ]
Warning and Safety Information
Safety Precautions
Be sure to observe the following warnings. Failure to follow these safety instructions and
warnings may result in a serious accident and/or personal injury..
• Install the cables and wiring so that it is not crimped or pinched by screws or sharp metal
edges. Route the cables away from moving parts or sharp pointed edges. This will prevent
crimping and damage to the wiring. If the wiring must pass through a metal hole, be sure
to use a rubber grommet to prevent the wire’s insulation from being cut by the metal edge
of the hole.
• Use caution if you need to disconnect the battery terminal. Please consult the vehicle’s
owner’s manual or a service technician prior to removing the battery positive or ground
connection, as it may cause damage to the vehicle’s electrical system or require reprogramming of the vehicle’s computer-controlled devices.
• Do not operate any function that takes your attention away from safely driving your vehicle.
Any function that requires your prolonged attention should only be performed after coming
to a complete stop. Always stop the vehicle in a safe location before performing these
functions. Failure to do so may result in an accident.
• Do not open, disassemble or alter the unit in any way. Doing so may result in fire, electric
shock or product damage.
• Do not insert any objects into the unit. Doing so may result in fire, electric shock or product damage.
• Do not install in locations that might hinder vehicle operation. Doing so may obstruct vision
or hamper movement which can result in a serious accident.
• Do not install the unit to high levels of humidity, moisture or dust. Doing so can result in
electric shock or product failure.
[ Warning and Safety Information ]
FCC Warning
This equipment may generate or use radio frequency energy. Changes or modifications to this
equipment may cause harmful interference unless the modifications are expressly approved in
this User Guide. The user could lose the authority to operate this equipment if an unauthorized change or modification is made.
FCC Compliance
Note: This equipment has been tested and found to comply with Part 15 of the FCC Rules.
These rules are designed to provide reasonable protection against harmful interference. This
equipment may cause harmful interference to radio communications if it is not installed and
used in accordance with these instructions. However, there is no guarantee that interference
will not occur in a particular installation. If this equipment does cause harmful interference
to radio or television reception, which can be determined by turning the equipment off and
on, the user is encouraged to try to correct the interference by one of more of the following
measures:
• Relocate the receiving antenna.
• Increase the separation between the other equipment and the receiver.
• Consult the dealer or an experienced radio technician for help.
Canadian Compliance
This Class B digital apparatus complies with Canadian ICES-003
Cet appareil numérique de la classe B est conforme à la nome NMB-003 du Canada.
[ Warning and Safety Information ]
Copyrights & Trademarks
© 2007 Sirius Satellite Radio Inc. All Rights Reserved.
® “SIRIUS”, the SIRIUS dog logo, “SiriusConnect”, channel names and logos are trademarks
of Sirius Satellite Radio Inc. All Rights Reserved.
Hardware, subscription, and activation fee required. For full Terms & Conditions, visit
http://sirius.com. Prices and programming are subject to change. Not available in HI and AK.
Equipment and subscription sold separately. Installation required with some equipment.
[ Copyrights & Trademarks ]
Package Contents
The following items are included with your purchase of the SIRIUS SC-C1 SiriusConnect
Vehicle Tuner. Unpack the kit carefully and make sure that everything shown is present. If
anything is missing or damaged, or if the unit fails to operate properly, notify your dealer immediately. It is recommended that you retain the original carton and packing materials in case
you need to ship your kit in the future.
SC OU
TP
UT
ANTE
NNA
SC-C1 Vehicle Tuner
(with mounting plate attached)
SiriusConnect Interface Cable
(Male/Male)
Mini-magnetic antenna with 21’ cable,
tail cover and alcohol pad
Mounting screws
(x4)
[ Package Contents ]
Connections
Connector Information
Figure 1 identifies and describes the connectors on the SC-C1 Vehicle Tuner. Figure 2 identifies the 8-pin pin-out configuration.
• SC OUTPUT: Connection for the SC Interface Cable.
• ANTENNA: Connection for the satellite antenna.
Connect to Sirius-Ready
Headunit or SiriusConnect
Interface Translator
Figure 1
7
8
6
4
3
5
1
2
1
2
3
4
5
6
7
1
Battery
Power Enable
Serial Data (RX)
Ground
Audio Right
Serial Data (TX)
Audio Ground
Audio Left
Figure 2
Note 1: The Serial Data TX and RX lines in the SiriusConnect Interface cable are crossed
Note 2: The Audio output is 1volt RMS.
[ Connections ]
Basic system wiring options
The SC-C1 SiriusConnect Vehicle Tuner is designed to work with any Sirius-Ready or SAT
Radio Ready headunit. Some headunits will require the use of a SiriusConnect Interface
Translator. Please consult your headunit manufacturer for more details concerning compatibility and interface availability. The SC-C1 can also be integrated in select factory audio
systems. Please consult your retailer for interface compatibility options.
System 1
SiriusConnect 8-pin DIN Cable
Sirius-Ready or SAT Radio Ready headunit with a SiriusConnect 8-pin DIN connector. Note that the headunit must be
capable of directly communicating to the SC-C1 tuner protocol
System 2
Headunit cable to SiriusConnect Interface Cable
Sirius-Ready or SAT Radio Ready headunit with an optional headunit specific connector/adapter. Note that the headunit
must be capable of directly communicating to the SC-C1 tuner protocol
System 3
Headunit bus cable
Optional
SiriusConnect
Interface
SiriusConnect Cable
Sirius-Ready, SAT Radio Ready or select OEM headunits with optional SiriusConnect Interface translator
[ Connections ]
Installation
Installing the SC-C1 Vehicle Tuner
It is recommended that prior to starting the installation, you thoroughly read this manual and
follow the guidelines listed below:
Consider the mounting location carefully. You should make sure that you avoid the following:
• Any location where the tuner is exposed to moisture.
• Any location where the unit is exposed to extreme heat.
• Any location where the tuner can not get adequate ventilation.
• Any location that would interfere with moving parts on the vehicle or hamper driving.
Mounting the SC-C1 Tuner
Be sure that you find a location that is flat and has clearance above the unit to prevent any damage as well as
allow for ventilation.
Caution: If you are attaching the unit directly to the
vehicle’s chassis, be sure that you check to make sure
the area behind the unit is free from moving parts, fuel
or break lines, wire harnesses or any other items which
may get damaged by drilling a mounting hole or using the
supplied screws.
10 [ Installation ]
SC O
UTP
UT
ANTE
NNA
Alternate Mounting Methods
The mounting plate can be removed allowing the SC-C1 to
be mounted directly to a surface using either double stick
tape, Velcro or other adhesive material. Simply remove the
2 screws on the bottom of the SC-C1 tuner to remove the
bracket as in Figure 3 below. If using adhesive material,
avoid covering the SID label.
Figure 3
Combining with a SiriusConnect Interface device
Some third-party interfaces are designed with the same asymmetrical chassis as the SC-C1.
To connect the units together, simply remove the mounting brackets from each unit, rotate
them 90° and connect as show in Figures 4 and 5 below
SiriusConnect
Interface
SC-C1 Tuner
Figure 4
Figure 5
[ Installation ]
11
Installing the Antenna
The antenna includes a 2-3/4” cable cover/tail which covers the exposed antenna cable and
keeps it attached securely to vehicle roof. The tail also helps position the antenna the proper
distance from the window, sunroof or rear hatch.
To attach the cover/tail:
1. Turn the antenna upside-down and extend the cable.
2. Connect the cover/tail to the antenna cable, making sure that the strain-relief on the
antenna seats into the cover/tail groove.
3. Route the cable through the wire channel in the cover/tail. (Figure 6)
4. Once you have determined the proper mounting location (see next section), clean the
area with the supplied alcohol pad.
5. Remove the remaining protective tape from the adhesive, carefully position the antenna
and apply pressure to secure to the vehicle. (Figure 7)
Adhesive
Strips
Antenna
Cover/Tail
Figure 6
12 [ Installation ]
Figure 7
Optimum Antenna Mounting Locations
The optimum location to mount the included antenna is on the roof of the vehicle. It is important to avoid any obstruction that will block satellite signal – like a roof rack. For convertible
vehicles, install the antenna on the trunk lid.
• Place the antenna on a metal surface of your vehicle at least 23/4” from a window or another edge. (Use the antenna cover/tail
as a guide for the proper distance).
• The antenna’s magnet will secure it to the metal surface. The
adhesive that is attached to the antenna cover/tail will secure the
cable to the vehicle. Before routing the antenna cable, confirm
that the antenna is mounted in a good location.
• Route the cable from the antenna to the vehicle’s interior by
tucking it underneath the rubber molding around the rear window
(if possible). Avoid sharp edges or tight areas that may pinch the
cable.
• For SUVs, minivans and five-door vehicles, bring the cable into
the vehicle under the rubber molding for the tailgate, and continue under the interior trim.
• For convertibles mount the antenna to the rear deck
and route the cable into the interior from within the
trunk.
Caution:
• Avoid sharp edges, moving parts and areas of
extreme heat.
[ Installation ]
13
Operation
Activating Your SC-C1 Tuner
You must activate the SC-C1 tuner before you can begin to receive the SIRIUS Satellite
Radio Service.
In order to activate your radio subscription, you will need the SIRIUS ID (SID) which uniquely
identifies your tuner. The SID can be found on a sticker located on the SC-C1 packaging, or
on the bottom of the SC-C1 itself. When you have located the SID, write it down in the space
provided near the end of this manual and store it for future reference.
The SID can also be recalled from your Sirius-Ready headunit. Most units will display the SID
on either Channel-0 or on Channel 255. Please consult your headunit owners manual or user
guide for specific details.
Power on your system and make sure that you are receiving good signal you are able to hear
audio on the SIRIUS Preview channel (Ch-184)
Have your credit card handy and contact SIRIUS on the internet at
https://activate.sirius.radio.com/ and follow the prompts to activate your subscription.
You can also call SIRIUS toll-free at 1-888-539-SIRIUS (1-888-539-7474)
Once activated, you will be able to begin enjoying SIRIUS Satellite Radio’s digital entertainment and can tune to other channels.
Operation Information
Consult the owners manual for your Sirius-Ready headunit or SiriusConnect Interface for
operating instructions.
14 [ Operation ]
Specifications
Operation Frequencies . . . . . . . . . . . . . . . . . . . . . . . . . . . . . . . . . . . . . . . . . . . . . . . . . . . . . . . . . Satellite . . . . . . . . . . . . . . . . . . . . . . . . . . . . . . . . . . . . . . . . . . . . . . . . 2322.293/2330.207 MHz
Terrestrial . . . . . . . . . . . . . . . . . . . . . . . . . . . . . . . . . . . . . . . . . . . . . . . . . . . . . . . 2326.250MHz
Power Requirements . . . . . . . . . . . . . . . . . . . . . . . . . . . . . . . . . . . . . . 12 Volts DC (1Amp MAX),
Operation Temperature . . . . . . . . . . . . . . . . . . . . . . . . . . . . . . . . . -20° to +85° C (-4° to 185° F)
Audio Output . . . . . . . . . . . . . . . . . . . . . . . . . . . . . . . . . . . . . . . . . . . . . . . . . . . . . . . . . 1V (RMS)
Signal-to-noise (S/N) . . . . . . . . . . . . . . . . . . . . . . . . . . . . . . . . . . . . . . . . . . . Greater than 75dB
Receiver Dimensions (SC-C1 only) . . . . . . . . . . . . . . . . 86.7mm x 88.7mm x 33.2mm (WxHxD)
Receiver Weight (with packaging) . . . . . . . . . . . . . . . . . . . . . . . . . . . . . . . . . . . . . . . . . . . . 520g
Receiver Weight (SC-C1 only) . . . . . . . . . . . . . . . . . . . . . . . . . . . . . . . . . . . . . . . . . . . . . . 120g)
Receiver Weight (SC-C1 with Mounting Bracket) . . . . . . . . . . . . . . . . . . . . . . . . . . . . . . . 180g)
Antenna Type . . . . . . . . . . . . . . . . . . . . . . . . . . . . . . . . . . . . . . . . . . . . . . . . . . . . . . . Automotive
Antenna Cable Length . . . . . . . . . . . . . . . . . . . . . . . . . . . . . . . . . . . . . . 21’ (single micro-cable)
Antenna Connector Type . . . . . . . . . . . . . . . . . . . . . . . . . . . . . . . . . . . . . . . . . . . . . . . . . . . SMB
[ Specifications ]
15
Warranty
12 Month Warranty
SIRIUS Satellite Radio Inc. (the “Company”) warrants to the original retail purchaser of this product
that should this product or any part thereof, under normal use and conditions, be proven defective in
material or workmanship within 12 months from the date of original purchase, such defect(s) will be
repaired or replaced with new or reconditioned product (at the Company’s option) without charge for
parts and repair labor. To obtain repair or replacement within the terms of this Warranty, the product
is to be delivered with proof of warranty coverage (e.g. dated bill of sale), specification of defect(s),
transportation prepaid, to the location shown below under WARRANTY RETURN.
This Warranty does not extend to the elimination of externally generated static or noise, to correction
of antenna problems, to costs incurred for installation, removal or reinstallation of the product, or to
damage to tapes, compact discs, speakers, accessories, or vehicle electrical systems.
This Warranty does not apply to any product or part thereof which, in the opinion of the Company,
has suffered or been damaged through alteration, improper installation, mishandling, misuse, neglect,
accident, or by removal or defacement of the factory serial number/bar code label(s). THE EXTENT
OF THE COMPANY’S LIABILITY UNDER THIS WARRANTY IS LIMITED TO THE REPAIR OR
REPLACEMENT PROVIDED ABOVE AND, IN NO EVENT, SHALL THE COMPANY’S LIABILITY
EXCEED THE PURCHASE PRICE PAID BY PURCHASER FOR THE PRODUCT.
This Warranty is in lieu of all other express warranties or liabilities. ANY IMPLIED WARRANTIES, INCLUDING ANY IMPLIED WARRANTY OF MERCHANTABILITY, SHALL BE LIMITED TO THE DURATION OF THIS WRITTEN WARRANTY. ANY ACTION FOR BREACH OF ANY WARRANTY HEREUNDER INCLUDING ANY IMPLIED WARRANTY OF MERCHANTABILITY MUST BE BROUGHT
WITHIN A PERIOD OF 48 MONTHS FROM DATE OF ORIGINAL PURCHASE. IN NO CASE SHALL
THE COMPANY BE LIABLE FOR ANY CONSEQUENTIAL OR INCIDENTAL DAMAGES FOR
BREACH OF THIS OR ANY OTHER WARRANTY, EXPRESS OR IMPLIED, WHATSOEVER. No
person or representative is authorized to assume for the Company any liability other than expressed
herein in connection with the sale of this product. Some states do not allow limitations on how long
an implied warranty lasts or the exclusion or limitation of incidental or consequential damage so the
above limitations or exclusions may not apply to you. This Warranty gives you specific legal rights and
you may also have other rights which vary from state to state.
WARRANTY RETURN: To obtain repair or replacement within the terms of this Warranty, please return product to an authorized retailer or call Customer Service at 1-800-869-5187; proof of purchase
and description of defect are required. Products to be returned to an approved warranty station must
be shipped freight prepaid.
16 [ Warranty ]
SIRIUS ID
Write down the SIRIUS ID (SID) of your SC-C1 Tuner in the space provided below.
SID:
[ SIRIUS ID ]
17
SIRIUS Customer Service: 1-888-539-7474
[email protected]
SIRIUS Satellite Radio Inc.
1221 Avenue of the Americas
New York, NY 10020
1-888-539-7474
http://www.sirius.com
SIRIUS Satellite Radio Inc.
1221 Avenue of the Americas
New York, NY 10020
(800) 869-5590
http://sirius.com
SIRIUS SC-C1 (113006a)