1
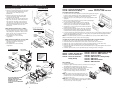
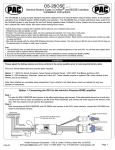
GM1488
1996-02
1996-03
Chevrolet Astro Van
GMC Safari Van
IN-DASH INSTALLATION KIT FOR
RADIO REMOVAL:
1. Extract (2) T-30 torx bolts, one from each side of the top console area and pop out top half of center
console assembly.
2. Extract (2) 9/32" hex screws from the bottom edge of the driver’s side under dash panel and (1) screw
from left dash below defroster vent.
3. Carefully pry underdash panel out to release, and use caution when handling parking brake release cable.
4. Insert key into "on", adjust shifter down (low gear), Pull outward on the instrument/radio panel to release
clips. Unplug switches, and remove panel.
5. Push down on side tabs securing radio, slide out of dash, unplug, and remove radio.
1988-03 FULL SIZE PICKUP/SPORT UTILITY
#2224L
MOUNTING CLIP
(LEFT)
CARRIAGE
BOLT
#1869/2543
MOUNTING
PANEL
#2006
MOUNTING
PANEL
HEX NUT
#2224R
MOUNTING
CLIP (RIGHT)
CADILLAC
1999-02
2002-02
GMC
ESCALADE
ESCALADE EXR
1992-00
1988-02
1996-03
1996-00
1992-02
1992-02
1999-99
2000-02
CHEVROLET
1996-02
2001-02
1992-94
1992-99
1996-00
1988-02
1992-02
1995-02
ASTRO VAN
AVALANCHE
BLAZER FULL SIZE
CREW CAB / DOOLEY PICKUP
EXPRESS VAN
PICKUP FULL SIZE
SUBURBAN
TAHOE
CREW CAB / DOOLEY PICKUP
PICKUP FULL SIZE
SAFARI
SAVANNA
SUBURBAN
YUKON
YUKON DENALI
YUKON XL
FACTORY WIRING CODES
CAR STEREO CONNECTORS
GM02B
MDA-1B
PROVIDE EASY CONNECTION OF YOUR CAR
STEREO TO FACTORY WIRING HARNESS.
GM02B
MDA-1B
1988-Up
Antenna Adaptor
INTRODUCTION / PRELIMINARY
1996-00
1996-00
This premium installation kit is for 1988-03 Full Size Pickup/Sport Utility vehicles. Included are all the parts
you need to mount your car stereo/cassette or CD player into your vehicle's dash. Refer to the individual
instruction in this manual to remove your vehicle's factory radio and assemble the kit.
Chevrolet Express Van
GMC Savanna
RADIO REMOVAL:
1. Carefully pull out on dash instrument/radio dash bezel to release spring clips, unplug connectors and
remove panel.
2. Compress the two plastic side radio mounting clips, slide radio out of dash, unplug connectors and remove
radio.
CAUTION:
DISCONNECT YOUR VEHICLE'S NEGATIVE BATTERY TERMINAL BEFORE THE INSTALLATION TO HELP
PREVENT ELECTRICAL DAMAGE. WE RECOMMEND THE USE OF A VOLT/OHM METER OVER A TEST LIGHT TO
CHECK WIRING. A TEST LIGHT OR GROUNDED WIRE PROBE CAN CAUSE DAMAGE TO THE VEHICLE'S
COMPUTER AND/OR DIAGNOSTIC SYSTEMS. AVOID ALL FACTORY AIRBAG WIRING - AIRBAGS CAN
ACCIDENTALLY DEPLOY CAUSING SERIOUS INJURY OR DEATH.
NOTES:
• See your vehicle's instructions for any special tools your installation might require.
• Read all instructions accompanying your car stereo/cassette player for proper wiring and mounting
instructions.
LIABILITY DISCLAIMER
This instruction booklet is based on carefully documented data and research of automobile dash disassembly, wire
harness/codes and information pertaining to installation of this kit (GM1488) in 1988-03 General Motors Vehicles.
Scosche Industries, Inc. can not be held responsible for discrepancies/inconsistencies that may occur due to the
automobile manufacturing changes or options, or damage that may occur in the automobile during the installation of
components while using this booklet.
4
If you have any further questions, call
© 2007 SCOSCHE INDUSTRIES, INC.
TECH HELP 1-800-621-3695 x 3
SI 12/06 - GM1488 (3000317)
STEREO INSTALLATION/KIT PREPARATION
STEREO INSTALLATION/KIT PREPARATION:
1992-94 Chevrolet Blazer
1992-99 Chevrolet Crewcab Dually
1992-00 GMC Crewcab Dually
ILLUSTRATION B
Panel #2006 panel preparation:
1. Remove the metal fastening clips from the bottom
of the factory dash bezel and attach them to the
same location on the #2006 panel. (See
Illustration B)
2. Remove the A/C vents from the factory dash
bezel by releasing the spring fastening clips
securing them into the bezel.
3. Mount the vents into the kit by inserting the inner
edge of the vent into the center inside pivot hole.
Then insert the outer edge of the vent into the
outer pivot hole. Using the same metal spring
clips and mounting procedures from the original
truck panel to mount the vents to the new
#2006 panel.
DASH BEZEL/TUNER PACK REMOVAL:
REAR
VIEW
OF KIT
1. Carefully remove the factory tape/EQ (or pocket) bezel by prying out along the
bottom to release fastening clips. Then carefully pull down on the bezel to
release the fasteners securing the top and remove the bezel.
2. Extract the two (2) screws securing the factory tape player/equalizer (when
equipped).
3. Remove the dash panel under the steering column by extracting the
two (2) screws securing it to the dash.
4. Locate the radio tuner pack (metal control box) under the
dash above the accelerator pedal. Remove it by extracting
the three (3) screws securing it to the underdash brackets.
5. Unplug all the connectors going into the radio tuner pack and
remove it from the vehicle.
6. Pull the tape player/equalizer from the dash and carefully pull
the plug harness through the dash from the radio tuner pack
location and remove the tape player/equalizer form the dash.
7. Locate the antenna plug and the plugs that were connected to the top of the radio tuner pack. Route them
into the tape player/equalizer cavity. These are the factory power, speaker and antenna plugs that will be
used for the aftermarket radio hook-ups.
NOTE: It is recommended that you use the Scosche GM02 factory connector and the MDA-1 antenna
adapter to eliminate the need to cut any of the factory plugs.
METAL
FASTENING
CLIP
STEREO INSTALLATION WITH THE 2006 PANEL:
1. Install the 2006 panel into the dash by inserting
the top mounting clips into the slots in the dash
and pushing up to snap them in. Then press the
bottom clips into the slots at the bottom of the
dash to secure the kit to the dash.
2. See illustration C for stereo mounting
configurations.
ILLUSTRATION C
#2006
MOUNTING
PANEL
RADIO'S
MOUNTING
SLEEVE
STEREO INSTALLATION WITH THE 1869/2543 PANEL
OPTIONAL FACTORY RADIO DISPLAY/CONTROL UNIT REMOVAL AND POCKET REPLACEMENT:
DIN
STEREO
1. Attach the left and right side brackets to the
mounting panel with the carriage bolts
and nuts provided.
2. See illustration D for stereo mounting
configurations.
BEND
TABS
OUTWARD
RADIO'S
SUPPLIED
TRIMPLATE
ILLUSTRATION D
1988-02 Chevrolet / GMC
Full Size Pickup
1992-02 Chevrolet / GMC Suburban
RADIO'S REAR
SUPPORT STRAP
#1869 / 2543
MOUNTING
PANEL
REAR SUPPORT IS
ESSENTIAL TO THE
INSTALLATION'S
STRUCTURAL
INTEGRITY.
RADIO'S REAR
SUPPORT STRAP
DIN
STEREO
BEND
TABS
OUTWARD
#2224L
MOUNTING
CLIP
SHAFT RADIO
RADIO'S SUPPLIED
TRIMPLATE
#2224R
MOUNTING
CLIP
#1869/2543
MOUNTING PANEL
NOTE: SNAP SHAFT MOUNTING
TABS NOT INCLUDED. IF
REQUIRED FOR YOUR STEREO
INSTALLATION, CALL
800-621-3695 X3 FOR IMMEDIATE
SHIPMENT
SNAP SHAFT TABS:
(SEE NOTE)
RADIO'S SUPPLIED
TRIMPLATE
SHAFT RADIO'S
SUPPLIED FACEPLATE
2
Extract the (4) screws securing the instrument cluster dash bezel to the dash.
Pull the dash bezel from the dash, disconnect all the connectors and remove the bezel.
Extract the (4) screws securing the heater controls to the dash and pull it out of the dash cavity.
Extract the (4) screws securing the radio to the dash and pull from the cavity.
Route the radio leads from the tuner location as mentioned in step 4 of tape player/equalizer removal and
remove the radio.
6. Install the optional pocket (Scosche part #1001518) by reversing procedures 1 through 4.
1999-02
2002-02
2001-02
1995-99
CAUTION:
RADIO'S
MOUNTING
SLEEVE
1.
2.
3.
4.
5.
Cadillac Escalade
Cadillac Escalade EXT
Chevrolet Avalanche
Chevrolet Crewcab /
Dually Pickup
1995-02
1992-02
1995-02
1995-00
1992-02
1999-99
2000-02
Chevrolet / GMC Full Size Pickup
Chevrolet / GMC Suburban
Chevrolet Tahoe
GMC Crewcab / Dually Pickup
GMC Yukon
GMC Yukon Denali
GMC Yukon XL
RADIO REMOVAL:
1. Engage parking brake.
2. Place key in ignition and depress brake to shift vehicle in to lowest gear.
This will allow the gear shift arm to be out of the way.
3. Carefully pull out on dash instrument/radio dash bezel to release
spring clips, unplug connectors and remove panel.
4. Compress the two plastic side radio mounting clips, slide
radio out of dash, unplug connectors and remove
radio.
NOTE: Use caution when removing the dash bezel over
the hazard switch. The hazard switch may need to be
pushed down as if to activate the hazard lights to allow
the bezel to slide over it.
NOTE (2): It is recommended that you use the Scosche GM02
factory connector and the MDA-1 antenna adapter to eliminate
the need to cut any of the factory plugs.
3