1
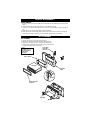
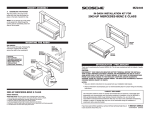
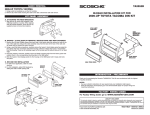
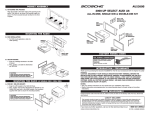
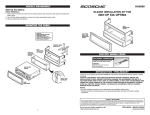
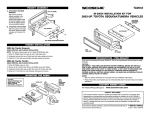
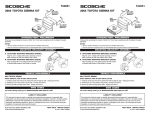
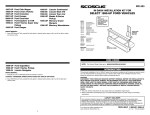
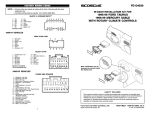
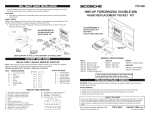
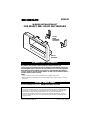
VO4148
IN-DASH INSTALLATION KIT
FOR SELECT 2001 VOLVO S80 VEHICLES
404148
REAR
MOUNTING
SUPPORTS
VO4148
KIT PANEL
INTRODUCTION / PRELIMINARY
CAUTION:
DISCONNECT YOUR VEHICLE'S NEGATIVE BATTERY TERMINAL BEFORE THE
INSTALLATION TO HELP PREVENT ELECTRICAL DAMAGE. WE RECOMMEND THE USE OF A
VOLT/OHM METER OVER A TEST LIGHT TO CHECK WIRING. A TEST LIGHT OR GROUNDED
WIRE PROBE CAN CAUSE DAMAGE TO THE VEHICLE'S COMPUTER AND/OR DIAGNOSTIC
SYSTEMS. AVOID ALL FACTORY AIR BAG WIRING - AIR BAGS CAN ACCIDENTALLY DEPLOY
CAUSING SERIOUS INJURY OR DEATH.
NOTES:
• See your vehicle's instructions for any special tools your installation might require.
• Read all instructions accompanying your car stereo/cassette player for proper wiring and mounting
instructions.
FACTORY WIRING CODES
For Factory Wiring Codes go to:
www.scosche-cars.com
LIABILITY DISCLAIMER
This instruction booklet is based on carefully documented data and research of automobile dash
disassembly, wire harness/codes and information pertaining to installation of this kit (VO4148) in
Select 2001 Volvo S80 Vehicles. Scosche Industries, Inc. can not be held responsible for
discrepancies/inconsistencies that may occur due to the automobile manufacturing changes or
options, or damage that may occur in the automobile during the installation of components while
using this booklet.
If you have any further questions, call our toll free technical help line at: 1-800-621-3695x3
© 2002 SCOSCHE INDUSTRIES, INC.
SI 10/02 - VO4148 (3000003)
VEHICLE DISASSEMBLY
RADIO REMOVAL
1. Carefully pry out and remove small filler piece located below the air conditioning controls and around
shifter.
2. Locate and extract (2) T-25 Torx at the bottom of air conditioning assembly.
3. Carefully pry out A/C assembly straight out from each top corner. Be careful as area surrounding is
soft.
4. Extract (2) T-25 Torx securing radio bracket, unplug and remove.
5. Extract (5) T-25 Torx screws holding radio to radio mount housing. Remove radio from housing and
retain housing. Housing is necessary to mount new radio. (See Kit Assembly Illustration)
KIT ASSEMBLY
KIT ASSEMBLY
1.
2.
3.
4.
Unscrew and remove rear mounting supports from kit.
Slide kit into metal factory radio housing. (See Radio Removal)
Reattach rear mounting supports to secure factory radio housing.
When installing kit assembly into dash make sure top of factory radio
housing fits snugly to upper radio opening.
404148 REAR
MOUNTING
SUPPORTS
NOTE:
REAR SUPPORTING
THE RADIO ADDS TO
THE INSTALLATIONS
STRUCTURAL
INTEGRITY.
RADIO SLEEVE
DIN RADIO
MOUNTING
PANEL
BEND
TABS
OUTWARD
RADIO'S SUPPLIED
TRIMPLATE
REAR VIEW
2