1
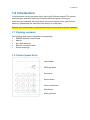
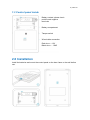
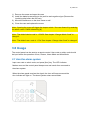
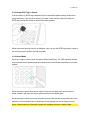
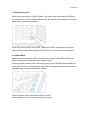
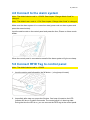
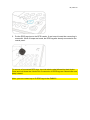
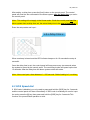
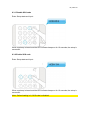
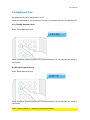
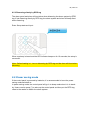
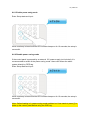
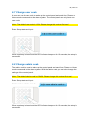
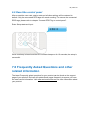
EM8622 Wireless Control Panel 2 | ENGLISH EM8622 - Wireless Control Panel Table of contents 1.0 Introduction ........................................................................................................... 3 1.1 Packing contents ............................................................................................... 3 1.2 Control panel front ............................................................................................. 3 1.3 Control panel inside ........................................................................................... 4 2.0 Installation ............................................................................................................. 4 3.0 Usage.................................................................................................................... 5 3.1 Arm the alarm system ........................................................................................ 5 3.2 Disarm the alarm system ................................................................................... 6 3.2.1 Using control panel to disarm ..................................................................... 6 3.2.2 Using RFID Tag to disarm .......................................................................... 7 3.2.3 Home Mode ................................................................................................ 7 3.2.4 Emergency Call .......................................................................................... 8 3.2.5 Mute Mode ................................................................................................. 8 4.0 Connect to the alarm system ................................................................................. 9 5.0 Connect RFID Tag to control panel........................................................................ 9 6.0 Settings ............................................................................................................... 11 6.1 Enter Setup-state............................................................................................. 11 6.2 Delay Arm........................................................................................................ 11 6.3 SOS Speed dial ............................................................................................... 12 6.3.1 Disable SOS code .....................................................................................13 6.3.2 Enable SOS code ......................................................................................13 6.4 Keyboard tone ................................................................................................. 14 6.4.1 Disable keyboard tone ...............................................................................14 6.4.2 Enable keyboard tone ................................................................................14 6.5 Disarm system by RFID tag ............................................................................. 15 6.5.1 Disable disarming by RFID tag ..................................................................15 6.5.2 Enable disarming by RFID tag ...................................................................15 6.5.3 Disarming silently by RFID tag ...................................................................16 6.6 Power saving mode ......................................................................................... 16 6.6.1 Enable power savig mode..........................................................................17 6.6.2 Disable power saving mode .......................................................................17 6.7 Change user code ........................................................................................... 18 6.8 Change admin code ........................................................................................ 18 6.9 Reset the control panel .................................................................................... 19 7.0 Frequently Asked Questions and other related information .................................. 19 8.0 Service and support............................................................................................. 20 9.0 Warning and points of attention ........................................................................... 21 10.0 Warranty conditions ........................................................................................... 22 11.0 Declaration of Conformity .................................................................................. 23 3 | ENGLISH 1.0 Introduction Congratulations with the purchase of this high-quality Eminent product! This product has undergone extensive testing by Eminent’s technical experts. Should you experience any problems with this product, you are covered by a five-year Eminent warranty. Please keep this manual and the receipt in a safe place. Register your product now on www.eminent-online.com and receive product updates! 1.1 Packing contents The following parts need to be present in the packing: EM8622 Wireless Control Panel Manual 3pcs AAA batteries External connection cable Screws and plugs 1.2 Control panel front Led indicator RFID tag reader Arm button Disarm button Home mode button SOS button Wake-up button 4 | ENGLISH 1.3 Control panel inside Battery contact, please check positive and negative terminals Battery compartment Tamper switch Wired cable connection Red wire = + 12V Black wire = - GND 2.0 Installation Install the batteries and mount the control panel on the door frame or the wall before use. 5 | ENGLISH 1) Remove the screw and open the case 2) Install the batteries according to the positive and negative signs (Remove the insulating strip before the first use) 3) Mount the backcover on the door frame or wall 4) Close the case and replace the screw Note : Opening the cover will trigger the tamper switch ! You can disarm it by entering the admin code 123456 followed by [#]. Note : The default admin code is : 123456. See chapter “Change Admin Code” to change it. Note : The default user code is : 1234. See chapter “Change User Code” to change it. 3.0 Usage The control panel can be used as a remote control. User code or admin code should be input before the operation of Arm, Disarm, Home Mode and Mute Mode. 3.1 Arm the alarm system Input user code or admin code, and press [Arm] key. The LED indicator flashes once and the control panel beeps once and sends Arm command to the alarm system. When the alarm panel receives the signal, the siren will beep once and the Arm indicator will light on. The alarm system enters armed state. 6 | ENGLISH If there is an intrusion the alarm system will be triggered, the siren will hoot and the alarm system will send an SMS and auto dial to pre-stored phone numbers to notify users. Note : When an entry delay is set, the external control panel will NOT warn you with an audio signal when a sensor is triggered. Only the alarm system itself will give an audio signal ! 3.2 Disarm the alarm system Users can disarm the alarm system by using the control panel or by using RFID tags. 3.2.1 Using control panel to disarm Input user code or admin code, and press the [Disarm] key. The LED indicator flashes once and the control panel beeps once, and sends Disarm command to the alarm system. When the alarm panel receives the signal, the siren will beep twice and the Disarm indicator will light. The alarm system enters disarmed state. In this state the sensors being triggered will not cause an alarm. 7 | ENGLISH 3.2.2 Using RFID Tag to disarm If direct disarm by RFID tag is disabled (this is the default power saving mode when using batteries), user needs to press [*] to wake up the control panel and then put RFID tag close to the reader to disarm the alarm system.. When the power saving function is disabled, user can put the RFID tag directly close to the control panel to disarm the alarm system. 3.2.3 Home Mode Input user code or admin code and press [Home Mode] key, the LED indicator flashes once and the control panel beeps once and sends Home Mode command to the alarm system. When the alarm panel receives the signal, the siren will beep once and the Home Mode indicator will light, the alarm system enters Home Mode state. All the sensors in other zones are armed to prevent the intruder except that the motion detector in Home Mode Zone is disarmed, so that people can move freely at home. Note : Check manual of the alarm system for installing sensors in home mode. 8 | ENGLISH 3.2.4 Emergency Call When the control panel is in SOS Speed Dial mode, user just holds the [SOS] key for 3 seconds, the LED indicator flashes once, the control panel beeps once, and the alarm system alarms immediately. When the control panel is not in SOS Speed Dial mode, user needs to input user code or admin code before holding the [SOS] key for 3 seconds to send an alarm. 3.2.5 Mute Mode Mute mode means that the LED indicators of the control panel flash, but the siren does not beep to avoid disturbing the neighbourhood. Input user code or admin code, and hold any key of [Arm] [Disarm] [Home Mode] for 2 seconds. The LED indicator flashes once, the control panel beeps once and sends corresponding command to the alarm system. When the alarm panel receives the signal, the LED indicator lights on or off, but the siren does not beep. 9 | ENGLISH 4.0 Connect to the alarm system Note : The default admin code is : 123456. See chapter “Change Admin Code” to change it. Note : The default user code is : 1234. See chapter “Change User Code” to change it. Make sure the alarm system is in connection state (press code on alarm system and press the memo button). Input the admin code on the control panel and press the Arm, Disarm or Home mode button. When the control panel is connected successful the alarm system will give one beep. 5.0 Connect RFID Tag to control panel Note : The default admin code is : 123456 1. Input the admin code followed by the [#] button. ( a long beep is heard) 2. Immediatly after step one, press the 9 button. One beep is heard an the LED indicator will be on for about 2 seconds. The control panel is in learning state. During the time the LED is on, you can connect the RFID tag to the control panel. 10 | ENGLISH 3. Put the RFID tag close to the RFID reader. If one beep is heard the connecting is successful. When 2 beeps are heard, the RFID tag was already connected to the control panel. To remove all connected RFID tags, input the admin code followed by the # button. Press and hold down the 9 button for six seconds. All RFID tags are cleared after one beep is heard. Note : you can connect up to 50 RFID tags to the EM8622. 11 | ENGLISH 6.0 Settings Before changing the settings of the control panel, the control panel should be in “setup-state”. 6.1 Enter Setup-state Note : The default admin code is : 123456 Input the admin code followed by the [#] button to wake up the control panel. Press [3] to enter the setup-state. The LED indicator will be on. Note : When there is no key press within 10 seconds the control panel will exit the setup-state automatically. You can also press [#] to exit the setup-state. 6.2 Delay Arm When the alarm system is armed, detectors will start working immediately. At that time, if you are still at home, it will trigger the alarm system. 12 | ENGLISH After setting a delay time, press the [Arm] button on the control panel. The control panel will send the Arm command to the alarm system after the delay time you set in the control panel. Note : This setting will not apply to the Home mode. If both the control panel and the alarm system have a delay time set, the actual delay time is the total of both times ! Enter the setup-state and input : When one beep is heard and the LED indicator keeps on for 10 seconds the setup is succesful. Once the delay time is set, the control panel will beep once every two seconds when the system is armed by the control panel. The reminding rhythm will speed up the last 15 seconds. After the delay time the alarm system enters arm state. Note : Users can input a time between 0 – 250 seconds. Default setting is 0, no delay. 6.3 SOS Speed dial If SOS code is disabled, you only need to press and hold the [SOS] key for 3 seconds and the control panel will alarm immediately. If SOS code is enabled,you need to input the code, press the [#] key,then press and hold the [SOS] key for 3 seconds.This function is to prevent false operation or trick. 13 | ENGLISH 6.3.1 Disable SOS code Enter Setup-state and input : When one beep is heard and the LED indicator keeps on for 10 seconds, the setup is successful. 6.3.2 Enable SOS code Enter Setup-state and input : When one beep is heard and the LED indicator keeps on for 10 seconds, the setup is successful. Note : Default setting is 0, SOS code is disabled. 14 | ENGLISH 6.4 Keyboard tone Keyboard tones can be switched on or off. If they are switched off, the beep when a setup is successful will also be switched off ! 6.4.1 Disable keyboard tone Enter Setup-state and input : When one beep is heard and the LED indicator keeps on for 10 seconds, the setup is successful. 6.4.2 Enable keyboard tone Enter Setup-state and input : When one beep is heard and the LED indicator keeps on for 10 seconds, the setup is successful. Note : Default setting is 1, keyboard tones are enabled. 15 | ENGLISH 6.5 Disarm system by RFID tag Users can enable or disable the function of disarming the alarm system by RFID tag, or disarming silent by RFID tag. 6.5.1 Disable disarming by RFID tag Enter Setup-state and input : When one beep is heard and the LED indicator keeps on for 10 seconds, the setup is successful. 6.5.2 Enable disarming by RFID tag Enter Setup-state and input : When one beep is heard and the LED indicator keeps on for 10 seconds, the setup is successful. 16 | ENGLISH 6.5.3 Disarming silently by RFID tag The alarm panel and siren will hoot twice when disarming the alarm system by RFID tag. If set disarming silently by RFID tag, the alarm system and siren will keep silent when disarming. Enter Setup-state and input : When one beep is heard and the LED indicator keeps on for 10 seconds, the setup is successful. Note : Default setting is 1, turn on disarming by RFID tag and the siren will hoot when disarming. 6.6 Power saving mode If the control panel is powered by batteries, it is recommended to have the power saving mode switched on. In power saving mode, the control panel will go in to sleep mode when it is in standby. Users need to press [*] to wake up the control panel and then put the RFID tag close to the reader to disarm the alarm system. 17 | ENGLISH 6.6.1 Enable power savig mode Enter Setup-state and input : When one beep is heard and the LED indicator keeps on for 10 seconds, the setup is successful. 6.6.2 Disable power saving mode If the control panel is powered by an external 12V power supply (not included), it is recommended to switch of the power saving mode. Users can disarm the alarm system directly by RFID tag. Enter Setup-state and input : When one beep is heard and the LED indicator keeps on for 10 seconds, the setup is successful. Note : Default setting is 0, power saving mode switched on. User needs to press [*] to wake up the control panel before using the RFID tag. 18 | ENGLISH 6.7 Change user code A user can use its own code to wake up the control panel and send Arm, Disarm or Home mode commands to the alarm system. The control panel can only have one user code. Note : The default user code is 1234. Please change this code at first use ! Enter Setup-state and input : When one beep is heard and the LED indicator keeps on for 10 seconds, the setup is successful. 6.8 Change admin code The admin code is used to wake up the control panel and send Arm, Disarm or Home mode commands to the alarm system. With the admin code you can also change the settings of the control panel. Note : The default admin code is 123456. Please change this code at first use ! Enter Setup-state and input : When one beep is heard and the LED indicator keeps on for 10 seconds, the setup is successful. 19 | ENGLISH 6.9 Reset the control panel After a reset the user code, admin code and all other settings will be restored to default. Only the connected RFID tags will remain working. To remove the connected RFID tags, please refer to chapter “Connect RFID Tag to control panel”. Enter Setup-state and input : When one beep is heard and the LED indicator keeps on for 10 seconds, the setup is successful. 7.0 Frequently Asked Questions and other related information The latest Frequently asked questions for your product can be found on the support page of your product. Eminent will update these pages frequently to assure you have the most recent information. Visit www.eminent-online.com for more information about your product. 20 | ENGLISH 8.0 Service and support This user’s manual has been carefully written by Eminent’s technical experts. If you have problems installing or using the product, please fill out the support form at the website www.eminent-online.com/support. You can also contact us by phone. Below you will find a list with phone numbers for each supported country. Country Belgium (Dutch) Belgium (French) Denmark Finland Germany Italy Norway Spain Sweden The Netherlands UK Hungary Hungary Hungary Phone number 070 277 286 070 277 286 +45 69918565 +35 8942415826 +49 (0)30 887 89 298 +39 0240042016 +47 21075033 807 080 042 +46 840 309985 0900-3646368 +44 (0)203 318 9998 1-4088902 (From Budapest) 06-1-4088902 (From the rest of Hungary) +36 1-4088902 (International) Rate per minute* €0.30 €0.30 Local Costs Local Costs Local Costs Local Costs Local Costs €0.41 Local Costs €0.10 Local Costs Local Costs Local Costs Local Costs * Rates mentioned in this table do not include cell phone charges. 21 | ENGLISH 9.0 Warning and points of attention Due to laws, directives and regulations set out by the European parliament, some (wireless) devices could be subject to limitations concerning its use in certain European member states. In certain European member states the use of such devices could be prohibited. Contact your (local) government for more information about this limitations. Always follow up the instructions in the manual*, especially where it concerns devices which need to be assembled. Warning: In most cases this concerns an electronic device. Wrong/improper use may lead to (severe) injuries! Repairing of the device should be done by qualified Eminent staff. The warranty immediately voids when products have undergone self-repair and/or by misuse. For extended warranty conditions, please visit our website at www.eminentonline.com/warranty. *Tip: Eminent manuals are written with great care. However, due to new technological developments it can happen that a printed manual does not longer contain the most recent information. If you are experiencing any problems with the printed manual or you cannot find what you are looking for, please always check our website www.eminent-online.com first for the newest updated manual. Also, you will find frequently asked questions in the FAQ section. It is highly recommended to consult the FAQ section. Very often the answer to your questions will be found here. 22 | ENGLISH 10.0 Warranty conditions The five-year Eminent warranty applies to all Eminent products, unless mentioned otherwise before or during the moment of purchase. After buying a second-hand Eminent product the remaining period of warranty is measured from the moment of purchase by the product’s initial owner. Eminent warranty applies to all Eminent products and parts, indissolubly connected or mounted to the product it concerns. Power supply adapters, batteries, antennas and all other products not directly integrated in or connected to the main product or products of which, without reasonable doubt, can be assumed that wear and tear during use will show a different pattern than the main product, are not covered by the Eminent warranty. Products are not covered by the Eminent warranty when exposed to incorrect/improper use, external influences or when opening the service parts of the product by parties other than Eminent. Eminent may use refurbished materials for repair or replacement of your defective product. Eminent cannot be held responsible for changes in network settings by internet providers. We cannot guarantee that the Eminent networking product will keep working when settings are changed by the internet providers. Eminent cannot guarantee the working of web services, apps and other third party content that is available through Eminent products. Eminent products with an internal hard disk have a limited warranty period of two years on the hard disk. Eminent could not be held responsible for any data lost. Please make sure that if the product stores data on a hard drive or other memory source, you will make a copy before you return the product for repair. When my product gets defective Should you encounter a product rendered defective for reasons other than described above: Please contact your point of purchase for taking care of your defective product. 23 | ENGLISH 11.0 Declaration of Conformity Application of Council Directives: Manufacturer’s Name: Eminent Type of Equipment: Control panel Equipment Class: Commercial, Light Industrial, Consumer PRODUCTNUMBER: EM8622 Conforms to the following standards: EN 301 489-1 V1.9.2:2011 EN 301 489-3 V1.4.1:2002 EN 300 220-1 V2.3.1:2010 EN 300 220-2 V2.3.1:2010 EN 62479:2010 EN60950-1:2006 + A11:2009 + A1:2010 + A12: 2011 Manufactured from: 5-11-2013 I, the undersigned, hereby declare that the equipment Conforms with the essential requirements and other relevant requirements of the R&TTE Directive (1999/5/EC) and to the above standards. Place: Date: Name: Barneveld, The Netherlands 5-11-2013 Marc Pannebakker Signature: EM8622 | 03-2014