1
4. USE IN THE VEHICLE
WARNING!
[MIDI_009] Never use the TAKATA ISOFIX BASE
on its own, or without properly securing the TAKATA
MIDI. Failure to observe this notice may seriously risk
your child’s safety, and the safety of other passengers.
NOTE!
Long-term use of the TAKATA ISOFIX BASE and
TAKATA MIDI may result in wear and tear of the
vehicle seat.
Securing the TAKATA ISOFIX BASE
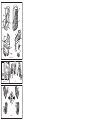
Step 1 – Fold out the support leg
Fold out the support leg as explained in Section 3 –
Basic instructions (Adjusting the support leg), and
ensure that it is properly locked in place.
NOTE!
Check the support leg is locked in place by lightly
shaking it with your hand.
Step 2 – Place on the vehicle seat
[MIDI_027] Place the TAKATA ISOFIX BASE on the
seat of the vehicle. Ensure that:
• The ISOFIX connectors are pointing to the back of
the car seat.
• The support leg is pointing to the vehicle floor.
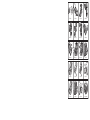
Step 3 – Pull out the ISOFIX connectors
[MIDI_023] Press in the button on the inner side of
each rear connection arm as far as possible, and fully
extend the connectors. Follow the instruction in
Section 3 – Basic instructions (Adjusting the ISOFIX
connectors).
NOTE!
The connectors have been fully extended when no
figure is displayed on the top of them.
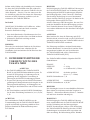
Step 4 – Connect the ISOFIX system
[MIDI_028] Point the open ISOFIX connectors on the
TAKATA ISOFIX BASE towards the ISOFIX points of
the vehicle. Slide the connectors into the vehicleʼs
ISOFIX points, until each one clicks into place, and
the green markings are visible on the release sliders.
20
NOTE!
[MIDI_029] If the vehicleʼs ISOFIX points are difficult
to reach, use the feeder supplied to guide them out.
This makes connecting the system much easier, and
protects the seat cover.
WARNING!
Ensure that both ISOFIX connectors are fully secured
to the vehicleʼs ISOFIX points. Failure to observe
this notice may seriously risk your child’s safety, and
the safety of other passengers. You can check the
connectors are properly secured to the ISOFIX points,
by lightly shaking the TAKATA ISOFIX BASE.
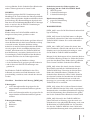
Step 5 – Fit the base against the back of the vehicle
seat
[MIDI_030] Press the two buttons to adjust the length
of the ISOFIX connectors, and push the TAKATA
ISOFIX BASE until it sits flush against the seat back.
WARNING!
[MIDI_031] When fixing the TAKATA ISOFIX BASE
to the vehicle seat, ensure that both ISOFIX
connectors are set correctly and to the same position.
Check this by lightly shaking the TAKATA ISOFIX
BASE, and check that the figures on the top of the
connectors match up (or that both are blank). Failure
to observe this notice may seriously risk your child’s
safety.
Step 6 – Adjust the support leg
[MIDI_032] Set the height of the support leg, following
the instructions in Section 3 – Basic instructions
(Adjusting the support leg), so that its base lies on the
vehicle floor.
WARNING!
Ensure that the support leg is locked into position, and
that it lies flush against the floor. Failure to observe
this notice may seriously risk your child’s safety, and
the safety of other passengers.
NOTE!
Check the support leg is locked in place by gently
pushing and pulling it.
NOTE!
If you notice that the TAKATA ISOFIX BASE can
still be moved around on the vehicle seat, repeat all
the steps in Section 4 – Use in the vehicle (Securing
the TAKATA ISOFIX BASE), until the base is firmly
secured to the vehicle seat.