1
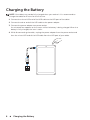
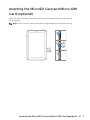
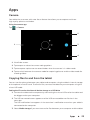
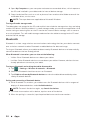
Venue 7/8 User's Manual Tablet model: Venue 7, Venue 8, Venue 7 3730, Venue 7 HSPA+, Venue 8 3830, Venue 8 HSPA+ Regulatory model: T01C/T02D Regulatory type: T01C001, T02C002/T02D001, T02D002 NOTE: A NOTE indicates important information that helps you make better use of your tablet. CAUTION: A CAUTION indicates potential damage to hardware or loss of data if instructions are not followed. WARNING: A WARNING indicates a potential for property damage, personal injury, or death. © 2013 Dell Inc. All rights reserved. Information in this document is subject to change without notice. Reproduction of these materials in any manner whatsoever without the written permission of Dell Inc. is strictly forbidden. Trademarks used in this text: Dell™, the DELL logo, and Venue™ are trademarks of Dell Inc. Bluetooth® is a registered trademark owned by Bluetooth SIG, Inc. and is used by Dell under license. Other trademarks and trade names may be used in this document to refer to either the entities claiming the marks and names or their products. Dell Inc. disclaims any proprietary interest in trademarks and trade names other than its own. 2013 – 10 Rev. A00 Contents Features . . . . . . . . . . . . . . . . . . . . . . . . . . . . . . . . . . . . . . . . . 5 Charging the Battery . . . . . . . . . . . . . . . . . . . . . . . . . . . . . 6 Inserting the MicroSD Card and Micro-SIM Card (optional) . . . . . . . . . . . . . . . . . . . . . . . . 7 Getting Started . . . . . . . . . . . . . . . . . . . . . . . . . . . . . . . . . . 8 Turning on/off the tablet . . . . . . . . . . . . . . . . . . . . 8 Finishing Android setup . . . . . . . . . . . . . . . . . . . . . 8 Customizing the screen . . . . . . . . . . . . . . . . . . . . . 9 Locking and unlocking your tablet . . . . . . . . . . . . . . 10 Touch tips . . . . . . . . . . . . . . . . . . . . . . . . . . . 10 Status bar . . . . . . . . . . . . . . . . . . . . . . . . . . . . . 11 Screen orientation . . . . . . . . . . . . . . . . . . . . . . . . 11 Keys and functions . . . . . . . . . . . . . . . . . . . . . . . . 12 Apps and widgets . . . . . . . . . . . . . . . . . . . . . . . . 12 Using Your Tablet . . . . . . . . . . . . . . . . . . . . . . . . . . . . . . . 13 Contacts . . . . . . . . . . . . . . . . . . . . . . . . . . . . . . 13 Text entry . . . . . . . . . . . . . . . . . . . . . . . . . . . . . 14 Managing your tablet's storage . . . . . . . . . . . . . . . . 14 Internet . . . . . . . . . . . . . . . . . . . . . . . . . . . . . . . . . . . . . . . . 15 Connecting to the Internet using Wi-Fi . . . . . . . . . . . 15 Connecting to the Internet using mobile broadband . . . . . . . . . . . . . . . . . . . . . . . . . . . . . 16 Using the airplane mode . . . . . . . . . . . . . . . . . . . . 17 3 Browsing the Internet . . . . . . . . . . . . . . . . . . . . . . 17 Email . . . . . . . . . . . . . . . . . . . . . . . . . . . . . . . . 18 Customizing Your Tablet . . . . . . . . . . . . . . . . . . . . . . . . 19 Display settings . . . . . . . . . . . . . . . . . . . . . . . . . . 19 Sound settings . . . . . . . . . . . . . . . . . . . . . . . . . . 20 Date, time, and time zone . . . . . . . . . . . . . . . . . . . 20 Protecting Your Tablet . . . . . . . . . . . . . . . . . . . . . . . . . 20 Screen-unlock pattern . . . . . . . . . . . . . . . . . . . . . 20 PIN . . . . . . . . . . . . . . . . . . . . . . . . . . . . . . . . . 21 Password . . . . . . . . . . . . . . . . . . . . . . . . . . . . . 21 Face unlock . . . . . . . . . . . . . . . . . . . . . . . . . . . . 22 Protecting your SIM card with the SIM lock password (LTE/HSPA+ models only) . . . . . . . . . . . . . 22 Apps . . . . . . . . . . . . . . . . . . . . . . . . . . . . . . . . . . . . . . . . . . 23 Camera . . . . . . . . . . . . . . . . . . . . . . . . . . . . . . 23 Copying files to and from the tablet . . . . . . . . . . . . . 23 Bluetooth . . . . . . . . . . . . . . . . . . . . . . . . . . . . . 24 Gallery . . . . . . . . . . . . . . . . . . . . . . . . . . . . . . . 25 Calendar . . . . . . . . . . . . . . . . . . . . . . . . . . . . . . 26 Clock . . . . . . . . . . . . . . . . . . . . . . . . . . . . . . . . 26 Troubleshooting . . . . . . . . . . . . . . . . . . . . . . . . . . . . . . 26 Specifications . . . . . . . . . . . . . . . . . . . . . . . . . . . . . . . . . 28 4 Features 8 9 10 1 2 11 3 7 6 4 Part 5 Functionality 1. Front camera Use to make video calls or to capture front photos and videos. 2. Micro-USB port Connect the USB cable to charge your tablet or to connect to your computer. 3. Volume button •Press to increase or decrease the volume by one level. •Press and hold to continuously increase or decrease the volume. 4. Service Tag label Provide the Service Tag when contacting Dell for support. 5. Speaker Outputs sound. 6. MicroSD-card slot Insert a microSD card to expand the storage on your tablet. 7. Micro-SIM card slot (HSPA+ models only) Insert a micro-SIM card to access mobile broadband. 8. Power button •Press and hold to turn on your tablet. •Press and release to lock or unlock the screen. •In standby mode, press and hold to open the options menu. 9. Microphone Use for recording sound or inputting voice in other voice-based apps. 10. Headset connector Connect headphones or headset. 11. Rear camera Capture pictures and videos. Features 5 Charging the Battery NOTE: Your tablet may not be fully charged when you receive it. It is recommend to charge the tablet for 4 hours for the first time. 1. Connect the micro-USB end of the USB cable to the USB port of the tablet. 2. Connect the other end of the USB cable to the power adapter. 3. Connect the power adapter to a power outlet. An animated icon appears on the screen while the battery is being charged. When the battery is fully charged, the icon is static. 4. While disconnecting the cable, unplug the power adapter from the power outlet and then the micro-USB end of the USB cable from the USB port of your tablet. 6 Charging the Battery Inserting the MicroSD Card and Micro-SIM Card (optional) Open the card-slot door, insert the cards into their respective slots, and close the card-slot door. NOTE: Make sure the cards are correctly aligned and are inserted all the way. SIM SIM Inserting the MicroSD Card and Micro-SIM Card (optional) 7 Getting Started Turning on/off the tablet To turn on your tablet, press and hold the power button for about 3 seconds. To turn off your tablet, press and hold the power button to open the options menu, and then select Power off→ OK. Finishing Android setup After you turn on your tablet for the first time, follow the prompts on the screen to finish Android setup. You can configure settings such as language, date and time, connect to your Wi-Fi network, sign-in to your Google account, enable Google location services, and so on. → 8 Getting Started Customizing the screen After finishing several Android setup optionally, you can customize your tablet's screen as prompted. → Getting Started 9 Locking and unlocking your tablet Press the power button to turn off the screen and lock your tablet. You can also configure your tablet to automatically lock after a certain period of time. Tap → Settings→ Display→ Sleep to set the time after which you want the tablet to enter sleep state and lock itself. To unlock the screen, press the power button to wake up the screen and then slide the lock icon in any direction. Touch tips Your tablet has a multi-touch sensitive screen. You can use the touch screen as follows: Tap Touch the screen once to access a menu or select an item. Tap and hold Touch and hold your finger in place. Slide Switch between different home screens. Drag Tap and hold an icon and then move the icon to the target position. Two-finger zoom Place two fingers on the screen and move the fingers apart to zoom-in or bring the fingers close to zoom out. You can use zoom-in and zoom-out in maps, photos, web pages, and so on. 10 Getting Started Status bar The status bar at the top of the screen displays notifications from various apps, time, and the states of various devices such as battery, SIM card, Bluetooth, and so on. 1 2 1. Notification panel displays notification icons to inform you of new email, messages, and so on. Slide the panel down to view the notifications and then tap a notification icon to view details of the notification. Tap to clear all the notifications from the notifications panel. 2. Status panel displays status icons to show the current state of your tablet, such as battery charge and charging progress, alarms, Bluetooth, and so on. Slide the panel down to access more settings and configuration options. Screen orientation For optimal viewing experience, the screen orientation changes automatically depending on how you hold the tablet. NOTE: To enable or disable auto-rotate, slide down the status panel and tap the Auto-rotate icon. Getting Started 11 Keys and functions 1 2 3 1. Back key •Tap to return to the previous screen and exit the running application. •Tap to close the on-screen keyboard in text input mode. 2. Home key •Tap to return to the main screen. •Tap and hold to open the Google search. 3. Menu key Tap to open the applications list used recently. Apps and widgets • Apps: Software that allows you to perform a specific task. Your tablet is preloaded with a variety of applications, and additional applications can be downloaded from the Play Store. • Widgets: A small application which resides on the home screen and provides quick and easy access to information. 12 Getting Started Using Your Tablet Contacts To view and manage your contacts, tap → People. Sign in to an existing Google account or create a new Google account to back up your contacts online. Creating a contact 1. Tap → People→ Create a new contact. 2. Enter the contact information using the on-screen keyboard and then tap Done to save the contact. Searching for a contact To locate a contact: 1. Slide the contact list until you find the desired contact. 2. Tap to open the search bar, and then type either the contact’s full or partial name in the Find contacts box. A list of matching contacts is displayed. After you locate the desired contact, tap the contact’s entry to view the contact’s details. Using Your Tablet 13 Text entry You can type text using the on-screen keyboard. To open the on-screen keyboard, tap a text box. To close the keyboard, tap the back key. 1 2 3 5 4 1. Tap to type letters. 2. Tap to delete a typed character, symbol, or a space to the left of the cursor. Tap and hold to quickly delete text to the left of the cursor. 3. Tap once to show the uppercase keyboard for typing a capital letter. Tap twice to enable the Caps Lock mode. Tap to change back to the lowercase mode. 4. Tap to use voice input. The tablet enters the words that it can recognize. NOTE: It is recommended to speak near the microphone and use this feature in a quiet environment to improve speech-recognition accuracy. 5. Tap to display the keys for typing numbers, punctuation marks, and symbols. Managing your tablet's storage Checking storage space Tap → Settings→ Storage. The used, unused, and total space on the tablet's internal storage and microSD card is displayed. Erasing app data and cache 1. Tap → Settings→ Apps→ Downloaded/All. 2. From the Apps list, tap the application whose cache or data you want to remove. 3. In the application screen, tap Clear cache or Clear data. 14 Using Your Tablet Un-mounting the SD card 1. Tap → Settings→ Storage. 2. Tap Unmount→ OK to remove the SD card. CAUTION: It is ecommended that you unmount the SD card before removing it. Removing the SD card while it is in use may cause data loss or result in application errors. Erasing all data from your tablet CAUTION: Performing these steps erases all data, including your personal information and downloaded applications from your tablet. Make sure that you back up all the required data before you proceed. 1. Tap → Settings→ Backup & reset→ Factory data reset. 2. Tap Reset tablet. 3. Read the warning and tap Erase everything. Internet You can connect your tablet to Wi-Fi networks to access the Internet. If you purchase a LTE/HSPA+ model, you can also connect to the Internet using various mobile broadband standards such as GPRS, EDGE, 3G, LTE, HSPA+, and so on. Connecting to the Internet using Wi-Fi NOTE: The range and quality of the Wi-Fi signal is affected by the distance between the tablet and the wireless router,the number of connected devices, infrastructure, and objects through which the signal is transmitted. 1. Tap → Settings→ Wireless & networks→ Wi-Fi. 2. Enable Wi-Fi by moving the slider to On position. The tablet scans for Wi-Fi networks in range. 3. Tap the network you want to connect to. 4. Type a password (if connecting to a secure network) and tap Connect to connect to the selected Wi-Fi network. Internet 15 NOTE: To connect to a secured Wi-Fi network, you must provide the security key. If you do not have the security key, contact the person who manages your Wi-Fi network or contaqct the router manufacturer. NOTE: To start a new search for available Wi-Fi networks, on the Wi-Fi screen, tap → Scan. Connecting to the Internet using mobile broadband 1. Tap → Settings→ Wireless & networks→ Wi-Fi, then touch Wi-Fi to disable it. 2. The tablet automatically searches for the carrier signal and connects to the network. When the tablet is connected to a mobile broadband network, the network type appears in the status bar. NOTE: On the LTE/HSPA+ models, if both Wi-Fi and mobile broadband networks are available, the tablet gives priority to Wi-Fi connection. NOTE: If the tablet cannot automatically searches for the carrier signal, tap → Settings→ Wireless & networks→ More→ Mobile networks→ Data enabled to enable it. 16 Internet Using the airplane mode Putting the tablet in Airplane mode disables all mobile and Wi-Fi connections. This feature is useful when wireless connectivity is strictly prohibited, such as on an airplane. Tap → Settings→ Wireless & networks→ More→ Airplane mode to enable it. Browsing the Internet Opening the browser Tap → Browser to open the browser app. Using the browser controls bar Enter the webpage address Setting up your home page 1. On the browser screen, tap View bookmarks, history and save pages → Settings→ General→ Set homepage→ Other. 2. Enter the address of the website you want to use as your homepage and then tap OK. Viewing web pages Slide your finger horizontally or vertically on the screen to scroll and view desired areas of a web page. Zoom-in or zoom-out using the two-finger zoom. Double-tap the desired area of a web page to switch between the magnified or normal views of the area. Internet 17 Email You can create POP3, IMAP, and exchange email accounts from web-based email services on your tablet. Opening the email app Tap → Email . Setting up an email account 1. On the email screen, enter the email address and password of the email account (the same as the account on your personal computer). 2. Tap Next to enter the account options screen to configure your email options. 3. After configuring the account options, tap Next to access your email. → Adding other email account In an email screen, tap → Settings→ ADD ACCOUNT to set up another email account. Deleting an email account on your tablet 1. In an email account screen, tap → Settings and then select one account. 2. To delete an email account, tap Remove account on the context menu. When asked to confirm deletion, tap OK. 18 Internet Creating and sending emails 1. Tap → Email. 2. Select an email account to use if you have set up more than one account on your tablet. 3. In an email account screen, tap to compose a new mail. 4. Type the recipient’s email address in the To field. If you are sending the email to multiple recipients, separate their email addresses with a comma. 5. Type the subject in the Subject field. 6. Compose your email content. 7. Tap SEND to send the email. Customizing Your Tablet You can configure settings such as display, sound, network, security and so on, using the Settings screen. Display settings Tap → Settings→ Display and then select the desired item under Display settings. Brightness Drag the slider to right to increase brightness. Move the slider to the left to decrease brightness. Tap OK to confirm the adjustment. NOTE: If the Automatic brightness is enabled, your tablet adjusts the screen brightness automatically based on the surrounding light conditions. Wallpaper Select a picture from the Gallery, Live wallpapers, or Wallpaper. Adjust the size and range of the picture, and then tap OK to set it as the wallpaper. Sleep Select the time after which the tablet goes into sleep mode automatically. Daydream Select the pictures or animation to show while the tablet is docked or being charged. Font size Set your tablet's font size from Small, Normal, Large, and Huge. Customizing Your Tablet 19 Sound settings To change the sound and ringtone settings: Tap → Settings→ Sound, and then select the desired item under Sound settings. Volumes Adjust the volume for music, videos, games, notification, and alarms. Default notification sound Select a default ringtone for notifications. Touch sounds Configure whether a sound is played every time you touch the screen. Screen lock sound Configure whether a sound is played when the screen is locked. Date, time, and time zone Your tablet automatically uses the network-provided date, time, and time zone by default. To manually set the date, time, and time zone: 1. Tap → Settings→ Date & time, and disable the automatic date, time and time zone. 2. Configure options such as the date, time, time zone, time format, and date format. Protecting Your Tablet You can protect your tablet against unauthorized access by setting a pattern, a PIN, a password, or with a face unlock. After you configure any of these security options, your tablet prompts for the respective unlocking information before you can use the tablet. Screen-unlock pattern This security method requires you to create a pattern that you need to draw every time to unlock the tablet. If incorrect unlock patterns are drawn for five consecutive times, the tablet forces a 30-second delay before you can try again. Creating a screen unlock pattern 1. Tap → Settings→ Security→ Screen lock→ Pattern. 2. Drag your finger to draw the unlock pattern by connecting at least four dots in a vertical, horizontal and/or diagonal direction. Take your finger off the screen when a pattern is drawn. The tablet records the pattern if it is correctly drawn. 3. Tap Continue. 4. Draw the pattern again and then tap Confirm. 20 Protecting Your Tablet Disabling or changing the screen unlock pattern 1. Tap → Settings→ Security→ Screen lock→ Pattern. 2. Draw your existing pattern. 3. Select None to disable screen unlock security or select Pattern to draw a new unlock pattern. PIN This security method requires you to enter a PIN that you need to enter every time to unlock the tablet. If incorrect unlock PINs are entered for five consecutive times, the tablet forces a 30-second delay before you can try again. Creating a PIN 1. Tap → Settings→ Security→ Screen lock→ PIN. 2. On the Choose your PIN page, enter a PIN in the text box. NOTE: Your PIN must be at least 4 characters. 3. Tap Continue to proceed. 4. Enter the PIN again to confirm. 5. Tap OK. Disabling or changing PIN 1. Tap → Settings→ Security→ Screen lock→ PIN. 2. Enter your existing PIN. 3. Select None to disable the PIN or select PIN to change the PIN. Password This security method requires you to enter a password that you need to enter every time to unlock the tablet. If incorrect unlock passwords are entered for five consecutive times, the tablet forces a 30-second delay before you can try again. Creating a password 1. Tap → Settings→ Security→ Screen lock→ Password. 2. On the Choose your password page, enter a password in the text box. NOTE: A valid password consists of at least 4 characters and contains at least one letter. 3. Tap Continue to proceed. 4. Enter the password again to confirm. 5. Tap OK. Protecting Your Tablet 21 Disabling or changing the password 1. Tap → Settings→ Security→ Screen lock→ Password. 2. Enter the password you have enabled. 3. Select None to disable the password or select Password to change password. Face unlock This security method requires you to look at your tablet to unlock it. Creating a face unlock 1. Tap → Settings→ Security→ Screen lock→ Face unlock. 2. After reading the warning, tap Set it up. 3. Find an indoor spot that is not too bright or too dim. Hold the tablet at eye level and then tap Continue. 4. Show your face in the face-capturing area. After your face is captured, tap Continue. You must set up an alternate unlocking method. This alternate method can be used to unlock the tablet when the Face unlock feature fails to recognize your face. 5. Tap OK to save the face unlock. Disabling or changing the password 1. Tap → Settings→ Security→ Screen lock→ Face unlock. 2. Enter the Pattern or PIN you have created as backed up. 3. Select None to disable the face unlock or select Face unlock to change the face unlock. Protecting your SIM card with the SIM lock password (LTE/HSPA+ models only) You can protect your SIM card against unauthorized use with a PIN. After a PIN is enabled to lock your SIM, you will need to enter the PIN each time you turn on the tablet in order to unlock your SIM. CAUTION: The SIM card will be permanently locked if you enter the incorrect PIN for three consecutive times. You must then enter the Personal Unblocking Key (PUK) to unlock the SIM card. Contact your service provider to obtain the PUK. 22 Protecting Your Tablet Apps Camera Your tablet has a camera with auto-focus feature that allows you to capture and share high-quality pictures and videos. Using the camera app → Camera. Tap 2 1 3 4 1. Viewfinder screen. 2. Tap to open or close the camera setting options. 3. Tap to capture a picture or to record videos when the camera is in video mode. 4. Tap to switch between the camera mode for capturing pictures and the video mode for shooting videos. Copying files to and from the tablet You can transfer pictures between your tablet and computer using the tablet’s internal storage or the optional microSD card. To transfer files, connect the tablet to your computer using the micro-USB cable. Setting the SD card or the internal device storage as a USB drive 1. Connect the tablet to the computer by connecting the micro-USB end to the tablet and the bigger end to your computer. 2. The USB connected screen appears and the USB connected banner flashes in the status bar. The USB notification icon appears in the status bar’s notification area when your tablet is connected to the computer. 3. Select Media storage if you want to transfer files between your computer and the tablet. Apps 23 4. Open My Computer on your computer to locate two removable drives, which represent the SD card installed in your tablet and the internal device storage. 5. Copy the desired files such as music or pictures from another drive/folder to one of the removable drives, or vice versa. NOTE: The steps above are applicable to Microsoft Windows. Turning off media storage mode The tablet does not recognize the SD card and the internal device storage when they are being used as USB drives. While the tablet is in media storage mode, you cannot use applications that involve saving or retrieving files on the SD card or the internal device storage, such as camera or music playback. Turn off media storage mode to allow the tablet to recognize the SD card and the internal storage. Bluetooth Bluetooth is a short-range wireless communications technology that lets your device connect over a wireless network to other Bluetooth-enabled devices for data exchange. Turning on Bluetooth allows your tablet to detect nearby Bluetooth devices and automatically connect to devices that are already paired. When Bluetooth is turned on, you can also set the following: • Visible: Other Bluetooth devices can detect your tablet. • Invisible: Other Bluetooth devices cannot detect your tablet. However, devices that are already paired can connect to your tablet. Turning on Bluetooth and making the tablet discoverable 1. Tap → Settings→ Wireless & networks→ Bluetooth. 2. Select the Bluetooth check box to turn on Bluetooth. 3. Tap Visible to all nearby Bluetooth devices to make the tablet discoverable by other nearby Bluetooth devices. Pairing and connecting a Bluetooth device 1. While Bluetooth is turned on, your tablet scans for Bluetooth devices within range and displays all detected devices under Available devices. NOTE: To search for devices again, tap Search for devices. 2. To initiate a connection with a device, tap the name of the device. 3. When the pairing is successful, tap the paired device to start the connection. 24 Apps Ending a Bluetooth connection → Disconnect to end the Bluetooth connection. On the Bluetooth connection page, tap Terminating a pairing partnership → Unpair to erase all pairing information with that On the Bluetooth connection page, tap device. Gallery To view and manage the pictures and videos stored on your tablet, tap → Gallery . Sharing or deleting albums All pictures and videos are grouped in separate albums according to their dates, sources, or folders in which they are stored. For example, pictures taken using the tablet camera are grouped as Camera, and downloaded pictures are grouped as Download. 1. Tap and hold an album until the options appear. 2. Tap and hold more albums if you want to do the same task for these albums. • To share the selected albums using Bluetooth, Google+, Email, Picasa and so on, tap . • To delete the albums, tap . Browsing picture and video 1. Tap an album to display the thumbnails of all pictures and videos in the folder. 2. To browse the pictures or videos,scroll through the thumbnails until the desired thumbnail is located. 3. To select a thumbnail, tap and hold it until the options appear. 4. Tap and hold more thumbnails as you need. • To share the selected pictures or videos using Bluetooth, Google+, Email, or Picasa, tap . • To delete the selected pictures or videos, tap . • To set a picture as the wallpaper, tap and hold the picture until the options appear and then select → Set picture as→ Wallpaper. • To set a picture as the contact photo, tap and hold the picture until the options appear and then select → Set picture as→ Contact photo. Displaying a full picture Tap a desired picture to display the picture in full screen. • Slide the picture to view the next or previous one. • To open the picture viewing controls, tap anywhere on the picture. Apps 25 Calendar Use the calendar to schedule and manage your events, meetings, and appointments. Opening the calendar Tap → Calendar. Adding a new event 1. On the Calendar screen, tap to open the new event details screen. 2. Type the event name, location, description and configure options such as time period, repetition, reminders and so on. 3. Tap Done to save the event. Clock Use the clock to set alarms, countdown, stopwatch, and so on. Opening the clock Tap → Clock. Setting an alarm: 1. On the Clock main screen, tap 2. On the alarms screen, tap → to enter the alarm main screen. to add an alarm. 3. Configure settings such as the alarm time, alarm tone, snooze duration, and so on. 4. Tap OK to add the alarm. Troubleshooting Security problems Possible causes Possible solutions The SIM card's PIN code is blocked. You have entered an incorrect PIN code three consecutive times. Contact your service provider to get the PUK code. System problems Possible causes Possible solutions Battery does not charge. The battery or battery charger is damaged. Contact the sales corporation. The ambient temperature is below 0°C or higher than 35°C. Adjust the battery charging Poor contact between the battery and charger. Check all connectors to ensure that all connections have been properly made. The battery has no charge. Charge the tablet. Unable to turn the tablet on. 26 Troubleshooting environment to avoid extreme temperatures. Shortened standby time. The duration of standby time is affected by your service provider’s system configuration. The same tablet used with different service providers' systems does not have the same duration of standby time (LTE/HSPA+ only). If you are located in an area where the network signal is weak, move your location to the area where the network signal is strong or temporarily turn off your tablet if needed. If you are not able to connect to the network, the tablet continues to send out signals as it attempts to locate a base station. Doing this consumes battery charge and consequently shortens standby time. Change your location to one where the network is accessible, or temporarily turn off your tablet. Messaging problems Possible causes Possible solutions Unable to send or receive text messages. Your tablet is in airplane mode with no wireless connectivity. Slide the status panel down and then disable Airplane mode. The network signal strength is not strong enough. Try moving to a different location for better signal reception. Unable to send or receive email. The Internet connection or the email setting is not configured properly. Check your network connection, and confirm with your email service provider if your email setting has been configured correctly. Internet problems Possible causes Possible solutions Unable to connect to the mobile broadband networks. Invalid SIM card. Contact your service provider. You are not within the network’s service area. Check the service area with your service provider. Poor signal. Move to an open space or if you are inside a building, move closer to a window. Your tablet is in airplane mode with no wireless connectivity. Slide the status panel down and then disable Airplane mode. Troubleshooting 27 Specifications Marketing model •Venue 7 3730, Venue 7 HSPA+. •Venue 8 3830, Venue 8 HSPA+ Regulatory model T01C/T02D Regulatory type T01C001, T02C002/T02D001, T02D002 Temprature range 0 °C - 35 °C (30 °F -95 °F) Battery 4100 mAh Venue 7 Dimensions: Venue 8 Height 193 mm 212 mm Width 118.20 mm 130 mm Depth 9.5 mm 28 Specifications 9.5 mm