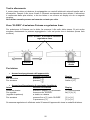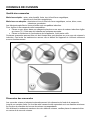
1
INSTRUCTION OF USE MANUALE D’ISTRUZIONE NOTICE D’UTILISATION P604INE Dear customer, Thank you for having chosen our induction ceramic hob. In order to make the best use of your appliance, we would advise you to read carefully the following notes and to keep them for a later consulting. SUMMARY SAFETY......................................................................................................................................... 3 PRECAUTIONS BEFORE USING........................................................................................................ 3 USING THE APPLIANCE .................................................................................................................. 3 PRECAUTIONS NOT TO DAMAGE THE APPLIANCE .............................................................................. 4 PRECAUTIONS IN CASE OF APPLIANCE FAILURE................................................................................ 4 OTHER PROTECTIONS ................................................................................................................... 4 DESCRIPTION OF THE APPLIANCE........................................................................................... 5 TECHNICAL CHARACTERISTICS ....................................................................................................... 5 CONTROL PANEL .......................................................................................................................... 5 USE OF THE APPLIANCE............................................................................................................ 6 DISPLAY ...................................................................................................................................... 6 VENTILATION ................................................................................................................................ 6 STARTING-UP AND APPLIANCE MANAGEMENT ..................................................................... 6 BEFORE THE FIRST USE................................................................................................................. 6 INDUCTION PRINCIPLE ................................................................................................................... 6 SENSITIVE TOUCH......................................................................................................................... 7 POWER SELECTION ZONE “SLIDER” AND TIMER SETTING ZONE ........................................................ 7 STARTING-UP ............................................................................................................................... 7 PAN DETECTION ........................................................................................................................... 7 RESIDUAL HEAT INDICATION .......................................................................................................... 8 BOOSTER FUNCTION ..................................................................................................................... 8 TIMER ......................................................................................................................................... 8 AUTOMATIC COOKING ................................................................................................................... 9 STOP&GO FUNCTION .................................................................................................................. 10 RECALL FUNCTION ..................................................................................................................... 10 « KEEP WARM » FUNCTION ......................................................................................................... 10 BRIDGE FUNCTION ..................................................................................................................... 10 COOKING ADVICES ................................................................................................................... 12 PAN QUALITY ............................................................................................................................. 12 PAN DIMENSION.......................................................................................................................... 12 EXAMPLES OF COOKING POWER SETTING...................................................................................... 13 MAINTENANCE AND CLEANING .............................................................................................. 13 WHAT TO DO IN CASE OF A PROBLEM .................................................................................. 13 ENVIRONMENT PRESERVATION ............................................................................................. 14 INSTALLATION INSTRUCTIONS ............................................................................................... 14 ELECTRICAL CONNECTION ..................................................................................................... 16 SAFETY Precautions before using Unpack all the materials. The installation and connecting of the appliance have to be done by approved specialists. The manufacturer can not be responsible for damage caused by building-in or connecting errors. To be used, the appliance must be well-equipped and installed in a kitchen unit and an adapted and approved work surface. This domestic appliance is exclusively for the cooking of food, to the exclusion of any other domestic, commercial or industrial use. Remove all labels and self-adhesives from the ceramic glass. Do not change or alter the appliance. The cooking plate can not be used as freestanding or as working surface. The appliance must be grounded and connected conforming to local standards. Do not use any extension cable to connect it. The appliance can not be used above a dishwasher or a tumble-dryer: steam may damage the electronic appliances. Using the appliance Switch the heating zones off after using. Keep an eye on the cooking using grease or oils: that may quickly ignite. Be careful not to burn yourself while or after using the appliance. Make sure no cable of any fixed or moving appliance contacts with the glass or the hot saucepan. Magnetically objects (credit cards, floppy disks, calculators) should not be placed near to the engaged appliance. Metallic objects such as knives, forks, spoons and lids should not be placed on the hob surface since they can get hot. In general do not place any metallic object except heating containers on the glass surface. In case of untimely engaging or residual heat, this one may heat, melt or even burn. Never cover the appliance with a cloth or a protection sheet. This is supposed to become very hot and catch fire. This appliance is not intended for use by persons (including children) with reduced physical, sensory or mental capabilities, or lack of experience and knowledge, unless they have been given supervision or instruction concerning use of the appliance by a person responsible for their safety. Children should be supervised to ensure that they do not play with the appliance. 3 Precautions not to damage the appliance Raw pan bottoms or damaged saucepans (not enamelled cast iron pots,) may damage the ceramic glass. Sand or other abrasive materials may damage ceramic glass. Avoid dropping objects, even little ones, on the vitroceramic. Do not hit the edges of the glass with saucepans. Make sure that the ventilation of the appliance works according to the manufacturer’s instructions. Do not put or leave empty saucepans on the vitroceramic hobs. Sugar, synthetic materials or aluminium sheets must not contact with the heating zones. These may cause breaks or other alterations of the vitroceramic glass by cooling: switch on the appliance and take them immediately out of the hot heating zone (be careful: do not burn yourself). Never place any hot container over the control panel. If a drawer is situated under the embedded appliance, make sure the space between the content of the drawer and the inferior part of the appliance is large enough (2 cm). This is essential to guaranty a correct ventilation. Never put any inflammable object (ex. sprays) into the drawer situated under the vitroceramic hob. The eventual cutlery drawers must be resistant to heat. Precautions in case of appliance failure If a defect is noticed, switch off the appliance and turn off the electrical supplying. If the ceramic glass is cracked or fissured, you must unplug the appliance and contact the after sales service. Repairing has to be done by specialists. Do not open the appliance by yourself. WARNING: If the surface is cracked, switch off the appliance to avoid the possibility of electric shock. Other protections Note sure that the container pan is always centred on the cooking zone. The bottom of the pan must have to cover as much as possible the cooking zone. For the users of pacemaker, the magnetic field could influence its operating. We recommend getting information to the retailer or of the doctor. Do not to use aluminium or synthetic material containers: they could melt on still hot cooking zones. THE USE OF EITHER POOR QUALITY POT OR ANY INDUCTION ADAPTOR PLATE FOR NON-MAGNETIC COOKWARE RESULTS IN A WARRANTY BREACH. IN THIS CASE, THE MANUFACTURER CANNOT BE HELD RESPONSIBLE FOR ANY DAMAGE CAUSED TO THE HOB AND/OR ITS ENVIRONMENT. 4 DESCRIPTION OF THE APPLIANCE Technical characteristics Type Total Power Position of the heating zone Nominal Power* 1st Booster Power* 2nd Booster Power* 7400 W Front left Rear left Rear right Front right 1850 W 1850 W 1850 W 2300 W 2300 W 2300 W 2300 W 2900 W 3000 W 3000 W 3000 W 3700 W P604INE Minimum diameter detection 100 mm 100 mm 100 mm 110 mm * The given power may change according to the dimensions and material of the pan. Control panel Control light timer Timer display Control light cooking zone Power display Control light Booster Control light on/off On/off key Booster selection zone “SLIDER” and timer setting zone 5 Keep warm key Booster key USE OF THE APPLIANCE Display Display 0 1…9 U A E H P L U U II ∏ Designation Zero Booster level No pan detection Heat accelerator Error message Residual heat 1st Booster 2nd Booster Locking Keep warm Keep warm Stop&Go Bridge Description The heating zone is activated. Selection of the cooking level. No pan or inadequate pan. Automatic cooking. Electronic failure. The heating zone is hot. The 1st Booster is activated. The 2nd Booster is activated. Control panel locking. Maintain automatically of 42°C. Maintain automatically of 70°C. The hob is in pause. 2 cooking zones are combined. Ventilation The cooling system is fully automatic. The cooling fan starts with a low speed when the calories brought out by the electronic system reach a certain level. The ventilation starts his high speed when the hob is intensively used. The cooling fan reduces his speed and stops automatically when the electronic circuit is cooled enough. STARTING-UP AND APPLIANCE MANAGEMENT Before the first use Clean your hob with a damp cloth, and then dry the surface thoroughly. Do not use detergent which risks causing blue-tinted colour on the glass surface. Induction principle An induction coil is located under each heating zone. When it is engaged, it produces a variable electromagnetic field which produces inductive currents in the ferromagnetic bottom plate of the pan. The result is a heating-up of the pan located on the heating zone. Of course the pan has to be adapted: All ferromagnetic pans are recommended (please verify it thanks a little magnet): cast iron and steel pans, enamelled pans, stainless-steel pans with ferromagnetic bottoms… Are excluded: cupper, pure stainless-steel, aluminium, glass, wood, ceramic, stoneware,… The induction heating zone adapts automatically the size of the pan. With a too small diameter the pan doesn’t work. This diameter is varying in function of the heating zone diameter. If the pan is not adapted to the induction hob the display will show [ U ]. 6 Sensitive touch Your ceramic hob is equipped with electronic controls with sensitive touch keys. When your finger presses the key, the corresponding command is activated. This activation is validated by a control light, a letter or a number in the display and/or a “beep” sound. In the case of a general use press only one key at the same time. Power selection zone “SLIDER” and timer setting zone To select the power with the slider, slide your finger on the “SLIDER” zone. You can already have a direct access if you put your finger directly on the chosen level. Power selection zone “SLIDER” and timer setting zone “SLIDER“ Direct access Starting-up Start up / switch off the hob: Action Control panel To start press key [ ] To stop press key [ ] Display [ 0 ] are blinking nothing or [ H ] Start up / switch off a heating zone: Action Control panel Display Zone selection press display [ 0 ] selected [ 0 ] and control light on To set slide on the “SLIDER“ [ 0 ] to [ 9 ] (adjust the power) to the right or to the left To stop slide to [ 0 ] on “SLIDER“ [ 0 ] or [ H ] or press on [ 0 ] [ 0 ] or [ H ] If no action is made within 20 second the electronics returns in waiting position. Pan detection The pan detection ensures a perfect safety. The induction doesn’t work: If there is no pan on the heating zone or if this pan is not adapted to the induction. In this case it is impossible to increase the power and the display shows [ U ]. This symbol disappears when a pan is put on the heating zone. If the pan is removed from the heating zone the operation is stopped. The display shows [ U ]. The symbol [ U ] disappears when the pan is put back to the heating zone. The cooking continues with the power level set before. After use, switch the heat element off: don’t let the pan detection [ U ] active 7 Residual heat indication After the switch off of a heating zone or the complete stop of the hob, the heating zones are still hot and indicates [ H ] on the display. The symbol [ H ] disappears when the heating zones may be touched without danger. As far as the residual heat indicators are on light, don’t touch the heating zones and don’t put any heat sensitive object on them. There are risks of burn and fire. Booster function The Booster function [ P ] and the Double Booster [ ] grants a boost of Booster to the selected heating zone. If this function is activated the heating zones work during 10 minutes with an ultra high Booster. Booster is foreseen for example to heat up rapidly big quantities of water, like nuddles Start up / Stop the booster function: Action Control panel Zone selection Press key [ 0 ] from the zone Start up the Booster Press key [ B ] Stop the Booster Slide on the “SLIDER“ Display [ 0 ] and control light on [P] [ 9 ] to [ 0 ] Start up / Stop the double booster function: Action Control panel Selection of the zone Press key [ 0 ] Start up Booster Press key [ B ] Start up Double Booster Re-press key [ B ] Stop the Double Booster Press key [ B ] Stop Booster Slide on the “SLIDER“ Display [0] [P] [ and P ] [P] [ 9 ] to [ 0 ] Booster management: The hole cooking hob is equipped with a maximum of Booster. When the Booster function is activated, and in order to exceed the maximum Booster, the electronic system orders to reduce automatically the Booster level of an other heating zone. The display is blinking on [ 9 ] during a few seconds and then shows the maximum of Booster allowed : Heating zone selected [ P ] is displayed The other heating zone: (example: Booster level 9) [ 9 ] goes to [ 6 ] or [ 8 ] depending the type of zone Timer The timer is able to be used simultaneous with all 4 heating zones and this with different time settings (from 0 to 99 minutes) for each heating zone. Setting and modification of the cooking time : Example for 16 minutes at power 7 : Action Control panel Zone selection press display [ 0 ] selected Select the power level slide on the “SLIDER“ to [ 7 ] Select « Timer » press display [ CL ] Set the units slide on the “SLIDER“ to [ 6 ] Valid the units press display [ 06 ] Set the tens slide on the “SLIDER“ to [ 1 ] Valid the tens press display [ 16 ] The time is confirmed and the cooking starts. 8 Display [ 0 ] and control light on [7] [ 00 ] [ 0 fixed ] [ 6 blinking ] [ 0 blinking ] [ 6 fixed ] [ 1 blinking ] [ 6 fixed ] [ 16 ] To stop the cooking time: Example for 13 minutes at power 7 : Action Control panel Zone selection press display [ 7 ] selected Select « Timer » press key [ 13 ] Deactivate the units slide on the “SLIDER“ to [ 0 ] Valid the units press display [ 10 ] Deactivate the tens slide on the “SLIDER“ to [ 0 ] Valid the tens press display [ 00 ] Display [ 7 ] and control light on [ 13 ] [ 1 fixed ] [ 0 blinking ] [ 1 blinking ] [ 0 fixed ] [ 0 blinking ] [ 0 fixed ] [ 00 ] Automatic stop at the end of the cooking time: As soon as the selected cooking time is finished the timer displays blinking [ 00 ] and a sound rings. To stop the sound and the blinking it is enough to press the key [ 00 ]. Egg timer function : Example for 29 minutes : Action Activate the hob Select« Timer » Set the units Valid the units Set the tens Valid the tens Control panel press display [ ] press display [ CL ] slide on the “SLIDER“ to [ 9 ] press display [ 09 ] slide on the “SLIDER“ to [ 2 ] press display [ 29 ] Display zone control lights are on [ 00 ] [ 0 fixed ] [ 9 blinking ] [ 0 blinking ] [ 9 fixed ] [ 2 blinking ] [ 9 fixed ] [ 29 ] After a few seconds the control light stops with blinking. As soon as the selected cooking time is finished the timer displays blinking [ 00 ] and a sound rings. To stop the sound and the blinking it is enough to press the display [ 00 ]. The hob switches off. Automatic cooking All the cooking zones are equipped with an automatic “go and stop” cooking device. The cooking zone starts at full power during a certain time, then reduces automatically its power on the preselected level. Start-up : Action Control panel Display Zone selection Full power setting Automatic cooking Power level selection (for example « 7 ») press display [ 0 ] selected slide on the “SLIDER“ to [ 9 ] re-press on display “SLIDER“ [ 9 ] slide on the “SLIDER“ to [ 7 ] [ 0 ] and control light on pass from [ 0 ] to [ 9 ] [ 9 ] is blinking with [ A ] [ 9 ] pass to [ 8 ] [ 7 ] [ 7 ] is blinking with [ A ] Switching off the automatic cooking : Action Control panel Display Zone selection press [ 7 ] from the zone Power level selection slide on the “SLIDER“ [ 7 ] blinking with [ A ] [ 1 ] to [ 9 ] 9 Stop&Go function This function brakes all the hob’s cooking activity temporarily and allows restarting with the same settings. Startup/stop the pause function : Action Control panel Display Engage pause Stop the pause Simultaneously press the 2 rear cooking zones Simultaneously press the 2 rear cooking zones, re-press the blinking display [ II ] on display [ II ] blinking Previous setting Recall Function After switching off the hob [ ], it is possible to recall the last settings. cooking stages of all cooking zones (Booster) minutes and seconds of programmed cooking zone-related timers Keep warm function The recall procedure is following: Press the key [ ] Then simultaneously press the 2 zones back in less than 6 seconds. The previous settings are again active. « Keep warm » Function This function allows to reach and maintain automatically a temperature of 42°C or 70°C. This will avoid liquids overflowing and fast burning at the bottom of the pan. To engage, to start the function « Keep warm » : Action Control panel Display Zone selection Press display [ 0 ] selected [ 0 ] to [ 9 ] or [ H ] 42°C to engage Press on key [ ] [U] 70°C to engage Press on key [ ] [U] To stop Slide on the “SLIDER“ [ 0 ] to [ 9 ] or [ H ] This function can be started independently on all the heating zones. When the pan leaves the cooking zone the "Keep warm" function remains active during approximately 10 minutes. The maximum duration of keeping warm is 2 hours. Bridge Function This function allows to use the 2 cooking zones at the left at same time with the same features as a single cooking zone. Booster function isn’t allowed. Action Activate the hob Control panel Press display [ Activate the bridge Press on the 2 left cooking zones Increase bridge Slide on the “SLIDER “ [ 1 to 9 ] or display [ ] Press on the 2 left cooking zones Stop the bridge 10 ] Display [ 0 ] or [ H ] on the 4 displays [ 0 ] appears on the before Area [ ∏ ] on the rear zone. [ 1 to 9 ] or [ U ] [ 0 ] or [ H ] on the 2 zones Control panel locking To avoid modification of the setting of the cooking zones , in particular during cleaning, the control panel can be locked (with exception to the On/Off key [ ]). Lock : Action Control panel Display Start Locking the hob press on key [ ] Hold a finger on the “SLIDER” and press 3 times on the [ P ] [ 0 ] or [ H ] [L] Once the hob locked, a 10 seconds countdown starts. During this countdown, you can unlock the hob. Once past this time, the release becomes impossible, you must shut down and re-ignite the hob. At each selection of [ B ] key, a segment of [ L ] appears. The hob is locked when the [ L ] is complete. Unlock : Action Control panel Display Start press on key [ ] [L] In the 10 seconds after start : Unlock the hob Hold a finger on the “SLIDER” and press 3 times on the [ P ] [ 0 ] or [ H ] At each selection of [ B ] key, a segment of [ L ] disappears. The hob is unlocked when the [ L ] disappears. 11 COOKING ADVICES Pan quality Adapted materials : steel, enamelled steel, cast iron, ferromagnetic stainless-steel, aluminium with ferromagnetic bottom. Not adapted materials : aluminium and stainless-steel without ferromagnetic bottom, cupper, brass, glass, ceramic, porcelain. The manufacturers specify if their products are compatible induction. To check if pans are compatibles : Put a little water in a pan placed on an induction heating zone set at level [ 9 ].This water must heat in a few seconds. A magnet stucks on the bottom of the pan. Certain pans can make noise when they are placed on an induction cooking zone. This noise doesn’t mean any failure on the appliance and doesn’t influence the cooking operating. Pan dimension The cooking zones are, until a certain limit, automatically adapted to the diameter of the pan. However the bottom of this pan must have a minimum of diameter according to the corresponding cooking zone. To obtain the best efficiency of your hob, please place the pan well in the centre of the cooking zone. 12 Examples of cooking power setting (the values below are indicative) 1 to 2 Melting Reheating 2 to 3 Simmering Defrosting 3 to 4 Steam 4 to 5 Water 6 to 7 7 to 8 9 P and Sauces, butter, chocolate, gelatine Dishes prepared beforehand Rice, pudding, sugar syrup Dried vegetables, fish, frozen products Vegetables, fish, meat Steamed potatoes, soups, pasta, fresh vegetables Meat, lever, eggs, sausages Goulash, roulade, tripe Potatoes, fritters, wafers Steaks, omelettes, fried dishes Water scallops, steaks Boiling significant quantities of water Medium cooking Simmering Cooking Frying, roasting Boiling water Frying, roasting Boiling water MAINTENANCE AND CLEANING Switch-off the appliance before cleaning. Do not clean the hob if the glass is too hot because they are risk of burn. Remove light marks with a damp cloth with washing up liquid diluted in a little water. Then rinse with cold water and dry the surface thoroughly. Highly corrosive or abrasive detergents and cleaning equipment likely to cause scratches must be absolutely avoided. Do not ever use any steam-driven or pressure appliance. Do not use any object that may scratch the ceramic glass. Ensure that the pan is dry and clean. Ensure that there are no grains of dust on your ceramic hob or on the pan. Sliding rough saucepans will scratch the surface. Spillages of sugar, jam, jelly, etc. must be removed immediately. You will thus prevent the surface being damaged. WHAT TO DO IN CASE OF A PROBLEM The hob or the cooking zone doesn’t start-up: The hob is badly connected on the electrical network. The protection fuse cut-off. The looking function is activated. The sensitive keys are covered of grease or water. An object is put on a key. The control panel displays [ U ]: There is no pan on the cooking zone. The pan is not compatible with induction. The bottom diameter of the pan is too small. The control panel displays [ E ]: The electronic system is defective. Disconnect and replug the hob. 13 One or all cooking zone cut-off: The safety system functioned. You forgot to cut-off the cooking zone for a long time. One or more sensitive keys are covered. The pan is empty and its bottom overheated. The hob also has an automatic reduction of Booster level and breaking Automatic overheating Continuous ventilation after cutting off the hob: This is not a failure, the fan continuous to protect the electronic device. The fan cooling stops automatically. The automatic cooking system doesn’t start-up: The cooking zone is still hot [ H ]. The highest Booster level is set [ 9 ]. The control panel displays [ L ]: Refer to the chapter control panel locking page. The control panel displays [ U ]: Refer to the chapter “Keep warm“. The control panel displays [ II ]: Refer to the chapter “Stop&Go“. The control panel displays [ ∏ ]: Refer to the chapter “Bridge“. ENVIRONMENT PRESERVATION The materials of packing are ecological and recyclable. The electronic appliances are composed of recyclable, and sometimes harmful materials for the environment, but necessary to the good running and the safety of the appliance. Don't throw your appliance with the household refuses Get in touch with the waste collection centre of your commune that is adapted to the recycling of the household appliances. INSTALLATION INSTRUCTIONS The installation comes under the exclusive responsibility of specialists. The installer is held to respect the legislation and the standards enforce in his home country. How to stick the gasket: The gasket supplied with the hob avoids all infiltration of liquids in the cabinet. His installation has to be done carefully, in conformity of the following drawing. Stick the gasket (2) two millimeters from the external edge of the glass, after removing the protection sheet (3). 14 Fitting - installing: The cut out sizes are: Ensure that there is a distance of 50 mm between the hob and the wall or sides. The hobs are classified as “Y” class for heat protection. Ideally the hob should be installed with plenty of space on either side. There may be a wall at the rear and tall units or a wall at one side. On the other side, however, no unit or divider must stand higher than the hob. The piece of furniture or the support in which the hob is to be fitted, as well as the edges of furniture, the laminate coatings and the glue used to fix them, must be able to resist temperatures of up to 100 °C. The mural rods of edge must be heat-resisting. Not to install the hob to the top of a not ventilated oven or a dishwasher. To guarantee under the bottom of the hob casing a space of 20 mm to ensure a good air circulation of the electronic device. If a drawer is placed under the work, avoid to put into this drawer flammable objects (for example: sprays) or not heat-resistant objects. Materials which are often used to make worktops expand on contact with water. To protect the cut out edge, apply a coat of varnish or special sealant. Particular care must be given to applying the adhesive joint supplied with the hob to prevent any leakage into the supporting furniture. This gasket guaranties a correct seal when used in conjunction with smooth work top surfaces. The safety gap between the hob and the cooker hood placed above must respect the indications of the hood manufacturer. In case of absence of instructions respect a distance minimum of 760 mm. The connection cord should be subjected, after building, with no mechanical constraint, such for example of the fact of the drawer. 15 ELECTRICAL CONNECTION The installation of this appliance and the connection to the electrical network should be entrusted only to an electrician perfectly to the fact of the normative regulations and which respects them scrupulously. Protection against the parts under tension must be ensured after the building-in. The data of connection necessary are on the stickers place on the hob casing near the connection box. The connection to the main must be made using an earthed plug or via an omnipolar circuit breaking device with a contact opening of at least 3 mm. The electrical circuit must be separated from the network by adapted devices, for example: circuit breakers, fuses or contactors. If the appliance is not fitted with an accessible plug, disconnecting means must be incorporated in the fixed installation, in accordance with the installation regulations. The inlet hose must be positioned so that it does not touch any of the hot parts of the hob or even. Caution! This appliance has only to be connected to a network 230 V~ 50/60 Hz. Connect always the earth wire. Respect the connection diagram. The connection box is located underneath at the back of the hob casing. To open the cover use a medium screwdriver. Place it in the slits and open the cover. Mains Connection Cable diameter 230V~ 50/60Hz 1 Phase + N 3 x 2,5 mm² 400V~ 50/60Hz 2 Phases + N 4 x 1.5 mm² Cable H 05 VV - F H 05 RR - F H 05 VV - F H 05 RR - F Protection calibre 25 A * 16 A * * calculated with the simultaneous factor following the standard EN 60 335-2-6/1990 Connection of the hob Setting up the configurations: For the various kinds of connection, use the brass bridges which are in the box next the terminal Monophase 230V~1P+N Put the 1st bridge between terminal 1 and 2, the 2nd between 4 and 5. Attach the earth to the terminate “earth”, the neutral N to terminal 4 or 5, the Phase L to one of the terminals 1 or 2. Biphase 400V~2P+N Put a bridge between terminal 4 and 5. Attach the earth to the terminate “earth”, the neutral N to terminal 4 or 5, the Phase L1 to the terminals 1 and the Phase L2 to the terminal 2. Caution! Be careful that the cables are correctly engaged and tightened. We cannot be held responsible for any incident resulting from incorrect connection or which could arise from the use of an appliance which has not been earthed or has been equipped with a faulty earth connection. 16 Gentile Cliente, Grazie per avere scelto nostro il nostro piano di cottura a induzione. Per ottenere il meglio dal Suo piano cottura, La preghiamo di leggere con attenzione le presenti istruzioni, e di conservarle per un’eventuale consultazione futura. INDICE SICUREZZA ................................................................................................................................ 18 PRECAUZIONI PRIMA DEL PRIMO UTILIZZO ..................................................................................... 18 UTILIZZO DELL’APPARECCHIO ...................................................................................................... 18 PRECAUZIONI ONDE NON DANNEGGIARE L’APPARECCHIO ............................................................... 19 PRECAUZIONI IN CASO DI MALFUNZIONAMENTO DELL’APPARECCHIO ................................................ 19 ALTRE PRECAUZIONI ................................................................................................................... 19 DESCRIZIONE DELL’APPARECCHIO....................................................................................... 20 DATI TECNICI.............................................................................................................................. 20 PANNELLO DI CONTROLLO ........................................................................................................... 20 USO DELL’APPARECCHIO ....................................................................................................... 21 DISPLAY .................................................................................................................................... 21 VENTILAZIONE ............................................................................................................................ 21 PRIMA ACCENSIONE E UTILIZZO DELL’APPARECCHIO ...................................................... 21 PRIMA DEL PRIMO UTILIZZO.......................................................................................................... 21 PRINCIPIO DELL’INDUZIONE.......................................................................................................... 21 TASTI A SFIORAMENTO ................................................................................................................ 22 ZONA “SLIDER” DI SELEZIONE POTENZA E REGOLAZIONE TIMER. ................................................... 22 PER INIZIARE.............................................................................................................................. 22 IDENTIFICAZIONE DELLA PENTOLA ................................................................................................ 23 INDICATORE DI CALORE RESIDUO ................................................................................................. 23 FUNZIONE BOOSTER ................................................................................................................... 23 TIMER ....................................................................................................................................... 24 COTTURA AUTOMATICA ............................................................................................................... 25 FUNZIONE PAUSA ....................................................................................................................... 25 FUNZIONE RICHIAMO .................................................................................................................. 25 FUNZIONE « MANTENIMENTO CALORE » ....................................................................................... 26 FUNZIONE PONTE ....................................................................................................................... 26 BLOCCO DEL PANNELLO DI CONTROLLO ....................................................................................... 26 SUGGERIMENTI DI COTTURA .................................................................................................. 27 QUALITÀ DELLE PENTOLE ............................................................................................................ 27 DIMENSIONI DELLE PENTOLE........................................................................................................ 27 ESEMPI DI REGOLAZIONE DELLA POTENZA ..................................................................................... 28 MANUTENZIONE E PULIZIA...................................................................................................... 28 COSA FARE IN CASO DI PROBLEMI........................................................................................ 28 PROTEZIONE DELL’AMBIENTE................................................................................................ 29 ISTRUZIONI DI INSTALLAZIONE .............................................................................................. 29 CONNESSIONE ELETTRICA ..................................................................................................... 31 17 SICUREZZA Precauzioni prima del primo utilizzo Sballare eliminando tutti i materiali di imballo. L’installazione e connessione dell’apparecchio devono essere effettuate da personale specializzato. Il Fabbricante declina ogni responsabilità civile e penale per danni causati da installazione e/o connessione non realizzate a regola d’arte. Per essere utilizzato, l’apparecchio deve essere correttamente installato in una cucina e su una superficie di lavoro idonea. Questo elettrodomestico è progettato esclusivamente per la cottura di cibo, con l’espressa esclusione di ogni altro uso domestico, commerciale o industriale. Rimuovere tutte le etichette adesive dal vetro. Non apportare alcuna modifica o alterazione all’apparecchio. La superficie in vetro dell’apparecchio non può essere utilizzata come zona di appoggio o di lavoro. L’apparecchio deve essere opportunamente messo a terra e collegato alla rete elettrica secondo la normativa in vigore localmente. Non usare nessuna prolunga elettrica per collegare il cavo di alimentazione. L’apparecchio non può essere utilizzato sopra una lavastoviglie o una asciugatrice: il vapour potrebbe danneggiare le componenti elettroniche dell’apparecchio. Utilizzo dell’apparecchio Spegnere le piastre riscaldanti dopo l’uso. Controllare le cotture che utilizzano grasso o olio: potrebbero incendiarsi con facilità. Fare attenzione a non ustionarsi durante o dopo l’uso dell’apparecchio. Verificare che nessun cablaggio di apparecchi fissi o mobili venga in conatto con il vetro dell’apparecchio o con pentole bollenti. Gli oggetti magnetici (carte di credito, floppy discs, calcolatrici) non devono essere piazzati vicino all’apparecchio quando questo è acceso. Non piazzare alcun oggetto metallico, tranne le pentole, sull’apparecchio. In caso di accensione involontaria, o di presenza di calore residuo dopo la cottura, questi potrebbero sciogliersi o anche incendiarsi. Non coprire mai l’apparecchio con un panno o telo protettivo, perché potrebbe surriscaldarsi e bruciare. Questo apparecchio non è progettato per essere utilizzato da persone (inclusi bambini) con capacità mentali, fisiche o sensoriali ridotte, o con mancanza di esperienza, a meno che non venga loro data supervisione o istruzione riguardo all’uso dell’apparecchio da una persona responsabile della loro sicurezza. I bambini devono sempre essere sotto il controllo di un adulto quando sono nelle vicinanze dell’apparecchio, onde evitare che giochino con lo stesso. Gli oggetti metallici quali coltelli, forchette, cucchiai e coperchi non devono essere piazzati sull’apparecchio perché potrebbero diventare incandescenti. 18 Precauzioni onde non danneggiare l’apparecchio Pentole con fondo graffiato o danneggiato (non di ghisa smaltata) possono danneggiare il vetro ceramico. Sabbia o altre sostanze abrasive possono danneggiare il vetro ceramico. Evitare di far cadere oggetti, anche piccoli, sul vetro ceramico. Assicurarsi che la ventilazione dell’apparecchio funzioni secondo quanto previsto dalle istruzioni del fabbricante. Non colpire i bordi del vetro con le pentole. Non mettere o lasciare pentole vuote sul vetro ceramico. Lo zucchero, i materiali sintetici e i fogli di alluminio non devono venire a contatto con le piastre riscaldanti, perché possono causare rotture o altre alterazioni del vetro ceramico durante il raffreddamento. Nel caso, accendere immediatamente l’apparecchio e rimuovere l’oggetto dalla piastra, prendendo le opportune precauzioni per non ustionarsi. Non piazzare mai un contenitore bollente sul pannello di controllo. Se sotto il piano cottura incassato c’è un cassetto, assicurarsi che lo spazio tra il contenuto dello stesso e la parte inferiore dell’apparecchio sia sufficiente (almeno 2 cm). Questo è essenziale per garantire una corretta ventilazione. Non mettere mai oggetti infiammabili (ad es. spray) nel cassetto situato sotto l’apparecchio. Gli eventuali contenitori per posate posti in cassetti sotto l’apparecchio devono essere resistenti al calore. Precauzioni in caso di malfunzionamento dell’apparecchio Se si nota un difetto di funzionamento, spegnere l’apparecchio e disconnetterlo dalla rete elettrica. Se il vetro ceramico è rotto o crepato, disconnettere immediatamente l’apparecchio dalla rete elettrica e chiamare l’assistenza tecnica. Qualsiasi riparazione deve essere compiuta esclusivamente da personale qualificato. Non aprire l’apparecchio per nessun motivo. ATTENZIONE: Se la superficie del vetro è crepata o rotta, spegnere immediatamente l’apparecchio per evitare il rischio di scosse elettriche. Altre precauzioni Assicurarsi che la pentola o padella sia sempre centrata sulla piastra di cottura. Il fondo dell’utensile deve coprire il più possibile la piastra di cottura. Per gli utilizzatori di pace-makers: il campo magnetico dell’apparecchio potrebbe influenzare il funzionamento del pace-maker. Si raccomanda di richiedere preventivamente informazioni al venditore dell’apparecchio e/o al medico curante. Non utilizzare contenitori di alluminio o di materiali sintetici: potrebbero fondere se appoggiati alle piastre accese o ancora calde dopo l’uso. L’UTILIZZO DI PENTOLE NON IDONEE OPPURE DI ACCESSORI RIMUOVIBILI POSTI TRA LA PENTOLA E LA PIASTRA PER RISCALDARE PENTOLE NON IDONEE ALL’INDUZIONE FA DECADERE LA GARANZIA. IL COSTRUTTORE NON PUÒ ESSERE CONSIDERATO RESPONSABILE PER QUALSIASI DANNO AL PIANO DI COTTURA OR DANNI CORRELATI. 19 DESCRIZIONE DELL’APPARECCHIO Dati tecnici Tipo P604INE Potenza totale 7400 W Posizione Potenza nominale* Potenza prima booster* Ant. sinistra Post. sinistra Post. destra Ant. destra 1850 W 1850 W 1850 W 2300 W 2300 W 2300 W 2300 W 2900 W Potenza secondo booster* 3000 W 3000 W 3000 W 3700 W Identificazione minimo 100 mm 100 mm 100 mm 110 mm * La Potenza dichiarata può cambiare a seconda delle dimensioni e del material della pentola. Pannello di controllo Spia timer Display Timer Display potenza Spia piastra Spia Pausa/Ripeti Spia on/off Tasto On/Off Zona “SLIDER” di selezione Potenza e impostazione timer 20 Tasto mantieni caldo Tasto Booster USO DELL’APPARECCHIO Display Display 0 1…9 U A E H P L u U II ∏ Descrizione Zero Livello potenza Sensore pentola Acceleratore riscaldamento Messaggio di errore Calore residuo Prima booster Secondo booster Blocco Mantenimento calore Mantenimento calore Pausa Ponte Funzione La piastra è attivata. Selezione del livello di potenza. Pentola assente o non adatta Cottura automatica. Difetto elettronico La piastra è calda Prima booster è attivata. Secondo booster è attivata. Blocco del pannello di controllo Mantiene automaticamente a 42°C. Mantiene automaticamente a 70°C. L’apparecchio è in pausa. 2 piastre induzione sono utilizzate in modalità combinata. Ventilazione Il sistema di raffreddamento è completamente automatico. La ventola entra in funzione a basso regime di rotazione quando il calore interno raggiunge un determinate livello. La ventilazione arriva ad elevati regimi di rotazione se l’apparecchio è utilizzato intensivamente. La ventola rallenta e si spegne automaticamente quando la temperatura interna del circuito elettronico scende sotto il livello prestabilito. PRIMA ACCENSIONE E UTILIZZO DELL’APPARECCHIO Prima del primo utilizzo Pulire l’apparecchio con uno straccio umido, indi asciugarlo accuratamente. Non utilizzare detergenti che possano causare colorazioni anomale del vetro. Principio dell’induzione Sotto ogni piastra riscaldante si trova un magnete induttore. Quanto viene attivato, questo produce un campo elettromagnetico che genera una corrente induttiva nel fondo ferromagnetico della pentola. Il risultato è il riscaldamento della pentola posizionata sulla piastra. Naturalmente, la pentola deve essere adatta: Tutte le pentole in materiale ferromagnetico sono consigliate (verificare utilizzando una calamita): pentole in ghisa, acciaio, smaltate e di acciaio inossidabile con fondo ferromagnetico… Da escludere: pentole in rame, acciaio inossidabile senza fondo ferromagnetico, alluminio, vetro, legno, ceramica, terracotta… La piastra a induzione si adatta automaticamente alla dimensione della pentola: se il diametro di quest’ultima è troppo piccolo tuttavia, la piastra non funziona. Il diametro minimo varia in funzione del diametro della piastra. Se la pentola non è adatta al piano di cottura a induzione, il display mostrerà la lettera [ U ]. 21 Tasti a sfioramento Il vostro piano cottura a induzione è equipaggiato con controlli elettronici azionati tramite tasti a sfioramento. Quando il dito tocca il tasto, il comando corrispondente viene attivato. L’attivazione è confermata dalla spia relativa, o da una lettera o un numero sul display e/o da un segnale acustico. Nell’utilizzo normale premere unicamente un tasto per volta. Zona “SLIDER” di selezione Potenza e regolazione timer. Per selezionare la Potenza con lo slider, far scorrere il dito sullo slider stesso. Si può anche scegliere direttamente la potenza appoggiando il dito nel punto che si desidera (senza farlo scorrere). Zona “SLIDER” di selezione Potenza e regolazione timer “SLIDER“ Accesso diretto Per iniziare Accensione/spegnimento dell’apparecchio: Azione Pannello di controllo Display Per accendere Per arrestare premere [ premere [ [ 0 ] lampeggiano niente o [ H ] ] ] Accensione/Spegnimento di una piastra riscaldante: Azione Pannello di controllo Display Selezione piastra Per regolare (regolare la potenza) Per arrestare premere il display [ 0 ] selezionato scorrere sullo “SLIDER“ a sinistra o a destra scorrere fino a [ 0 ] sullo “SLIDER“ O premere su [ 0 ] [ 0 ] e spia accesa da [ 0 ] a [ 9 ] [0]o[H] [0]o[H] Se nessuna regolazione è effettuata entro 20 secondi l’apparecchio torna in modalità di attesa. 22 Identificazione della pentola L’identificazione della pentola assicura la totale sicurezza. L’induzione non funziona: Se non c’è pentola sulla piastra, o se la pentola non è adatta all’induzione. In questo caso è impossibile aumentare la Potenza è il display mostra [ U ]. Questo simbolo scompare quando si posiziona una pentola adatta sulla piastra. Se la pentola viene rimossa dalla piastra di cottura: la cottura si arresta e il display mostra [ U ]. Il simbolo [ U ] scompare quando la pentola è posizionata nuovamente sulla pistra. La cottura ricomincia con il livello di potenza scelto precedentemente. Dopo l’utilizzo, spegnere la piastra a induzione: non lasciare il simbolo [ U ] del sensore pentola acceso. Indicatore di calore residuo Dopo aver spento l’apparecchio, la piastra è ancora calda e il display indica [ H ]. Il simbolo [ H ] scompare quando la piastra può essere toccata senza pericolo di bruciature. Finché la spia di calore residuo è accesa, non toccare la piastra né posizionarvi alcun oggetto sensibile al calore: c’è rischio di bruciature o incendi. Funzione Booster La funzione Booster [ P ] e Secondo Booster [ ] garantisce un aumento di potenza alla piastra selezionata. Quando la funzione viene attivata, la piastra funziona per dieci minuti ad una potenza molto elevata. Il Booster serve ad esempio per riscaldare rapidamente grandi quantità d’acqua. Accensione/Spegnimento della funzione Booster: Azione Pannello di controllo Display Selezione piastra Attivare il booster Arrestare il booster premere [ 0 ] della zona scelta premere il tasto [ B ] scorrere sullo “SLIDER“ [ 0 ] e spia accesa [P] da [ P ] a [ 0 ] Accensione/Spegnimento della funzione Secondo Booster: Azione Pannello di controllo Display Selezione piastra Attivare il booster Attivare il secondo booster Arrestare il secondo booster Arrestare il booster premere [ 0 ] della zona scelta premere il tasto [ B ] premere de nuovo il tast [ B ] premere il tasto [ B ] scorrere sullo “SLIDER“ [ 0 ] e spia accesa [P] [ eP] [P] da [ P ] a [ 0 ] Gestione della potenza: L’apparecchio ha un sistema di limitazione della potenza massima. Quando la funzione Booster è attiva, al fine di non eccedere in potenza, il sistema elettronico riduce automaticamente la potenza di una delle altre piastre. Il display lampeggia su [ 9 ] per qualche secondo e poi indica la Potenza massima consentita: Piastra selezionata Compare il simbolo [ P ] L’altra piastra: (esempio: livello potenza 9) [ 9 ] diventa [ 6 ] o [ 8 ] a seconda del tipo di piastra coinvolta 23 Timer Il timer può essere utilizzato con entrambe le piastre simultaneamente e con regolazioni diverse (da 0 a 99 minuti) per ognuna di esse. Regolazione e modifica del tempo di cottura : Esempio: per 16 minuti a Potenza 7 : Azione Pannello di controllo Display Selezione piastra Selezionare il livello di potenza Selezionare « Timer » Impostare le unità Convalidare le unità Impostare le decine Convalidare le decine [ 0 ] e spia accesa [7] [ 00 ] [ 0 fisso ] [6 lampeggia] [ 0 lampeggia] [6 fisso ] [ 1 lampeggia] [ 6 fisso ] [ 16 ] premere [ 0 ] per la piastra selezionata scorrere sullo “SLIDER“ a [ 7 ] premere display [ CL ] scorrere sullo “SLIDER“ a [ 6 ] premere il display [ 06 ] scorrere sullo “SLIDER“ a [ 1 ] premere il display [ 16 ] Il tempo è confermato e la cottura ha inizio. Per arrestare il tempo di cottura Esempio: per 13 minuti a Potenza 7 : Azione Selezione piastra Selezionare « Timer » Disattivare le unità Convalidare le unità Disattivare le decine Convalidare le decine Pannello di controllo premere il display [ 7 ] selezionato premere [ 13 ] scorrere sullo “SLIDER“ fino a [ 0 ] premere display [ 10 ] scorrere sullo “SLIDER“ a [ 0 ] premere display [ 00 ] Display [ 7 ] e spia accesa [ 13 ] [ 1 fisso ] [0 lampeggia] [ 1 lampeggia] [ 0 fisso ] [ 0 lampeggia] [ 0 fisso ] [ 00 ] Arresto automatico alla fine del tempo di cottura Quando viene raggiunto il tempo impostato per la cottura, il display del timer lampeggia su [ 00 ], viene prodotto un segnale acustico e la piastra si spegne. Per arrestare il segnale acustico è sufficiente premere il tasto [ 00 ]. Funzione timer al di fuori della cottura: Esempio: per 29 minutes : Azione Pannello di controllo Display Attivare l’apparecchio Selezionare « Timer » Impostare le unità Convalidare le unità Impostare le decine Convalidare le decine premere display [ ] premere il display [ CL ] scoirrere sullo “SLIDER“ fino a [ 9 ] premere display [ 09 ] scorrere sullo slider “SLIDER“ a [ 2 ] premere il display [ 29 ] spie piastra accese [ 00 ] [ 0 fisso ] [9 lampeggia] [ 0 lampeggia] [ 9 fisso ] [ 2 lampeggia ] 9 fisso ] [ 29 ] Dopo qualche secondo la spia smette di lampeggiare. Appena il tempo impostato è esaurito i display del timer lampeggiano a [ 00 ] e si ode un segnale acustico. Per arrestare il segnale acustico è sufficiente premere il display [ 00 ]. L’apparecchio si spegne. 24 Cottura automatica Tutte le piastre sono equipaggiate con una funzione automatica “stop and go” (partenza-arresto). La piastra si accende a piena Potenza per un dato tempo, poi riduce automaticamente la Potenza a un livello prestabilito. Avvio: Azione Pannello di controllo Display Selezione piastra premere il display [ 0 ] selezionato [ 0 ] e spia accesa Regolazione a piena potenza scorrere sullo “SLIDER“ a [ 9 ] va da [ 0 ] a [ 9 ] Cottura automatica premere ancora display “SLIDER“ [ 9 ] [ 9 ] lampeggia con [ A ] Selezione livello potenza scorrere sullo “SLIDER“ a [ 7 ] [ 9 ] passa a [ 8 ] [ 7 ] (per esempio « 7 ») [ 7 ] lampeggia con [ A ] Spegnere la cottura automatica : Azione Selezione piastra Selezione livello Potenza Pannello di controllo premere [ 7 ]della piastra scorrere sullo “SLIDER“ Display [ 7 ] lampeggia con [ A ] da [ 1 ] a [ 9 ] Funzione Pausa Questa funzione arresta tutte le attività di cottura e permette di ri-attivarle in un secondo momento con le stesse regolazioni. Attivare / Disattivare la funzione pausa: Azione Attivare la pausa Arrestare la pausa Pannello di controllo Toccare simultaneamente i tasti delle 2 piastre posteriori Toccare simultaneamente i tasti delle 2 piastre posteriori Quindi toccare la spia lampeggiante Display [ II ] sul display [ II ] lampeggia Funzione Richiamo Dopa ver spento l’apparecchio [ ], è possibile richiamare le ultime impostazioni. Regolazioni di cottura di tutte le piastre (Potenza) Minuti e secondi dei timer delle piastre Funzione riscaldamento La procedura di Richiamo è la seguente: Premere il tasto [ ] Toccare simultaneamente le due piastre posteriori per meno di 6 secondi La regolazione precedente viene attivata. 25 Funzione « Mantenimento calore » Questa funzione permette di raggiungere e mantenere automaticamente la temperature di 42°C o 70°C. Questo impedirà il deborda mento di liquidi o di bruciare alimenti nelle pentole. Per attivare la funzione «Mantenimento calore » : Azione Pannello di controllo Display Selezione zona premere il display [ 0 ] selezionato da [ 0 ] a [ 9 ] o [ H ] Per attivare 42°C premere il tasto [ ] [u] Per attivare 70°C premere il tasto [ ] [U] Per arrestare Scorrere sullo “SLIDER“ da [ 0 ] a [ 9 ] Questa funzione può essere attivata indipendentemente su tutte le piastre. Quando la pentola viene tolta dalla piastra, la funzione di Mantenimento calore resta attiva per circa 10 minuti. La durata massima della funzione di mantenimento calore è di due ore. Funzione ponte Questa funzione consente l’utilizzo delle due piaster di destra contemporaneamente con le stesse funzionalità di una singola piastra. La funzione booster non è consentita. Pannello di controllo premere display [ ] Toccare il tasto delle due piaster di sinistra Aumentare la Potenza del ponte Scorrere sullo “SLIDER” [da 1 a 9] oppure toccare il tasto [ ] Disattivare il ponte Toccare il tasto delle due piastre di sinistra Azione Attivare l’apparecchio Attivazione del ponte Display [0]o[H] [ 0 ] sulla piastra anteriore [ ∏ ] sulla piastra posteriore [ 1 a 9 ] oppure [ U ] [ 0 ] oppure [ H ] sulle due zone Blocco del Pannello di Controllo Per evitare di modificare inavvertitamente una regolazione, in particolare durante le operazioni di pulizia, il Pannello di controllo può essere bloccato (con l’eccezione del tasto On/Off [ ]). Blocco: Pannello di controllo Display Azione Attivare l’apparecchio premere display [ ] [0]o[H] Blocco del pannello di controllo Tenere un dito sullo slider e [L] Premere tre volte sul tasto [ B ] Una volt ache il pannello di controllo è bloccato, inizio un contro alla rovescia di 10 secondi. Durante il conto alla rovescia, è possibile sbloccare il pannello di controllo. Una volta trascorso il conto alla rovescia, il pannello di controllo è bloccato, per sbloccare il pannello bisogna spegnere e riaccendere e riaccendere il piano. Ad ogni selezione del tasto [ P ] apparirà un segmento del simbolo [ L ]. Il piano è bloccato quando il simbolo è completa. Sblocco: Azione Pannello di controllo Display Attivare l’apparecchio premere display [ ] [L] Entro 10 secondi dall’accensione: Sbloccare il piano Tenere un dito sullo “SLIDER” E premere 3 volte sul tasto [ B ] [ 0 ] oppure [ H ] Ad ogni selezione del tasto [ B ], un segmento [ L ] scomparirà. Il piano è sbloccato quando il simbolo [ L ] scompare 26 SUGGERIMENTI DI COTTURA Qualità delle pentole Materiali adatti : acciaio, acciaio smaltato, ghisa, acciaio inox ferromagnetico, alluminio con fondo ferromagnetico. Materiali non adatti: alluminio e acciaio inox con fondo non ferromagnetico, rame, ottone, vetro, ceramica, porcellana. Il fabbricante degli utensili specifica se essi sono compatibili con piani di cottura a induzione. Per verificare se gli utensili (pentole) sono compatibili: Mettere un litro d’acqua nella pentola e posizionarla sulla piastra a induzione a livello di potenza [ 9 ]. L’acqua si deve scaldare in pochi secondi. Un magnete (calamita) deve aderire al fondo della pentola. Alcune pentole possono fare rumore quando vengono utilizzate sulla piastra a induzione. Questo rumore non comporta alcun malfunzionamento dell’apparecchio e non ne influenza il funzionamento e/o l’efficacia di cottura. Dimensioni delle pentole Le piastre di cottura si adattano automaticamente, entro un certo limite, al diametro delle pentole. Tuttavia la pentola deve avere un diametro minimo, a seconda delle dimensioni della piastra. Per ottenere l’efficienza migliore dal vostro apprecchio, posizionate la piastra nel centro della piastra. 27 Esempi di regolazione della potenza (I valori sotto sono indicativi) Da 1 a 2 Da 2 a 3 Sciogliere Riscaldare Cuocere a fuoco lento Scongelare Da 3 a 4 Da 4 a 5 Vapore Acqua Da 6 a 7 Cottura media Bollitura a fuoco lento Cottura Friggere, arrostire Far bollire l’acqua Acqua bollente Da 7 a 8 9 Pe Salse, burro, cioccolata, gelatine Piatti preparati in precedenza Riso, budini, sciroppi di zucchero Verdure liofilizzate, pesce, prodotti congelati Verdure, pesce, carne Patate bollite, zuppe, pasta, Verdure fresche Carne, fegato, uova, salsicce Goulash, arrosti, trippa Patate, patatine fritte, wafers Bistecche, omelettes, piatti fritti Acqua Far bollire quantitativi significativi d’acqua MANUTENZIONE E PULIZIA Spegnere l’apparecchio prima di pulirlo. Non pulire l’apparecchio se il vetro è troppo caldo: rischio di ustioni! Rimuovere segni leggeri con uno straccio umido con liquido detergente diluito in acqua. Risciacquare con acqua fredda e asciugare accuratamente la superficie. Detergenti altamente abrasivi e corrosivi, che possono causare graffi, devono assolutamente essere evitati. Non utilizzare mai apparecchi a vapore o a pressione per pulire l’apparecchio. Non utilizzare alcun oggetto che potrebbe graffiare il vetro ceramico. Assicurarsi che la pentola sia asciutta e pulita. Assicurarsi che non vi siano granelli di polvere sul vetro ceramico o sulla pentola. Far scivolare pentole con fondo irregolare può causare graffi alla superficie del vetro ceramico. Versamenti di zucchero, marmellata, conserve ecc devono essere rimossi immediatamente, in modo da evitare danni alla superficie del vetro ceramico. COSA FARE IN CASO DI PROBLEMI L’apparecchio non si accende L’apparecchio non è collegato correttamente alla rete elettrica. Il fusibile è assente o il circuito aperto Il sistema di blocco è attivo I tasti a sfioramento sono coperti da grasso o acqua. Un oggetto è posizionato su uno dei tasti. Compare il simbolo [ U ] Manca la pentola sulla piastra. La pentola non è compatibile con il piano cottura a induzione. Il diametro del fondo della pentola è troppo piccolo. Compare il simbolo [ E ] Il sistema elettronico è difettoso. Sconnettere a riconnettere il piano. 28 Una delle piastre viene disattivata È entrato in funzione il sistema di sicurezza. Si è dimenticato di disattivare la piastra per un certo periodo. Uno o più tasti a sfioramento sono coperti da qualcosa. La pentola è vuota e il fondo si è surriscaldato. Entrata in funzione della funzione automatica di riduzione o interruzione della potenza in caso di surriscaldamento. Ventilazione continua dopo lo spegnimento dell’apparecchio Questo non è un difetto di funzionamento. La ventola continua ad andare per proteggere le componenti elettroniche dal surriscaldamento. La ventola si arresta automaticamente. Il sistema di cottura automatica non parte La piastra è ancora calda [ H ]. È selezionato il livello di Potenza massima [ 9 ]. Il pannello di controllo indica [ L ]: Vedere il capitolo riguardante il blocco del pannello di controllo. Il pannello di controllo indica [ U ]: Vedere il capitolo “Mantenimento calore”. Il pannello di controllo indica [ II ]: Vedere il capitol “Pausa“. Il pannello di controllo indica [ ∏ ]: Vedere il capitol “Ponte“. PROTEZIONE DELL’AMBIENTE Il materiale dell’imballo è ecologico e deve essere riciclato. L’apparecchio contiene alcuni metalli nobili. Contattare le autorità locali per informarsi sulle modalità di riciclo o smaltimento dell’apparecchio al momento della sua dismissione. Non gettare l’apparecchio nei rifiuti. Contattare l’organizzazione del vostro comune preposta al riciclaggio degli elettrodomestici. ISTRUZIONI DI INSTALLAZIONE L’installazione è di esclusiva responsabilità dell’installatore specializzato. L’installatore è tenuto a rispettare la legislazione locale e le normative in vigore nel Paese in cui viene installato l’apparecchio. Come fissare la guarnizione La guarnizione fornita con l’apparecchio serve a evitare le infiltrazioni di acqua o altri liquidi nel mobile sottostante l’apparecchio. La sua installazione deve essere fatta attentamente, seguendo il disegno qui sotto. Incollare la guarnizione a (2) due mm dal bordo inferior esterno del vetro, dopo aver rimosso la protezione della stessa (3). 29 Inserimento – installazione Le misure di incasso sono: Assicurarsi che ci sia una distanza di almeno 50 mm tra l’apparecchio e il muro o le pareti o paratie laterali. L’apparecchio è classificato come classe “Y” di protezione dal calore. Idealmente l’apparecchio dovrebbe essere installato con un ampio spazio da entrambi i lati. Ci può essere un muro posteriormente e mobili alti o un muro su un lato. Sull’altro lato tuttavia, non deve esserci un divisorio o un mobile più alto della posizione dell’apparecchio. Il mobile o piano di lavoro sul quale l’apparecchio è installato, nonché i bordi dei mobili e/o unità pensili, i rivestimenti laminati che li rivestono e la colla di assemblaggio, devono essere in grado di resistere a temperature fino a 100 °C. I supporti a muro devono essere resistenti al calore. I materiali utilizzati per i piani di lavoro spesso tendono a gonfiarsi con l’umidità. Per proteggere il foro di incasso dell’apparecchio, applicare uno strato di vernice o sigillante apposito. Una particolare cura deve essere dedicata alla corretta applicazione della guarnizione fornita con l’apparecchio, onde evitare qualsiasi infiltrazione nel mobile sottostante. La guarnizione garantisce una corretta tenuta se utilizzata su superfici lisce. Non installare l’apparecchio al di sopra di un forno non opportunamente ventilato, o di una lavastoviglie. Garantire la presenza di uno spazio di almeno 20 mm al di sotto della cassetta dell’apparecchio, onde permettere una corretta areazione dell’apparecchio. Se sotto l’apparecchio c’è un cassette, non riporvi oggetti infiammabili, come bombolette di spray, od oggetti non resistenti al calore. La distanza di sicurezza tra l’apparecchio e una eventuale cappa di aspirazione sovrastante deve essere quello previsto dal fabbricante della cappa. In caso di mancanza di indiazioni in merito, rispettare una distanza minima di 760 mm. Il cavo di alimentazione, dopo l’installazione dell’apparecchio, non deve essere soggetto a sollecitazioni meccaniche, come ad esempio schiacciamento a causa del movimento di cassetti o altro. 30 CONNESSIONE ELETTRICA L’installazione di questo apparecchio e la connessione alla rete elettrica devono essere affidate esclusivamente a personale qualificato e autorizzato, nel rispetto della normativa in vigore. Dopo l’installazione, una adeguata protezione delle parti sotto tensione deve essere garantita. I necessari dati di connessione si trovano sull’etichetta posta sulla cassetta dell’apparecchio, in prossimità della morsettiera. La connessione alla rete elettrica deve essere fatta utilizzando una presa con messa a terra, o tramite un circuito omnipolare con fusibile di interruzione con un’apertura di almeno 3 mm. Il circuito elettrico dell’apparecchio deve essere separato dalla rete tramite opportuni apparecchi, quali fusibili, interruttori di apertura circuito o capacitatori. Se l’apparecchio non viene installato con una spina accessibile, un dispositivo di disconnessione conforme alle norme di installazione deve essere previsto nell’installazione. Il cavo di alimentazione deve essere posizionato in modo che non venga a contatto con alcuna delle parti calde del piano. Attenzione! Questo apparecchio può solo essere collegato ad una rete elettrica a 230 V~ 50/60 Hz Collegare sempre il cavo di terra. Rispettare il diagramma di connessione. La morsettiera si trova sul lato posteriore del fondo dell’’apparecchio (cassetta). Per aprire il coperchio utilizzare un cacciavite medio. Posizionarlo nelle fessure e aprire il coperchio. Rete Connessione Diametro cavo 230V~ 50/60Hz 1 Phase + N 3 x 2,5 mm² 400V~ 50/60Hz 2 Phases + N 4 x 1.5 mm² Cavo H 05 VV - F H 05 RR - F H 05 VV - F H 05 RR - F Fusibile di protezione 25 A * 16 A * * Calcolato con il fattore di simultaneità secondo la norma EN 60 335-2-6/1990 Connessione del piano cottura Approntamento della configurazione: Per i vari tipi di connessione, utilizzare i ponticelli di ottone forniti nella scatolina a fianco della morsettiera. Monofase 230V~ 1P+N Inserire il primo ponticello tra i terminali 1e 2, e il secondo ponticello tra il 4 e il 5. Collegare la terra al terminale “terra”, il neutro N al terminale 4 o 5, la fase L a uno dei terminali 1 o 2. Bifase 400V~ 2P+N Inserire un ponticello tra i terminali 4 e 5. Collegare la terra al terminale “terra”, il neutro N al terminale 4 o 5, la fase L1 al terminale 1 e la fase L2 al terminale 2. Attenzione! Assicurarsi di aver fissato correttamente i cavi e i ponticelli e di aver serrato correttamente le viti. Il fabbricante declina qualsiasi responsabilità per ogni incidente risultante da Il fabconnessione sbagliata dell’apparecchio, incluso l’utilizzo di un apparecchio non correttamente messo a terra, o connesso con una messa a terra difettosa. 31 Chère cliente,cher client, Nous vous remercions de la confiance que vous nous avez accordée en choisissant notre table de cuisson vitrocéramique à induction. Afin de bien connaître cet appareil, nous vous recommandons de lire attentivement cette notice d’utilisation dans son intégralité et de la conserver pour une consultation ultérieure. SOMMAIRE SECURITE................................................................................................................................... 33 PRECAUTIONS AVANT UTILISATION EN CUISSON ............................................................................. 33 UTILISATION DE L’APPAREIL ......................................................................................................... 33 PRECAUTIONS POUR NE PAS DETERIORER L’APPAREIL ................................................................... 34 PRECAUTIONS EN CAS DE DEFAILLANCE DE L’APPAREIL .................................................................. 34 AUTRES PROTECTIONS ............................................................................................................... 34 DESCRIPTION DE L’APPAREIL ................................................................................................ 35 CARACTERISTIQUES TECHNIQUES ................................................................................................ 35 BANDEAU DE COMMANDE ............................................................................................................ 35 UTILISATION DE L’APPAREIL .................................................................................................. 36 AFFICHAGE ................................................................................................................................ 36 VENTILATION .............................................................................................................................. 36 MISE EN ROUTE ET GESTION DE L’APPAREIL ...................................................................... 36 AVANT LA PREMIERE UTILISATION ................................................................................................. 36 PRINCIPE DE L’INDUCTION ........................................................................................................... 36 TOUCHES SENSITIVES ................................................................................................................. 37 ZONE DE SELECTION DE PUISSANCE “ SLIDER “ ET DE REGLAGE DE LA MINUTERIE .......................... 37 DETECTION DE RECIPIENT ........................................................................................................... 38 INDICATEUR DE CHALEUR RESIDUELLE .......................................................................................... 38 FONCTION BOOSTER ................................................................................................................... 38 FONCTION MINUTERIE ................................................................................................................. 39 PROGRAMMATION D’AUTOMATISME DE CUISSON ............................................................................ 40 FONCTION STOP&GO ................................................................................................................. 40 FONCTION RAPPEL ..................................................................................................................... 40 FONCTION « MAINTIEN AU CHAUD » ............................................................................................. 41 FONCTION BRIDGE ..................................................................................................................... 41 VERROUILLAGE DU BANDEAU DE COMMANDE................................................................................. 41 CONSEILS DE CUISSON ........................................................................................................... 42 QUALITE DES CASSEROLES ......................................................................................................... 42 DIMENSION DES CASSEROLES...................................................................................................... 42 EXEMPLES DE REGLAGE DES PUISSANCES DE CUISSON .................................................................. 43 ENTRETIEN ET NETTOYAGE.................................................................................................... 43 QUE FAIRE EN CAS DE PROBLEME........................................................................................ 43 PROTECTION DE L’ENVIRONNEMENT .................................................................................... 44 INSTRUCTIONS D’INSTALLATION ........................................................................................... 44 CONNEXION ELECTRIQUE ....................................................................................................... 46 32 SECURITE Précautions avant utilisation en cuisson Retirez toutes les parties de l’emballage. L’installation et le branchement électrique de l’appareil sont à confier à des spécialistes agrées. Le fabricant ne saurait être tenu responsable des dommages résultant d’une erreur d’encastrement ou de raccordement. L’appareil ne doit être utilisé que s’il est monté et installé dans un meuble et un plan de travail homologué et adapté. Son utilisation est uniquement destinée à l’usage domestique habituel (préparation des aliments), à l’exclusion de toute autre utilisation domestique, commerciale ou industrielle. Enlevez toutes les étiquettes et autocollants du verre vitrocéramique. Ne pas transformer ou modifier l’appareil. La table de cuisson ne doit pas servir de support ou de plan de travail. La sécurité n’est assurée que si l’appareil est raccordé à une terre de protection conforme aux prescriptions en vigueur. Pour le raccordement au réseau électrique n’utilisez pas de rallonge. L’appareil ne doit pas être utilisé au-dessus d’un lave-vaisselle ou d’un sèche-linge : les vapeurs d’eau dégagées pourraient détériorer l’électronique. Utilisation de l’appareil Coupez toujours les foyers après utilisation. Surveillez constamment les cuissons qui utilisent des graisses et des huiles, car elles sont susceptibles de s’enflammer rapidement. Prenez garde aux risques de brûlures pendant et après l’utilisation de l’appareil. Assurez-vous qu’aucun câble électrique d’appareil fixe ou mobile ne vienne en contact avec la vitre ou la casserole chaude. Les objets magnétisables (cartes de crédits, disquettes informatiques, calculatrices) ne doivent pas se trouver à proximité immédiate de l’appareil en fonction. Les objets métalliques tels que des couteaux, des fourchettes, des cuillères et des couvercles ne devraient pas être placés la surface vitrée puisqu'ils peuvent devenir chauds. De façon générale ne placez aucun objet métallique autre que les récipients de chauffe sur la surface vitrée. En cas d’enclenchement intempestif ou de chaleur résiduelle, celui-ci risquerait selon le matériau de chauffer, de fondre ou de commencer à brûler. Ne jamais couvrir l’appareil d’un chiffon ou d’une feuille de protection. Il pourrait devenir très chaud et prendre feu. Cet appareil n'est pas destiné à être utilisé par des personnes (enfants y compris) ayant des facultés physiques, sensorielles ou mentales réduites, ou un manque d'expérience et de connaissance, à moins qu'elles aient eu des explications concernant l'utilisation de l'appareil par une personne chargée de leur sécurité. Les enfants doivent être informés pour s'assurer qu'ils ne jouent pas avec l'appareil. 33 Précautions pour ne pas détériorer l’appareil Les casseroles à semelles brutes (fonte non émaillée,…) ou abîmées peuvent endommager la vitrocéramique. La présence de sable ou d’autres matériaux abrasifs peut endommager la vitrocéramique. Evitez de faire chuter des objets, mêmes petits, sur la vitrocéramique. Ne heurtez pas les bords de la vitre avec les casseroles. S’assurer que la ventilation de l’appareil se fasse suivant les instructions du constructeur. Ne posez pas ou ne pas laisser de casseroles vides sur la table de cuisson. Eviter que le sucre, les matières synthétiques ou une feuille d’aluminium ne touchent les zones chaudes. Ces substances peuvent au refroidissement provoquer des cassures ou d’autres modifications de la surface vitrocéramique: Eteindre l’appareil et enlevez-les immédiatement de la zone de cuisson encore chaude (attention : risque de brûlures). Ne placez jamais de récipients chauds au dessus de la zone de commande. Si un tiroir est situé sous l’appareil encastré, assurer un écart suffisant (2 cm) entre le contenu de ce tiroir et la partie inférieure de l’appareil afin d’assurer une bonne ventilation. Ne déposez pas d’objets inflammables (ex. sprays) dans le tiroir placé sous la table de cuisson. Les éventuels casiers à couverts doivent être en matériau résistant à la chaleur. Précautions en cas de défaillance de l’appareil Si un défaut est constaté, il faut débrancher l’appareil et couper l’alimentation électrique. En cas de fêlure ou de fissure de la vitrocéramique il faut impérativement débrancher l’appareil du réseau électrique et prévenir le service après-vente. Les réparations doivent être entreprises exclusivement par un personnel spécialisé. N’ouvrez en aucun cas l’appareil vous-même. ATTENTION : Si la surface vitrée est fissurée, coupez l’alimentation de l’appareil pour éviter une éventuelle décharge électrique. Autres protections Assurez-vous que le récipient de cuisson soit toujours centré sur la zone de cuisson. Le fond de la casserole doit autant que possible couvrir la zone de cuisson. Pour les utilisateurs portant un régulateur de rythme cardiaque, le champ magnétique pourrait influencer son fonctionnement. Nous recommandons de se renseigner auprès du revendeur ou du médecin. N’utilisez pas de récipients en matière synthétique ou en aluminium : ils pourraient fondre sur des foyers encore chauds. L’UTILISATION DE CASSEROLES NON ADAPTÉES, OU D’ACCESOIRES AMOVIBLES INTERMÉDIAIRES POUR FAIRE CHAUFFER DES CASSEROLES NON INDUCTIVES ENTRAÎNE UNE RUPTURE DE LA GARANTIE. LE FABRICANT NE SAURAIT ÊTRE TENU POUR RESPONSABLE DES DÉTERIORATIONS DE LA TABLE OU DE SON ENVIRONNEMENT. 34 DESCRIPTION DE L’APPAREIL Caractéristiques techniques Type P604INE Puissance totale Position du foyer Puissance nominale* Puissance du 1er booster* Puissance du 2ème booster* Détection minimum 7400 W Avant Gauche Arrière Gauche Arrière Droit Avant Droit 1850 W 1850 W 1850 W 2300 W 2300 W 2300 W 2300 W 2900 W 3000 W 3000 W 3000 W 3700 W 100 mm 100 mm 100 mm 110 mm * la puissance peut varier en fonction des dimensions et des matériaux des casseroles. Bandeau de commande Voyants de sélection du foyer pour minuterie Affichage de la minuterie Affichage du niveau de puissance Voyant de sélection de foyer Voyant de mise en marche Touche Marche/Arrêt Voyant Booster Zone de sélection de puissance « SLIDER » et de réglage de la minuterie 35 Touche Maintien au chaud Touche Booster UTILISATION DE L’APPAREIL Affichage Affichage 0. 1…9 U A E H P L U U II ∏ Désignation Zéro Niveau de puissance Non détection de casserole Accélérateur de chauffe Message d’erreur Chaleur résiduelle 1er Booster 2nd Booster Verrouillage Maintien Chaud Maintien Chaud Stop&Go Bridge Description La zone de chauffe est activée. Choix du niveau de cuisson. Récipient manquant ou inapproprié. Cuisson automatique. Défaut de circuit électronique. La zone de cuisson est chaude. Le 1er Booster est activé. Le 2nd Booster est activé. La table est sécurisée. La cuisson est maintenue à 42°C. La cuisson est maintenue à 70°C. La table est en pause. 2 zones de cuisson sont combinées. Ventilation Le ventilateur de refroidissement a un fonctionnement entièrement automatique. Il se met en route à petite vitesse dès que les calories dégagées par l’électronique dépassent un certain seuil. La ventilation enclenche sa seconde vitesse lorsque la table de cuisson est utilisée intensivement. Le ventilateur réduit sa vitesse et s’arrête automatiquement dès que le circuit électronique est suffisamment refroidi. MISE EN ROUTE ET GESTION DE L’APPAREIL Avant la première utilisation Nettoyez votre appareil avec un chiffon humide, puis séchez-le. N’utilisez pas de détergent qui risquerait de provoquer une coloration bleutée sur les surfaces vitrées. Principe de l’induction Une bobine d’induction se trouve sous chaque foyer de cuisson. Lorsque celle-ci est enclenchée, elle produit un champ électromagnétique variable qui, à son tour produit des courants induits dans le fond ferro-magnétique du récipient. Il en résulte un échauffement du récipient placé sur la zone de chauffe. Bien entendu le récipient doit être adapté : Sont recommandés tous les récipients métalliques ferro-magnétiques (à vérifier éventuellement avec un petit aimant) tels que : cocotte en fonte, poêle en fer noir, casseroles métalliques émaillées, en inox à semelle ferro-magnétique… Sont exclus les récipients en cuivre, inox, aluminium, verre, bois, céramique, grès, terre cuite, inox non ferro-magnétique… La zone de cuisson à induction prend automatiquement en compte la taille du récipient utilisé. Avec un diamètre trop petit, le récipient ne fonctionne pas. Ce diamètre varie en fonction du diamètre de la zone de cuisson. Lorsque le récipient n’est pas adapté à la table de cuisson le symbole ( U ) reste affiché. 36 Touches sensitives Votre appareil est équipé de touches sensitives permettant de commander les différentes fonctions. Un effleurage de la touche active leur fonctionnement. Cette activation est validée par un voyant, un affichage et/ou par un signal sonore. Dans le cas d’une utilisation générale n’appuyez que sur une seule touche à la fois. Zone de sélection de puissance “ SLIDER “ et de réglage de la minuterie Pour la sélection de la puissance par le slider faire glisser votre doigt sur la zone “SLIDER“. Vous bénéficiez également d’un accès direct en posant votre doigt directement sur le niveau souhaité. Zone de sélection de puissance “SLIDER“ et de réglage de la minuterie “SLIDER“ Accès direct Mise en route Enclencher / arrêter la table de cuisson : Action Enclencher Arrêter Bandeau de commande appuyer sur [ ] appuyer sur [ ] Réglage de la zone de chauffe : Bandeau de commande Action Sélectionner la zone appuyer sur [ 0 ] de la zone Régler (Ajuster la puissance) glisser sur le “SLIDER“ vers la droite ou la gauche Afficheur [ 0 ] clignotent aucun ou [ H ] Afficheur [ 0 ] et voyant de zone allumé [0]à[9] glisser jusqu’à [ 0 ] sur le “SLIDER“ [ 0 ] ou [ H ] ou appuyer sur [ 0 ] [ 0 ] ou [ H ] Si aucun réglage n’est fait dans un délai de 20 secondes l’électronique revient en position d’attente. Arrêter 37 Détection de récipient La détection de récipient assure une sécurité parfaite. L’induction ne fonctionne pas : Lorsqu’il n’y a pas de récipient sur la zone de cuisson ou lorsque ce récipient est inadapté à l’induction. Dans ce cas il est impossible d’augmenter la puissance et dans l’afficheur le symbole [ U ] apparaît. Le [ U ] disparaît lorsqu’une casserole est posée sur le foyer de cuisson. Si en cours de cuisson le récipient est enlevé de la zone de cuisson, le fonctionnement est interrompu. Dans l’afficheur le symbole [ U ] apparaît. Le [ U ] disparaît lorsque le récipient est remis sur le foyer de cuisson. La cuisson reprend au niveau de puissance sélectionnée au préalable. Après utilisation, éteignez la zone de chauffe. Ne laissez pas la détection de casserole [ U ] active. Indicateur de chaleur résiduelle Après l’arrêt des zones de cuisson ou l’arrêt complet de la table, les zones de cuissons sont encore chaudes et sont signalées par le symbole [ H ]. Le symbole [ H ] s’éteint lorsque les zones de cuisson peuvent être touchées sans danger. Tant que les témoins de chaleur résiduelle sont allumés, ne touchez pas les zones de cuisson et ne posez aucun objet sensible à la chaleur. Risque de brûlure et d’incendie ! Fonction booster La fonction Booster [ P ] et Double Booster [ ] octroie un renforcement de puissance à la zone de cuisson sélectionnée. Si ces fonctions sont activées, les zones de cuisson fonctionnent pendant 10 minutes avec une puissance nettement plus élevée. Le Booster et le Double Booster sont conçus par exemple pour faire chauffer rapidement de grandes quantités d’eau, comme pour la cuisson des pâtes. Enclencher / arrêter le 1er Booster: Action Sélectionner la zone Bandeau de commande Appuyer sur [ B ] de la zone Enclencher Booster Stopper Booster Appuyer sur [ B ] Glisser sur le “SLIDER“ Enclencher / arrêter le 2nd Booster: Action Sélectionner la zone Bandeau de commande Appuyer sur [ 0 ] de la zone Enclencher le 1er Booster Enclencher le 2nd Booster Stopper le 2nd Booster Stopper le 1er Booster Appuyer sur [ B ] Ré-appuyer sur [ B ] Appuyer sur [ B ] Glisser sur le “SLIDER“ Afficheur [ 0 ] et voyant de zone allumé [P] [9]à[0] Afficheur [ 0 ] et voyant de zone allumé [P] [ puis P ] [P] [9]à[0] Gestion de la puissance maximale : L’ensemble de la table de cuisson est doté d’une puissance maximale. Lorsque la fonction Booster est activée, et pour ne pas excéder cette puissance maximale, la commande électronique réduit automatiquement le niveau de cuisson d’une autre zone de chauffe. Durant quelques secondes, l’afficheur de cette zone de cuisson en clignotant [ 9 ] puis affiche le niveau de cuisson maximum possible : Zone de cuisson sélectionnée [ P ] est affiché Autre zone de cuisson ( exemple : puissance niveau 9 ) [ 9 ] passe à [ 6 ] ou [ 8 ] suivant le type de foyer 38 Fonction minuterie La minuterie peut être affectée simultanément aux 4 foyers de cuisson et ceci avec des réglages de temps de minuterie différents (de 0 à 99 minutes) pour chacune des zones. Réglage ou modification de la durée de cuisson : Exemple pour 16 minutes à puissance 7 : Action Bandeau de commande Sélectionner la zone appuyer sur [ 0 ] de la zone Sélectionner la puissance Sélectionner « Minuterie » Réglage des unités Valider les unités Réglage des dizaines Valider les dizaines glisser sur le “SLIDER“ jusqu’à [ 7 ] appuyer sur [ CL ] glisser sur le “SLIDER“ jusqu’à [ 6 ] appuyer sur [ 06 ] glisser sur le “SLIDER“ jusqu’à [ 1 ] appuyer sur [ 16 ] Afficheur [ 0 ] et voyant de zone allumé [7] [ 00 ] [ 0 fixe ] [ 6 clignotant ] [ 0 clignotant ] [ 6 fixe ] [ 1 clignotant ] [ 6 fixe ] [ 16 ] La durée est sélectionnée et le décompte démarre. Arrêter la fonction minuterie cuisson : Exemple pour 13 minutes restantes à puissance 7 : Action Bandeau de commande Afficheur Sélectionner la zone appuyer sur [ 7 ] de la zone Sélectionner « Minuterie » Désactiver les unités Valider les unités Désactiver les dizaines Valider les dizaines appuyer sur [ 13 ] glisser sur le “SLIDER “jusqu’à [ 0 ] appuyer sur [ 10 ] glisser sur le “SLIDER “jusqu’à [ 0 ] appuyer sur [ 00 ] [ 7 ] et voyant de zone allumé [ 13 ] [ 1 fixe ] [ 0 clignotant ] [ 1 clignotant ] [ 0 fixe ] [ 00 clignotant ][ 0 fixe ] [ 00 ] Arrêt automatique en fin de cuisson : Dès que le temps de cuisson sélectionné est écoulé la minuterie affiche en clignotant [ 00 ] et un signal sonore retentit. Pour stopper le son et le clignotement, il suffit d’appuyer sur la touche [ 00 ]. Minuterie utilisée hors cuisson : Exemple pour 29 minutes : Action Activer la table de cuisson Sélectionner « Minuterie » Réglage des unités Valider les unités Réglage des dizaines Valider les dizaines Bandeau de commande appuyer sur [ ] appuyer sur [ CL ] glisser sur le “SLIDER“ jusqu’à [ 9 ] appuyer sur [ 09 ] glisser sur le “SLIDER“ jusqu’à [ 2 ] appuyer sur [ 29 ] Afficheur voyants de zone allumes [ 00 ] [ 0 fixe ] [ 9 clignotant ] [ 0 clignotant ] [ 9 fixe ] [ 2 clignotant ] [ 9 fixe ] [ 29 ] La durée est sélectionnée et le décompte démarre. Dès que le temps de cuisson sélectionné est écoulé la minuterie affiche en clignotant [ 00 ] et un signal sonore retentit. Pour stopper le son et le clignotement, il suffit d’appuyer sur la touche [ 00 ]. La table s’éteint. 39 Programmation d’automatisme de cuisson Toutes les zones de cuisson sont équipées d’un dispositif de cuisson automatique. La zone de cuisson se met en marche à pleine puissance pendant un certain temps, puis réduit automatiquement sa puissance sur le niveau présélectionné. Mise en route de l’automatisme : Action Sélectionner la zone Bandeau de commande appuyer sur [ 0 ] de la zone Activer la pleine puissance glisser sur le “SLIDER“ jusqu’à [ 9 ] ré appuyer sur [ 9 ] du “SLIDER“ glisser sur le “SLIDER“ jusqu’à [ 7 ] Activer l’automatisme Sélectionner niveau (par exemple « 7 ») Afficheur [ 0 ] et voyant de zone allumé passe de [ 0 ] à [ 9 ] [ 9 ] clignote avec [ A ] [ 9 ] passe à [ 8 ] [ 7 ] [ 7 ] clignote avec [ A ] Arrêt de l’automatisme : Action Sélectionner la zone Bandeau de commande appuyer sur [ 7 ] de la zone Sélectionner niveau glisser sur le “SLIDER“ Afficheur [ 7 ] clignote avec [ A ] [1]à[9] Fonction Stop&Go Cette fonction permet d’interrompre temporairement la cuisson et de la réactiver avec les mêmes réglages. Enclencher, désactiver la fonction : Action Bandeau de commande Activer Stop&Go Appuyer simultanément sur les 2 zones arrières Stopper Stop&Go Appuyer simultanément sur les 2 zones arrières, puis ré-appuyer sur l’un des 2 afficheurs clignotants Afficheur [ II ] sur les afficheurs [ II ] clignottent Les réglages précédent s’affichent Fonction rappel Après avoir éteint la table [ ], il est possible de rappeler les derniers réglages sélectionnés : Etat de cuisson de toutes les zones de cuisson (puissance). Minutes et secondes des zones de cuisson programmées par les minuteries. Fonction “cuisson automatique”. Fonction “maintien chaud”. La procédure de rappel est la suivante : Appuyer sur la touche [ ]. Ensuite appuyer simultanément sur les 2 zones arrière en moins de 6 secondes. Les réglages précédents sont à nouveau actifs. 40 Fonction « Maintien au chaud » Cette fonction de maintien au chaud permet d’atteindre et de maintenir automatiquement une température de 42 ou 70°C. Ceci évitera aux liquides de déborder et aux mets d’attacher au fond de la casserole. Activer, désactiver la fonction « Maintien au chaud » : Action Bandeau de commande Afficheur Sélectionner la zone Appuyer sur [ 0 ] de la zone [ 0 ] à [ 9 ] ou [ H ] Activer le maintien au chaud Appuyer 1 fois sur [ ] pour 42°C [U] Activer le maintien au chaud Appuyer 2 fois sur [ ] pour 70°C [U] Arrêter le maintien au chaud glisser sur le “SLIDER“ [ 0 ] à [ 9 ] ou [ H ] Cette fonction peut être mise en route indépendamment sur tous les foyers. Lorsque la casserole quitte la zone de cuisson la fonction « Maintien au chaud » reste active pendant environ 10 minutes. La durée maximale de maintien au chaud est de 2 heures. Fonction Bridge Cette fonction permet de combiner les 2 zones de gauche avec les mêmes fonctionnalités qu’une seule zone. La fonction Booster n’est pas compatible avec cette fonction. Action Mis en route Bandeau de commande Appuyer sur [ ] Activer le bridge Appuyer sur les 2 zones de gauche Augmenter le bridge Glisser sur le “SLIDER “ [ 1 à 9 ] ou [ [ 1 à 9 ] ou [ ] Appuyer sur les 2 zones de gauche Arrêter le bridge Afficheur [ 0 ] ou [ H ] sur les 4 afficheurs [ 0 ] sur la zone avant et [ ∏ ] sur la zone arrière. ] [ 1 à 9 ] ou [ U ] [ 0 ] ou [ H ] sur les 2 zones Verrouillage du bandeau de commande Pour éviter de modifier une sélection de la table de cuisson, notamment dans le cadre du nettoyage de la vitre, le bandeau de commande (à l’exception de la touche marche/arrêt [ ]) peut être verrouillé. Verrouillage : Bandeau de commande Afficheur Action Mise en route Appuyer sur [ ] [ 0 ] ou [ H ] Verrouiller la table Maintenir un doigt sur le SLIDER [L] et appuyer 3 fois sur la touche [ B ] Une fois la table vérrouillé, un décompte de 10 secondes se lance. Pendant cette durée, vous avez la possibilité de déverrouiller la table. A chaque sélection de la touche [ B ], un segment du [ L ] apparait. La table est verrouillé quand le [ L ] est complet. Déverrouillage : Bandeau de commande Afficheur Action Mise en route Appuyer sur [ ] [L] Dans les 10 secondes après la mise en route : Déverrouiller la table Maintenir un doigt sur le SLIDER [ 0 ] ou [ H ] et appuyer 3 fois sur la touche [ B ] A la mise en route de la table, lorsque la table est vérrouillée, un décompte de 10 secondes s’affiche. Pendant cette durée vous pouvez déverrouillez la table. Une fois passé ce délai, le dévérrouillage devient impossible, il vous faut éteindre et ré-allumer la table. A chaque sélection de la touche [ B ], un segment du [ L ] disparait. La table est déverrouillée quand le [ L ] disparait. 41 CONSEILS DE CUISSON Qualité des casseroles Matériaux adaptés : acier, acier émaillé, fonte, inox à fond ferro-magnétique, aluminium à fond ferro-magnétique. Matériaux non adaptés : aluminium et inox à fond non ferro-magnétique, cuivre, laiton, verre, céramique, porcelaine. Les fabricants spécifient si leurs produits sont compatibles induction. Pour vérifier si des casseroles sont compatibles : Placez un peu d’eau dans une casserole placée sur une zone de cuisson induction réglée au niveau [ 9 ]. Cette eau doit chauffer en quelques secondes. Placez un aimant sur le fond externe de la casserole, il doit rester collé. Certaines casseroles peuvent faire du bruit lorsqu’elles sont placées sur une zone de cuisson à induction. Ces bruits ne traduisent en aucun cas un défaut de l’appareil et n’influent nullement sur son fonctionnement. Dimension des casseroles Les zones de cuisson s’adaptent automatiquement à la dimension du fond de la casserole jusqu’à une certaine limite. Le fond de cette casserole doit cependant avoir un diamètre minimum en fonction du diamètre de la zone de cuisson correspondante. Afin d’obtenir le rendement maximum de votre table de cuisson, veuillez placer la casserole bien au centre de la zone de cuisson. 42 Exemples de réglage des puissances de cuisson (Les valeurs ci-dessous sont indicatives) 1à2 Faire fondre Réchauffer 2à3 Gonfler Décongélation 3à4 Vapeur 4à5 Eau 6à7 Cuire à feu doux 7à8 Cuire Frire Frire, Porter à ébullition Frire, Porter à ébullition 9 P et Sauces, beurre, chocolat, gélatine Plats pré-cuisinés Riz, pudding et plats cuisinés Légumes, poisson, produits congelés Légumes, poissons, viande Pommes de terre à l’eau, soupes, pâtes Légumes frais Viandes, foie, œufs, saucisses Goulasch, roulades, tripes Pommes de terre, beignets, galettes Steaks, omelettes eau Porter à ébullition des quantités importantes d’eau ENTRETIEN ET NETTOYAGE Pour nettoyer il faut mettre l’appareil hors fonctionnement. Laissez refroidir l’appareil, car risques de brûlures. Nettoyez les restes de cuisson avec de l’eau additionnée de produit vaisselle ou un produit du commerce conseillé pour la vitrocéramique. N’utilisez en aucun cas d’appareils « à vapeur » ou « à pression ». Ne pas utiliser d’objets qui risqueraient de rayer la vitrocéramique (tel que tampon abrasifs ou pointe de couteau…). N’utilisez pas de produits de nettoyage abrasifs qui pourraient endommager l’appareil. Séchez l’appareil avec un chiffon propre. Enlevez immédiatement le sucre et les mets contenant du sucre. QUE FAIRE EN CAS DE PROBLEME La table de cuisson ou les zones de cuisson ne s’enclenchent pas : La table est mal connectée au réseau électrique. Le fusible de protection a sauté. Vérifiez si le verrouillage n’est pas activé. Les touches sensitives sont couvertes d’eau ou de graisse. Un objet est posé sur les touches sensitives. Le symbole [ U ] s’affiche : Il n’y a pas de casserole sur la zone de cuisson. Le récipient utilisé n’est pas compatible avec l’induction. Le diamètre du fond de casserole est trop petit par rapport à la zone de cuisson. Le symbole [ E ] s’affiche : Le système électronique est défectueux. Débranchez et rebranchez l’appareil. 43 L’une des zones ou l’ensemble du plan de cuisson se déclenche : Le déclenchement de sécurité a fonctionné. Celui-ci s’actionne dans le cas ou vous avez oublié de couper une des zones de chauffe. Il s’enclenche également lorsqu’une ou plusieurs touches sensitives sont couvertes. Une des casseroles est vide et son fond a surchauffé. La table dispose également d’un dispositif de réduction automatique de niveau de puissance et de coupure automatique en cas de surchauffe. La soufflerie de ventilation continue de tourner après l’arrêt de la table : Ce n’est pas un défaut, le ventilateur continue de protéger l’électronique de l’appareil. La soufflerie s’arrête automatiquement. La commande de cuisson automatique ne s’enclenche pas : La zone de cuisson est encore chaude [ H ]. Le niveau de cuisson maximum est enclenché [ 9 ]. La commande affiche [ L ]: Se référer au chapitre verrouillage du bandeau de commande. Le symbole [ U ] s’affiche : Se référer au chapitre “Maintien chaud“. Le symbole [ II ] s’affiche : Se référer au chapitre “Pause“. Le symbole [ ∏ ] s’affiche : Se référer au chapitre “Bridge“. PROTECTION DE L’ENVIRONNEMENT Les matériaux d’emballage sont écologiques et recyclables. Les appareils électroniques sont composés de matériaux recyclables et parfois de matériaux nocifs pour l’environnement, mais nécessaires au bon fonctionnement et à la sécurité de l’appareil. Ne jetez en aucun cas votre appareil avec les déchets ménagers. Faites appel au service d’enlèvement ou aux sites de dépôt mis en place par votre commune et adaptés au recyclage des appareils électroménagers. INSTRUCTIONS D’INSTALLATION Le montage relève de la compétence exclusive de spécialistes. L’utilisateur est tenu de respecter la législation et les normes en vigueur dans son pays de résidence. Mise en place du joint d’étanchéité Le joint adhésif fourni avec l’appareil permet d’éviter toute infiltration dans le meuble. Sa mise en place doit être effectuée avec un grand soin suivant le croquis ci-dessous. Coller le joint (2) sur le rebord de la table à 2mm du bord externe, après avoir ôté la feuille de protection (3). 44 Encastrement La découpe du plan de travail sera suivant le modèle de table de : La distance entre la table de cuisson et le mur doit être au minimum de 50mm. La table de cuisson est un appareil qui appartient à la classe de protection « Y ». Lors de son encastrement, une paroi d’armoire haute ou un mur peut se trouver sur l’un des côtés et sur la face arrière. Mais de l’autre côté, aucun meuble ni aucun appareil ne doit être plus haut que le plan de cuisson. Les placages et revêtements des plans de travail doivent être réalisés en matériaux résistant à la chaleur (100°C). Les baguettes de bord murales doivent être thermo résistantes. Les matériaux des plans de travail peuvent gonfler au contact de l’humidité. Pour protéger le chant de la découpe, appliquer un vernis ou une colle spéciale. N’installer pas la table au dessus d’un four non ventilé ou d’un lave-vaisselle. Garantir entre le fond du caisson de l’appareil un espace de 20 mm pour assurer une bonne circulation de l’air de refroidissement de l’électronique. Si un tiroir se trouve sous le plan de cuisson, éviter d’y ranger des objets inflammables (par exemple : spray) et des objets non résistants à la chaleur. L’écart de sécurité entre la table de cuisson et la hotte aspirante placée au-dessus d’elle doit respecter les indications du fabricant de hottes. En cas d’absence d’instructions respecter une distance minimum de 760 mm. Le câble de raccordement ne doit être soumis, après encastrement, à aucune contrainte mécanique, comme par exemple du fait d’un tiroir. 45 CONNEXION ELECTRIQUE L’installation de cet appareil et son branchement au réseau électrique ne doit être confiés qu’à un électricien parfaitement au fait des prescriptions normatives. La protection contre les pièces sous tension doit être assurée après le montage. Les données de raccordement nécessaires se trouvent sur la plaque signalétique et la plaque de branchement placées sous l’appareil. Cet appareil doit être séparé du secteur par un dispositif de sectionnement omnipôles. Lorsque celui-ci est ouvert (déclenché), un écartement de 3mm doit être assuré. Le circuit électrique doit être séparé du réseau par des dispositifs appropriés, par exemple les disjoncteurs, les fusibles, les disjoncteurs différentiels et les contacteurs. Si l’appareil n’est pas muni d’une fiche accessible, des moyens de déconnection doivent être incorporé à l’installation fixe conformément aux réglementations de l’installation. Le câble d’alimentation doit être placé de sorte à ce qu’il ne touche pas de parties chaudes de la table de cuisson. Attention ! Cet appareil n’est conçu que pour une alimentation en 230 V~ 50 / 60 Hz. Raccordez toujours le fil de terre de protection. Respectez le schéma de raccordement. Le boîtier de raccordement se situe sous la plaque de cuisson. Pour ouvrir le capot, servez-vous d’un tournevis moyen. Placez le dans les 2 fentes situées à l’avant des 2 flèches. Réseau Raccordement Diamètre câble 230V~ 50/60Hz 1 Phase + N 3 x 2.5 mm² 400V~ 50/60Hz 2 Phases + N 4 x 1.5 mm² Câble H 05 VV - F H 05 RR - F H 05 VV - F H 05 RR - F Calibre de protection 25 A * 16 A * * calculé avec le coefficient de simultanéité suivant standard EN 60 335-2-6/1990 Branchement de la table: Pour vous adapter au réseau électrique (230V~1P+N ou 400V~2P+N), veuillez utiliser les pontets en laiton situés dans le boitier de connexion Monophasé 230V~1P+N : Mettre un pontet entre les plots 1 et 2, puis un pontet entre 4 et 5. Visser le fil vert/jaune au plot prévu pour la mise à la terre. Visser le neutre N au plot 4 ou 5. Visser la phase L sur un des plots 1 ou 2. Biphasé 400V~2P+N : Mettre un pontet entre 4 et 5. Visser le fil vert/jaune au plot prévu pour la mise à la terre. Visser le neutre N au plot 4 ou 5. Visser la phase L1 sur le plot 1 et la phase L2 sur le plot 2. Attention ! Veillez à bien engager les fils et à bien serrer les vis. Notre responsabilité ne saurait être engagée pour tout incident résultant d’un mauvais branchement, ou qui pourrait survenir à l’usage d’un appareil non relié à la terre ou équipé d’une terre défectueuse. 46 15523/0