1
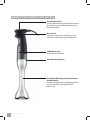
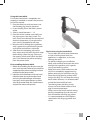
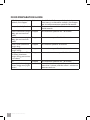
CONTROL GRIP
Instruction manual
CONTROL GRIP
CO N T R O L
GRIP
CONTENTS
2
Congratulations
3
Catler recommends safety first
6
Know your Control Grip SB 4010
8
Operating your Control Grip SB 4010
15
Care and Cleaning
R2
Recipes
CONTENTS
1
Congratulations
on the purchase of your new Catler Control Grip SB 4010.
2
CATLER RECOMMENDS SAFETY FIRST
CONGRATULATIONS
CATLER RECOMMENDS SAFETY FIRST
We at Catler are very safety conscious. We design and manufacture consumer products with
the safety of you, our valued customer foremost in mind. In addition we ask that you exercise
a degree of care when using any electrical appliance and adhere to the following precautions:
IMPORTANT SAFEGUARD FOR YOUR CONTROL GRIP SB 4010
• Carefully read all instructions before
operation and save for future reference.
• Remove and safely discard any packaging
material and promotional labels before
using the appliance for the first time.
• To eliminate a choking hazard for young
children, remove and safely discard the
protective cover fitted to the power plug
of the appliance.
• Use this appliance ONLY for the purposes
that it has been intended for and how it is
described in this manual. This appliance
has been designed exclusively for
household use and contructed to process
of normal amount of food in household.
• Do not place the appliance near the edge
of a bench or table during operation. Use
the appliance only on level surface, free of
water.
• Ensure that the surface is clean, level, and
free of water.
• Do not place the appliance on or near a
hot gas burner, electric element or where
it could touch a heated oven.
• Do not operate the appliance on a sink
drain board.
• This appliance is not intended to be
operated by means of an external timer or
separate remote control system.
• Do not use sprays near the appliance.
• Before you connect the appliance into
the power outlet make sure the voltage
on the rating label corresponds to the
voltage in your power outlet.
• Always make sure the appliance is
completely and properly assembled
before operating, mainly the blending leg.
Follow the instructions in the manual.
• Ensure the appliance is turned off and
the power is switche d off at the power
outlet before attempting to assemble or
disassemble.
• Do not run the appliance unless it is
correctly and properly assembled. Do not
run an empty appliance. Incorrect using of
the appliance can negatively influence its
life.
• Handle the appliance and the accessories
with care – remember the blades are very
sharp and should be kept out of reach of
children.
• Never use the appliance to process food
on a hot stove or gas burner. Always
remove the saucepan from the heat
source and ensure the power cord and
the appliance are also kept away from any
heat source.
• Use the appliance as decribed in this
manual.
• Use the whisk attachment only for
the recipes which require the whisk
attachment usage. Do not use the whisk
attachment any other purposes than it is
intended for.
• Do not process hot or boiling liquids in
the chopper / mixing bowl. Allow liquids
to cool before placing into the bowl.
• Insert only food for mixing into the
chopper / mixing bowl.
• Allow the hot food to cool down to the
temperature of 60°C at least.
• Do not operate the appliance
continuously for more than 1 minute.
After 1 minute, turn off the appliance and
allow the motor to rest for 1 minute at
least.
CATLER RECOMMENDS SAFETY FIRST
3
• When processing dry, thick or heavy
mixtures, interrupt the process after 30
seconds. Stir the ingredients and allow the
motor to rest for 1 minute at least.
• Recipes in the manual are considered as
common food amount in household.
• If food becomes lodged around the
processing blade, turn off the appliance
by releasing the main switch and
disconnect the power cord from the
power outlet. Use a spatula, or plastic
knife, to dislodge the food. In no cases
use your fingers to dislodge the food. The
blades are very sharp.
• Do not insert your hand into the mixing
bowl if the appliance is in process.
• Do not remove the appliance from the
mixing mixture during operation. Turn
off the appliance at first, disconnect the
power cord from the power outlet and
wait until the blades stop turning. Then
you can revome the appliance from the
mixing mixture.
• Do not leave the appliance unattended
when in use.
• Do not use the appliance with wet hands.
• Always ensure the appliance has been
turn off before attempting to move the
•
•
•
•
•
appliance, when the appliance is not in
use and before cleaning and storing. Then
you can unplug the appliance from the
power outlet.
If you do not use the appliance for a
long time or you attempt to leave it
unattended, unplug the appliance from
the power outlet.
Do not disconnect the appliance from the
power point by pulling the electric cable
– it may damage the electric cable/power
point. Disconnect the cable from the
power point by gently pulling the plug of
the electric cable.
The appliance is not intended for use by
young children or infirm persons unless
they have been adequately supervised by
a responsible person to ensure they can
use the appliance safely.
Use only supplied accessories or
recommended accessories by a
manufacturer. Otherwise it may result in
fire, electric shock or injury to persons.
Keep the appliance clean. Follow the
cleaning instructions provided in Care and
Cleaning chapter.
CAUTION: HOUSEHOLD USE ONLY. READ INSTRUCTIONS BEFORE USE. DO
NOT IMMERSE IN ANY LIQUID.
TO PROTECT AGAINST ELECTRIC SHOCK DO NOT IMMERSE THE MOTOR
BODY, POWER CORD OR POWER PLUD IN WATER OR ANY OTHER LIQUID
OR DO NOT ALLOW MOISTURE TO COME IN CONTACT WITH THESE PARTS.
DO NOT WASH THE POWER BASE UNDER RUNNING WATER.
4
CATLER RECOMMENDS SAFETY FIRST
IMPORTANT SAFEGUARD FOR ALL
ELECTRICAL APPLIANCES
• This appliance is for household use only.
• Unwind the cord fully before use.
• Do not let the cord hang over the edge of
a table or counter, touch hot surfaces or
become knotted.
• This appliance is not intended for use by
persons (including children) with reduces
physical, sensory or mental capabilities
or lack of experience and knowledge,
unless they have been given supervision
or instruction concerning use of the
appliance by a person responsible for
their safety.
• Children should be supervised to ensure
that they do not play with this appliance.
• It is recommended to inspect the
appliance regularly. Do not use the
appliance if power supply cord, plug or
appliance becomes damaged in any way.
Return the entire appliance to the nearest
authorised Catler Service Centre for
examination and/or repair.
• Any maintenance other than cleaning
should be performed at an authorised
Catler Service Centre.
• Do not use this appliance for other than
its intended use. Do not use in moving
vehicles or boats. Do not use outdoors.
• The installation of a residual current
device (safety switch) is recommended to
provide additional safety protection when
using electrical appliances. It is advisable
that a safety switch with a rated residual
operating current not exceeding 30mA be
installed in the electrical circuit supplying
the appliance. See your electrician for
professional advice.
• For the security reasons, we recommend
to plug the appliance directly to its own
circuit, separate from other appliances.
It is not recommended using hub or
extension cord.
This symbol points out that the
device has double insulation
between the dangerous mains
voltage and the parts accessible to
the user. In the case of servicing use
only identical spare parts.
DO NOT OPERATE THE APPLIANCE ON AN INCLINED SURFACE. DO NOT MOVE
THE APPLIANCE WHILE IT IS SWITCHED ON.
THE POWER PLUG WHEN PLUGGED MUST REMAIN ACCESSIBLE FOR EASY
REMOVING.
THE BLADES ARE VERY SHARP. PAY YOUR OWN ATTENTION WHEN HANDLING
WITH BLADES.
CATLER RECOMMENDS SAFETY FIRST
5
KNOW YOUR CONTROL GRIP SB 4010
Speed Control Dial
Turn the dial fluently anticlockwise to increase
the speed. Turn the dial fluently clockwise to
reduce the speed.
Main Switch
Located in ergonomic handle; press and
hold the switch to operate the appliance.
700W Motor Unit
With ergonomic handle
Attach/Detach Buttons
Detachable Blending Attachement with
doubled blade
Unique enlarged design of blade protective
part ensures equal and proper food
processing.
6
KNOW YOUR CONTROL GRIP SB 4010
Chopper Bowl Lid with Gear
easy attachment of motor unit
Chopper Bowl
750ml measuring bowl
Chopping Doubled Blade
Double Purpose Storage Lid and Anti-Slip
Mat
intelligent opening system. Lid can be used
as an anti-slip mat at the same time.
1,2l Blending Jug
measuring jug with a funnel for easy
pouring of mixture.
Gear Box
allows easy and comfortable attaching and
operating of a whisk.
Whisk
Unique whisk design ensures proper whip
of ingredients.
KNOW YOUR CONTROL GRIP SB 4010
7
OPERATING YOUR CONTROL GRIP SB 4010
BEFORE FIRST USE
Before first use, remove and safely discard all
promotional lables and packaging materials
attached to the device.
• chopper bowl with lid and chopping
blade – for use as a chopper;
• whisk with gear box – for use as a hand
whisk.
Wash the following accessories in warm
soapy water with:
• detachable blending attachement;
• chopper bowl lid with gear;
• chopper bowl;
• chopping blade;
• lid / anti-slip mat;
• blending jug;
• gear box; and
• whisk.
STICK MIXER
Assambling the stick mixer
1. Before attaching the blending
attachment, ensure the attachment is
clean and dry not to damage the motor
unit by running water left inside after
cleaning.
2. Hold the blending attachment with
the blade down, and align the top end
of the blending attachment with the
corresponding end of the motor body.
Push until you hear a click, signalizing
correct lock of blending attachment.
3. Ensure the stick mixer is correctly and
firmly attached; it does not move or show
any deviation from the midline.
Rinse and dry thoroughly. Ensure no water
remains inside any accessory and these are dry
thoroughly to avoid water running into the
motor body when attached.
It is important you wash all parts which come
in touch with food in warm soapy water.
NOTE
Other parts of the appliance wipy by a soft
cloth, gently soaked in lukewarm water and dry
thoroughly.
Detachable blending attachment, chopper
bowl, blending jug, whisk and lid / anti-slip mat
can be washed in the dishwasher.
NOTE
Motor unit is a versatile appliance that can be
attached to:
• detachable blending attachment – for use
as a stick mixer;
IN NO CASE WASH CHOPPER BOWL LID WITH GEAR, GEAR BOX AND MOTOR
UNIT IN WATER OR IN THE DISHWASHER. SEE THE CARE AND CLEANING
CHAPTER FOR CLEANING INSTRUCTIONS.
8
OPERATING YOUR CONTROL GRIP SB 4010
Using the stick mixer
Ensure the blending attachment is attached
correctly to motor unit as stated in the
previous part of the manual.
1. Place food to be processed into the
blending jug (or sufficient mixing bowl
or saucepan). The jug provided should be
only ½ full or less when blending liquids
or when making fruit / vegetable puree.
2. Insert the plug into a 230/240 V~ power
outlet to power on.
3. Rotating speed of blade can be operated
by speed control dial which is located at
the top of motor unit.
Low speed: 1
High speed: 15
Disassembling the stick mixer
1. Before disassembling the device ensure
the main swich has been released, the
rotary blade has stopped and the power
cord plug has been removed from the
power outlet.
2. Place the device on the flat surface and
hold the blending attachment with one
hand. Using thumb and finger of the
other hand, press on the eject buttons on
either sides of the motor body. Press both
buttons and pull the motor unit upwards.
Processing food, it is recommended that you
start with a low speed and gradually increase
to the higher speed to avoid splattering and
over-processing.
NOTE
4. Place the stick mixer as deeply as possible
into the jug and press the main switch.
The main switch must be held for the
required duration of operation. If you
release the main switch, the appliance will
stop.
5. Work through the ingredients in the jug
with a gentle raising and lowering motion.
6. If you need to stop the appliance, release
the main switch.
7. Ensure the motor has completely stopped
before lifting the stick mixer out of the
jug.
8. When processing has finished, switch
off at the power outlet and remove the
power plug.
BLENDING BLADE IS VERY SHARP. PAY YOUR OWN ATTENTION WHEN
HANDLING THE BLENDING ATTACHMENT.
OPERATING YOUR CONTROL GRIP SB 4010
9
Tips for using the stick mixer
• The stick mixer blends foods and liquids
rapidly and effectively, therefore it is
easy to over-process. Stop the stick mixer
regularly and check food throughout the
operation.
• Always allow food to cool down before
blending.
• The stainless steel blending attachment
allows to process food directly in the
saucepan. This makes blending soups and
sauses very easy to prepare.
• For safety reasons remove saucepan away
from the heat before processing.
• Ensure the power cord and the body are
kept away from any heat source.
• Cut food for processing into uniform sizes.
This will ensure smooth and consistent
results.
• Heat up the liquids you add to warm
blended soups or sauces. This will ensure
even blending.
• Place the blending jug on the anti-slap
mat during blending. This will keep the
jug stable and you can process food more
comfortably.
• Do not operate the appliance
continuously for more than 1 minute.
After 1 minute, turn off the appliance and
allow resting for 1 minute.
If food becomes lodged around the
processing blade, follow these instructions.
1. Release the main switch and wait until
the processing blade stops turning.
Disconnect the power plug from the
power outlet.
2. Use a spatula to carefully dislodge the
food. In no case use your fingers to clean
the blade. Attention! The blade is very
sharp.
3. After the food has been removed and
blade is clean, plug the power plug
into the power outlet and continue in
blending.
10
OPERATING YOUR CONTROL GRIP SB 4010
CHOPPER
Assembling the chopper
1. Before assembling the chopper ensure
that all parts (chopper bowl, chopping
blade and chopper bowl lid with gear) are
clean and dry not to damage the motor
unit by running water left inside after
cleaning, mainly from the chopper bowl
lid.
2. Place the chopping blade on the metal
pivot pin in the base of the chopper
bowl. You should hear a click sound when
placing the chopping blade. Ensure the
blade is properly and firmly placed.
3. Place the food you wish to chop inside
the chopping bowl. Do not exceed the
maximum MAX (750 ml) marking.
4. Place the lid onto the chopping bowl so
that the grooves on the chopping blade
fit into the openings on the bottom part
of the lid.
Always place the chopping blade on the pivot
pin on the buttom of the chopper bowl before
placing any food in the bowl. Do not lift the
blade before the complete chopping operation
is finished.
NOTE
5. Allign the upper part of the lid with the
correspondant openings on the motor
unit and push down until the motor unit
clicks into its place. Ensure the motor unit
is properly and firmlyy placed on the lid.
Using the chopper
Ensure the chopper is completely and
properly assembled as stated in the previous
part of the manual.
1. Insert the plug into a 230/240V~ power
outlet.
2. Select a speed between 1 – 15 to process
the food.
3. Press and hold the main switch to start
the chopping. The main switch must
be held for the required duration of
operation. If you release the main switch,
the appliance will stop.
4. Once the food is sufficiently chopped,
release the main swich, wait until the
blade stops and unplug the power cord
plug from the power outlet.
5. Detach the motor unit (see the next
chapter) and the lid. Carefully remove
the chopping blade and use a spatula
to scrape off any food residues from the
blade. Use a spatula to remove food from
the chopping bowl.
Disassembling the chopper
1. Before disassembling the device ensure
the main swich has been released, the
rotary blade has stopped and the power
cord plug has been removed from the
power outlet.
THE CHOPPING BLADE IS VERY SHARP. PAY YOUR OWN ATTENTION WHEN
HANDLING THE BLENDING ATTACHMENT.
OPERATING YOUR CONTROL GRIP SB 4010
11
2. Place the device on the flat surface and
hold the chopper bowl lid with one hand.
Using thumb and finger of the other hand,
press on the eject buttons on either sides
of the motor body. Press both buttons
and pull the motor unit upwards.
Tips for using the chopper
• Do not use the chopper when the
chopper bowl is empty.
• In order to avoid an accidental slip or spill,
place the chopper bowl on the anti-slip
mat. However, it is recommended during
processing to hold the motor body with
one hand and the chopper bowl and lid
with the other one.
• Cut the food you want to chop into
uniform sizes to ensure quicker and even
and more consistent results.
• Do not process hard food such as coffee
beans, cereal or chocolate in lumps as
these may damage the chopping blade.
• Do not process boiling or hot foods in the
chopper bowl.
• Never remove the chopping blade if it
is under the process. Always wait until it
stops.
• The chopper chops foods rapidly and
effectively, therefore it is easy to over
process. Remember to check food
throughout the operation.
12
OPERATING YOUR CONTROL GRIP SB 4010
HAND WHISK
Assembling the hand whisk
1. Before attaching the whisk ensure that the
gear box and the whisk are clean and dry
not to damage the motor unit by running
water left inside after cleaning.
2. At first you should attach the whisk to the
gear box. Thin end of the whisk insert into
the narrow end of the gear box so that
the projections on the whisk fit into the
grooves in the gear box. You should hear
a click, notifying the correct attaching.
Ensure the whisk is properly and firmly
attached and it does not move.
3. Hold the whisk attachment in one hand
and hold the motor unit in the other
one. Allign the upper part of the whisk
attachment with the corresponding end
of the motor unit. Push in until you hear a
click, notifying the correct assembling of
the whisk attachment.
4. Ensure the whisk is correctly and firmly
attached; it does not move or shows no
deviation from the midline.
Using the hand whisk
Ensure the hand whisk is completely and
properly assembled as stated in the previous
part of the manual.
1. Place the food you wish to process into
the blending jug, bowl or container.
2. Insert the plug into a 230/240V~ power
outlet.
3. Select a speed between 1 – 15.
4. Place the whisk as deep as possible into
the jug and press the main switch. The
main switch must be held for the required
duration of operation. If you release the
main switch, the appliance will stop.
5. Move the whisk through the ingredients
with a gentle raising and lowering action
until the desired texture is achieved.
6. After finish the whipping, release the
main switch and wait until the whisk stops
before lifting it from the jug. Otherwise,
the rotating whisk could splash the food
over. Then remove the power cord plug
from the power outlet.
Disassembling the hand whisk
1. Before disassembling the device ensure the
main swich has been released, the whisk has
stopped and the power cord plug has been
removed fro the power outlet.
2. Hold the whisk attachment with one hand.
Hold the motor unit with the other hand
and using thumb and finger of the other
hand, press on the eject buttons on either
sides of the motor body. Press both buttons
and pull the motor unit upwards.
Tips for the using the hand whisk
• Do not allow the whisk to hit the bottom
or sides of mixing bowl while the
appliance is in operation, as this may
damage the whisk.
• For perfect whipping use a sufficient
deep, wide container and move the whisk
through the ingredients with a gentle
raising and lowering action.
• Release the main switch and ensure the
whisk has completely stopped turning
before removing the whisk from the jug.
• Place the mixing bowl on a damp cloth
durign whisking. This will keep the mixing
bowl stable. However, it is recommended
to hold the bowl with free hand.
• To achieve greater whisking results,
always use fresh chilled cream or fresh
eggs at room temperature.
• Always ensure the whisk and the mixing
bowl are completely dry and clean and
free of fat before whisking egg whites.
• It is recommended to use the highest
speed when whisking egg whites and
cream.
OPERATING YOUR CONTROL GRIP SB 4010
13
FOOD PREPARATION GUIDE
14
Milkshakes, smoothies,
cocktails, fruit frappes
Stick mixer
Soups, dips, baby food
Stick mixer
Cheese (maximum weight
200 g, pre-cut into 2 cm
cubes)
Carrot (maximum weight
200 g, pre-cut into 2 cm
cubes)
Onion, herbs (maximum
weight 30 g)
Nuts (gring) (maximum
weight 150 g)
Read meat, chicken fillets,
fish fillets (maximum
weight 250 g, pre-cut into
2 cm cubes)
Ice
Cream (400 ml max), egg
whites (4 eggs max), light
batters
Chopper
Use chilled milk. Process until the desired
consistency is achieved for cocktails, fruit frappes
etc. Use mid to maximum speed for 30 seconds.
Process until smooth. Use mix to maximum speed
for 30 seconds.
Use maximum speed for 20 – 30 seconds.
Chopper
Use maximum speed for 20 – 30 seconds.
Chopper
Use medium speed for 20 seconds.
Chopper
Use maximum speed for 20 – 30 seconds.
Chopper
Use med to maximum speed for 20 – 30 seconds.
OPERATING YOUR CONTROL GRIP SB 4010
Chopper
Use maximum speed for 20 – 30 seconds.
Hand whisk Use mid to maximum speed. Do not whisk for
more than 1 minute, and then allow 1 minute rest
between each use.
CARE AND CLEANING
Before disassembling and cleaning, release
the main switch. Wait until it completely
stops and remove the power cord plug from
the power outlet.
Do not use any alkaline or abrasive cleaning
agents, steel wool or sponges with steel wool,
petrol, dissolving agents or any other similar
agents for cleaning the appliance as these
could damage the surface.
NOTE
Cleaning the motor unit
To remove any food residue wipe the motor
unit and cord with a damp cloth only.
Cleaning the blending attachment
After deattaching the blending attachment,
it can be hand washed in hot soapy water,
rinsed and dried thoroughly. Alternatively,
the blending attachment can also be washed
in the dishwasher.
Before re-attaching, ensure there is no water
residue left inside the attachment.
Quick wash: Between each processing task,
with the motor unit attached and turned
on at the power outlet, place the blending
attachment only into a jug of water and press
the main switch to turn on for 5 seconds.
This will remove any food on the blade and
leg and allow you to continue onto the next
processing task.
Cleaning the chopper bowl, chopper bowl
lid with gear, chopping blade and lid /
anti-slip mat
After disassembling the chopper, the chopper
bowl, chopper bowl lid with gear and chopping
blade should be hand washed in hot soapy
water, rinsed and dried thoroughly. Accessories
(chopper bowl, chopping blade and lid / antislip mat) can be also washed in the diswasher.
Do not wash the chopper bowl lid with gear in
the dishwasher.
Before re-assembling, ensure there is no water
residue left inside the attachment.
NEVER IMMERSE THE MOTOR UNIT IN WATER OR ANY OTHER LIQUID. DO NOT
PLACE MOTOR UNIT IN THE DISHWASHER.
BLADES ARE VERY SHARP. PAY YOUR OWN ATTENTION WHEN HANDLING
BLADES.
CARE AND CLEANING
15
Cleaning the whisk
After disassembling the whisk, the whisk and
gear box can be hand washed in hot soapy
water, rinsed and dried thoroughly. The
whisk can be also washed in the dishwasher.
Do not wash the gear box in the dishwasher.
Whisk Gear Box
Cleaning the blending jug
The blending jug can be hand washed in hot
soapy water, rinsed and dried thoroughly or
it can be also washed in the dishwasher.
Use a soft cloth for cleaning.
NOTE
16
CARE AND CLEANING
RECIPES
RECEPTY
1
CONTENTS
R2
CONTENTS
R3
Soups
R4
Dips and sauces
R5
Refreshing drinks
R6
Quick desserts
SOUPS
ZUCCHINI AND POTATO SOUP (SERVES 4 – 6)
2 tablespoons olive oil
2 leeks, thinly sliced
500 g potatoes, peeled, washed and chopped
8 zucchinis, chopped
8 cups chicken stock
Pepper to taste
1 cup cream
1.
2.
3.
4.
5.
6.
7.
Heat the oil in a large saucepan over medium heat, sauté leeks until they soften.
Add potatoes, zucchinis and chicken stock.
Bring to boil. Then reduce heat to simmer until potatoes and zucchinis soften.
Once the potatoes and zucchinis have softened, add cream and bring to boil. Let heat up.
Remove from heat and cool slightly.
Place the stick mixer in the saucepan and blend until soup is smooth.
Serve hot.
PUMPIN SOUP (SERVES 2 – 4)
2 tablespoons oil
1 onion, peeled and diced finely
2 cloves garlic, peeled and crushed
400 g pumpkin, peeled and diced
4 cups / 1 l chicken stock
1. Heat oil in the saucepan and add onion and garlic. Sauté for 5 minutes.
2. Add pumking and stir to coat with the onion and garlic mix. Then add the stock and bring
to boil.
3. Reduce heat and simmer for 20 minutes until pumpkin soften.
4. Allow the mix to cool slightly.
5. Place the stick mixer into the saucepan and blend until soup is smooth.
6. Serve hot.
SOUPS
R3
DIPS AND SAUCES
PESTO DIP (1 ½ CUPS)
1 cup fresh basil leaves
1 clove garlic, peeled and chopped
2 tablespoons lemon juice
¼ cup pine nuts
¼ cup olive oil
½ cup cottage cheese
¼ cup grated fresh Parmesan cheese
1. Place basil leaves, garlic, lemon juice and pine nuts into chopper bowl. Use speed 2 and
blend until finely chopped.
2. Turn off the chopper and open the lid. Pour 1/3 olive oil and process. Repeat with the rest
of oil.
3. Once processed and mixed properly, turn off chopper, remove the lid and carefully take out
the chopping blade. Using a spatula add cottage cheese.
4. Chill before serving. Serve with toasted white bread.
BASIC BÉCHAMEL SAUCE (1 ½ CUPS)
3 tablespoons butter
3 tablespoons plain flour
1 ¼ cups milk
Salt and pepper to taste
1.
2.
3.
4.
5.
6.
Melt butter in a small saucepan over medium heat.
Stir flour and cook for 1 minute until lumps form.
Remove from heat.
Gradually add milk and using the stick mixer blend until smooth.
Return to the heat and continue blending until sauce starts bubble gently and thickens.
Season with pepper and salt if desired.
Variation:
Cheese sauce
1 cup grated eidam cheese
1 teaspoon mustard
Herb mixture
3 shallots, thinly chopped
3 tablespoons parsley, chopped
1 tablespoon dill, finely chopped
R4
DIPS AND SAUCES
REFRESHING DRINKS
VANILLA MILKSHAKE
1 cup chilled milk
2 scoops vanilla ice cream
¼ teaspoon vanilla essence
1. Place milk, ice cream and vanilla essence into the jug.
2. Place the stick mixer into the ingredients and blend until smooth and frothy (about 30
seconds).
3. Serve chilled.
Variations:
Chocolate
Add 1 tablespoon chocolate syrup or ½ tablespoon cocoa or ½ tablespoon malt.
STRAWBERRY
Add 5 fresh strawberries and 1 tablespoon strawberry syrup.
STRAWBERRY SMOOTHIE
5 fresh strawberries, washed and hulled
50 g natural yoghurt
1 scoop vanilla ice cream
1 cup chilled milk
1 tablespoon honey
1. Place strawberries, yoghurt, ice cream, milk and honey into the jug.
2. Place the stick mixer into the ingredients and blend until thick and smooth (about 30 seconds).
Tip:
Strawberries can be substituted with seasonal fruit of your choice: mangoes, blueberries,
raspberries or bananas.
GET UP AND GO BREAKFAST SHAKE
½ cup chilled milk
½ cup chilled fruit juice
1 egg
1 tablespoon honey
1. Place milk, juice, egg and honey into the jug.
2. Place the stick mixer into the ingredients and blend until smooth and creamy (about 30 seconds).
REFRESHING DRINKS
R5
QUICK DESSERTS
ONE BOWL CAKE
1 ½ cup plain flour
1 cup castor suger
125 g butter, melted
2 eggs, lightly beaten
1 teaspoon vanilla
½ cup milk
1.
2.
3.
4.
5.
Place flour, suger, butter and egg into medium mixing bowl.
Place the stick mixer into the ingredients and whisk until just combined (about 30 seconds).
Add vanilla and milk and whisk into flour mixture until just combined (about 30 seconds).
Grease 20cm round cake pan and pour cake mixture inside.
Bake in preheated moderate 185°C oven for 30 – 35 minut until cooked and golden brown.
Variations:
Chocolate cake
Substitute ¼ cup plain flour with ¼ cup cocoa.
Banana cake
Add ¼ cup mashed bananas and ¼ teaspoon bicarbonate of soda.
CHOCOLATE MOUSSE
800 ml thickened cream
3 eggs
2 x 2 bars dark chocolate, melted
1. Pour cream into medium mixing bowl.
2. Place whisk into cream and whisk until cream has doubled in size and soft peaks formed.
3. Gently add eggs, one by one, and whisk until smooth and creamy. Then slowly whisk in the
cooled chocolate until combined.
4. Pour mixture into individual serving dishes (cups) and refrigerate for several hours or
overnight before serving.
5. Serve chilled with seasonal fruit.
R6
QUICK DESSERTS
INSTRUCTIONS AND INFORMATION REGARDING THE DISPOSAL OF USED PACKAGING
MATERIALS
Dispose of packaging material at a public waste disposal site.
DISPOSAL OF USED ELECTRICAL AND ELECTRONIC APPLIANCES
The meaning of the symbol on the product, its accessory or packaging indicates
that this product shall not be treated as household waste. Please, dispose of
this product at your applicable collection point for the recycling of electrical &
electronic equipment waste. Alternatively in some states of the European Union
or other European states you may return your products to your local retailer when
buying an equivalent new product. The correct disposal of this product will help
save valuable natural resources and help in preventing the potential negative
impact on the environment and human health, which could be caused as a result
of improper liquidation of waste. Please ask your local authorities or the nearest
waste collection centre for further details. The improper disposal of this type of
waste may fall subject to national regulations for fines.
For business entities in the European Union
If you wish to dispose of an electrical or electronic device, request the necessary
information from your seller or supplier.
Disposal in other countries outside the European Union
If you wish to dispose of this product, request the necessary information about the
correct disposal method from local government departments or from your seller.
This product meets all the basic EU regulation requirements that relate to it.
Changes to the text, design and technical specifications may occur without prior notice and
we reserve the right to make these changes.
NOTES
Due to continued product improvement, the products illustrated/photographed in this brochure may vary slightly from the
actual product.
W W W . C A T L E R . E U
CUSTOMER SERVICE
10
I N F O @ C A T L E R . E U
POZNÁMKY