1
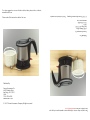
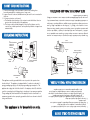
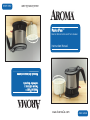
www.AromaCo.com
AWK-160SB
Pasta Plus™
Tetera eléctrica y
cocinador de pasta
Manual de instrucciones
Instruction Manual
Electric Water Kettle and Pasta Cooker
Pasta Plus™
www.AromaCo.com
AWK-160SB
For recipe suggestions or more kitchen solution ideas, please visit us online at
www.AromaCo.com
© 2007 Aroma Housewares Company.
Todos los derechos reservados.
Please read all the instructions before first use.
Aroma Housewares Co.
6469 Flanders Drive
San Diego, CA 92121
U.S.A.
1-800-276-6286
www.aromaco.com
Publicada Por:
Published By:
Aroma Housewares Co.
6469 Flanders Drive
San Diego, CA 92121
U.S.A.
1-800-276-6286
www.aromaco.com
© 2007 Aroma Housewares Company All rights reserved.
Para consejos sobre recetas o ideas para nuevos aparatos para su hogar, por
favor visítanos en línea a www.AromaCo.com.
1
SAVE THESE INSTRUCTIONS
Read all instructions before using.
Before connecting the appliance to
the power supply, check that the
voltage indicated on the appliance
(underside the appliance & base)
corresponds with the voltage in your
home. If this is not the case, contact
your dealer and do not use the
cooker.
3. If the supply cord is damaged, it
must be replaced by the
manufacturer or its service agent or
a similarly qualified person in order
to avoid a hazard.
4. Do not let the cord hang over the
edge of a table or counter or to
touch a hot surface.
5. Do not place on or near a hot gas or
electric burner or in a heated oven.
6. Do not operate without water;
otherwise the heating element may
be damaged.
7. Ensure that the appliance is used on
a firm and flat surface and out of
reach of children in order to prevent
overturning the cooker and causing
personal injury or damage to the
cooker.
8. To protect against fire, electric
shock or personal injury, do not
immerse cord, electric plugs or
cooker in water or other liquids.
9. Avoid contact with steam from the
spout while the water is boiling or
shortly after it has switched off.
Open the lid carefully.
10. Always take care to pour boiling
water slowly and carefully without
tipping the cooker to fast.
11. Close supervision is necessary when
any appliance is used by or near
children.
12. Do not touch hot surfaces. Use
handles or knobs.
13. Extreme caution must be taken
when moving an appliance containing
hot water, oil or other hot liquids.
14. Unplug from outlet when not in use
and before cleaning. Allow to cool
down before putting on or taking off
parts and before cleaning the
appliance.
15. Always ensure the lid is closed and
do not lift the lid while the water is
boiling. Scalding may occur if the lid
is removed during boiling cycles.
16. Do not use this appliance for other
than its intended use.
17. The use of accessory attachments
not recommended by the
manufacturer may result in fire,
electric shock, or injury to persons.
18. Do not operate any appliance with a
damaged cord or after the appliance
malfunctions or has been damaged in
any manner. Return appliance to the
nearest authorized service facility for
examination, repair, or adjustment.
19. Do not use outdoors.
20. To disconnect, turn any control to
“off” and then remove plug from wall
outlet.
21. Do not boil harsh chemical liquids in
this appliance.
1.
2.
Basic safety precautions should always be followed when using electrical
appliances, including the following:
MEDIDAS IMPORTANTES DE SEGURIDAD
Cuando se usen aparatos electricos, siempre deberán observarse las
precauciones básicas de seguridad, incluyendo las siguientes:
1. Lea todas las instrucciones antes de
usar.
2. Antes de conectar el aparato al
suministro eléctrico, verifique que el
voltaje indicado en el aparato (en la
parte inferior y la base) se
corresponda con el voltaje de su
casa. De no ser así, comuníquese
con su distribuidor y no use la olla
eléctrica.
3. Si el cable de alimentación está
dañado, el cambio debe ser
realizado por el fabricante o su
agente de servicio técnico o
persona igualmente calificada, a fin
de evitar peligros.
4. No deje que el cable cuelgue del
borde de una mesa o encimera ni
que toque una superficie caliente.
5. No lo coloque sobre una hornilla
caliente, eléctrica o a gas, o cerca
de una; tampoco lo coloque en un
horno caliente.
6. No lo utilice sin agua; de lo
contrario, el elemento calentador
podría averiarse.
7. Asegúrese de utilizar el aparato
sobre una superficie firme y plana, y
de mantenerlo fuera del alcance de
los niños para evitar que se voltee y
se dañe o cause lesiones a las
personas.
8. Para prevenir incendios, descargas
eléctricas o lesiones a las personas,
no sumerja el cable, los enchufes
eléctricos o la olla en agua u otros
líquidos.
9. Evite el contacto con el vapor
proveniente del pico vertedor
mientras el agua esté hirviendo o
poco después de apagada la olla.
Abra la tapa con cuidado.
10.Siempre tómese la precaución de
verter el agua hirviendo lentamente
y con cuidado, sin inclinar la olla
eléctrica demasiado rápido.
11.Cuando el aparato sea usado por
niños o cerca de ellos, es necesario
supervisarlos cuidadosamente.
12.No toque las superficies calientes.
Use las asas y perillas.
13.Se debe tener sumo cuidado al
trasladar un aparato con agua,
aceite u otros líquidos calientes.
14.Desenchúfelo del tomacorriente
cuando no esté en uso y antes de
limpiarlo. Deje enfriar el aparato
antes de colocar o quitar piezas y
antes de limpiarlo.
15.Mientras el agua esté hirviendo,
asegúrese siempre de que la tapa
esté cerrada y no la levante.
Pueden producirse escaldaduras si
se retira la tapa durante los ciclos
de hervor.
16.Sólo debe utilizar este aparato para
su uso previsto.
17.El uso de accesorios no
recomendados por el fabricante
puede derivar en incendios,
descargas eléctricas o lesiones a las
personas.
18.No utilice el aparato si tuvo algún
desperfecto, si ha sido dañado de
alguna forma o si el cable está
dañado. Devuelva el aparato al
agente de servicio técnico
autorizado más cercano para que lo
examinen, reparen o ajusten.
19.No lo utilice al aire libre.
20.Para desconectarlo, apague todos
los controles y desenchúfelo del
tomacorriente.
21.No utilice este delectrodoméstico
para hervir líquidos químicos.
GUARDE ESTAS INSTRUCCIONES
IMPORTANT SAFEGUARDS
1
INSTRUCCIONES DE CABLE CORTO
1. Se proporciona un cable eléctrico corto con el propósito de reducir el
riesgo de tropezarse o enredarse con un cable más largo.
2. Hay cables de extensión más largos disponibles y deben ser usados con
sumo cuidado.
3. Si se usa un cable de extensión más largo:
a. La clasificación eléctrica marcada en el cable de extensión debe ser
por lo menos igual que la clasificación eléctrica del aparato.
b. El cable más largo debe ser colocado de manera que no cuelgue por
el borde del mostrador o mesa en donde pudiera ser jalado por un
niño o alguien pudiera tropezarse con el cable sin querer.
INSTRUCCIONES PARA PONER A TIERRA
(A)
CONDUCTOR DE
CIRCUITO CONECTADO
CORRECTAMENTE A TIERA
(B)
TORMILLO METALICO
PARA LA CONEXION
(C)
ADAPTOR
(B)
ESPIGAS DE CONTACTO
DE PUESTO A TIERRA
2
This appliance is for household use only.
This appliance must be grounded while in use to protect the operator from
electrical shock. The appliance is equipped with a 3-conductor cord and a 3prong grounding-type plug to fit the proper grounding-type receptacle. The
appliance has a plug that looks like sketch A. An adapter, sketch B, should be
used for connecting sketch-A plug plugs to two-plugs to two-prong receptacles.
The grounding tab, which extends from the adapter, must be connected to a
permanent ground such as a properly grounded outlet box as shown in sketch C
using a metal screw.
GROUNDING MEANS
AA22D
(C)
ADAPTER
COVER OF GROUNDED
OUTLET BOX
GROUND
PRONG
METAL
MOUNTING
SCREW
(A)
CIRCUIT GROUNDING
CONDUCTOR
CONNECTED
PROPERLY
CONTACTO DE PUESTO A TIERRA
AA22D
Este aparato electrodoméstico debe estar puesto a tierra mientras se usa para
proteger al usuario contra un choque eléctrico. El aparato viene equipado con un
cable de 3 conductores y una clavija de puesto a tierra de 3 espigas de contacto
para entrar al receptáculo correcto de puesto a tierra. El aparato tiene una clavija
como se muestra en el dibujo A. Se debe usar un adaptador, dibujo B, para
conectar la clavija al receptáculo de dos espigas. La espiga de puesto a tierra, que
se extiende del adaptador, debe conectarse a un puesto a tierra permanente tal y
como una caja de salida debidamente puesta a tierra como se muestra en el dibujo
C usando un tornillo metálico.
ESTE APARATO ES PARA USO DOMÉSTICO.
GROUNDING INSTRUCTIONS
1. A short power-supply cord is provided to reduce risk resulting from
becoming entangled in or tripping over a longer cord.
2. Longer extension cords are available and may be used if care is exercised in
their use.
3. If a longer extension cord is used:
a. The marked electrical rating of the extension cord should be at least as
great as the electrical rating of the appliance.
b. The longer cord should be arranged so that it will not drape over the
counter top or tabletop where it can be pulled by children or tripped over
unintentionally.
SHORT CORD INSTRUCTIONS
2
3
1. Pasta Fork
2. Lid
3. Lid Release Button
4. Pasta Fork Holder
5. Stainless Steel Housing
6. ON Indicator Light
7. Cool-Touch Handle
8. Power Switch
9. Power Base
10.Temperature Knob
IDENTIFICACION DE LAS PARTES
2
1
3
6
7
4
5
10
9
8
8
9
10
5
1.
2.
3.
4.
5.
6.
7.
8.
9.
10.
4
7
6
3
2
1
Tenedor para pasta
Tapa
Botón de liberación de la tapa
Portatenedor para pasta
Cubierta de acero inoxidable
Luz indicadora de encendido
Asa termoaislante
Interruptor de encendido
Base eléctrica
Perilla selectora de temperatura
PARTS IDENTIFICATION
3
COMO USAR EL APARATO
4
Notas sobre el funcionamiento:
Ajustes 1 a 4
Estos ajustes se usan para calor continuo, como para calentar sopas o cocinar
pastas. No utilice la tapa al realizar este tipo de cocción. NOTA: la olla eléctrica
permanecerá encendida hasta que el selector de temperatura esté en 0 y se
apague el interruptor de encendido. Además, la luz indicadora puede encenderse y
apagarse cuando realice estos ajustes. Es normal que esto suceda, ya que el
elemento calentador se regula para mantener la temperatura seleccionada. Tenga
en cuenta que, durante su uso, la olla siempre tiene corriente, por lo que debe
supervisarla cuidadosamente.
Ajuste de sólo agua (5)
Only use the lid when using setting 5 – Water Only. Do not use the lid when
warming soups or boiling pasta.
Lid
Should the cooker accidentally be switched on without water or soup inside,
the boil-dry protection will automatically switch the power to OFF. If this
should occur, allow the cooker to cool before using again.
Si la olla eléctrica se enciende accidentalmente sin agua o sopa en su interior, el
sensor de encendido en vacío apagará el aparato en forma automática. Si esto
llega a ocurrir, deje enfriar la olla eléctrica antes de volver a utilizarla.
The cooker must contain water or soup at a level between these two lines in
order to function properly. If the water level is beneath the MIN line, the
cooker will shut off. If the water is above the MAX line, it may boil over and
cause injuries.
Este ajuste se usa solamente para hervir agua. Utilice siempre la tapa al hervir
agua. Cuando el agua llegue a un punto de ebullición completa, la olla se apagará
automáticamente.
Sensor de encendido en vacío
Líneas de nivel mínimo o máximo
Para que funcione correctamente, la olla eléctrica debe contener un nivel de agua
o sopa que esté dentro de estas dos líneas. Si el nivel de agua se encuentra por
debajo de la línea "MÍN", la olla eléctrica se apagará. Si el agua se encuentra por
encima de la línea "MÁX", es posible que salpique agua durante la ebullición y
cause lesiones.
Tapa
Use la tapa sólo al seleccionar el ajuste 5 de sólo agua. No use la tapa para
calentar sopas o cocinar pastas.
Minimum/Maximum Lines
Boil-Dry Protection
This setting is for boiling water only. Always use the lid when boiling water.
When the water has come to a rolling boil, the power will automatically switch
off.
Water Only Setting (5)
These settings are used for continuous heat, such as warming soups or boiling
pasta. Do not use the lid when doing this type of cooking. NOTE: The cooker
will remain ON until the temperature dial is turned to 0 and the power switch is
lifted up. Also, the indicator light may come on and off when using these
settings. This is normal as the heating element adjusts to maintain the
selected temperature. Please note that the power is always on during use and
that close supervision is necessary.
Settings 1-4
Notes On Operating your Pasta Plus™
4
USING YOUR PASTA PLUS™
5
COMO USAR EL APARATO
Antes del primer uso:
1.
10.Unplug the power cord from the wall outlet when not in use.
NOTE: Do not open the lid right after the water has come to a boil. Instead,
pour through the spout opening. Opening the lid before the water has
cooled poses a risk of scalding and steam burns.
1. Remove the pot from the power base.
2. Remove the lid by pressing in on the two lid release buttons and lifting up.
3. Fill the pot with water. Do not fill below the MIN line or above the MAX line in
order to avoid damage to the cooker and personal injury.
4. Replace the lid onto the pot by pressing in on the lid release buttons and
setting it into place. Ensure that the lid is firmly locked into place.
5. Place the pot onto the power base. Turn the temperature knob to the 5 WATER ONLY position.
6. Connect the plug into a functioning wall outlet.
7. Press down on the power switch. The indicator light will illuminate.
8. When the water has come to a boil, the power switch will pop up and the
indicator light will turn off.
9. Carefully lift the pot from the power base by the cool-touch handle. Stainless
steel exterior will be hot.
Boiling Water:
1. Wipe out the interior with a damp, soapy cloth. Rinse and dry thoroughly,
taking care not to let water come into contact with the electrical components
on the bottom of the cooker.
2. Wash lid and pasta fork in warm soapy water. Rinse and dry thoroughly.
3. Wipe stainless steel exterior and power base with a damp cloth, taking care
not to touch the electrical components. Dry thoroughly.
4. It is recommended that you allow a full pot of water to come to a boil inside
the cooker twice and rinse thoroughly before placing food in the cooker.
Refer to the section titled “How to Use” for boiling instructions.
2.
3.
4.
Limpie el interior con un paño humedecido con agua y jabón. Enjuáguela y
séquela completamente, procurando que el agua no entre en contacto con los
componentes eléctricos que se encuentran en la base de la olla eléctrica.
Lave la tapa y el tenedor para pasta con agua jabonosa tibia. Enjuáguela y
séquela completamente.
Pase un paño húmedo por el exterior de acero inoxidable y la base eléctrica,
procurando no tocar los componentes eléctricos. Séquelos completamente.
Se recomienda llevar a punto de ebullición una olla completa de agua dos
veces y enjuagar bien la olla eléctrica antes de colocar alimentos en ella.
Consulte las instrucciones de cocción en la sección “Cómo usar”.
Para hervir agua:
1. Retire la olla de la base eléctrica.
2. Para retirar la tapa, presione los dos botones de liberación y levántela.
3. Llene la olla con agua. No la llene por debajo de la línea MÍN o por encima de
la línea MÁX, para evitar averías en la olla eléctrica o lesiones a las personas.
4. Vuelva a poner la tapa en la olla presionando los botones de liberación y
ajustándola en su lugar. Asegúrese de que la tapa quede bien colocada y
asegurada.
5. Coloque la olla sobre la base eléctrica. Lleve la perilla de temperatura a la
posición 5: SÓLO AGUA.
6. Conecte el enchufe en un tomacorriente de pared.
7. Oprima el interruptor de encendido. Se encenderá la luz indicadora.
8. Cuando el agua llegue a punto de ebullición, el interruptor de encendido
saltará y la luz indicadora se apagará.
9. Con cuidado, retire la olla de la base eléctrica, levantándola del asa
termoaislante. El exterior de acero inoxidable estará caliente.
NOTA: No abra la tapa inmediatamente después de que el agua haya llegado al
punto de ebullición. En cambio, vierta a través del orificio vertedor. Si
abre la tapa antes de que el agua se haya enfriado, existe el riesgo de
que se produzcan escaldaduras o quemaduras por vapor.
10. Cuando la olla eléctrica no esté en uso, desenchufe el cable de alimentación
del tomacorriente.
Before First Use:
USING YOUR PASTA PLUS™
5
COMO USAR EL APARATO
Para hervir fideos:
1. Agregue agua en la olla, procurando llenarla entre la línea MÍN y la línea MÁX.
2. Con cuidado, coloque la olla sobre la base eléctrica. No coloque la tapa sobre
la olla.
3. Conecte el enchufe en un tomacorriente de pared.
4. Lleve el selector de temperatura al ajuste Pasta.
5. Deje que el agua llegue a punto de ebullición. Mientras tanto, coloque la
pasta en el colador. No llene el colador más de la mitad, ya que la pasta
aumentará de tamaño durante la cocción.
NOTA: En el caso de los fideos más largos, como espaguetis, recomendamos que
los parta por la mitad antes de colocarlos en el colador. Cuando ya estén
en el agua hirviendo y comiencen a ablandarse, puede revolverlos hasta
que estén completamente sumergidos en el agua.
6. Cuando el agua comience a hervir, coloque cuidadosamente el colador en la
olla, sosteniéndola por el asa.
7. Hierva los fideos durante el tiempo necesario (consulte las instrucciones de
cocción en el envase de los fideos). Revuelva de vez en cuando con el
tenedor para pasta.
8. Al finalizar la cocción de los fideos, lleve el selector de temperatura a 0 y
apague el interruptor de encendido.
9. Con cuidado, levante el colador de la olla. PRECAUCIÓN: el colador y el asa del
colador estarán calientes. Es conveniente utilizar el tenedor para pasta o una
manopla para horno para levantar el colador. También se recomienda esperar
unos minutos para que el colador se enfríe, pero igualmente debe proceder
con cuidado para evitar quemaduras.
10. Vierta los fideos en un bol o recipiente apto para calor.
11. Tire el agua de la olla en el fregadero.
12. Cuando la olla eléctrica no esté en uso, desenchufe el cable de alimentación
del tomacorriente.
Fideaos instantáneos:
1.
2.
3.
4.
5.
Agregue agua en la olla conforme a las instrucciones del envase; tenga
cuidado de no llenarla por debajo de la línea MÍN o por encima de la línea
MÁX.
Con cuidado, coloque la olla sobre la base eléctrica. No coloque la tapa sobre
la olla.
Conecte el enchufe en un tomacorriente de pared.
Lleve el selector de temperatura al ajuste Pasta.
Deje que el agua llegue a punto de ebullición.
6
6
1. Add water to the pot according to package instructions, taking care not to fill
under the MIN line or exceed the MAX line.
2. Carefully place the pot onto the power base. Do not place the lid onto the
pot.
3. Plug the power cord into a functioning wall outlet.
4. Turn the temperature dial to the Pasta setting.
5. Allow the water to come to a boil.
6. When the water has begun to boil, carefully place the noodles (you may
choose to use the colander if you like) into the pot.
Instant Noodles:
6. When the water has begun to boil, carefully place the colander into the pot,
holding it by the handle.
7. Allow the noodles to boil for the required amount of time (refer to the
instructions on the pasta packaging). Stir occasionally with the pasta fork.
8. When the noodles have finished, turn the temperature dial to 0 and pull up
the power switch.
9. Carefully lift the colander from the pot. WARNING: Colander and colander
handle will be hot. It is best to use the pasta fork or an oven mitt when
lifting the colander. You may also wait a few minutes for the colander to
cool, but care should still be taken to avoid burns.
10. Empty the noodles into a heat-safe bowl or container.
11. Empty the used water from the pot into a sink.
12. Unplug the power cord from the wall outlet when not in use.
NOTE: For longer noodles, such as spaghetti, we recommend that you break the
noodles in half and place them in the colander. Once they are placed in
the boiling water and begin to soften, they can be stirred until they are
fully submerged in water.
1. Add water to the pot, taking care not to fill under the MIN line or exceed the
MAX line.
2. Carefully place the pot onto the power base. Do not place the lid onto the
pot.
3. Plug the power cord into a functioning wall outlet.
4. Turn the temperature dial to the Pasta setting.
5. Allow the water to come to a boil. Meanwhile, place pasta in the colander.
Do not fill colander more than halfway full, as pasta will expand during
cooking.
Boiling Noodles:
USING YOUR PASTA PLUS™
7
COMO USAR EL APARATO
Fideos instantáneos:
9.
8.
6.
7.
5.
3.
4.
2.
1.
Add soup or stew to the pot, taking care not to fill under the MIN line or
exceed the MAX line.
Carefully place the pot onto the power base. Do not place the lid onto the
pot.
Plug the power cord into a functioning wall outlet.
Turn the temperature dial between settings 2 and 4, depending on the type
and thickness of your soup. Stir often and check for over-bubbling or
burning. If either of these occurs, the temperature setting is too high.
Allow the contents of the pot to warm to the desired temperature, stirring
occasionally.
If bubbling or sputtering occurs, turn the temperature dial to a lower setting.
When food has finished warming, turn the temperature dial to zero and pull
up the power switch.
Lift the pot from the power base by the cool touch handle and carefully
pour the contents into a heat-safe container.
Unplug the power cord from the wall outlet when not in use.
Warming Soups/Stews:
7. Allow the noodles to boil for the required amount of time (refer to the
instructions on the pasta packaging). Stir occasionally with the pasta fork.
8. When the noodles have finished, turn the temperature dial to 0 and pull up
the power switch.
9. If not using the colander, carefully pour noodles and water into a heat-safe
bowl or container.
10.If using the colander, carefully lift the colander from the pot and empty the
noodles into a heat-safe bowl or container. WARNING: Colander and colander
handle will be hot. It is best to use the pasta fork or an oven mitt when
lifting the colander. You may also wait a few minutes for the colander to
cool, but care should still be taken to avoid burns.
11.Unplug the power cord from the wall outlet when not in use.
Instant Noodles (continued):
6. Cuando el agua comience a hervir, introduzca con cuidado los fideos (puede
utilizar el colador, si prefiere) en la olla.
7. Hierva los fideos durante el tiempo necesario (consulte las instrucciones de
cocción en el envase de los fideos). Revuelva de vez en cuando con el
tenedor para pasta.
8. Al finalizar la cocción de los fideos, lleve el selector de temperatura a 0 y
apague el interruptor de encendido.
9. Si no utiliza el colador, vierta cuidadosamente los fideos y el agua en un bol
o recipiente apto para calor.
10. Si utiliza el colador, levántelo cuidadosamente de la olla y vierta los fideos en
un bol o recipiente apto para calor. PRECAUCIÓN: el colador y el asa del
colador estarán calientes. Es conveniente utilizar el tenedor para pasta o una
manopla para horno para levantar el colador. También se recomienda esperar
unos minutos para que el colador se enfríe, pero igualmente debe proceder
con cuidado para evitar quemaduras.
11. Cuando la olla eléctrica no esté en uso, desenchufe el cable de alimentación
del tomacorriente.
Para calentar sopas y caldos:
1.
2.
3.
4.
5.
6.
7.
8.
9.
Coloque la sopa o el guisado en la olla, procurando llenarla entre la línea MÍN
y la línea MÁX.
Con cuidado, coloque la olla sobre la base eléctrica. No coloque la tapa sobre
la olla.
Conecte el enchufe en un tomacorriente de pared.
Gire el selector de temperatura entre los ajuste 2 y 4, según el tipo y la
consistencia de la sopa. Revuelva con frecuencia y controle que no borbotee
ni se queme. Si se presenta alguna de estas situaciones, quiere decir que la
temperatura está demasiado alta.
Deje calentar el contenido de la olla hasta que alcance la temperatura
deseada, revolviendo de vez en cuando.
Si se produce borboteo o salpicaduras, reduzca el ajuste del selector de
temperatura.
Una vez calentada la comida, lleve el selector de temperatura a cero y
apague el interruptor de encendido.
Retire la olla de la base eléctrica levantándola del asa termoaislante y vierta
cuidadosamente el contenido en un recipiente apto para calor.
Cuando la olla eléctrica no esté en uso, desenchufe el cable de alimentación
del tomacorriente.
USING YOUR PASTA PLUS™
7
COMO USAR EL APARATO
8
Para calentar/Recalentar:
1.
2.
3.
4.
5.
6.
Para recalentar sopas, guisos o fideos, vuelva a colocarlos en la olla. Si
recalienta pasta, añada agua suficiente para cubrir los fideos.
Coloque la olla en la base eléctrica y enchufe el cable de alimentación
eléctrica en un tomacorriente de pared.
Lleve el selector de temperatura a 1.
Deje calentar el contenido de la olla por un rato. Si desea más calor, suba la
perilla de temperatura hasta alcanzar la temperatura deseada. Para calentar
sopas o pasta, nunca lleve la perilla de temperatura al ajuste 5.
La olla eléctrica permanecerá encendida hasta que la perilla selectora de
temperatura se lleve a 0 y se apague el interruptor de encendido. Se debe
supervisar cuidadosamente la olla eléctrica mientras está en funcionamiento.
Cuando la olla eléctrica no esté en uso, desenchufe el cable de alimentación
del tomacorriente.
Fideos instantáneos con mantequilla o leche:
1.
Siga las instrucciones del envase y procure ajustar la temperatura según sea
necesario y controlar que la comida no se queme ni que haya borboteo.
Cocine con la olla destapada. No use la tapa.
Cuando la olla eléctrica no esté en uso, desenchufe el cable de alimentación
del tomacorriente.
Follow package instructions, taking care to monitor for burning or overbubbling and adjusting temperature settings as necessary.
Cook with pot uncovered. Do not use the lid.
Unplug the power cord from the wall outlet when not in use.
2.
3.
2.
3.
1.
Instant Pasta with Butter or Milk:
6.
5.
3.
4.
2.
1.
To reheat soups, stews or noodles, place them back into the pot. If you are
reheating pasta, add enough water to cover the noodles.
Place the pot onto the power base and plug the power cord into a
functioning wall outlet.
Turn the temperature dial to 1.
Allow the contents of the pot a few moments to heat up. If more heat is
desired, turn up the temperature knob until the desired temperature is
reached. Never turn the temperature knob to setting 5 when heating soups
or pasta.
The cooker will remain on until the temperature knob is turned to 0 and the
power switch is pulled up. Close supervision is necessary during operation.
Unplug the power cord from the wall outlet when not in use.
Re-Heating/Warming:
8
USING YOUR PASTA PLUS™
9
COMO LIMPIAR
Desconecte siempre la unidad y deje que se
enfríe completamente antes de limpiarla.
1.
2.
3.
4.
5.
6.
7.
• Do not use harsh abrasive cleaners or products.
• This appliance is NOT dishwasher safe. Cooking pot, colander, and
accessories are to be hand-washed only.
• Do not let electrical components come into contact with water.
• Do not submerge power base, cord or plug in water or any other liquids.
Vacíe el contenido de la olla por completo.
Limpie el interior de la olla de acero inoxidable con agua jabonosa tibia y un
paño suave. Tenga cuidado de que el agua no entre en contacto con los
componentes eléctricos en la parte inferior de la olla.
Enjuáguela y séquela completamente.
Lave la tapa y el tenedor de pasta en agua jabonosa tibia. Enjuáguela y
séquela completamente.
Con un paño húmedo y suave, limpie la base eléctrica y el exterior de la olla.
Tómese la precaución de no dejar que los componentes eléctricos entren en
contacto con el agua o la toalla húmeda.
La tapa puede guardarse en la olla. La olla puede guardarse sobre la base
eléctrica. El tenedor para pasta puede guardarse en el portatenedor que se
encuentra en la parte superior de la tapa.
Deje siempre desenchufada la Pasta Plus™ cuando no la utilice.
• No use limpiadores abrasivos o fibras.
• Este electrodoméstico NO es seguro para lavaplatos.
• No sumerje el base, el cordón, o la ploya en agua u otros líquidos.
7.
6.
3.
4.
5.
1.
2.
Empty contents from the pot completely.
Wash out the interior of the stainless steel pot with warm, soapy water and
a soft cloth. Take care not to let water come into contact with the
electrical components on the underside of the pot.
Rinse and dry thoroughly.
Wash lid and pasta fork in warm, soapy water. Rinse and dry thoroughly.
With a damp, soft cloth, wipe the power base and the exterior of the pot
clean. Take care not to let water or wet towel come into contact with
electrical components.
The lid may be stored on the pot. The pot may be stored on the power
base. The pasta fork may be stored in its holder on top of the lid.
Always leave the Pasta Plus™ unplugged when not in use.
Always unplug unit and allow to cool
completely before cleaning.
HOW TO CLEAN
9
GARANTÍA LIMITADA
10
Aroma Housewares Company garantiza que este producto no
tenga defectos en sus materiales y fabricación durante un
período de un año a partir de la fecha comprobada de compra
dentro de la parte continental de los Estados Unidos.
Dentro de este período de garantía, Aroma Housewares Company
reparará o reemplazará, a su opción, las partes defectuosas sin
ningún costo, siempre y cuando el producto sea devuelto, con el
flete prepagado, con comprobación de compra y $10.00 dólares
para cargos de envío y manejo a favor de Aroma Housewares
Company. Antes de devolver un producto, sírvase llamar al
número telefónico gratuito que está más abajo para obtener un
número de autorización de devolución. Espere entre 2-4 semanas
para recibir el aparato nuevamente.
Esta garantía no cubre la instalación incorrecta, el uso indebido,
maltrato o negligencia por parte del usuario. La garantía también
es inválida en caso de que el aparato sea desarmado o se le dé
mantenimiento en un centro de servicio no autorizado.
Esta garantía le da derechos legales específicos los cuales podrán
variar de un estado a otro y no cubre áreas fuera de los Estados
Unidos.
AROMA HOUSEWARES COMPANY
6469 Flanders Drive
San Diego, California 92121
1-800-276-6286
L-V, 8:30 AM - 5:00 PM, Tiempo del Pacífico
Sitio Web: www.aromaco.com
AROMA HOUSEWARES COMPANY
6469 Flanders Drive
San Diego, California 92121
1-800-276-6286
M-F, 8:30 AM - 5:00 PM, Pacific Time
Website: www.aromaco.com
This warranty gives you specific legal rights and which may vary from
state to state and does not cover areas outside the United States.
This warranty does not cover improper installation, misuse, abuse or
neglect on the part of the owner. Warranty is also invalid in any case
that the product is taken apart or serviced by an unauthorized service
station.
Within this warranty period, Aroma Housewares Company will repair or
replace, at its option, defective parts at no charge, provided the product
is returned, freight prepaid with proof of purchase and U.S. $10.00 for
shipping and handling charges payable to Aroma Housewares Company.
Before returning an item, please call the toll free number below for a
return authorization number. Allow 2-4 weeks for return shipping.
Aroma Housewares Company warrants this product free from defects in
material and workmanship for one year from provable date of purchase
in the continental United States.
10
LIMITED WARRANTY