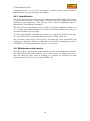
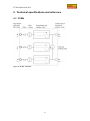
1
FCMix User Manual Version 1.000 April 2012 NorECs AS NorECs Norwegian Electro Ceramics AS Gaustadalleen 21, NO-0349 Oslo, Norway [email protected] http://www.norecs.com Ph. +47-22958623 Fax +47-22604427 FCMix Manual 04.2012 2 FCMix Manual 04.2012 List of contents 1 Introduction ............................................................................................................ 6 2 Safety First ............................................................................................................. 7 3 2.1 Normal safe use according to specifications .................................................. 7 2.2 Residual hazards ............................................................................................ 7 2.3 Consequences of misuse ................................................................................ 8 2.4 Do’s and Don’t’s ............................................................................................ 8 Installation.............................................................................................................. 9 3.1 Unpacking and inspection .............................................................................. 9 3.2 Introduction to the devices ............................................................................. 9 3.2.1 FCMix .................................................................................................... 9 3.2.2 Probble humidification and pressure control devices .......................... 10 3.3 3.3.1 General ................................................................................................. 11 3.3.2 Tubing .................................................................................................. 11 3.3.3 How to make Swagelok tube fittings ................................................... 12 3.3.4 Gas supply to FCMix (3 lines) ............................................................. 12 3.3.5 FCMix to first bubblers inputs (2 lines) ............................................... 12 3.3.6 First bubblers outputs to fuel cell inputs (2 lines)................................ 13 3.3.7 Fuel cell outputs return to second bubblers inputs (2 lines) ................ 14 3.3.8 Common outlets to ventilation (2 hoses) ............................................. 14 3.3.9 Control and marking ............................................................................ 14 3.4 4 Gas line connections .................................................................................... 11 Startup and checks during initial operation ................................................. 14 3.4.1 Wear eye-protection ............................................................................. 14 3.4.2 Water level ........................................................................................... 14 3.4.3 Gas lines only (no need for an operating fuel cell) .............................. 14 3.4.4 Gas lines onwards through the fuel cell ............................................... 16 3.4.5 A word on water cooling...................................................................... 16 3.4.6 Leakage tests ........................................................................................ 17 3.4.7 How to leave the system after use........................................................ 17 Normal operation ................................................................................................. 18 4.1 Solid Oxide Fuel Cell (SOFC) test .............................................................. 18 4.1.1 Heating up in a safe atmosphere before and during sealing ................ 18 4.1.2 The sealing process; utilise a pressure difference ................................ 18 3 FCMix Manual 04.2012 4.1.3 Equalling the flows and pressures........................................................ 19 4.1.4 Monitoring the electrical performance of the cell................................ 19 4.1.5 Reducing the anode .............................................................................. 19 4.1.6 Living with leakage; optimising the OCV ........................................... 19 4.1.7 Hot-spots? ............................................................................................ 20 4.1.8 Too much water from leakages? .......................................................... 20 4.1.9 Fuel cell performance .......................................................................... 20 4.1.10 Operate with low or high fuel utilisation? ........................................... 21 4.2 4.2.1 Reduced humidification ....................................................................... 21 4.2.2 Controlled temperature chiller bath for the humidifiers ...................... 21 4.2.3 Other remedies for problems of water condensation ........................... 21 4.3 Polymer electrolyte membrane fuel cells (PEMFC) ............................ 22 4.3.2 High temperature PEMFC ................................................................... 22 4.3.3 Solid Acid Fuel Cells (SAFC) ............................................................. 22 4.3.4 Proton conducting solid oxide fuel cells (PC-SOFC) .......................... 22 4.4.1 Other applications ........................................................................................ 22 Gas separation membrane testing ........................................................ 22 4.5 What the FCMix & Probbles can not do ...................................................... 23 4.6 Use of FCMix standalone without Probbles ................................................ 23 4.7 Use of Probble standalone ........................................................................... 23 4.8 Calculations.................................................................................................. 23 4.8.1 Gas flows and mixing .......................................................................... 23 4.8.2 Humidification ..................................................................................... 24 4.9 6 Other types of fuel cells ............................................................................... 22 4.3.1 4.4 5 Further issues on water vapour .................................................................... 21 Maintenance and service .............................................................................. 24 Technical specifications and reference ................................................................ 27 5.1 FCMix .......................................................................................................... 27 5.2 Probble ......................................................................................................... 28 Safety reference ................................................................................................... 29 6.1 Reference to the EC Pressure Equipment Directory (PED)......................... 29 6.1.1 Conformity, Compliance, and General issues...................................... 29 6.1.2 Design .................................................................................................. 29 6.1.3 Manufacturing ...................................................................................... 30 6.1.4 Materials .............................................................................................. 30 4 FCMix Manual 04.2012 6.1.5 Fired or otherwise heated pressure equipment..................................... 30 6.1.6 Piping ................................................................................................... 30 6.1.7 Specific quantitative requirements for certain pressure equipment ..... 31 6.2 Reference to other directories ...................................................................... 31 5 FCMix Manual 04.2012 1 Introduction Welcome to the FCMix manual. It covers the FCMix and accompanying “Probble” humidifiers and pressure controls. The manual intends to provide you with all essential information for Safety Installation These parts are to be studied and used in the sequence they are provided here. We consider it essential that no parts are omitted. They form one part of the training for the user responsible. Thereafter we provide instructions for Normal operation which shows how the FCMix and Probble humidifiers and pressure controls are used in normal operation after installation. It thus forms the second part of the training, intended for all users, after they have been trained in safety and fundamental aspects by the user responsible. The section also contains some remarks on alternative uses. Finally, we provide more detailed technical reference sections for safety and conformity. NorECs AS April 2012 6 FCMix Manual 04.2012 2 Safety First In this section we list important aspects of safety of using the FCMix. Read this first in order to be prepared and post it’s Do’s and Don’t’s. Later sections will provide a deeper understanding of using the FCMix correctly and safely as well as more detail and reference of safety aspects and technical specifications. 2.1 Normal safe use according to specifications Purpose: The FCMix controls and displays flows of 3 input gases intended for use in a small fuel cell; oxidant (ox), inert gas (inert), and fuel (red). The flowmeters are marked and calibrated according to the actual gases selected upon ordering. Default is Air, Argon (Ar), and Hydrogen (H2). The inert gas can be routed for mixing into the oxidant or into fuel gas, for safety, soft-start, and tests of effects of dilution of the fuel or oxygen. The Probble humidifiers and pressure controls are connected after the FCMix, and are used to humidify oxidant and fuel separately and to provide overpressure safeguard. They furthermore receive the gases after passage through the fuel cell and there provide pressure control, flow visualisation, and outlet to ventilation. Normal safe use implies careful control that oxidant and fuel gas lines are not intermixed anywhere along the way. We provide a sticker sheet with colour coding for markings on inlets and outlets, and devices, and gas lines for this purpose. Input gases: As oxidant may be used the gas specified (default; air) or any of oxygen (O2) or air (natural or artificial). As inert gas must be used the gas specified (default: argon, Ar) or any of nitrogen (N2) or the noble gases (e.g. He, Ar). As fuel may be used the gas specified (default: hydrogen, H2) or any of hydrogen H2, methane CH4, CO, propane C3H8, or mixtures of these or with inert gases. Ammonia (NH3) may not be used with the present version of the FCMix because of corrosion, and not with the Probble as it will react with the water. Gases must only be connected to the appropriate input. We suggest to adhere to the colour coding - blue = oxidant - green = inert - red = fuel(flammable). Mark new lines and devices accordingly. NOTE: The presence and use of inert gas for flushing and soft-start according to this manual is required, and must not be omitted. Pressures: Apply input gases to the FCMix at pressure preferably in the range 1 - 3.5 bar and not exceeding 6 bar. 2.2 Residual hazards If the specifications (input gas types and pressures), correct connections of oxidant and fuel, and instructions for use of inert gas are adhered to, the FCMix and Probbles are inherently safe. 7 FCMix Manual 04.2012 Any fuel cell may break down in ways that allow the fuel and oxidant to mix through leakages, cracks, etc. This will often lead to combustion into water and thus represent no direct danger. Unstabilities in the fuel cell may in the worst case still lead to mixtures of fuel and oxidant in the in- or outlets, and these may even reach the Probbles. For this reason the Probble is made with relatively small volumes and contain no glass parts in case of explosion. 2.3 Consequences of misuse Application of input pressures higher than 6 bar may lead to damage to and leakage in the tubing and flow control and readout parts. Use of other input gases than specified above may have the following consequences: Corrosive gases: Cl2, NH3, SO2 are examples of gases that will corrode and destroy the FCMix in its normal version, that utilises brass components and Cu tubing. Many of them will also react with the water in the Probbles. Mixing up connections of gases anywhere on the inputs or outputs of the FCMix, Probbles, or the fuel cell, may lead to a mix of fuel and oxidant. Failure to flush with inert gas prior to use of fuel may have the same effect. Mixes of fuel and oxidant may combust in the fuel cell, or explode if ignited (by e.g. static discharge) in the FCMix, Probbles, fuel cell, or elsewhere in the gas lines. Because of small volumes and absence of glass parts in the FCMix and Probbles, the risks of serious damage or injuries are small. It is nevertheless strongly advised to wear safety goggles at all times when working with this and other apparatus handling flammable or explosive gases. 2.4 Do’s and Don’t’s Wear safety goggles at all times. Connect appropriate gases only to the corresponding input. Do not cross fuel and oxidant lines. Adhere to the colour coding. Do not omit the inert gas and its proper use. Keep Probble water levels between the specified limits. 8 FCMix Manual 04.2012 3 Installation 3.1 Unpacking and inspection The package normally contains the 1 x FCMix, 2 x Probble humidifier and pressure control devices, 6 lengths of gas line tubing (PTFE) for connections between the FCMix and the Probbles and between the Probbles and the fuel cell and back, 2 lengths of PVC hose for output to ventilation, 3 + 2 Swagelok stems, the Manual and documentation, and minor accessories. Note that the documentation – in addition to the Manual – contains also manufacturers’ documentation for the flowmeters. Check that the packaging and all parts appear without visible damage from the transport. In case of visible damage it is likely that this has resulted from rough handling during transport. Please notify NorECs and if possible also the transporter, without delay. 3.2 Introduction to the devices 3.2.1 FCMix The FCMix is preassembled and need not be opened during installation or normal use. Its schematics are shown in Section 6.1. Its flowmeters run on batteries that will last for approximately 2 years, and has thus no need for mains power. The batteries are preinstalled upon delivery, and the flowmeters are thus permanently on: Check that the LED panels of all flowmeters are on (e.g. showing zero flow). Please identify and check that you understand the functions of the following items on the FCMix: On the rear are three (3) gas inputs on one side (left-hand side when seen from the front, right-hand when seeing the box from the rear). These use Swagelok quickconnects with valves. They are marked with the oxidant gas (ox), inert gas (inert), and fuel gas (red). On the rear are also two (2) outputs on the other side, oxidant (ox) and fuel (red). For simplicity, these are still marked the same as for the inlet, although the inert gas may be mixed into one or the other. Figure 1. Rear and front of FCMix. 9 FCMix Manual 04.2012 On the front plate, from left to right, you find for each of the gases a symbolic input, a stop-valve, a flowmeter with digital battery driven display and manual needle valves for flow regulation. In addition, the inert line (default Ar) has a “3-way” selector with which it can be set to feed (mix into) the oxidant gas or the fuel gas, or neither (closed). It may be noted that the valve cannot be set so as to mix oxidant and fuel. Finally, there are two symbolic outlets on the front plate. The FCMix has particle filters mounted on its three gas inputs. NOTE: FCMix can be used without the Probbles. Considerations for this is treated in a later chapter. However, here we will onwards assume you will use the Probbles. 3.2.2 Probble humidification and pressure control devices The details of the Probble are shown in schematics in figure 2. Note that the two Probbles are physically identical, but may be pre-marked with oxidant (blue) and fuel (red) (default Air and H2). Adhere strictly to this. Each Probble is preassembled for default operation mode. You may at this time fill both Probbles with water – preferentially distilled or deionised – to the maximum level. Each Probble device has two plexiglass bubbler tubes and one small hose stub mounted on the lid. Figure 2. Left: “Probble” humidification and pressure control device delivered with FCMix. Right: Schematic of a Probble. Constructional details may vary. 10 FCMix Manual 04.2012 The stub is the common outlet and should be led to ventilation using an open hose. This stub may also be used to refill water. You must understand the difference between the two plexiglass bubbler tubes on each device, and their functions and connections. Look at one of the Probble devices and find its two bubbler tubes (PMMA plexiglass): The first gas bubbler tube has two connections on the cap and both (input and output) are open. The second gas bubbler tube has only one connection on the cap (input) that is open – the other is plugged. This bubbler has instead a small hole in the plexiglass tube wall above the water level, functioning as its output. Here is how it works: The first bubbler receives gas from the FCMix oxidant (default Air) output into its thin, long PTFE hose (input) which then bubbles within the enclosing outer plexiglass tube, and out of the first bubbler’s output (short PTFE hose). (Only if the path onwards is blocked will the gas press the water column down the outer tube and bubble outside it, acting as an overpressure relief.) The gas goes from the first bubbler to the gas input for the appropriate electrode chamber – the cathode - on the fuel cell. It returns from the same chamber and is entered into the thin PTFE hose of the second bubbler on the same Probble device. It exits through the hole in the plexiglass tube and continues out the stub to the ventilation hose. The other device is exactly the same, and has the same functions, just supplied and working with the fuel gas from the FCMix to and from the anode chamber of the fuel cell. We will next describe the connections and operating principles in more detail, but be certain that you understand what is meant by the two Probble devices (for oxidant and fuel), and their two bubblers (first and second), and where the gas goes in and out on each of the bubblers. 3.3 Gas line connections 3.3.1 General We now describe the connections of the gas lines connecting the various parts. For pedagogical reasons we do this from left to right, from supply to exit, in Figure 3 below. However, keep all valves closed during mounting. We will first give some advice on location of units and how to connect tubing. 3.3.2 Locate the units Place the Probbles preferably not more than 1 meter away from the FCMix, and as close as possible to the fuel cell. The latter is to reduce pressure loss in the tubing. Moreover, place the Probbles as low as possible compared to the fuel cell, in order to reduce the risk that water formed in the fuel cell clogs the gas line. 3.3.3 Tubing The gas lines are made by PTFE tubing. The 6 lengths are intended used between the FCMix and Probbles and back and forth between the Probbles and the fuel cell. 11 FCMix Manual 04.2012 When you have decided the locations of the FCMix, Probbles and fuel cell (ProboStat or other), cut the tubes – especially between the Probble and fuel cell - to keep the lengths not longer than necessary. The PTFE tubing is connected to the Probble by simply inserting the tip of the tube into a hole on top of the plexiglass tubes and pushing down to the desired depth, as discussed later. The PTFE tubing is connected to the FCMix and fuel cell (in case it is a ProboStat) using Swagelok tube fittings with stems, included with your FCMix and ProboStat.. 3.3.4 How to make Swagelok tube fittings When making Swagelok connections, be sure that you know the procedures. This can be learnt in Swagelok documentation, and is briefly repeated here: When making a new connection, be sure that the ferrules are inside and correctly placed. You can trust this is the case if the tube connection is brand new from Swagelok and never has been opened. Insert and keep the tube all the way in, and fasten the nut with your fingers. From finger-tight, tighten ¾ turn (for 1/8’’ tubing) by using two 7/16’’ wrenches. When re-connecting a previously connected Swagelok tube connection, the ferrules are already in place and have deformed the tube. In this case, only tighten 1/8 turn by the two wrenches, using only the force of two fingers. 3.3.5 Gas supply to FCMix (3 lines) In the following, make reference to Figure 3 below. First connect each high pressure (max. 6 bar) supply of oxidant, inert gas, and fuel to the three respective inputs of the FCMix. For this purpose use the three quick-connect stems with valves (B-QM2-D200) that are included with the FCMix shipment; they are to be connected to 1/8’’ Cu or polymer tubing. The user should mark the stems with the appropriate colour coding: - blue = oxidant - green = inert - red = fuel(flammable). Check that all three inlet valves on the FCMix are closed. Then insert the three gas lines by pressing the ring on the bulkhead quick-connect inwards as the stem is inserted. 3.3.6 FCMix to first bubblers inputs (2 lines) Next, connect the oxidant output of the FCMix to the input on the first bubbler on the oxidant Probble. Similarly, connect the fuel output of the FCMix to the input on the first bubbler on the fuel Probble. For these two lines use the two stems without valves (B-QM2-S-200) to connect to the FCMix outlets. These stems do not have colour coding. The length of tubing between the FCMix and the Probbles is not important – there is plenty of driving pressure for the flow through these. 12 FCMix Manual 04.2012 3.3.7 First bubblers outputs to fuel cell inputs (2 lines) Next, connect the outlet of the first bubbler on the oxidant Probble to the oxidant (cathode side) inlet of the fuel cell. Similarly, connect the outlet of the first bubbler on the fuel Probble to the fuel (anode side) inlet of the fuel cell. If the fuel cell is a NorECs ProboStat™, use two Swagelok quick-connect stems with valves that were supplied with the ProboStat™. Keep tubing short. NOTE: Figure 3 shows an example where the oxidant (cathode) side is the Inner chamber of a ProboStat™ and the fuel (anode) side is the Outer chamber. It is fully your responsibility to understand and implement the use of the correct chambers and their in- and outlets for your fuel cell in your laboratory. Figure 3. Connections of the inlets of the FCMix to oxidant, inert, and fuel gas supplies (default Air, Ar, and H2) and of the outlets to two Probble humidifier and pressure control devices, and of these feeding the electrode chambers of a fuel cell test, and of the exit gases returned to and bubbled in the same device for pressure adjustment and flow visualisation. Both overpressure 13 FCMix Manual 04.2012 safeguard relief gas and return gas exit to ventilation through two lines (AirV and H2V) that should be kept separate. NOTE: Care must be taken to ensure that the exit of one cell chamber returns to the same humidification device that feeds that chamber. The fuel cell configuration exemplified is that of a NorECs ProboStat™ (only gas connections shown, electrical connections omitted). 3.3.8 Fuel cell outputs return to second bubblers inputs (2 lines) Next, connect the outlet of the oxidant (cathode) side of the fuel cell to the input of the second bubbler on the oxidant Probble. Similarly, connect the outlet of the fuel (anode) side of the fuel cell to the input of the second bubbler on the fuel Probble. If the fuel cell is a NorECs ProboStat™ use two Swagelok quick-connect stems without valve that were supplied with the ProboStat™. Keep tubing lengths short. NOTE: It is very important that you here do not cross lines; the oxidant gas must end up at the oxidant Probble and the fuel gas at the fuel Probble. Use colour coding and adhere to it. 3.3.9 Common outlets to ventilation (2 hoses) Finally, connect the common outlet stub of the oxidant Probble to safe ventilation or hood. Connect similarly the common outlet stub of the fuel Probble to safe ventilation or hood. For these, use separate hoses. NOTE: Make sure that the ventilation hoses are open and that there is no possibility that the gas flow in them can be obstructed in any way. 3.3.10 Control and marking Make a final visual check that all lines go as described above, and especially that oxidant and fuel lines never cross. Consider to add marking (color or writing or other) that is clear and meaningful to you and your staff, and that will prevent anyone from making ill-connections. 3.4 Startup and checks during initial operation 3.4.1 Wear eye-protection Wear eye-protection safety goggles. 3.4.2 Water level If not done before, fill both Probbles with water – preferably distilled or deionised – to the maximum level. The maximum level must be below the height of the small hole in the plexiglass tube of the second bubbler. 3.4.3 Gas lines only (no need for an operating fuel cell) With all valves on the FCMix closed, open for gas supply at controlled pressure not exceeding 6 bars to the inlets of the FCMix. Check that all three flowmeter valves are closed (turned fully clockwise (don’t use force!)). 14 FCMix Manual 04.2012 Open the three inlet stop valves. The flow indicators should be at or come to rest at zero flow. Set the inert gas routing valve to the oxidant side. Turn up the flow on the middle, inert gas, flowmeter, using its needle valve. A positive flow should read in the LED window of the flowmeter. Observe that the inert gas is now led into the output of the oxidant line, and it should start bubbling inside the plexiglass tube of the first bubbler on the oxidant Probble. If it bubbles, OK. If it does not, turn the flow down, close the inlet valves, and look for solutions: - If there was no steady flow in the flowmeter window (and no bubbling) it is possible that o there was no gas present on the input o the inlet valve was not open o the inert gas routing valve was not pointing to one of the output lines o the wrong type of quick-connect stem was used o or – in the least likely case - a Swagelok connection was made too tight so as to close the tube opening. - If there was positive steady flow in the flowmeter, but no bubbling, it is possible that o the oxidant line from the FCMix was connected to the wrong place on the oxidant Probble o the oxidant line from the FCMix was connected to the wrong Probble o the wrong type of quick-connect stem was used o the inert gas routing valve was not pointing to the oxidant line. Close valves, check and correct, carefully reopen valves and repeat the procedure until it works (flow and bubbling) as expected. Now check whether the gas continues to bubble only on the inside of the plexiglass tube, or whether the column of water inside is pressed down and the gas eventually starts bubbling on the outside. Both are safe: - If the gas continues to bubble on the inside and the water level stabilises this means that the gas is continuing out of the first bubbler and finds its way into the fuel cell (if connected). - If the water level is pressed down and it eventually starts bubbling on the outside, this means that the onwards gas flow is more or less obstructed. The gas will now instead flow out of the Probble through the common outlet and to ventilation via the hose (which must be open and unobstructed). If the gas flows outside because the pathway onwards is obstructed, this is OK. If the gas flows outside while the pathway onwards is in fact open, you are trying to push through the system more gas than can be realised with your Probbles: The resistance in the tubing etc. requires a higher pressure and the column of the first 15 FCMix Manual 04.2012 bubbler is not enough and it over-bubbles. Reduce the flow and/or the length of the tubing. If the gas is indeed flowing well, you may try to stop it somewhere down the line (e.g. by retracting the stem from the fuel cell input – if the stem has a valve, like in the ProboStat™, the gas will stop). Then observe and check the bubbling out of the plexiglass tube (overpressure relief). While inert gas in running to the oxidant line, add oxidant gas by turning up the flow on the oxidant gas flowmeter. Observe and check that the bubbling increases. Afterwards, turn the oxidant gas back down to zero. Turn the inert gas routing valve to the fuel side. Observe and check flow and that bubbling starts in the fuel Probble. If not, see the suggestions above. Rise the flow of inert gas to a considerable level. Let it run for a minute to flush out air. Add a small (less than 5 %) flow of fuel. Observe the flow in the flowmeter. Then turn the fuel flow back down to zero. Turn the inert gas flow down to a moderate level. You have now verified function and flow for all three gases in the FCMix and the first bubblers of the two Probbles. You have seen how the inert gas can be used for flow in the oxidant or fuel lines (but not both at the same time) for flushing and function testing, and how it can be used to dilute fuel to a safe level for startup operations. 3.4.4 Gas lines onwards through the fuel cell The following assumes you have a fuel cell system of some kind – operating or not – connected. It could also be some other kind of application, like a membrane test setup. Let inert gas flow through the one of the Probbles and onwards to the fuel cell. If the cell is properly sealed towards the surroundings, the gas will be flowing back to the Probble and will bubble in the second bubbler. If the two chambers of the cell are not sealed, the gas may leak between chambers, and it will flow back to the Probble with lowest overpressure (bubbling height) of the second bubbler. You may repeat this for the other Probble by directing the inert gas there at the FCMix. You may vary the heights of the second bubbler by loosening the nut around it close to the lid and sliding the whole assembly up and down an re-fastening. Ensure that the hole in the plexiglass tube remains between the lid and the water level. If everything operates as expected, the initial testing of gas lines and functions is hereby finished. You have learned to use the bubbling in the second bubblers as a coarse means to verify gas tightness to the surroundings and between chambers. You have also seen that you may vary the relative pressures by adjusting the heights of the second bubblers, and that this may be done to enforce leakage flow between chambers. 3.4.5 A word on water cooling and water condensation Since the gases are humidified, no parts of the gas lines or ventilation or the fuel cell should be cooled below room temperature, as it may cause condensation of water. If such condensation occurs it makes itself known sometimes by fluctuations in the flow (as droplets move back and forth – up and down) or – in a low-pressure system like ours – by simply stopping the flow, so that the overpressure relief starts operating. 16 FCMix Manual 04.2012 Therefore: Avoid having cooling water lines even near the gas lines. And do not cool the fuel cell more than necessary. Let it rather be considerably above room temperature than near room temperature. If the fuel cell is a ProboStat™ there is probably no need at all to cool the base unit - if tolerates a lot of heat. (See also ProboStat™ manual.) Later on we will return to this issue and further measures against water condensation. 3.4.6 Leakage tests A simple and rough test of leakages to the surroundings may be done by letting gas flow in one or both lines so that there is bubbling in both first and second tubes. Then stop the flow by closing one or more valves in the FCMix. The bubbling stops. If the system is gastight the gas column in the thin inner tubes will remain constant. If there is leakage to the outside, these columns will decrease. If the pressures and columns are different for the two chambers, the rate by which they level out is informative for the leakage between the chambers. The tests above are best done with a cold fuel cell, to avoid thermal fluctuations. Tests of gas tightness and sealing efficiency of an operating fuel cell is a more special issue, the we come back to below under. 3.4.7 How to leave the system after use If the system will not be used for some time, it is suggested to flush the fuel line with inert gas, then simply close all gas inlets and otherwise leave the system as is. An alternative may be to leave a minute flow of inert gas flow through the fuel line. 17 FCMix Manual 04.2012 4 Normal operation We describe the normal operation of the system in terms of a rather specific example; an SOFC test – discussing many detailed subjects along the way. However, the system can be used also for other types of fuel cells, with most of the considerations the same as for SOFC. Thus, other types of fuel cells, as well as other uses, are described only briefly after the full treatment of the SOFC case. 4.1 Solid Oxide Fuel Cell (SOFC) test In the following we will go through a typical use of the mixer to manage a test of a small SOFC. We assume you have mounted the cell with electrodes and sealing such as a gold gasket. The cell has a typically a Ni-YSZ cermet anode, but before mounting this is NiO-YSZ; the NiO is reduced only by use of a reduced gas after sealing. 4.1.1 Heating up in a safe atmosphere before and during sealing In order to start the process in as safe and gentle way, do the initial heating with a flow of oxidant to the cathode side and a flow of inert gas to the anode side. 4.1.2 The sealing process; utilise a pressure difference We suggest that you before the sealing starts make a difference in pressure of a couple of cm of water column between the two chambers, so that the higher pressure is on one side of the fuel cell and presses it slightly towards the seal (and not away from the seal). If the fuel cell is a ProboStat™ this normally means applying a higher pressure to the outer (top) chamber, pressing the sample down towards the support (helping the spring load). The pressure difference is set by retracting the second bubbler on the low-pressure side a couple of centimetres. This will make gas from the high pressure side exit through the leak and through the low pressure bubbler. We suggest at this stage to stop the supply of gas to the low pressure chamber, so that gas runs only into the high pressure chamber and out from any chamber depending on the leakage. The sealing may now proceed. If it comprises a metal it may mean heating to close below the melting point. If it is a brazing or glass ceramic it requires heating to a specified temperature. As the sealing proceeds, this flow on the low pressure side will get smaller and smaller and the flow out of the high pressure side higher. If the low pressure flow stops entirely, the sealing is qualitatively successful. In some cases it is then desirable to cool the cell considerably to prevent the seal to flow too much. If there is still a minor flow on the low pressure side of gas out through a leakage, the user must make own judgements on whether to continue to let the seal heal, whether it is an acceptably small leak, or whether to abandon this run. 18 FCMix Manual 04.2012 4.1.3 Equalling the flows and pressures After the sealing is satisfactory, turn up the flow of the gas to the low pressure side (which we stopped during sealing). We suggest to operate with equal flows on both sides as a starting point. The pressures should next be equalled by equalling the second bubbler heights (water column heights). This will minimise cross-flows and mixing of oxidant and fuel. 4.1.4 Monitoring the electrical performance of the cell Before continuing, it is suggested to have done or running measurements of AC conductivity or of DC open circuit voltage (OCV), or both (via a manual switch or reconnection or an automatic switch/multiplexer). These data are valuable for evaluating what goes on during the forthcoming introduction of fuel and the anode reduction. 4.1.5 Reducing the anode Now, the fuel side electrode (anode, normally NiO-based) may be reduced (to Ni) if required. This is normally done by going to the appropriate temperature selected for reduction, and then mixing in an increasing amount of fuel gas to the inert gas already running to the anode of the fuel cell. Be aware that the reduction may increase the water vapour level in the exit gas considerably, and that water may condense in the gas line. For this purpose, you may want to introduce the hydrogen slowly, perhaps supplying it drier or taking measures to collect the water. Normally one will observe a dramatic increase in OCV and conductance during the initial reduction. This will level out as the process completes. The cell now is operative. A good fuel cell stays stable in this operative state. A mediocre cell may degrade in OCV or conductance over time. A poor cell will immediately start to degrade – often sooner than the maximum OCV has been reached. This is why collecting data in the initial stage is important. It may be mentioned that the reduction process itself may be a decisive factor for the microstructure of the anode, and thus for the stability and performance of the cell. Factors that may affect the reduction process are temperature, concentration of hydrogen, rate of increase of the concentration of hydrogen, and total flow rate of fuel side gas. 4.1.6 Living with leakage; optimising the OCV Many fuel cells will have leakage in sealing or in the electrolyte itself. These leaks may be of various kinds and behaviour depending on the size of the openings, type of gas species, and temperature. There may in addition be diffusional leakage through sealing or other components, especially of hydrogen, which is permeable to most materials. There may finally also be electrochemical leakage through the electrolyte if it exhibits some mixed ionic electronic conduction. Normally one would like to minimise the effect of such leakages. This can be done by increasing the flows of one or both gases. Furthermore, one may adjust the pressures 19 FCMix Manual 04.2012 of the chambers by adjusting the second bubbler columns. Be aware that flows affect the pressures in the cell slightly, so that flow and pressure adjustments are interrelated. Sometimes, it is beneficial to operate with a deliberate small flow of one gas from one chamber into the other. This may be because one electrode is less exposed to the leakage stream than the other. Moreover, if hydrogen is used in the pure state and flows more easily than other gases in small openings, it may reduce the overall mixing of gases if the openings are filled with the slower flowing oxidant gas, i.e. if there is a small deliberate overpressure on the oxidant side. 4.1.7 Hot-spots? A fuel cell can operate well with some leakage. However, there will be evolved heat from the reaction between the fuel and oxidant – such leaky spots are thus named hotspots. They may possibly destroy parts of the sealing or electrolyte. A leaky cell is therefore probably best kept running on diluted fuel. 4.1.8 Too much water from leakages? Leakage and consequent mixing in the cell will (should) react immediately and form water. The amount of water depends on the leakage and on the flow and content of fuel and oxidant. The problem of the water is – as mentioned earlier - that it condenses and may obstruct or eventually block gas lines. We will return to remedies against this problem later on, but for now just mention that cells with large leakages for this and other reasons are best left running on diluted fuel. 4.1.9 Fuel cell performance Fuel cells and their performance are complex and there are many parameters to characterise. Firstly, the OCV should be measured and checked against the theoretical value. The OCV should vary with the hydrogen to water ratio of the fuel gas and with the oxidant content. Thus, mixing inert gas into either the fuel or oxidant gas will affect the OCV. One furthermore wants to measure the I-U-curve of the cell, namely its voltage U vs the load current I. (U is often replaced by V, so that it would be V vs I (I-V-curve)). The curve is often shaped like a straight line (the ohmic loss due to electrolyte and other resistances) with bends at low and/or high currents. We here make a few comments about the factors that tend to be dependent on the gas composition and flow: The curvature at low currents (near open circuit) may be due to polarisation of the charge transfer process at the electrode; the resistance and slope gets smaller as the overpotential increases (Tafel behaviour). It may also reflect a change in the composition of the gas. With the two Probbles, both gases are humidified, so that gas compositions stay relatively constant at both electrodes, both for oxide ion and proton conducting SOFCs. The curvature at high currents comprises approach to a limiting current. This signals that there is not enough supply of reactants to the electrodes, or not sufficiently fast removal of products; we enter into mass transport limitations. These may be lessened by increasing the flow of gas and usually by increasing the content of reactant (oxidant or fuel). Testing whether the content and flow of oxidant or of fuel make the main difference can thus tell you which electrode is the limiting one. 20 FCMix Manual 04.2012 4.1.10 Operate with low or high fuel utilisation? The above brings up an important question, namely whether to test the fuel cell under conditions of low fuel and oxidant utilisation, or under conditions of high fuel (and possibly oxidant) utilisation: If the flow of fuel and oxidant is high compared to the current load, we have low fuel (and oxidant) utilisation. The limiting mass transfers are then usually reduced and the cell performs electrically at its best. This is beneficial for characterising the electrolyte and electrode kinetics (overpotentials) under relatively constant gas concentrations. High flows to current ratio (low fuel utilisation) moreover has the advantage that the increase in content of water is minimal, reducing the risk of condensation in the outlets. However, running at low fuel utilisation is of course not very realistic for a final fuel cell application; the overall efficiency from fuel to electrical energy becomes very poor, and it may be interesting to decrease the supply of fuel and perhaps also oxidant. High fuel utilisation is obtained by supplying low flows of fuel, compared to the current load. This will bring about mass transport limitations and the performance of the cell will decrease, realistically. One must furthermore be aware of the danger of producing enough water to get condensation. A way to reduce the problem with water may be to reduce the content of fuel instead of the flow; by having a larger overall flow, the water content in the exhaust becomes smaller. There are, however, also other remedies, see below. 4.2 Further issues on water vapour 4.2.1 Reduced humidification There may be reasons to reduce the level of water vapour in the humidified gases. This may be desire to tests applications with dryer gases, or it may be necessary to avoid condensation with cells that produce a lot of water internally. In order to reduce the water level, one may simply open the first bubbler of the Probble and shorten the hose to above the water level, or simply remove it. The gas then obtains only a partial humidification from the surface of the water, depending on the flow rate. 4.2.2 Controlled temperature chiller bath for the humidifiers The Probbles may be immersed in a chilled bath. This will give a smaller and more constant level of water vapour, and reduced chance for condensation later in the gas line. 4.2.3 Other remedies for problems of water condensation First of all, avoid having cooling water lines near the gas lines. Also, do not cool the fuel cell or other devices too much – perhaps better not at all - they are best run well above room temperature. 21 FCMix Manual 04.2012 If the fuel cell produces too much water by load or leakage, or during reduction of anode NiO, one may apply natural or active heating of the base units of the cell. Moreover, the return gas lines may be heated using e.g. heating tape. If using a ProboStat, you may furthermore use a tap in the exit hole of the chamber with the wet gas – this will prevent water from exiting until the level stands above the height of the tap. Extra outlet tap for the outer chamber (equal to the inlet tap) can be obtained from NorECs. Condensing water can be handled also by having a continuous downhill path of the tube from the fuel cell to the Probble. It may be an idea to insert an unheated container in the line to collect condensed water before going back to the Probble or to another ventilation exit. 4.3 Other types of fuel cells 4.3.1 Polymer electrolyte membrane fuel cells (PEMFC) PEMFCs have electrolytes such as Nafion© that need water and conduct H3O+ ions. The cells may thus run preferentially using both humidifiers of the FCMix. 4.3.2 High temperature PEMFC High temperature polymers like phosphonated PBI work above 100 °C and are in principle purely proton conducting, but also here humidification of the gases – at least the fuel gas - is probably beneficial for long term operation. 4.3.3 Solid Acid Fuel Cells (SAFC) These use acidic salts, such as CsHSO4 or CsH2PO4, as electrolytes and work around 200 °C. They are pure proton conductors and do in principle not require humid gases. Again, however, it is likely that the long term stability of the electrolytes is favoured by humidification. 4.3.4 Proton conducting solid oxide fuel cells (PC-SOFC) Such cells use oxides with predominant proton conduction as electrolytes. PC-SOFCs produce water on the cathode (oxidant) side instead of the anode. This must be taken into account when considering the possibilities of condensation. Another issue with these cells is that water vapour is necessary the proton conduction as such. Thus, wetting both the oxidant and fuel may be beneficial for the operation of such cells. 4.4 Other applications 4.4.1 Gas separation membrane testing The FCMix system may be used to supply two gases to the two sides of a gas separation membrane. For instance, one may measure oxygen permeation between oxidant (O2 or air) on one side and inert gas or inert gas with H2 on the other side. 22 FCMix Manual 04.2012 One may similarly measure hydrogen permeation between H2 on one side and inert gas or inert gas with O2 on the other. One may choose to feed premixed gases in order to have another component for differentiating between leaks and diffusion. 4.5 What the FCMix & Probbles can not do The Probbles is not designed to supply humidification above dew point of room temperature. It moreover cannot supply gas at pressures much more than atmospheric. If any of these are desirable, one may use the FCMix standalone. The Probble can not support high flows, because its short water columns cannot uphold a high flow through the thin tubing, and it will stat to flow over. In its standard setup it can take 50 ml/min, which can be increased to 100 ml/min if water level is kept high and tubing heights are adjusted. Light-flowing gases like H2 can operate at somewhat higher flows. 4.6 Use of FCMix standalone without Probbles The FCMix can be used without the Probbles. One must then take special care to ensure another way of overpressure relief. One may consider to use a FCMix to simply mix two gases for any application. 4.7 Use of Probble standalone The Probble humidifier and pressure control devices can be used separately. However, remember that they contain no flow control; there must be a needle valve to control the flow, e.g. as part of a flowmeter, in front of the Probble. 4.8 Calculations 4.8.1 Gas flows and mixing The flowmeters are calibrated for the gas specified and display the flow directly. Other gases may be used, but only within the same category (oxidant, inert, fuel/flammable). The flow must then be recalculated from the flow displayed by a conversion. Contact NorECs AS or the flowmeter manufacturer to obtain the conversion. After mixing in inert gas in any of the oxidant or fuel gas, the total flow can be calculated as the sum. The content of the components after mixing is calculated as simple ratios given by the individual flows of the two gases divided by the total flow. After humidification, around 3 % of H2O(g) is added to the total flow so that the content of H2O becomes 3 % and the other components are reduced to 97 % of their value in the dry gas. The flows referred to here are in mln/min or ln/h where the subscript “n” refers to standard conditions. In a high temperature cell, the flow will be the same in these 23 FCMix Manual 04.2012 normalised units or in e.g. mol/s or mol/min or mol/h. However, the gas will be diluted and the velocity of the gas will be higher. 4.8.2 Humidification The water vapour content in the gas after bubbling through the Probble will be close to the saturation pressure of water vapour over pure water at the temperature at hand (normally room temperature). This pressure can be found in Handbook tables or calculated by Thermochemical software. The effectiveness of the bubbler will vary with flow, depth, temperature, bubble size etc. You may expect humidification of, 95-100 % of theoretical. Thus, the accuracy of the obtained pH2O is not very high. As a first approximation of all the above factors, we suggest that 0.03 bar (0.03 atm, or 3 %) H2O is used as a reasonable statement of pH2O in the wetted gas. The precision of this may be increased by measuring the room temperature and looking up in the tables. Moreover, calibration or check with a humidity meter can be worthwhile, but such instruments are often not very accurate. 4.9 Maintenance and service The only needs for maintenance are the refilling of water in the Probbles as necessary and replacement of flowmeter batteries every 2 years. (Note: If a battery goes low, it does not affect the flow, only the reading; it is entirely the manual valve that determines the flow.) For service, contact NorECs AS. 24 FCMix Manual 04.2012 5 Troubleshooting 5.1 No display in FCMix flowmeter panel Background: The panels LCD panels should show some letters and a reading of e.g. 0.0 even if the mixer is not in use or no gas is flowing. Symptom: No display. Cause: The battery is empty and needs to be replaced Action: Order from NorECs or the flowmeter manufacturer directly. Note: The FCMIx can still be used in a qualitative manner for supplying one gas or flushing, using the bubbling in Probbles as indicator of flow. 5.2 No flow in FCMix flowmeter Symptom: There is no positive reading of flow after opening the needle valve several turns counterclockwise. Cause: The gas pathway is closed at some stage before or after the flowmeter or there is no supply of gas. Action: Turn the flowmeter fully down (clockwise) before looking for the error and solving it. Check if the input valve (to the left of the flowmeter) is open (horizontal). If the gas is the inert gas (in the middle) check that the selector valve on its output (to the right of the flowmeter) is open to the output gas you want (fuel (up) or oxidant (down)). Finally, check that there gas line is connected to the appropriate FCMix input using a stem with valve (supoplied with the FCMIx), and that there is gas pressure on the line. When the error is found, close all valves, apply pressure on the input line, and carefully open the valves in the right order and finally open the flowmeter valve counterclockwise (several turns if necessary) to obtain a flow reading. 5.3 No bubbling in the Probble input despite flow in the flowmeter panel Caution: Since you are working with a fuel cell and potentially with a fuel and an oxidant, this error may indicate a potentially dangerous situation, namely that you have misconnected one of these gases, with the potential danger of mixing fuel and oxidant Cause 1: There is a disconnected or misconnected line between the FCMix and the Probble. Action: Identify the missing or wrong connection and fix it. Cause 2: The plastic tube is not inserted deep enough into the water. Action: Inserte the tube till just a few millimetres from the bottom of the plexiglass tube. Note: There is not really a problem if the tube doesn’t go into the water. The gas still flows – it just takes with it less water vapour. 25 FCMix Manual 04.2012 5.4 The Probble input bubbles over into its main chamber Cause 1: The gas line further on is stopped. This may be normal if it is deliberate. The overbubbling is then your overpressure relief. If it is a mistake, identify the reason. A typical reason may be that the input to a ProboStat is made to the wrong entry or with the wrong quick-connect stem: ProboStat inputs have a valve and needs to be connected using a stem also with a valve. Action: If the gas stoppage is undeliberate, identify the cause and fix it. Cause 2: The gas line into or – more typically - out of your ProboStat or other process chamber is fully or partially clogged by condensed water. This can be a result of a cold-spot along the gas line (no point should be colder than the Probble humidifier). It can also be a result of water forming during drying/dehydration of a material, during a chemical reaction (e.g. reduction of NiO with H2 or mixing of CO2 and H2), during operation of a fuel cell, or as a result of a leak in a fuel cell. Action: Remove the water by opening and letting it out, blow it out if necessary. Remove coldspots if this is the problem. Reduce input water level by retracting the input tube into the Probble to above the water level. If a high water output is unavoidable, install a water trap directly at the outlet of the ProboStat or ensure that the gas line out of the ProboStat to the Probble return bubbler has a continuous downhill slope. The considerations and measures are also described in the parts on operation in the manual. Cause 3: You are trying to have a larger flow than the tubing and pressures of the Probble can uphold. Action: Reduce the flow. Fill the water level in the Probble higher. Retract the return input tube to just below the water surface. 26 FCMix Manual 04.2012 6 Technical specifications and reference 6.1 FCMix Figure 4. FCMix schematic. 27 FCMix Manual 04.2012 6.2 Probble Figure 5. Schematic of Probble during normal operation. 28 FCMix Manual 04.2012 7 Safety reference 7.1 Reference to the EC Pressure Equipment Directory (PED) 7.1.1 Conformity, Compliance, and General issues The FCMix may be used with fluids (gases) in Group 1 (Dangerous) and Group 2 (Other). The FCMix may receive and handle gases at pressures up to 6 bar. The FCMix comprises pressurised accessories and tubing of a total volume less than 0.1 L. The FCMix comprises pressurised tubing of DN = 6. On this bases, referring to Annex II Tables 1-7, the FCMix falls below Category I of the PED. It is thus not CE-classified, but manufactured according to Sound Engineering Practices (SEP). Nevertheless, it is instructive to treat the pressure-related safety aspects of the FCMix according to the PED, notably Annex I. 7.1.2 Design 7.1.2.1 General The main design and component selection of the FCMix is based on normal principles for regulating and mixing flows of gases. The design of the Probble humidifier and overpressure control devices is based on many years of experience and testing of humidifying and pressure controlling bubblers. The units have been produced in prototypes and tested in real fuel cell tests. 7.1.2.2 Design for adequate strength The materials used for gas tubing and components are all qualified for the gases and pressures used, and this is well-proven over many years of use of the same or similar components in similar equipment. 7.1.2.3 Provisions to ensure safe handling and operation The FCMix has no parts in danger of mistakes of handling and operation. The Probble humidifier and overpressure control devices are made without use of glass, and these and the FCMix are marked throughout with colour codes to help avoid mixing fuel and oxidant lines. The FCMix involves no voltages above 12 V. It has no hot external surfaces. 7.1.2.4 Means of examination Each FCMix is manually assembled. It is tested for major leakages before shipment. 7.1.2.5 Means of draining and venting FCMix and the Probble humidifier and overpressure control devices have venting outlets to be led to ventilation or hood. FCMix is equipped with an inlet for inert gas that enbles flushing of the fuel cell and gas lines. 29 FCMix Manual 04.2012 7.1.2.6 Corrosion or other chemical attack The most corrosive gases considered that FCMix can tolerate used intermittently over many years is wet CO2 and wet O2. 7.1.2.7 Wear No issues known. 7.1.2.8 Assemblies Not Applicable (N.A.) 7.1.2.9 Provisions for filling and discharge N.A. 7.1.2.10 Protection against exceeding the allowable limits of pressure equipment If the user applies pressures higher than specified, some parts in the FCMix may eventually rupture, but only at much higher pressures (> 25 bar, i.e. 4 times the specified maximum pressure). Volumes are very small, and no further dangers from this are foreseen directly. However, the fuel gs may leak out. No special protection against this is implemented. However, the FCMix contains no electrical switches etc. than can ignite the fuel gas. Moreover, there are no glass parts. 7.1.2.11 Safety accessories The unit is equipped with a set of safety goggles. 7.1.2.12 External fire The FCMix is considered of too small pressure and volume of fluids (gases) of Group 1 (Dangerous) that any special precautions are necessary in case of fire. 7.1.3 Manufacturing The FCMix is manufactured according to specifications for making Swagelok connections. 7.1.4 Materials The FCMix in the standard version is made using copper tubing and brass components for all parts carrying pressure above atmospheric. The Probble humidifier and overpressure control devices are made using polymers (plexiglass, PVC, rubber) and brass. 7.1.5 Fired or otherwise heated pressure equipment N.A. 7.1.6 Piping All piping is done with 1/8’’ Cu tubing and Swagelok tube fittings. 30 FCMix Manual 04.2012 7.1.7 Specific quantitative requirements for certain pressure equipment N.A. 7.2 Reference to other directories The FCMix carries no voltages except the low voltage DC batteries internal in each of the flowmeters. There are thus no hazards related to electricity. The FCMix does not conform to the EC ATEX directory for equipment to be used in environments with flammable or explosive fluids. 31