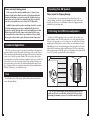
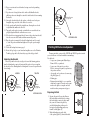
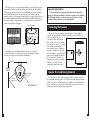
1
Limited USA Warranty:
5-Years for Drivers and Cabinets
Definitive Technology warrants to the original retail purchaser only that this Definitive
Technology Loudspeaker Product (the “Product”) will be free from defects in materials and
workmanship for a period of five (5) years from the date of the original purchase from a
Definitive Technology Franchised Dealer. However, this warranty will automatically
terminate prior to the expiration of five (5) years if the original retail purchaser sells or
otherwise transfers the Product to any other party or if the serial number is defaced or
removed. The original retail purchaser shall hereinafter be referred to as “you.” To obtain
the warranty protection for your DefinitiveTechnology Product(s), you must fill out the
Warranty Registration Card(s), within ten days of the date of purchase.
Defective Products must be shipped, together with proof of date of purchase, prepaid
insured to the Franchised Dealer from whom you purchased the Product, or to the nearest
Factory service center. Product(s) must be shipped in the original shipping container or its
equivalent; in any case the risk of loss or damage in transit is to be borne by you. If, upon
examination at the Factory or a Definitive Technology Franchised Dealer it is determined
that the unit was defective in materials or workmanship at any time during this Warranty
period, Definitive Technology or the Definitive Technology Franchised Dealer will, at its
option, repair or replace this product at no additional charge, except as set forth below. All
replaced parts and Product(s) become the property of Definitive Technology. Product(s)
replaced or repaired under this Warranty will be returned to you, within a reasonable time,
freight collect.
This Warranty does not include service or parts to repair damage caused by accident,
misuse, abuse, negligence, improper mounting, inadequate packing or shipping procedures,
voltage in excess of the rated maximum of the unit, normal wear and tear, cosmetic
appearance of cabinetry or components not directly attributable to defects in materials or
workmanship, or service, or repair or modification of the Product which has not
been authorized by Definitive Technology.
Definitive Technology makes no Warranty with respect to its Products purchased from
dealers or outlets other than Definitive Technology Franchised Dealers.
This Warranty is in lieu of all other expressed Warranties. If this Product is defective in
material or workmanship as warranted above, your sole remedy shall be repair or
replacement as provided above. In no event will Definitive Technology be liable to you for
any incidental or consequential damages arising out of the use or inability to use the
Product, even if Definitive Technology or a Definitive Technology Franchised Dealer has
been advised of the possibility of such damages, or for any claim by any other party. Some
states do not allow the exclusion or limitation of consequential damages, so the above
limitation may not apply to you.
All implied warranties on the Product are limited to the duration of this expressed
Warranty. Some states do not allow limitation on how long an implied Warranty lasts, so
the above limitations may not apply to you. This Warranty gives you specific legal rights,
and you also may have other rights which vary from state to state.
This product complies with the essential
requirements of the EMC directive 89/336/EEC.
EAAT012108
AW5500 & AW6500
All-Weather Loudspeakers
Owner’s Manual
Thank You
Thank you for choosing Definitive Technology AW Series
all-weather outdoor loudspeakers. Your AW loudspeaker is
a unique high performance product developed to allow you
to experience the joy of superb music reproduced anywhere,
whether indoors or outdoors, in both domestic and
commercial applications. It utilizes specially developed
materials and components, brought together to achieve a
level of sound quality previously unavailable in all-weather
loudspeakers.
Our engineers have spent many years in developing this
product. In order to ensure that you experience the finest
performance and durability possible, we encourage you
to take a moment to fully read this owner’s manual and
familiarize yourself with the proper installation and set-up
procedures for your AW Series speakers.
Safety Precautions
CAUTION
RISK OF ELECTRIC SHOCK
DO NOT OPEN
CAUTION! To reduce the risk of electric shock and fire, do not remove the cover or back plate of this
device. There are no user serviceable parts inside. Please refer all servicing to licensed service technicians.
Avis: Risque de choc electricque, ne pas ouvrir.
Service
Your local Definitive Technology dealer will usually be able to service your
Definitive loudspeakers. If, however, you wish to return the speaker to Definitive,
please contact us first, describing the problem and requesting authorization as well
as the location of the nearest factory service center. Please note that the address
given in this booklet is the address of our office only. Under no circumstances
should loudspeakers be shipped to our office or returned without contacting
us first and obtaining return authorization.
CAUTION! The international symbol of a lightning bolt inside a triangle is intended to alert the user to
uninsulated “dangerous voltage” within the device’s enclosure. The international symbol of an exclamation
point inside a triangle is intended to alert the user to the presence of important operating, maintenance and
servicing information in the manual accompanying the device.
Definitive Technology Offices
11433 Cronridge Drive,
Owings Mills, Maryland 21117
Phone: (800) 228-7148 (US & Canada),
01 (410) 363-7148 (all other countries)
CAUTION! To prevent electrical shock, match wide blade of plug to wide slot, fully insert. Attention: Pour
eviter les chocs electriques, introduire la lame la plus large de la fiche dans la borne correspondante de la
prise et pousser jusqu'au fond.
CAUTION! To reduce the risk of electrical shock, do not expose this equipment to rain or moisture.
1. Read Instructions—All safety and operating instructions should be read before operating the device.
2. Retain Instructions—The safety and operating instructions should be retained for future reference.
3. Heed Warnings—All warnings on the device and in the operating instructions should be adhered to.
4. Follow Instructions—All operating and safety instructions should be followed.
5. Water & Moisture—The device should never be used in, on or near water for risk of fatal shock.
6. Carts & Stands—The device should only be used on carts or stands recommended by the manufacturer.
7. Wall & Ceiling Mounting—The device should be mounted on a wall or ceiling only as recommended
by the manufacturer.
8. Ventilation—The device should always be located in such a way that it maintains proper ventilation.
It should never be placed in a built-in installation or anywhere that may impede the flow of air through
its heat sink.
9. Heat—Never locate the device near heat sources such as radiators, floor registers, stoves or other
heat-generating devices.
10. Power Supply—The device should only be connected to a power supply of the type described in the
operating instructions or as marked on the device.
11. Power Cord Protection—Power cables should be routed so they are not likely to be stepped on or
crushed by items placed on them or against them. Special attention should be paid to areas where the
plug enters a socket or fused strip and where the cord exits the device.
12. Cleaning—The device should be cleaned in accordance with manufacturer’s instructions.
13. Periods Of Non-Use—The device should be unplugged when not being used for extended periods.
14. Dangerous Entry—Care should be taken that no foreign objects or liquids fall or are spilled inside
the device.
15. Damage Requiring Service—The device should be serviced by licensed technicians when:
• The plug or power supply cord has been damaged.
• Objects have fallen or liquid has spilled inside the device.
• The device has been exposed to moisture.
• The device does not appear to be operating properly or exhibits a marked change in performance.
• The device has been dropped or the cabinet becomes damaged.
16. Service—The device should always be serviced by licensed technicians. Only replacement parts
specified by the manufacturer should be used. The use of unauthorized substitutions may result in fire,
shock, or other hazards.
Technical Assistance
It is our pleasure to offer assistance if you have any questions regarding your
AW Series speakers or their set-up. Please contact your nearest Definitive
Technology dealer or call us directly at (800) 228-7148 (US & Canada),
01 (410) 363-7148 (all other countries), or e-mail [email protected].
Specifications
AW5500
Dimensions:
Driver Complement:
Inputs:
Frequency Response:
Nominal Impedance:
Rec. Assoc. Amplification:
Sensitivity:
Weight:
AW6500
Dimensions:
Driver Complement:
Inputs:
Frequency Response:
Nominal Impedance:
Rec. Assoc. Amplification:
Sensitivity:
Weight:
1211/16" L x 73/4" W x 83/16" D
One 51/2" BDSS cast-basket bass/midrange driver
One 5" x 8" pressure-driven Low-Bass Radiator
One 1" Pure Aluminum dome tweeter
Gold-plated 5-way binding posts
45 Hz – 30 kHz
4 – 8 Ohms
10 – 175 Watts/channel
91 dB
8.33 lbs. (3.78 kG)
147/16" L x 87/8" W x 91/4" D
One 61/2" BDSS cast-basket bass/midrange driver
One 51/2" x 10" pressure-driven Low-Bass Radiator
One 1" Pure Aluminum dome tweeter
Gold-plated 5-way binding posts
40 Hz – 30 kHz
4 – 8 Ohms
10 – 200 Watts/channel
92 dB
10 lbs. (4.52 kG)
Specifications subject to change without notice.
2
Visit us at www.definitivetech.com.
11
Power and Loud Listening Levels
It takes more speakers and more amplifier power to achieve a given
amount of sound outdoors than it takes indoors. Keep this in mind when
designing and listening to your outdoor system. Be careful how loud you
turn up your outdoor system. We recommend leaving the bass and treble
controls on your amplifier or receiver at their “flat” (0 dB) positions.
Audible distortion when the speakers are playing at loud levels is caused
by driving (turning up) your receiver or amplifier louder than it or the
speakers are capable of playing. Most receivers and amplifiers put out their
full-rated power well before the volume control is turned all the way up,
so the position of the volume control is a poor indicator of its power limit.
If your speakers distort when you play them loud, turn the volume down!
Commercial Applications
AW Series speakers are perfect for restaurant, bar and other retail commercial
applications indoors and out. Their grilles and enclosures can be readily cleaned
of dust, smoke and oily films with soap and water while their robust construction
ensures years of reliable operation. Definitive AW series speakers have broader
dispersion and better bass than conventional commercial speakers so you will need
fewer of them to cover an area with great sound. Your customers will appreciate
that you have made an extra effort to treat them with high quality music in your
place of business while your competitors torture their customers with harsh noise.
Definitive Technology — the competitive edge!
Unpacking Your AW Speakers
Please Inspect For Shipping Damage
Each loudspeaker leaves our plant in perfect condition. Any visible or
concealed damage most likely occurred in handling after it left our plant and
should be reported at once to your Definitive dealer or the shipping company
which delivered your loudspeaker.
Positioning Your AW Series Loudspeakers
Position your AW loudspeakers as close as possible to the area where you
will be listening to them. The AW speakers have a very wide dispersion pattern;
however, if you are trying to cover a very large area, you will be better off using
multiple pairs of AW speakers in order to achieve an even distribution of sound.
With multiple pairs you will avoid having areas where the sound is too loud and
others where the sound is not loud enough. One pair of AW Series loudspeakers
will cover approximately 200–400 square feet of listening area at moderately loud
levels. Try to point the speakers directly at the listening area.
Care
Periodically wash your AW speakers with a mild soap and water solution to
remove dirt and pollutants.
The AW Series speakers utilize special components and materials for
outdoor use. However, you will achieve the longest life of the speaker by
positioning it to minimize exposure to the elements as much as possible.
10
3
AW speakers may be oriented either horizontally or vertically. Always position
the speakers so that the side with the mid/bass driver and tweeter (the Definitive
Technology logo badge is on this side) faces the listening area. The side with the
Low Bass Radiator may point toward an adjacent surface such as a wall, the
underside of an eave or the ground, as long as there are a couple of inches between
the Low Bass Radiator and the surface. Positioning the Low Bass Radiator near a
large surface will give you louder bass. If you want less bass, move the speaker
farther away from the wall or ground.
Important Safety Notice
It is essential that you use appropriate hardware that is designed for
proper, safe and secure mounting to the surface to which you are attaching
the AW loudspeaker. If you are unsure in any way about how to do this,
consult a building contractor or professional installer.
Low Bass Radiator
Connecting the Speakers
Logo badge
Mid/Bass Driver
Tweeter
Mounting the speakers horizontally under your roof eaves is a good
location (especially if it is on the same level as the listening area). Point the
driver/tweeter/logo side down towards the listening area.
EAVE
SIDE OF
HOUSE
Driver/Tweeter
(logo) side
Low Bass
Radiator Side
LISTENING AREA
4
It is critical for proper performance that both speakers (left and right) be
connected in proper polarity. Note that one terminal on each speaker (the +) is
colored red and the other (the -) is
colored black. Please make certain
that you connect the red (+) terminal
on each speaker to the red (+) terminal
of its channel on your amplifier or
receiver and the black (-) terminal to
the black (-) terminal. It is essential
that both speakers be connected in the
same way to the amplifier (in phase).
If you experience lack of bass, it is
likely that one speaker is out of phase
with the other; double check the
wiring and reconnect if necessary.
AMPLIFIER OR
RECEIVER
Speaker Pre-Conditioning (Break-In)
Your AW Series speakers should sound good right out of the box; however, a
pre-conditioning (break-in) period of 20–40 hours of normal playing at moderate
volume is required to reach full performance capability. Pre-conditioning allows
the driver suspensions to loosen and results in fuller bass, clearer, more open
midrange, and smoother high-frequency reproduction.
9
8. Drive screws into stud or wall anchors, leaving screw heads protruding
1
/8" (3 mm).
9. If speaker wire is being fed from a hole in the wall behind the bracket,
pull this speaker wire through the center hole in the bracket before mounting
the bracket.
10. Line up the bracket attached to the speaker, so that the screw heads pass
through the large center hole of the bracket’s screw slot.
11. Let the speaker and bracket slide straight down, allowing the screw head
to slip behind the smaller end of the slot.
12. Tug gently on the speaker to make certain that the screws and bracket are
properly aligned and that the wall anchors are secure.
13. If the bracket is not snug against the wall, remove the speaker from the wall,
drive the screws in a little further, and then remount the speaker.
14. Once the speaker is mounted, the bracket locking knobs can be loosened
to “aim” the speaker and then hand-tightened to keep the speaker angled
correctly.
15. Follow the hookup directions on page 9.
16. Rotate the logo badge so your friends and neighbors can see the Definitive
Technology logo and be all jealous that you got the really good stuff.
Adjusting the Bracket
In order to point the driver/tweeter/logo side toward the listening position,
turn the locking knobs counter-clockwise until the speaker is loose enough in
the bracket to rotate. Hand-tighten the locking knobs to secure the speaker in the
desired angle.
LOOSEN
TIGHTEN
Driver/
Tweeter
(logo) side
WALL
8
Driver/
Tweeter
(logo) side
WALL
LISTENING AREA
Driver/Tweeter
(logo) side
Low Bass
Radiator side
WALL
LISTENING AREA
Painting AW Series Loudspeakers
You may paint white versions of the AW5500 and AW6500 speakers to match
your color scheme or to blend in with their surroundings.
You will need:
• A spray can of primer paint (Krylon Spray
Primer #1318, or equivalent).
• A spray can of the paint of your choice.
Choose exterior grade paint if you plan to use
A
the speakers outdoors.
• A paperclip, awl or corkscrew (for removing
the grille) [figure A].
• Masking tape.
• Paint mask (not included) to cover parts that
should not be painted. To make an easy paint
mask use the grille as a template and cut a
mask from heavy, nonporous craft paper.
Preparing to Paint
1. Separate the parts of the speaker. Remove
the bracket knobs and brackets by rotating
the bracket knobs counter-clockwise until
they come off. Remove the grilles by
carefully hooking them with an awl or
bent paper clip and pulling gently away
from the cabinet [figure A].
2. Mask the binding posts on the back
of the speaker [figure B], the metal threaded
B
int Mask Pain
Paint Mask Paint
Paint Mask Paint M
Paint Mask Paint
Paint Mask Paint M
Paint Mask Pain
Paint Mask Pain
int Mask
5
screw inserts on the end panels and the metal screws on the bracket knobs.
Carefully mask both baffles to protect the drivers, tweeters, low-bass
radiators, and baffles [figure C]. Make sure the tape forms a tight seal around
the edges so that no paint can get on the baffle or speaker parts. If paint gets
on the speaker parts (driver, tweeter, Low Bass Radiator), it will affect the
sound and is not covered by the warranty. The grille features an engraved
logo badge. You can remove it before painting the grille or paint right over it.
Painting the Cabinet, Bracket
Knobs and Bracket
1. Apply two thin coats of primer to the
cabinets and locking knobs. The brackets
P
do not require primer.
2. When the primer is completely dry, P
apply the finish color [figure D].
3. When the paint is completely dry, P
remove the masking materials.
4. Do not re-attach the speaker to the
bracket until the bracket is mounted.
Try to keep all handling of freshly
painted parts to a minimum.
Painting the Grille
C
Paint Mask
Paint Mask
Paint Mask
Paint Mask
Paint Mask
Paint Mask
Paint Mask
Paint Mask
Paint Mask P
Paint Mask Pa
Paint Mask P
Paint Mask
Paint Mask P
Paint Mask Pa
Paint Mask P
Paint Mask
Ma
aint
sk P ainnt M
a
M
aint Mask P t Ma
in
t
Pain ask Pa int M
M
aint Mask Pa t Ma
in
t
Pain ask Pa int M
a
tM
Pain t Mask P aint M
Pain ask P aint
int M
P
sk
D
Pa t Ma
1. The grille features an even, protective
Pain
powder coating. This powder coating is
an ideal primer. The grille features an
engraved logo badge. You can remove it
before painting the grille or paint right over
E
it. Rotate the logo badge to its horizontal
or vertical orientation prior to painting
the grille.
2. Using spray paint, spray two thin coats
of finish color with no primer [figure E].
If you’re using a compressor and spray
gun, use the finest, most diffuse setting.
Be careful not to fill the holes in the grille
with paint.
3. When the paint is completely dry, carefully fit the grille into its recess
so that it is just resting on the cabinet. Starting with one corner, go around
the speaker and push the grille into the grille notch a little bit at a time.
Be gentle; the grille may be easily bent out of shape by rough handling.
6
Mounting AW Series Speakers
The AW speakers can be mounted vertically or horizontally but remember to
always point the speaker in such a way as to allow water to roll off the driver cone
and/or Low Bass Radiator.
Installation of AW Series Loudspeakers requires basic skills in using tools such
as a drill and screwdriver. If you are in doubt that you possess the necessary skills
or tools, consult your Definitive Technology dealer, general contractor or a
professional installer.
To mount the speakers, remove the bracket, mount the bracket to the surface,
and then re-attach the speaker to the bracket, re-insert the locking knobs and
tighten. Aim the speaker so that the driver/tweeter side points as directly as
possible toward the listening area.
Detailed Mounting Directions
1. Make sure the mounting hardware and surface you choose are both capable of
holding the weight of the speaker (see specifications on page 11) combined
with the force generated by strong wind and/or snow accumulations common
to your area.
2. Make sure the locations you select do not conceal electrical wiring or
plumbing behind the surface.
3. Prior to installation, hold the speaker in the chosen location to make sure it
safely clears obstacles such as ceiling, adjacent walls, corners, beams, lighting
fixtures and door/window frames.
4. Remove the bracket and locking knobs by turning them counter-clockwise
until they come completely out of the cabinet.
5. Using the slots in the bracket as a template, mark the screw locations with
a pencil.
6. If you are certain that there is a stud
F
behind the wall surface, drive #10 screws
(not included) through the
wall and into the stud [figure F].
7. If there is no stud behind the wall
at the chosen location, install wall anchors
(not supplied) into the wall
by following the wall anchor
manufacturer’s instructions. Always
use two wall anchors and two screws per
speaker [figure F]. We do
not provide mounting screws or other hardware because we do not know what
kind of material you will be attaching the speaker to. For wood surfaces and
studs, use wood screws; for sheetrock or gypsum, you should use wall
anchors; for masonry, use masonry anchors.
7
8. Drive screws into stud or wall anchors, leaving screw heads protruding
1
/8" (3 mm).
9. If speaker wire is being fed from a hole in the wall behind the bracket,
pull this speaker wire through the center hole in the bracket before mounting
the bracket.
10. Line up the bracket attached to the speaker, so that the screw heads pass
through the large center hole of the bracket’s screw slot.
11. Let the speaker and bracket slide straight down, allowing the screw head
to slip behind the smaller end of the slot.
12. Tug gently on the speaker to make certain that the screws and bracket are
properly aligned and that the wall anchors are secure.
13. If the bracket is not snug against the wall, remove the speaker from the wall,
drive the screws in a little further, and then remount the speaker.
14. Once the speaker is mounted, the bracket locking knobs can be loosened
to “aim” the speaker and then hand-tightened to keep the speaker angled
correctly.
15. Follow the hookup directions on page 9.
16. Rotate the logo badge so your friends and neighbors can see the Definitive
Technology logo and be all jealous that you got the really good stuff.
Adjusting the Bracket
In order to point the driver/tweeter/logo side toward the listening position,
turn the locking knobs counter-clockwise until the speaker is loose enough in
the bracket to rotate. Hand-tighten the locking knobs to secure the speaker in the
desired angle.
LOOSEN
TIGHTEN
Driver/
Tweeter
(logo) side
WALL
8
Driver/
Tweeter
(logo) side
WALL
LISTENING AREA
Driver/Tweeter
(logo) side
Low Bass
Radiator side
WALL
LISTENING AREA
Painting AW Series Loudspeakers
You may paint white versions of the AW5500 and AW6500 speakers to match
your color scheme or to blend in with their surroundings.
You will need:
• A spray can of primer paint (Krylon Spray
Primer #1318, or equivalent).
• A spray can of the paint of your choice.
Choose exterior grade paint if you plan to use
A
the speakers outdoors.
• A paperclip, awl or corkscrew (for removing
the grille) [figure A].
• Masking tape.
• Paint mask (not included) to cover parts that
should not be painted. To make an easy paint
mask use the grille as a template and cut a
mask from heavy, nonporous craft paper.
Preparing to Paint
1. Separate the parts of the speaker. Remove
the bracket knobs and brackets by rotating
the bracket knobs counter-clockwise until
they come off. Remove the grilles by
carefully hooking them with an awl or
bent paper clip and pulling gently away
from the cabinet [figure A].
2. Mask the binding posts on the back
of the speaker [figure B], the metal threaded
B
int Mask Pain
Paint Mask Paint
Paint Mask Paint M
Paint Mask Paint
Paint Mask Paint M
Paint Mask Pain
Paint Mask Pain
int Mask
5
AW speakers may be oriented either horizontally or vertically. Always position
the speakers so that the side with the mid/bass driver and tweeter (the Definitive
Technology logo badge is on this side) faces the listening area. The side with the
Low Bass Radiator may point toward an adjacent surface such as a wall, the
underside of an eave or the ground, as long as there are a couple of inches between
the Low Bass Radiator and the surface. Positioning the Low Bass Radiator near a
large surface will give you louder bass. If you want less bass, move the speaker
farther away from the wall or ground.
Important Safety Notice
It is essential that you use appropriate hardware that is designed for
proper, safe and secure mounting to the surface to which you are attaching
the AW loudspeaker. If you are unsure in any way about how to do this,
consult a building contractor or professional installer.
Low Bass Radiator
Connecting the Speakers
Logo badge
Mid/Bass Driver
Tweeter
Mounting the speakers horizontally under your roof eaves is a good
location (especially if it is on the same level as the listening area). Point the
driver/tweeter/logo side down towards the listening area.
EAVE
SIDE OF
HOUSE
Driver/Tweeter
(logo) side
Low Bass
Radiator Side
LISTENING AREA
4
It is critical for proper performance that both speakers (left and right) be
connected in proper polarity. Note that one terminal on each speaker (the +) is
colored red and the other (the -) is
colored black. Please make certain
that you connect the red (+) terminal
on each speaker to the red (+) terminal
of its channel on your amplifier or
receiver and the black (-) terminal to
the black (-) terminal. It is essential
that both speakers be connected in the
same way to the amplifier (in phase).
If you experience lack of bass, it is
likely that one speaker is out of phase
with the other; double check the
wiring and reconnect if necessary.
AMPLIFIER OR
RECEIVER
Speaker Pre-Conditioning (Break-In)
Your AW Series speakers should sound good right out of the box; however, a
pre-conditioning (break-in) period of 20–40 hours of normal playing at moderate
volume is required to reach full performance capability. Pre-conditioning allows
the driver suspensions to loosen and results in fuller bass, clearer, more open
midrange, and smoother high-frequency reproduction.
9
Power and Loud Listening Levels
It takes more speakers and more amplifier power to achieve a given
amount of sound outdoors than it takes indoors. Keep this in mind when
designing and listening to your outdoor system. Be careful how loud you
turn up your outdoor system. We recommend leaving the bass and treble
controls on your amplifier or receiver at their “flat” (0 dB) positions.
Audible distortion when the speakers are playing at loud levels is caused
by driving (turning up) your receiver or amplifier louder than it or the
speakers are capable of playing. Most receivers and amplifiers put out their
full-rated power well before the volume control is turned all the way up,
so the position of the volume control is a poor indicator of its power limit.
If your speakers distort when you play them loud, turn the volume down!
Commercial Applications
AW Series speakers are perfect for restaurant, bar and other retail commercial
applications indoors and out. Their grilles and enclosures can be readily cleaned
of dust, smoke and oily films with soap and water while their robust construction
ensures years of reliable operation. Definitive AW series speakers have broader
dispersion and better bass than conventional commercial speakers so you will need
fewer of them to cover an area with great sound. Your customers will appreciate
that you have made an extra effort to treat them with high quality music in your
place of business while your competitors torture their customers with harsh noise.
Definitive Technology — the competitive edge!
Unpacking Your AW Speakers
Please Inspect For Shipping Damage
Each loudspeaker leaves our plant in perfect condition. Any visible or
concealed damage most likely occurred in handling after it left our plant and
should be reported at once to your Definitive dealer or the shipping company
which delivered your loudspeaker.
Positioning Your AW Series Loudspeakers
Position your AW loudspeakers as close as possible to the area where you
will be listening to them. The AW speakers have a very wide dispersion pattern;
however, if you are trying to cover a very large area, you will be better off using
multiple pairs of AW speakers in order to achieve an even distribution of sound.
With multiple pairs you will avoid having areas where the sound is too loud and
others where the sound is not loud enough. One pair of AW Series loudspeakers
will cover approximately 200–400 square feet of listening area at moderately loud
levels. Try to point the speakers directly at the listening area.
Care
Periodically wash your AW speakers with a mild soap and water solution to
remove dirt and pollutants.
The AW Series speakers utilize special components and materials for
outdoor use. However, you will achieve the longest life of the speaker by
positioning it to minimize exposure to the elements as much as possible.
10
3
Safety Precautions
CAUTION
RISK OF ELECTRIC SHOCK
DO NOT OPEN
CAUTION! To reduce the risk of electric shock and fire, do not remove the cover or back plate of this
device. There are no user serviceable parts inside. Please refer all servicing to licensed service technicians.
Avis: Risque de choc electricque, ne pas ouvrir.
Service
Your local Definitive Technology dealer will usually be able to service your
Definitive loudspeakers. If, however, you wish to return the speaker to Definitive,
please contact us first, describing the problem and requesting authorization as well
as the location of the nearest factory service center. Please note that the address
given in this booklet is the address of our office only. Under no circumstances
should loudspeakers be shipped to our office or returned without contacting
us first and obtaining return authorization.
CAUTION! The international symbol of a lightning bolt inside a triangle is intended to alert the user to
uninsulated “dangerous voltage” within the device’s enclosure. The international symbol of an exclamation
point inside a triangle is intended to alert the user to the presence of important operating, maintenance and
servicing information in the manual accompanying the device.
Definitive Technology Offices
11433 Cronridge Drive,
Owings Mills, Maryland 21117
Phone: (800) 228-7148 (US & Canada),
01 (410) 363-7148 (all other countries)
CAUTION! To prevent electrical shock, match wide blade of plug to wide slot, fully insert. Attention: Pour
eviter les chocs electriques, introduire la lame la plus large de la fiche dans la borne correspondante de la
prise et pousser jusqu'au fond.
CAUTION! To reduce the risk of electrical shock, do not expose this equipment to rain or moisture.
1. Read Instructions—All safety and operating instructions should be read before operating the device.
2. Retain Instructions—The safety and operating instructions should be retained for future reference.
3. Heed Warnings—All warnings on the device and in the operating instructions should be adhered to.
4. Follow Instructions—All operating and safety instructions should be followed.
5. Water & Moisture—The device should never be used in, on or near water for risk of fatal shock.
6. Carts & Stands—The device should only be used on carts or stands recommended by the manufacturer.
7. Wall & Ceiling Mounting—The device should be mounted on a wall or ceiling only as recommended
by the manufacturer.
8. Ventilation—The device should always be located in such a way that it maintains proper ventilation.
It should never be placed in a built-in installation or anywhere that may impede the flow of air through
its heat sink.
9. Heat—Never locate the device near heat sources such as radiators, floor registers, stoves or other
heat-generating devices.
10. Power Supply—The device should only be connected to a power supply of the type described in the
operating instructions or as marked on the device.
11. Power Cord Protection—Power cables should be routed so they are not likely to be stepped on or
crushed by items placed on them or against them. Special attention should be paid to areas where the
plug enters a socket or fused strip and where the cord exits the device.
12. Cleaning—The device should be cleaned in accordance with manufacturer’s instructions.
13. Periods Of Non-Use—The device should be unplugged when not being used for extended periods.
14. Dangerous Entry—Care should be taken that no foreign objects or liquids fall or are spilled inside
the device.
15. Damage Requiring Service—The device should be serviced by licensed technicians when:
• The plug or power supply cord has been damaged.
• Objects have fallen or liquid has spilled inside the device.
• The device has been exposed to moisture.
• The device does not appear to be operating properly or exhibits a marked change in performance.
• The device has been dropped or the cabinet becomes damaged.
16. Service—The device should always be serviced by licensed technicians. Only replacement parts
specified by the manufacturer should be used. The use of unauthorized substitutions may result in fire,
shock, or other hazards.
Technical Assistance
It is our pleasure to offer assistance if you have any questions regarding your
AW Series speakers or their set-up. Please contact your nearest Definitive
Technology dealer or call us directly at (800) 228-7148 (US & Canada),
01 (410) 363-7148 (all other countries), or e-mail [email protected].
Specifications
AW5500
Dimensions:
Driver Complement:
Inputs:
Frequency Response:
Nominal Impedance:
Rec. Assoc. Amplification:
Sensitivity:
Weight:
AW6500
Dimensions:
Driver Complement:
Inputs:
Frequency Response:
Nominal Impedance:
Rec. Assoc. Amplification:
Sensitivity:
Weight:
1211/16" L x 73/4" W x 83/16" D
One 51/2" BDSS cast-basket bass/midrange driver
One 5" x 8" pressure-driven Low-Bass Radiator
One 1" Pure Aluminum dome tweeter
Gold-plated 5-way binding posts
45 Hz – 30 kHz
4 – 8 Ohms
10 – 175 Watts/channel
91 dB
8.33 lbs. (3.78 kG)
147/16" L x 87/8" W x 91/4" D
One 61/2" BDSS cast-basket bass/midrange driver
One 51/2" x 10" pressure-driven Low-Bass Radiator
One 1" Pure Aluminum dome tweeter
Gold-plated 5-way binding posts
40 Hz – 30 kHz
4 – 8 Ohms
10 – 200 Watts/channel
92 dB
10 lbs. (4.52 kG)
Specifications subject to change without notice.
2
Visit us at www.definitivetech.com.
11
Limited Warranty:
5-Years for Drivers and Cabinets,
3-Years for Electronic Components
Definitive Technology warrants to the original retail purchaser only that this Definitive
Technology Loudspeaker Product (the “Product”) will be free from defects in materials and
workmanship for a period of five (5) years covering the drivers and cabinets, and three (3)
years for the electronic components from the date of the original purchase from a
Definitive Technology Authorized Dealer. However, this warranty will automatically
terminate prior to the expiration of five (5) years for the drivers and cabinets and three (3)
years for the electronic components if the original retail purchaser sells or otherwise
transfers the Product to any other party. The original retail purchaser shall hereinafter be
referred to as “you.” Defective Products must be shipped, together with proof of date of
purchase, prepaid insured to the Authorized Dealer from whom you purchased the Product,
or to the nearest factory service center. Product(s) must be shipped in the original shipping
container or its equivalent; in any case the risk of loss or damage in transit is to be borne by
you. If, upon examination at the Factory or a Definitive Technology Authorized Dealer, it
is determined that the unit was defective in materials or workmanship at any time during
this Warranty period, Definitive Technology or the Definitive Technology Authorized
Dealer will, at its option, repair or replace this Product at no additional charge, except as set
forth below. All replaced parts and Product(s) become the property of Definitive
Technology. Product(s) replaced or repaired under this Warranty will be returned to you,
within a reasonable time, freight collect.
This Warranty does not include service or parts to repair damage caused by accident,
misuse, abuse, negligence, inadequate packing or shipping procedures, commercial use,
voltage in excess of the rated maximum of the unit, cosmetic appearance of cabinetry not
directly attributable to defects in materials or workmanship, or service, or repair or
modification of the Product which has not been authorized by Definitive Technology.
Definitive Technology makes no Warranty with respect to its Products purchased from
dealers or outlets other than Definitive Technology Authorized Dealers. This Warranty is
in lieu of all other expressed Warranties. If this Product is defective in material or
workmanship as warranted above, your sole remedy shall be repair or replacement as
provided above. In no event will Definitive Technology be liable to you for any incidental
or consequential damages arising out of the use or inability to use the Product, even if
Definitive Technology or a Definitive Technology Authorized Dealer has been advised of
the possibility of such damages, or for any claim by any other party. Some states do not
allow the exclusion or limitation of consequential damages, so the above limitation may
not apply to you.
All implied warranties on the Product are limited to the duration of this expressed
Warranty. Some states do not allow limitation on how long an implied Warranty lasts, so
the above limitations may not apply to you. This Warranty gives you specific legal rights,
and you also may have other rights which vary from state to state.
This product complies with the essential
requirements of the EMC directive 89/336/EEC.
EAAT013009