1
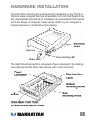
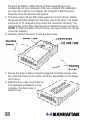
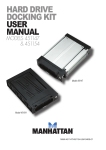
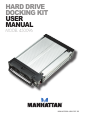
Hard Drive
Docking Kit
user
manual
Model 450096
MAN-450096-UM-1007-02
introduction
Thank you for purchasing the MANHATTAN ® Hard Drive Docking Kit,
Model 450096.
The easy-to-follow instructions in this user manual help make setup
and operation quick and simple, so you’ll also soon be enjoying the
benefits of these additional features:
• Easily converts any 3.5” ATA 133/100/66/33 hard drive into a portable
storage solution – installs into any 5.25” bay
• Supports data transfer rates of up to 133 MBps
• Ideal for securing and transporting data between multiple locations
and PCs; hot-swappable
• Electronic lock disconnects power for safe removal and helps reduce
unauthorized access, drive damage and data loss
• Built-in cooling fans maximize airflow and cooling efficiency
• Anti-vibration construction helps shield drive from shock
• Lifetime Warranty
System Requirements
• Available 12 V Molex power and ATA 40-pin data connections
• Windows 98SE/Me/NT/2000/XP/Vista
Package Contents
• Hard Drive Docking Kit with mounting hardware
• User manual
hardware installation
The Hard Drive Docking Kit is designed for installation in any PC/AT or
Pentium-class computer that has an available 5.25-inch half-height drive
bay. Generalized instructions for installation are presented in this manual
since the design of computer cases varies. Refer to your computer’s
manual whenever in doubt about procedures.
Key lock
Power LED
Drive Activity LED
The Hard Drive Docking Kit is composed of two components: the docking
case (above) and the drive case (below, with cover removed).
Installing the Docking Case
1. Turn off the power to your computer and any other connected peripheral
devices. Follow these precautions for static electricity discharge:
•Discharge any static electricity buildup in your body by touching a
grounded metal surface such as the computer case, if plugged in.
• During installation procedures, avoid any contact with internal device parts.
2. Unplug the power cord from the back of the computer.
3. Remove your computer’s cover.
4. Remove the computer’s front cover plate from the 5.25-inch drive bay in which you plan to install your docking case.
5. Remove (separate) the drive case from the docking case by lifting the
handle and pulling it out.
6. Slide the docking case into the 5.25-inch drive bay.
7. Attach an existing IDE 40-pin data cable from the system motherboard
to the 40-pin connector on the back of the docking case. NOTE: Most
connectors are keyed for proper insertion. If there is no key, orient the
cable so the Pin-1 colored-stripe edge is nearest the power connector.
8. Attach an available 4-pin power cable from the system’s power supply
to the 4-pin connector on the back of the docking case. The power
connector is “D”-shaped to ensure proper orientation when making the connection. (See image below.)
9. Replace the computer’s cover; reconnect the power and other external
cabling.
Mounting a Drive in the Drive Case
These steps are for installing a 3.5-inch
drive device in the drive case. NOTE:
A special adapter kit is required in
order to install a 2.5-inch drive.
1. Remove the drive case
cover by sliding it
toward the back of
the unit.
2. If you plan to install a drive that features removable media — such as
a Zip, TR-4 tape, MO, LS-120 drive or
ATA Flash memory reader — carefully
punch out the center part of the
front panel. IMPORTANT: If
you are installing a new
hard drive in the case,
you may need to
configure the drive
before you install it.
Refer to the drive
manufacturer’s
documentation
and configure
the drive as Master, Cable Select or Slave depending on the
configuration of your computer. After you complete this installation,
you may also need to re-configure the computer’s BIOS setup to
make the drive functional in the system.
3. The drive case’s 40-pin IDE cable supports 3.5-inch drives. Attach
the power and IDE cables from the drive case to the drive. The power
connector is “D”-shaped to help orient the connector correctly. The
colored stripe on the IDE cable should be nearest the power connector.
NOTE: In order to install a 2.5-inch drive, you need a 44-pin-to-40-pin
connector adapter.
4. Carefully position the drive inside the drive case.
5. Secure the drive in place using the supplied mounting screws. Use
the mounting holes on the sides or bottom, depending on the design
of the drive.
6. Slide the drive case cover back on.
The hardware installation is now
complete; the drive case is
ready to use.
Hot-Swapping
Power to the computer can be on both when the drive is inserted or removed.
Use the key to turn the drive on after inserting it and off before removing it.
To insert the drive case:
1. Insert the drive case (with drive installed) into the installed docking case,
pushing firmly until the drive is seated.
2. Insert the provided key and lock the case in place by pushing the key
in and turning it clockwise. The LED beneath the switch lights after a
slight delay, indicating the device is ready to use.
To remove the drive case:
1. Unlock the drive case (if locked) by turning the key counterclockwise.
CAUTION: Do not turn the key to unlock the drive case while the drive
is in use, as loss of data may occur.
2. Gently pull on the handle to slide the drive case out.
specifications
Standard and Certifications
• ATA 133/100/66/33, CE, TUV, RU
General
• ATA-to-ATA interface; hot-swappable
• Supports data transfer rates of
up to 133 MBps
• Electronic locking mechanism &
integrated power switch with LEDs, 2 keys
• Single rear-mount cooling fan,
4 cm (1.5 in.)
• LED indicators: Power & Activity
Connections
• Drive-to-tray: 4-pin Molex power
& 40-pin IDE data connections
• Tray-to-chassis: Centronic-type
connector (gold-plated)
• Chassis: 4-pin Molex power &
40-pin IDE data connections
Physical
• Material: aluminum
• Chassis: 219 x 146 x 41 mm
(8.625 x 5.75 x 1.625 in.)
• Tray: 203 x 114 x 41.3 mm
(8 x 4.5 x 1.625 in.)
• Weight: 723 g (25.5 oz.)
Environmental
• Operating temp.: 23 – 122˚F
(-5 – 50˚C)
• Storage temperature: -4 – 149˚F
(-20 – 65˚C)
• Operational humidity: 10 – 80%
• Storage humidity: 10 – 90%
www.manhattan-products.com
Are you completely satisfied with this product?
Please contact your MANHATTAN dealer
with comments or questions.
®
Copyright © MANHATTAN
All products mentioned are trademarks or registered trademarks of their respective owners.