1
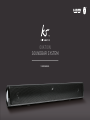
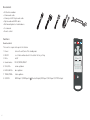
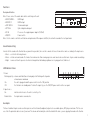
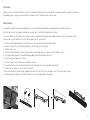
kitsound.co.uk
JB. 2705 / Made in China. © KitSound™ 2013 Christchurch, Dorset. BH23 4FL
1
OVATION
SOUNDBAR SYSTEM
USER MANUAL
1
2
We are craf tspeople. We are musicians. We are Kit Sound ™
And we all commit ourselves to achieving one shared goal: Bringing
people closer to their music. By truly understanding music we stay true
to its craft. Pure, rich, incredible sound. We’ll settle for nothing less.
3
At KS we believe your music deserves to be showcased on great
quality products that don’t cost the earth. We might not all share
the same taste in music (the ferocious disputes on music forums
prove that), but whether it’s Irish folk, death metal or any number
of obscure genres which seem to be multiplying by the minute, the
artists responsible for connecting with you through their craft have
bared their souls to do so. And we think that’s worth celebrating.
4
5
Box contents
• KS Ovation soundbar
• 3.5 mm audio cable
• 3.5 mm jack to RCA jack audio cable
• Optical audio and HDMI cables
• Wall mounting bracket and hardware
• User manual
• Remote control
Functions
RESET
Remote control
The remote is required to operate the Ovation.
1. Power:
turn on the unit/turn off to standby mode
6
2. RESET:
reset treble and bass back to the default factory setting
3. Mute:
on/off
4. Sound modes:
MUSIC/MOVIE/NIGHT
5. VOL+/VOL-:
volume up/down
6. BASS+/BASS-:
bass up/down
7. TREB+/TREB-: treble up/down
8. SOURCE:
HDMI Input 1/ HDMI Input 2 /
+
VOL
BASS –
BASS +
VOL
–
TREB –
TREB +
SOURCE
HDMI1
(Bluetooth Input) /AUX Input 1/AUX Input 2 / OPTICAL Input
HDMI2
AUX1
AUX2
OPTICAL
MUSIC
MOVIE
NIGHT
Functions
Rear panel interface
Note: Please connect the audio cables before switching on the unit
• HDMI 1/HDMI 2:
HDMI input
• HDMI OUT:
HDMI output
• AUX 1/AUX 2:
3.5 mm audio input
• OPTICAL:
Optical digital audio input
• DC IN:
Please use the supplied power adapter (18 V/4 A)
• ON/OFF:
Power switch
Note: Use the remote control to switch between input modes. When powered off/on, the unit will remember the last input mode.
HDMI IN 1
AUX2
AUX1
HDMI IN 2
HDMI OUT
OPTICAL
DC IN
ON/OFF
Sound mode setting
In order for the sound on the Ovation to be as powerful as possible, there are three modes to choose from on the remote according to the input source
• Music: use this for listening to music
• Movie: virtual surround sound effect makes for an immersive film viewing experience and can also be used for music to give a wider soundstage
• Night: removes all low frequencies to allow listening without disturbing neighbours or sleeping partners/children etc
LED indicator status
1. Power
Flashing quickly:volume and treble/bass is being adjusted. Flashing will stop when
at maximum or minimum
1
2
2
2
On:
the unit is plugged in and the power switch is in the ‘ON’ position
Off:
the Ovation is in standby mode. To turn off completely, use the ‘ON/OFF’ power switch on the rear panel
2. Input source
On: Double flash:
2
2
2
indicates which source the unit is currently set to
the input mode is on and active
Aux inputs
The Aux 1 and Aux 2 inputs can be used for any device with a 3.5 mm (headphone) output such as a mobile phone, MP3 player and some TVs. You can
use either the provided cables or one of your own. The volume will normally be controlled on both the device you are playing from and on the Ovation.
7
Optical input
The Optical Input can be used for superior sound quality over all other inputs. This input can be used for devices including televisions, DVD/Blu-ray
players and games consoles. Using the supplied cable, connect one end to the Ovation and the other to your device. If your TV has an optical audio output,
we recommend connecting this to the Ovation and connecting all your other devices to the TV.
Note: • For all inputs, please make sure the device outputting the audio/video is outputting audio over the correct media, e.g. a Blu-ray player will
likely output audio over HDMI by default. If you want to output audio via Optical, this may need to be changed in the settings.
• For games consoles such as the PS3 and PS4, you will need to make sure the audio format is set to PCM. Bitstream is not compatible
with the Ovation. If you are using a Sky Box, make sure the Digital Audio Output – Optical/HDMI is set to ‘NORMAL’ rather than ‘DOLBY D’.
• For Blu-ray/DVD players and games consoles such as the PS3 and PS4, you will need to make sure the audio format is set to PCM, Stereo or Normal. Bitstream, Dolby DTS/ True HD™ is not compatible with the Ovation. The Ovation will decode the raw audio in PCM and create the virtual
surround from there. If you are using a Sky Box, make sure the Digital Audio Output – Optical/HDMI is set to ‘NORMAL’ rather than ‘DOLBY D’.
HDMI inputs/output
Most televisions do not output sound as standard from their HDMI ports. To use HDMI set up with the Ovation, we recommend connecting as follows:
• Using HDMI cables, connect your devices (i.e. DVD/Blu-ray player, games console, set top box or media player) to the HDMI inputs
• Connect the Ovation HDMI output to an HDMI input on your TV
Note: When switching onto/between HDMI inputs, please wait for a few seconds for changes to take effect.
Bluetooth pairing
To connect the Ovation via Bluetooth, first you will need to pair your device.
1. Plug the unit into the mains and select Bluetooth input.
2. The blue LED light will flash quickly to indicate that it is in pairing mode.
3. On your device, go to the Bluetooth menu and search for new devices. OVATION should appear in the list. Select it and if asked for a passcode, enter ‘0000’.
4. Once pairing is successful, the blue indicator light will be flashing slowly and you will hear a ‘click’.
5. The volume level is controlled on both the Ovation and the device you are playing from.
Notes for use with Bluetooth
1.When mode is selected, the Ovation will automatically connect to the last paired device. If someone has paired to the Ovation after you and would like
your device to be the one which pairs automatically, simply delete/forget from your Bluetooth list and repeat the pairing process.
2.Your device will have an internal amplifier and if it is playing digital files like MP3s it will also have an integrated DAC (Digital Audio Converter). If you
turn the volume up to 100%, your device will be sending a distorted signal. To avoid this, and to get the best quality from the speaker, we recommend
that you do not run your device any higher than 95% volume. Some devices output higher than others, so you may need to reduce the volume if you
experience distortion.
8
Positioning
For best results, the Ovation should be at ear level of normal listening, with the front facing the listening area and 10 cm away from the wall.
Depending on your set up, you can either put the Ovation on your TV stand or mount it onto the wall.
Wall mounting
To avoid the risk of personal injury and damage to the unit, installation should be done only by qualified or competent persons.
Note: For best results, the speaker should be installed at least 10 cm (4 inches) below your television.
Please note that due to the weight of the ovation, we only recommend wall mounting onto solid brick/concrete walls and stud walls only
if you are able to locate and fix each of the 3 anchor points into the actual studs.
1. Put the 2 short supplied hand screws into the holes at the rear of the unit (do not tighten fully)
2. Connect the bracket to the Ovation, making sure that the large hole is at the top
3. Tighten the screws
4. Offer the Ovation and bracket up to the wall and once you’re happy that it is level and central, mark the 3 holes
5. Drill your marks using a 6.5-8 mm drill bit (depending on how soft/hard your walls are)
6. Insert the grey wall plugs into the holes
7. Use the 3 long screws to fix the bracket tightly to the wall
8. Loosen the hand screws attaching the bracket to the Ovation by ¾ of a turn and slide the bracket off
9. Ensure that all cables are connected to the Ovation
10.Attach the Ovation to the bracket by sliding onto the bracket (if too stiff, loosen the hand screws, if too loose, tighten them)
11. Finally, tighten the hand screws until the Ovation is securely clamped against the bracket
9
Care for your Ovation
Please DON’T
• Get the Ovation wet
• Drop the Ovation as this will invalidate your warranty
• Open up the Ovation. There are no user serviceable parts inside
• Use any other mains adaptor than the one supplied
• Expose the Ovation to extreme temperatures or rapid changes of hot to cold or vice versa
Please DO
• Clean the Ovation with a soft dry cloth and no detergents
Specifications
• Frequency response: 30 Hz – 20 kHz
• Sensitivity: 95 dB
• Output RMS: 60 W
• Speaker magnets: NdFeB
• Bluetooth range: up to 10 m
• Cable length: 1.5 m
• Unit size: H85 x W800 x D90 (mm)
10
Troubleshooting
No sound
• Either the audio cables are not connected or the speaker is not in the correct mode
• Ensure that the cables are connected and use the remote control to select the correct mode
No power
• The Ovation is not connected to the mains power or the adaptor is not connected to the Ovation
• The off/on switch on the rear panel interface is not switched to ‘ON’
• Ensure that the adaptor is properly connected and press the ‘Power’ button on the remote control
Remote control not working
• The remote control is further than 8 metres from the unit
• The batteries in the remote control are flat and need replacing
No sound/image in HDMI input mode
• The unit is not in HDMI input mode, the TV is not connected to the unit through the HDMI output, the TV is not in the correct HDMI output mode
or the TV does not output audio over HDMI
• Ensure that the HDMI connection between the unit and the TV is correct and switch to the correct HDMI mode
No sound in Bluetooth mode
• A Bluetooth connection had not been established or there are no video/audio files playing
• Ensure that Bluetooth is connected and press play on the video/audio files
• Check that the volume is up on your device
Sound is distorted
• The volume is too high on your device
• The bass is set too high for volume level
We hope you’ve now got all the information you need to get started, but if you’re having problems with anything, please feel free to contact us at:
[email protected]
Product overview
This unit contains recyclable parts which should only be extracted by a professional. Please dispose of the unit at your local recycling centre.
Packing materials, used batteries and old equipment should be disposed of according to local regulations.
We apologise for any inconvenience caused by minor inconsistencies in these instructions, which may occur as a result of product improvement and development.
11