1
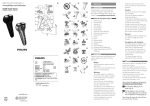
After every shave: shaving unit
and hair chamber
1Switch off the shaver, remove the
adapter from the wall socket and pull
the micro USB plug out of the shaver.
2Clean the top of the appliance with
the cleaning brush supplied (Fig. 8).
3Press the release button (1) and pull
the shaving unit in a straight upward
movement off the shaver (2).  (Fig. 9)
4Clean the inside of the shaving unit
with the cleaning brush (Fig. 10).
9Put the shaving heads back into the
shaving unit (Fig. 19).
10Put the retaining frame back into the
shaving unit (1) and turn the orange
wheel clockwise (2) (Fig. 20).
11Put the shaving unit back onto the
shaver (Fig. 12).
Storage
Keep the appliance dry.
Use and store the appliance at a
temperature between 5°C and 35°C.
1Switch off the shaver.
5Clean the hair chamber with the
cleaning brush (Fig. 11).
2Put the shaver in the storage pouch
(YS502 only).
6Put the shaving unit back onto the
shaver (Fig. 12).
3Put the protection cap on the shaver to
protect it from any dirt accumulation
 ( YS501,YS500 only ) (Fig. 21).
Every two months: shaving heads
Note: Do not use cleaning agents or alcohol
to clean the shaving heads. Only use Philips
Cleaning Spray (HQ110).
1Switch off the shaver, remove the
adapter from the wall socket and pull
the small plug out of the shaver.
2Press the release button (1) and pull
the shaving unit in a straight upward
movement off the shaver (2) (Fig. 9).
3Turn the orange wheel anticlockwise
(1) and remove the retaining frame
(2) (Fig. 13).
4 Remove and clean one shaving head
at a time. Each shaving head consists
of a cutter and a guard (Fig. 14).
Note: Do not clean more than one cutter and
guard at a time, since they are all matching
sets. If you accidentally mix up the cutters
and guards, it may take several weeks before
optimal shaving performance is restored.
5Remove the guard from the
cutter (Fig. 15).
6Clean the cutter with the short-bristled
side of the cleaning brush. Brush carefully
in the direction of the arrows (Fig. 16).
Replacement
Replace the shaving heads every two years
for optimal shaving results.
Replace damaged or worn shaving heads
with Philips shaving heads only (HQ4+ for
China or HQ56 for the rest of the world).
For instructions on how to remove the shaving
heads, see chapter ‘Cleaning and maintenance’,
section ‘Every two months: shaving heads’.
Ordering accessories
To purchase accessories for this
appliance, please visit our online shop at
www.shop.philips.com/service. If the
online shop is not available in your country,
go to your Philips dealer or a Philips service
centre. If you have any difficulties obtaining
accessories for your appliance, please
contact the Philips Consumer Care Centre
in your country. You find its contact details
in the worldwide guarantee leaflet.
To retain the top performance of your shaver,
make sure you clean it regularly and replace
its shaving heads at the recommended time.
--
7Clean the guard with the long-bristled
side of the cleaning brush (Fig. 17).
8Put the cutter back into the guard
after cleaning (Fig. 18).
--
Shaving heads
We advise you to replace your shaving
heads every two years. Always replace
them with Philips shaving heads only
(HQ4+ for China or HQ56 for the
rest of the world) (Fig. 22).
Cleaning
Use Philips Cleaning Spray (HQ110) to
clean the shaving heads thoroughly.
Environment
--
--
Do not throw away the appliance with
the normal household waste at the end of
its life, but hand it in at an official collection
point for recycling. By doing this, you help
to preserve the environment (Fig. 23).
The built-in rechargeable battery
contains substances that may pollute the
environment. Remove the battery before
you discard and hand in the appliance
at an official collection point. Dispose
of the battery at an official collection
point for batteries. If you have trouble
removing the battery, you can also take
the appliance to a Philips service centre.
The staff of this centre will remove the
battery for you and will dispose of it in an
environmentally safe way (Fig. 24).
Troubleshooting
This chapter summarises the most common
problems you could encounter with the
appliance. If you are unable to solve the
problem with the information below, visit
www.philips.com/support for a list of
frequently asked questions or contact the
Consumer Care Centre in your country.
Problem
Possible
cause
Solution
The
shaver
does not
shave as
well as it
used to.
The shaving
heads are
dirty.You
have not
cleaned the
shaver well
enough or
you have not
cleaned it for
a long time.
Clean the shaving
heads thoroughly
before you
continue shaving.
See chapter
‘Cleaning and
maintenance’.
Long
hairs obstruct the
shaving
heads.
Clean the cutters
and guards with
the cleaning
brush supplied.
See chapter
‘Cleaning and
maintenance’,
section ‘Every
two months:
shaving heads’.
You mixed
up the
cutters and
guards when
you placed
them back
into the
retaining
frame after
cleaning.
Put each cutter
in the other
guard. If you
do not switch
the cutters, it
may take 2 to
3 weeks until
optimal shaving
performance is
restored.
The shaving
heads are
damaged or
worn.
Replace the
shaving heads.
See chapter
‘Replacement’.
The
rechargeable
battery is
empty.
Recharge the
battery. See
chapter ‘Charging’.
Removing the rechargeable
battery
Only remove the rechargeable battery
when you discard the shaver. Make
sure the battery is completely empty
when you remove it.
1Remove the adapter from the wall
socket and pull the micro USB plug
out of the shaver.
2Let the shaver operate until it stops
and undo the screw at the back of the
shaver (Fig. 25).
3Remove the back panel of the shaver
with a screwdriver.
4Remove the rechargeable battery.
Do not connect the shaver to the mains
again after you have removed the battery.
Guarantee and support
If you need information or support, visit
www.philips.com/support or go to
your Philips dealer. You can also contact
the Philips Consumer Care Centre in your
country (see the worldwide guarantee
leaflet for contact details).
Guarantee restrictions
The shaving heads (cutters and guards) are
not covered by the terms of the international
guarantee because they are subject to wear.
The
shaver
does not
work
when I
press the
on/off
button.
Problem
Possible
cause
Solution
My skin is
irritated
after shaving.
Your skin
needs time
to get used
to the Philips
shaving
system.
Skin irritation
during the first
2-3 weeks of
use is possible.
After this period,
the skin irritation
usually disappears.
The rotation speed
of the
shaving
heads is
slower
than usual.
Too much
dirt has
collected in
the shaving
heads.
Clean the shaving heads. See
chapter ‘Cleaning
and maintenance’.
The
rechargeable
battery is
low.
Recharge the
battery. See
chapter ‘Charging’.
Too much
dirt has
collected in
the shaving
heads.
Clean the shaving heads. After
cleaning, lubricate
the central point
on the inside of
the guards with
Philips Cleaning
Spray (HQ110).
See chapter
‘Cleaning and
maintenance’.
The shaving
heads are
damaged or
worn.
Replace the
shaving heads.
See chapter
‘Replacement’.
The
appliance
makes a
strange
noise.