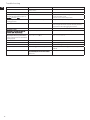
1
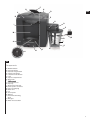
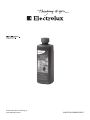
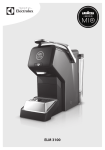
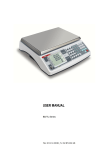
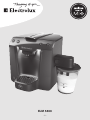
ELM 5400
• EN •
EN Instruction book ..................3–13
Before using the appliance for the
first time, please read the safety
advice on page 4.
F
H
G
D
C
B
EN
E
U
I
O
P
M
R
A
N
T
S
L
K
J
Q
EN
Components
A. ON/OFF button
B. Espresso button
C. Espresso Lungo button
D. Cappuccino button
E. Latte Macchiato button
F. Lever
G. Capsule compartment
H. Water tank
I.
J. Cup support rack
K. Drip tray
L. Waste water indicator
M. Used capsules container
N. Power cord & plug
O. Motor unit
P. Lid
Q. Steam spout
R. Whisker
S. Removable whisking
spiral
T. Milk glass
U. Motor release button
3
Safety advice
EN
Read the following instruction care-
•
time.
• This appliance is not intended for use
by persons (including children) with
reduced physical, sensory or mental
capabilities, or lack of experience
and knowledge, unless they have
been given supervision or instruction
concerning use of the appliance by a
person responsible for their safety.
• Children should be supervised to
ensure that they do not play with the
appliance.
• The appliance may only be connected
to a power supply whose voltage and
tions on the rating plate!
• Never use or pick up the appliance if
– the supply cord is damaged,
– the housing is damaged.
• The appliance must only be connected
to an earthed socket. If necessary an
extension cable suitable for 10 A can
be used.
• If the appliance or the supply cord is
damaged, it must be replaced by the
manufacturer, its service agent or simi-
•
hazard.
4
•
•
•
•
•
•
•
•
•
•
Always place the appliance on a
level surface.
Never leave the appliance unattended
while connected to the supply mains.
The appliance and accessories become
hot during operation. Use only designated handles and knobs. Allow to
cool down before cleaning or storage.
The mains cable must not come into
contact with any hot parts of the appliance.
Do not immerse the appliance in water or any other liquid.
Do not exceed the maximum
volume as indicated on the appliances.
Fill the water tank only with cold water, never with milk or other liquids.
Do not use the appliance if the water
Do not use the appliance without the
drip tray or the drip grid.
This appliance is intended for domestic use only. The manufacturer cannot
accept any liability for possible damage caused by improper or incorrect
use.
Do not carry machine by the handle.
This machine can only be used with
Lavazza A MODO MIO capsules. Do not
•
•
in the capsule compartment. The capsules can be used only once.
The motor unit is not waterproof and
cannot be immersed into the water.
To avoid steam leakage during
frothing, the frothing function shall be
run with a capsule inserted.
Getting started
EN
1.
face
drinkable and non sparkling water.
(The machine must not be used with
empty tank!) Plug the power cord
into the mains and press the ON
button. The machine is ready to use
when the cup indicator lights stop
and become steady.
2. When starting the machine for
Place a glass under
pressing the Espresso Lungo button. Run also the Latte Macchiato
function one time by pressing the
Latte Macchiato button with water
in the milk glass.
3. The machine must not be used
with empty tank!
coming out during brewing try to
prime it. To prime the circuit,run
the Latte Macchiato function one
time by pressing the Latte Macchiato button with water in the milk
spout and run also the fresh water
ing the Espresso Lungo button.
5
Other functions
1.
EN
for
it down or pushing it up.
The machine is equipped with an
energy saving function that autoof inactivity.
2. A MODO MIO capsules. Only suitable Lavazza “A MODO MIO” capsules
should be placed in the capsule
compartment. Single dose capsules
NOT use the capsules more than
once. Inserting 2 or more capsules
can cause the machine to malfunction.
3. Light. The machine is equipped
with a lamp which lights up the cup
support rack. The light will be on
during the brewing time and will
cup is ready.
-
6
Preparing coffee
EN
1. Lift the lever, insert a capsule in
the compartment. Close the lever
and press either Espresso or Espresready, lift the lever and the capsule
falls down into the used capsules
container.
2.
Place a cup on the cup support
rack. Press and hold the Espresso
or Espresso Lungo button. Release
reached. The programmed quantity
is memorized by the machine.
7
Preparing Cappuccino/Latte Macchiato
1. Frothing milk for Cappuccino
and Latte Macchiato: Fill the glass
of the milk frother with fresh milk
(standard fridge temperature of 4-8
degrees) exactly to the level for the
Cappuccino or Latte Macchiato line
(do not exceed the line). Place the
lid on top of the glass, plug the motor into the machine and then slide
the glass under the motor. You can
select hot and cold frothing.
EN
8
2. Warm frothing: Press the Cappuccino or Latte Macchiato button, the
The
amber light will start
frothing process will start in 30 sec.
The process will stop automatically
when the milk is prepared (you can
stop it manually as well by pressing it again). Approximate time for
warm frothing is 75 sec (Cappuccino) to 110 sec (Latte Macchiato).
3. Cold frothing: Press the Cappuccino or Latte Macchiato button
for more than 2 sec. The LED light
and turn
buttons will start
blue and only the whisker will be
working (no steam function). Approximate time for cold frothing is
45 sec.
EN
4. Preparing Cappuccino: Froth
the milk as described in previous
3 steps. Prepare an Espresso in a
Cappuccino cup and then pour the
frothed milk on top of the Espresso.
5. Preparing Latte Macchiato: Froth
the milk as described in previous 3
steps. When the frothing process
stops, pour the frothed milk into
a latte glass. Place the glass under
Espresso.
9
Cleaning and care
1.
EN
cord and let the machine cool
down. Wipe all outer surfaces with
a damp cloth. Rinse the water tank
once a day.
2.
is
visible above the grid, the drip
tray must be emptied. Lift out grid,
tray and waste container. Empty,
rinse, dry and put back in place.
This procedure should be carried
out every two or three days or after
dishwasher proof (paint can be
damaged).
10
3. The milk frother glass, lid, whisker
and steam spout can be washed in
dishwasher.
The motor unit is
not waterproof and cannot be immersed into the water. Please use
the soft damp cloth for cleaning.
Decalcifying
EN
1. Decalcifying. We recommend to
decalcify the machine regularly
depending on the water hardness
(2–3 months). We recommend to
use Electrolux decalcifying solution EPD4/C/D/E/N/R (never use
vinegar). Remove and empty the
water tank. Fill the water tank with
decalcifying solution (follow product instructions).
2. Empty the milk frother glass and
assemble it to the machine. Press
both the Cappuccino and Latte
Macchiato button for more than 3
sec to start the descaling. (Cappuccino and Latte Macchiato button
will
alternately during the 30
minute decalcifying process).
3. When the decalcifying process is
without a capsule by pressing the
Espresso Lungo button. Run also
the Latte Macchiato function by
pressing the Latte Macchiato button with water in the milk glass one
time. Run through a half watertank.
11
Troubleshooting
EN
Problems
Causes
Solutions
The machine does not turn on.
The machine is not connected to the
power source.
Connect the machine to the power source.
The pump is very noisy. Both indicator lights for small and big cups are
No water
No water in the tank.
Fill the tank with fresh drinking water.
1. Prime the water circuit.
2. Check correct water tank position.
The loading lever doesn’t reach the
brewing position.
Capsule inserted incorrectly.
Empty the used capsule compartment.
Contact Electrolux customer service.
Repeat the sequence, open and close the lever. If that
is not enough remove the capsule manually from the
compartment after unplugging the machine.
Preheat the cup with the hot water.
Capsule already used.
Open the lever and insert a new capsule.
Circuit is not primed
Prime the water circuit.
Not suitable milk.
Use fresh, partially skimmed milk.
drips only from the spout and there
is also a spillage from the back of the
brewing spout.
The milk does not froth.
The frothed milk is too hot or cold.
12
The milk is too hot.
Use milk at refrigerator temperature.
The whisking spiral is not in place.
Make sure that the whisking spiral is correctly assembled.
ing to the Cappuccino and Latte Macchiato line.
-
Decrease or increase the milk amount.
Disposal
Disposal
Packaging materials
The packaging materials are environmentally friendly and can be recycled.
by markings, e.g. >PE<, >PS<, etc.
Please dispose of the packaging materials in the appropriate container at the
community waste disposal facilities.
Old appliance
on the product or on
The symbol
its packaging indicates that this product may not be treated as household
waste. Instead it shall be handed over
to the applicable collection point for
the recycling of electrical and electronic equipment. By ensuring this
product is disposed of correctly, you
will help prevent potential negative
consequences for the environment
and human health, which could otherwise be caused by inappropriate waste
handling of this product. For more
detailed information about recycling
of this product, please contact your
EN
disposal service or the shop where you
purchased the product.
13
Share more of our thinking at
www.electrolux.com
3480 E ELM5400 02010612