1
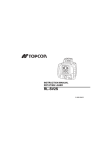
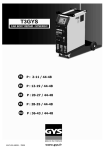
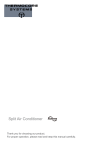
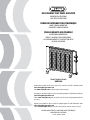
MICATHERMIC FLAT PANEL RADIATOR
IMPORTANT INSTRUCTIONS
SAVE THESE INSTRUCTIONS
PANNEAU RAYONNANT MICATHERMIQUE
MODE D’EMPLOI IMPORTANT
CONSERVEZ CE MODE D’EMPLOI
PANEL RADIANTE MICATHERMIC
INSTRUCIONES IMPORTANTES
REPASE Y GUARDE ESTAS INSTRUCCIONES
LEA CUIDADOSAMENTE ESTE INSTRUCTIVO ANTES
DE USAR SU APARATO
Model/Modèle/Modelo
HMP1500
Register this product on-line and receive a free trial issue of Cook's Illustrated. Visit
www.delonghiregistration.com
Visit www.delonghi.com for a list of service centers near you.
Enregistrez ce produit en ligne et recevez un numéro gratuit de Cook's Illustrated. Visitez
www.delonghiregistration.com
Visitez www.delonghi.com pour y voir une liste des centres de réparation proches de
chez vous.
Registre este producto en línea y reciba un ejemplar gratis de Cook's Illustrated. Visite
www.delonghiregistration.com
Visite www.delonghi.com para ver la lista de centros de servicios cercanos a usted.
ELECTRIC CHARACTERISTICS/ CARACTÉRISTIQUES ÉLECTRIQUES/
CARACTERISTICAS ELECTRICAS
120 V~ 60 Hz 1 500 W
2
FIG. 1
FIG. 2
1
2
3
EN
DESCRIPTION
1 Power selector
2 Pilot lamp
3 Room thermostat
FR
DESCRIPTION DE L’APPAREIL
1 Sélecteur de puissance
2 Voyant lumineux
3 Thermostat d'ambiance
ES
DESCRIPCIÓN DEL APARATO
1 Selector de fónction
2 Piloto
3 Termostato ambiente
FIG. 3
FIG. 4
3
EN
IMPORTANT INSTRUCTIONS
When using electrical appliances, basic precautions should always be followed to reduce risk of fire,
electric shock, and injury to persons, including the following:
1. Read all instructions before using this heater.
2. If your appliance is equipped with a polythene tape used as carry handle, remove it before
connecting appliance to the outlet.
3. This heater is hot when in use. To avoid burns, do not let bare skin touch hot surfaces. Use handle
when moving this heater. Keep combustible materials, such as furniture, pillows, bedding,
papers, clothes, and curtains at least 3 feet (0,9 m) from the front and top of the heater and keep
them away from the sides and rear.
4. The appliance is not intended for use by persons (including children) with reduced physical,
sensory ormental capabilities, or lack of experience and knowledge, unless they have been given
supervision or instruction concerning use of the appliance by a person responsible for their
safety. Children should be supervised to ensure that they do not play with the appliance.
5. Extreme caution is necessary when any heater is used by or near children and whenever the
heater is left operating and unattended.
6. Always unplug heater when not in use.
7. Do not operate any heater with a damaged cord or plug or after the heater
malfunctions, has been dropped or damaged in any manner. Return heater to authorized service facility for examination, electrical or mechanical adjustment, or repair.
8. Do not use outdoors.
9. This heater is not intended for use in bathrooms, laundry areas and similar indoor locations.
Never locate heater where it may fall into a bath tub or other water container.
10. Do not run cord under carpeting. Do not cover cord with throw rugs, runners, or the
like. Arrange cord away from traffic area and where it will not be tripped over.
11. To disconnect heater, turn controls to off, then remove plug from outlet.
12. Connect to properly polarized outlets only.
13. Do not insert or allow foreign objects to enter any ventilation or exhaust opening as this may
cause an electric shock, fire, or damage the heater.
14. To prevent a possible fire, do not block air intakes or exhaust in any manner. Do not use on soft
surfaces, like a bed, where openings may become blocked.
15. A heater has hot or arcing or sparking parts inside. Do not use it in areas where gasoline, paint, or flammable liquids are used or stored.
16. Use this heater only as described in this manual. Any other use not recommended by the
manufacturer may cause fire, electric shock, or injury to persons.
17. To prevent overload and blown fuses, be sure that no other appliance is plugged into the same
outlet (receptacle) or into another outlet (receptacle) wired into the same circuit.
18. It is normal for the heater’s plug and cord to feel warm to the touch. A plug or cord which
becomes hot to the touch or becomes distorted in shape may be a result of a worn electrical
outlet. Worn outlets or receptacles should be replaced prior to further use of the heater.
Plugging heater into a worn outlet /receptacle/ may result in overheating of the power cord or
fire.
19. This heater is not intended for use with an extension cord or outlet strip. Plug the cord directly
into an appropriate wall receptable.
20. Be sure that the plug is fully inserted into an appropriate outlet. Please remember that outlets
also deteriorate due to aging and continuous use: check periodically if signs of overheating or
deformations are evidenced by the plug. Do not use the outlet and CALL your electrician.
4
21. Check that neither the appliance nor the power cable have been damaged in any way during
transportation.
22. Make sure that no pieces of polystyrene or other packaging material have been left on the
appliance. It may be necessary to pass over the appliance with a vacuum cleaner.
23. When switching on the appliance for the first time, allow it to run at full power for at
least two hours to get rid of the unpleasant smell. Make sure that the room in which
the appliance is located is well ventilated during this operation. It is normal for the
appliance to emit small cracking sounds when you turn it on.
24. CAUTION: to prevent electric shock match wide blade of plug to wide slot, then fully insert.
25. Do not cover the appliance while it is functioning in order to avoid overheating which may cause
risk of fire.
SAVE THESE INSTRUCTIONS
For Household use only
HOW TO USE YOUR MICATHERMIC FLAT PANEL RADIATOR
Thank you for choosing this De'Longhi heater. Please read this instruction booklet carefully before using this heater. By doing
so, you will obtain optimum results with maximum safety.
1. General instructions
Remove the heater from the packaging. Check that neither the heater nor the power cable has been damaged during transport. Do not operate the heater if damaged. Your heater is suitable for either freestanding or wall mounting usage. Do not
assemble the feet if wall mounting.
2. Electrical connection
- Before plugging in the appliance, check that your supply voltage is the same as that shown on the rating plate of the
appliance and that the power supply is able to with stand the power consumption (Watts) shown on the rating plate.
- If using more than one appliance at a time, it is important to ensure that the power supply is able to with stand the
power requirements.
3. Free standing operation
To fit the feet to the appliance, proceed as follows:
Fix the foot with the supplied screws, as shown in fig.1.
CAUTION: Never use this heater without feet when not wall-mounted.
ASSEMBLY KIT
The wall mounting kit contains:
4 x screws for wall mounting
4 x anchors (0.6 x 30) for wall mounting
1 x mounting bracket
REQUIRED TOOLS FOR ASSEMBLY AND ESTIMATED ASSEMBLY TIME
Screwdriver PH 2 x 100 (Phillips type)
Estimated assembly time: 30 minutes
4. Wall-Mounting Installation
Before installing the unit , make sure of the following:
a. The heater is not located directly below a power outlet.
b. The power outlet can be easily reached by the plug and after installation.
5
c. No electric cables or other pipes could be damaged during the installation.
d. Keep away from curtains or inflammable materials.
To wall-mount, proceed as follows:
For brick walls use a 15/64" (6 mm) concrete drill bit . For plaster board or false (hollow) walls, it is recommended to use
appropriate screws and anchors (not supplied).
1. Before drilling the wall, mark out a template using the mounting bracket respecting the minimum distances as
shown in fig. 3.
2. Drill the wall where previously marked, and insert the plastic anchors.
3. Fix the bracket with the 2 screws provided (see fig. 4).
4. Hang the heater on the bracket.
5. Mark out the 2 lower fixing points (fig. 2). Remove the appliance, drill the lower holes and insert the wall anchors.
6. Now, you can hang back the heater to the bracket and fix the lower part of the appliance with the 2 remaining
screws.
5. Functioning and use
- Insert the plug into the mains.
- Turn the thermostat knob in a clockwise direction until it reaches the 6 setting.
- Minimum power (750W): turn the function knob to setting “MIN” (the pilot light will light on).
- Maximum power(1500W): turn the function knob to setting “MAX” (the pilot light will light on).
- Switching off: turn the function knob to setting“OFF” and remove the plug.
6. Adjusting the thermostat
Turn the thermostat knob in a clockwise direction until it reaches the maximum setting (6). When the room has reached
the desired temperature, slowly turn the thermostat knob counter-clockwise until you hear a click and not beyond. The
thermostat will now adjust the set temperature automatically keeping it constant.
7. Frost prevention mode
With the thermostat dial at minimum and the mode selector on "MAX", the appliance maintains room temperature at
about 41° F (5°C), preventing freezing with minimal energy consumption.
8. Maintenance
Before carrying out any maintenance, unplug the heater from the mains and wait for it to cool off completely. This heater
requires no particular maintenance. It is sufficient to remove the dustwith a soft, dry cloth. Never use abrasive powders or
solvents. If necessary remove concentrated areas of dirt with a vacuum cleaner.
9. Warnings
- Do not use the heater in the vicinity of bathtubs, wash basins, showers or swimming pools.
- Never use the heater to dry laundry.
- Never place the power cable on top of the heater while it is hot.
- Only use the heater in an upright position.
- If the supply cord is damaged, it must be replaced by the manufacturer, its service agent or similarly qualified persons
in order to avoid a hazard.
- Do not use your heater with a power strip or extension cord. Overheating of a power strip or extension cord could
result in a fire.
- As with any electrical appliance, whilst the instructions aim to cover as many eventualitiesas possible, caution and
common sense should be applied when operating your appliance, particularly in the vicinity of young children.
- The appliance is fitted with a tilt-switch which turns the appliance off should it fall over or become unstable. To
restart the appliance, simply place it upright again.
The appliance is fitted with a safety auto shut-off device which will switch the appliance off in case of accidental
overheating. To reset, disconnect the plug from the power socket for a few minutes, remove the cause of overheating then
plug the appliance in again.
WARNING: In order to avoid overheating, never under any circumstances cover the appliances during operation, as this
would lead to dangerous overheating.
6
LIMITED WARRANTY
This warranty applies to all products with De’Longhi or Kenwood brand names.
What does the warranty cover?
We warrant each appliance to be free from defects in material and workmanship. Our obligation under this warranty is limited
to repair at our factory or authorized service center of any defective parts or part thereof, other than parts damaged in transit.
In the event of a products replacement or return, the unit must be returned transportation prepaid. The repaired or new model
will be returned at the company expense.
This warranty shall apply only if the appliance is used in accordance with the factory directions, which accompany it, and on an
Alternating current ( AC ) circuit.
How long does the coverage last?
This warranty runs for one year (1) from the purchase date found on your receipt and applies only to the original purchaser for
use.
What is not covered by the warranty?
The warranty does not cover defects or damage of the appliance, which result from repairs or alterations to the appliance outside our factory or authorized service centers, nor shall it apply to any appliance, which has been subject to abuse, misuse,
negligence or accidents. Also, consequential and incidental damage resulting from the use of this product or arising out of any
breach of contract or breach of this warranty are not recoverable under this warranty. Some states do not allow the exclusion
or limitation of incidental or consequential damage, so the above limitation may not apply to you.
How do you get service?
If repairs become necessary, see contact information below:
U.S. Residents: Please contact our toll free hotline at 1-800-322-3848 or log onto our website at www.delonghi.com
Residents of Canada: Please contact our toll free hotline at 1-888-335-6644 or log onto our website at www.delonghi.com
Residents of Mexico: Please contact our toll free number 01-800-711-8805 for assistance or log onto our website at
www.delonghi.com
The above warranty is in lieu of all other express warranties and representations. All implied warranties are limited to the
applicable warranty period set forth above. This limitation does not apply if you enter into an extended warranty with
De’Longhi. Some states/countries do not allow limitations on how long an implied warranty lasts, so the above exclusions may
not apply to you. De’Longhi does not authorize any other person or company to assume for it any liability in connection with
the sale or use of its appliance.
How does country law apply?
This warranty gives you specific legal rights, and you may also have other rights, which vary from state to state/country to
country.
7