1
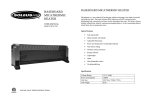
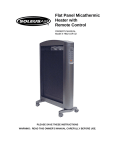
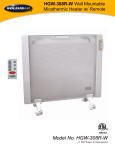
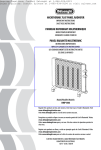
FLAT PANEL
MICATHERMIC
HEATER
USER MANUAL
Model # HGW-308
3057224
PLEASE SAVE THESE INSTRUCTIONS
Table of Contents
INTRODUCTION………………………………………………….……..……… 3
Special Features…………………………………………………………… 3
Specifications……………………………………………………………… 3
HEATER DIAGRAM………………………………………………….………… 4
ASSEMBLY………………………………………………………………..…..… 5
Remove Packaging…………………………………………………………5
Installation……………………..………………………………..….………6
IMPORTANT SAFEGUARDS……………………………………..……….……7
OPERATION…………………………………………………………..………… 8
CLEANING……………………………………………………….………....…… 10
STORAGE……………………………………………………….………....…… 10
TROUBLESHOOTING………………………………………….………....…… 10
WARRANTY……….…………………………………………….………....…… 11
For warranty, technical support, customer service,
missing or defective parts, please call:
(888) 876-5387
2
FLAT PANEL MICATHERMIC HEATER
Introduction
Micathermic heat utilizes technology from both convection and reflective heat. The
heater releases 80% convection and 20% reflective heat, distributing heat consistently
and more evenly throughout the room. The heater radiates heat to warm surrounding
objects, increasing the room temperature. As the surrounding objects absorb heat, the air
temperature rises.
Nowadays, saving energy is very important. Our heater features an ECO function
specifically designed for this reason. When the room temperature reaches the desired
temperature, one-third of energy will be cut-off automatically.
Special Features
¾
¾
¾
¾
¾
¾
¾
¾
¾
¾
Heats instantly
Economic, energy-saving function [ECO]
Adjustable thermostat
Power and temperature controlled light indicator
Anti-freeze setting
Overheat safety protection
Lightweight
Quiet
Low temperature surface
No dehumidifying
Specifications
Voltage Rating
Power Consumption
Unit Size
Unit Weight
120 V, 60Hz
1500W
8.5 in. (L) x 22.5 in. (H) x 24.75 in. (W)
11.5 lbs
3
Heater Diagram
1. Power Switch
2. ECO Green Light
Indicator
3. Temperature Control
Knob
4. Temperature Control
Red Light Indicator
5. Power Supply Cord
6. Foot with Caster
7. Metal Grille
8. Built-in Handle
9. Mounting Hole
10. Mounting Support
11. Screws
12. Mounting Anchor
for Wall Mounting
4
Assembly
Remove Packaging
PLEASE READ ALL INSTRUCTIONS BEFORE OPERATING HEATER!
1. Remove the heater from the
box.
2. Remove the poly foam from
both ends of the heater, and
remove the poly bag.
3. Remove the 2 remaining bags
from the box.
One bag contains:
2 feet with casters. [Fig 1]
The other bag contains:
1 mounting support, 2 screws
and 2 mounting anchors for
wall mounting. [Fig 2]
4.
Save the packaging for storing
the heater while it is not in use
or during summer months.
Note: If any part is damaged or
missing, do not use or attempt
installation. Contact customer
service for a replacement.
5
Installation
Required Tools for Floor Use:
Phillips screwdriver (not supplied)
Estimated Assembly Time for Floor Use:
1 minute
Assembly Instructions for Floor Use:
Insert the feet and bolts onto the unit as shown in the
diagram.
Required Tools for Wall Mounting:
Phillips screwdriver (not supplied), Drill (not supplied),
Hammer (not supplied)
Mounting Instructions:
STEP 1
Using the mounting support as a guide, mark the first
screw hole on the wall.
STEP 2
Move the mounting support, and drill the first screw
hole.
STEP 3
Insert the first mounting anchor into the drilled hole.
STEP 4
Place the mounting support on the wall. Insert a screw
through the mounting support and anchor. Tighten the
screw lightly.
STEP 5
Use the other side of the mounting support to mark the
second screw hole on the wall [approximately 5 7/16
in.].
STEP 6
Move the mounting support, and drill the second hole.
STEP 7
Insert the second mounting anchor into the drilled hole.
STEP 8
Place the mounting support on the wall. Insert the
second screw through the mounting support and
anchor. Firmly tighten both screws.
STEP 9
After mounting the heater, insert two screws into the
bottom holes and secure to wall for safety purposes.
6
Important Safeguards
PLEASE READ ALL INSTRUCTIONS BEFORE OPERATING HEATER!
¾
¾
¾
¾
¾
¾
¾
¾
¾
¾
¾
¾
¾
¾
¾
The heater is hot when in use. To avoid burns, do not let bare skin touch hot
surface. Use handles when moving this heater.
Keep combustible materials, such as drapery and other furnishings, at least 3
feet (0.9M) from the front of the heater and away from its sides and rear.
Do not leave the heater unattended while it is in operation.
Extreme caution is necessary when any heater is used by or near children or
pets, or when the heater is left operating or unattended.
Do not use outdoors. Never locate heater where it may fall into a bathtub or
other water container.
This heater has hot and arcing or sparking parts inside. Do not use in areas
where gasoline, paint or flammable liquids are used or stored.
Do not insert or allow foreign objects to enter any ventilation or exhaust
opening. This may cause electric shock, fire, or damage to the heater.
To prevent a possible fire, do not block air intakes or exhaust in any manner.
Do not operate this appliance on soft surfaces. The air inlet openings can
become blocked.
Avoid using an extension cord. The extension cord may overheat and cause a
risk of fire. If an extension cord must be used, the conductor wire inside the cord
must be No.14 AWG minimum size and rated not less than 1875 watts.
Do not run cord under carpet, and do not cover the cord with throw rugs,
runners, or the like. Place the cord away from traffic areas where it will not be
tripped over.
The heater must not be placed immediately below an outlet.
Do not operate any heater with a damaged cord or plug, after the heater
malfunctions, or has been dropped or damaged in any manner. If the heater is
damaged, it must be serviced by the manufacturer or a similarly qualified
service agent to ensure safety.
Connect the heater to properly grounded outlets only.
Use this heater only as described in this manual. Any other use not
recommended by the manufacturer may cause fire, electric shock, or injury to
persons.
Do not use this heater with a programmer, timer or any other device that
switches the heater on automatically, since a fire risk exists if the heater is
covered or positioned incorrectly.
WARNING: This heater is equipped with a polarized plug (one blade is wider than the
other). The plug is intended to fit into a power outlet only one way, with the wide blade
in the wide slot. This is a safety feature, if you are unable to insert the plug fully into the
outlet, try reversing the plug. If the plug still does not fit, contact a qualified electrician.
DO NOT DEFEAT THE SAFETY PURPOSE OF THE POLARIZED PLUG.
7
Operation
PLEASE READ ALL INSTRUCTIONS BEFORE OPERATING HEATER!
1. Make sure the Temperature
Control Knob is at the “DOT”
position. [Fig 1]
Make sure the power switch is at
the off position.
[Fig 2]
2. Plug the power cord into a
suitable electrical outlet.
[Rated not less than 115 volt].
3. Turn the power switch to the
“ON” position. Adjust the
Temperature Control Knob
clockwise until the Red Light
Indicator turns on [Fig 2]. The
Temperature Control should
begin.
Note: The Red Light Indicator
will turn off when the room
reaches the desired temperature.
After a while, as the room
temperature falls, the heater will
turn on again and release heat
until the room temperature rises
to the desired temperature.
Desired room temperature is
maintained automatically by this
procedure.
You can adjust the temperature
control knob to increase or
decrease the room temperature as
desired by turning the knob
clockwise or counter-clockwise
direction as shown in Fig 2.
8
4. Comfortable Zone
To obtain a desirable
temperature, there is an area
indicated on the Temperature
Control Knob known as the
“Comfortable Zone.” You can
adjust the knob to select a
temperature within this range.
5. Anti-Freeze Setting
This setting keeps the
temperature of the surrounding
area above freezing to prevent
pipes from breaking. To do this,
simply plug in the heater and
turn the Temperature Control
Knob to the “Snowflake”
position. The heater will
automatically turn on when the
ambient temperature drops
below 41°F.
6. Economic Energy Saving
Function (ECO)
When the room temperature
reaches a certain point, the ECO
Green Light will switch on,
indicating that one-third of the
power has been cut-off
automatically to save energy.
[our 1500 Watt heater will work
on 1000 Watts]
7. Overheat Safety Protection
The heater comes equipped with
overheat safety protection, so it
can detect if it is overheating and
will automatically shut off.
When the unit temperature falls
again, power will be resumed.
To avoid overheating and
potential risk of fire, DO NOT
cover the heater.
9
Cleaning
¾
¾
¾
¾
¾
Before cleaning, turn off the heater, unplug the power cord and allow the heater
to cool.
Do not immerse the power cord, plug or heater in water or other liquid or pour
water or other liquid over the heater.
Use a vacuum cleaner to remove dust and lint from the metal grille of the heater.
Wipe the heater with a dry cloth to remove dust and a damp cloth [not wet] to
clean off stains.
Do not use detergents, abrasive cleaning powder or polish of any kind on the
body of the heater, as these can damage the finish.
Storage
¾
¾
Store the heater in a cool dry location.
To prevent dust and dirt build up, use the old packaging to repack the unit.
Troubleshooting
HEATER WILL NOT HEAT
1. Make certain the heater is plugged in and turned on.
2. Make certain the Temperature Control Knob is in the right position.
3. Make certain there are no objects covering the unit.
HEATER WILL NOT TURN ON
1. Make certain the power cord is plugged into an electrical outlet.
2. Make certain the electricity or main fuse is working.
3. Make certain the power switch is in the ON position.
4. Make certain the heater is on the Thermostat Control condition [ensure the Light
Indicator is on].
Printed in China
10
WARRANTY
One Year Limited Warranty
Soleus International Inc. warrants the accompanying Soleus Air HGW-308 to be free of defects in
material and workmanship for the applications specified in its operation instruction for a period of
ONE (1) year from the date of original retail purchase in the United States or Canada.
If the heater exhibits a defect in normal use, Soleus International Inc. will, at its option, either
repair or replace it, free of charge within a reasonable time during the warranty period.
As a condition to any warranty service obligation, the consumer must present this Warranty
Certificate along with a copy of the original purchase invoice or sales receipt.
THIS WARRANTY DOES NOT COVER:
1) Damage, accidental or otherwise, to the heater while in the possession of a consumer not caused
by a defect in material or workmanship.
2) Damage caused by consumer misuse, tampering, or failure to follow the care and special
handling provisions in the instructions.
3) Damage to the finish of the case, or other appearance parts caused by wear.
4) Damage caused by repairs or alterations of the heater by anyone other than those authorized by
Soleus International Inc.
5) Freight and Insurance cost for the warranty service.
ALL WARRANTIES, INCLUDING ANY IMPLIED WARRANTY OF MERCHANT ABILITY
ARE LIMITED TO ONE-YEAR DURATION OF THIS EXPRESS LIMITED WARRANTY.
SOLEUS INTERNATIONAL INC. DISCLAIMS ANY LIABILITY FOR CONSEQUENTIAL
OR INCIDENTAL DAMAGES AND IN NO EVENT SHALL SOLEUS INTERNATIONAL
INC’S LIABILITY EXCEED THE RETAIL VALUE OF THE HEATER FOR BREACH OF ANY
WRITTEN OR IMPLIED WARRANTY WITH RESPECT TO THIS HEATER.
This warranty covers only new products purchased from our authorized dealers or retailers. It does
not cover used, salvaged, or refurbished products.
As some states do not allow the limitation or exclusion of incidental or consequential damages, or
do not allow limitation on implied warranties, the above limitations and exclusions may not apply
to you. This warranty gives you specific legal rights, and you may also have other rights that vary
from state to state.
For Warranty, Technical Support, Customer Service, Missing or Defective Parts
Please Call (888) 876-5387
Or Write To:
Soleus International Inc.
9451 Telstar Ave.
El Monte, CA 91731 USA
www.soleusair.com
11