1
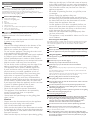
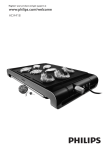
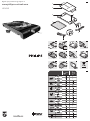
Register your product and get support at
1
www.philips.com/welcome
HD6340
2
4
5
6
7
8
9
10
11
12
13
IN
M
3
14
Min.
4222.005.0431.2
English
Introduction
Congratulations on your purchase and welcome to Philips! To fully benefit
from the support that Philips offers, register your product at
www.philips.com/welcome. Your new grill with drip tray allows you to
prepare all kinds of tasty food almost smoke-free. Grilling with this appliance
is easy because of the large grilling surface.
General description (Fig. 1)
A Cool-touch handgrips
B Dishwasher-safe grilling plate
CBase
D Drip tray
E Thermostat unit socket
F Thermostat unit
G Temperature control with on/off position and heating-up light
H Mains cord with twist tie
I Two-in-one spatula and tongs
Important
Read this user manual carefully before you use the
appliance and save it for future reference.
Danger
-- Do not immerse the thermostat unit with mains cord
in water or any other liquid.
Warning
-- Check if the voltage indicated on the bottom of the
appliance corresponds to the local mains voltage
before you connect the appliance.
-- Do not use the appliance if the plug, the mains cord
or the appliance itself is damaged.
-- If the mains cord is damaged, you must have it replaced
by Philips, a service centre authorised by Philips or
similarly qualified persons in order to avoid a hazard.
-- Only connect the appliance to an earthed wall socket.
-- Keep the mains cord away from hot surfaces.
-- Do not let the mains cord hang over the edge of the
table or worktop on which the appliance stands.
-- This appliance can be used by children aged from
8 years and above and by persons with reduced
physical, sensory or mental capabilities or lack of
experience and knowledge if they have been given
supervision or instruction concerning use of the
appliance in a safe way and if they understand the
hazards involved. Cleaning and user maintenance shall
not be made by children unless they are older than
8 and supervised. Keep the appliance and its cord out
of reach of children aged less than 8 years.
-- Children shall not play with the appliance.
-- Never let the appliance operate unattended.
-- This appliance is not intended to be operated by
means of an external timer or a separate
remote-control system.
-- Never leave the spatula/tongs on the grilling plate
when it is hot.
Caution
-- Always insert the thermostat unit into the appliance
before you put the plug in the wall socket.
-- Only use the thermostat unit supplied.
-- Make sure that the inside of the thermostat unit socket
is completely dry before you insert the thermostat unit.
-- Put the appliance on a flat, stable surface with sufficient
free space around it.
-- Make sure the drip tray is always in place during grilling.
-- Make sure the drip tray is filled with water at least up
to the MIN level before you start using the appliance.
-- Always preheat the plate before you put any food on it.
-- The accessible surfaces may become hot when the
appliance operates.
-- Be careful of spattering fat when you grill fatty meat
or sausages.
-- Always unplug the appliance after use.
-- Always switch off the appliance after use and remove
the mains plug from the wall socket before you remove
the thermostat unit from the thermostat unit socket.
-- Always clean the appliance after use.
-- Let the appliance cool down completely before you
remove the plate, clean the appliance or put it away.
-- Never touch the plate with sharp or abrasive items,
as this damages the non-stick coating.
-- Make sure you reassemble the plate properly after
you have removed it.
-- This appliance is only intended for indoor use. Do not
use it outdoors.
Electromagnetic fields (EMF)
This Philips appliance complies with all standards regarding electromagnetic
fields (EMF). If handled properly and according to the instructions in this
user manual, the appliance is safe to use based on scientific evidence
available today.
Before first use
1Remove any stickers and wipe the body of the appliance with a damp cloth.
2Clean the appliance and the plate thoroughly (see chapter ‘Cleaning’).
Using the appliance
Note:The appliance may produce some smoke when you use it for the first
time.This is normal.
1Slide the drip tray into the base (Fig. 2).
Note:The drip tray can only be slid into the base in one way.
2Fill the drip tray up to the minimum water level indication
(MIN) (Fig. 3).
-- The water in the drip tray helps to prevent food particles from getting
burnt.
-- To make cleaning easier, you can line the drip tray with aluminium foil
before you fill it with water.
-- When you line the drip tray, make sure the foil does not hang over the
sides of the tray, as this prevents proper air circulation.
3Place the grilling plate into the slots in the base (Fig. 4).
Note:The grilling plate only fits in the base in one way.
4Insert the thermostat unit into the thermostat unit socket in the side
of the appliance.  (Fig. 5)
5Turn the temperature control to the position appropriate for the
ingredients to be grilled (see section ‘Grilling times’ in this chapter).
,, The heating-up light goes on.
6Use the spatula/tongs provided to place the ingredients on the grilling
plate when the heating-up light goes out.
Be careful: the grilling plate is hot!
Note: Use the spatula with the serrated end for the ribbed section of the plate
and use the spatula with the straight end for the flat section of the plate .
,, During the grilling process, the heating-up light comes on and goes
out from time to time. This indicates that the heating element is
switched on and off to maintain the correct temperature.
7Turn the food from time to time with the spatula/tongs provided.
8When the food is done, remove it from the grilling plate.
Use the spatula/tongs provided to remove the food. Do not use metal,
sharp or abrasive kitchen utensils.
9For optimal results, remove excess oil from the grilling plate with a
piece of kitchen paper. Loosen any caked food or grease carefully with
the spatulas provided and remove it from the plate before you grill
the next batch of food.
10To continue grilling, place the next batch of food on the grilling plate
when the heating-up light goes out.
Grilling times
In the table at the end of this booklet you find some types of food you can
cook on this table grill. The table shows which temperature to select and
how long the food has to be grilled. The time required to heat up the
appliance has not been included in the grilling times indicated in the table.
The grilling time and temperature depend on the type of food that you
prepare (e.g. meat), its thickness and its temperature and also on your own
taste. You can also refer to the indications on the thermostat unit.
Tips
-- The ribbed section of the grilling plate is ideal for preparing meat and
poultry (Fig. 6).
-- The flat section of  the grilling plate is ideal for preparing fish, eggs,
ham, mushrooms, tomatoes, onions, etc. It is also handy for keeping food
hot (Fig. 7).
-- You can also use the table grill as a thermostatically controlled hotplate
that automatically keeps your dishes at the required temperature.
Cover the ribbed section of the plate with aluminium foil with the shiny
side facing upwards. Then set the temperature control to position 2 or 3.
-- Tender pieces of meat are best suited for grilling.
-- Pieces of meat such as steaks or spare rib chops become more tender
if marinated overnight.
-- Turn the food from time to time with the spatula/tongs provided to
ensure that it remains juicy inside and does not dry out. Do not use any
metal tools like forks or grill tongs as they damage the non-stick coating
of the grilling plate.
-- Do not turn the grilled food too frequently. When the items are brown
on both sides, grill them at a lower temperature to ensure they do not
dry out and are cooked more evenly.
-- If you want to defrost frozen food, wrap the frozen food in aluminium foil
and set the temperature control to position 3 or 4. Turn the food from
time to time. The defrosting time depends on the weight of the food.
-- When you prepare satay, chicken, pork or veal, first sear the meat at a
high temperature (position 5). If necessary, you can then set the
temperature control one position lower and grill the food until it is done.
-- When you make satay or kebab, soak bamboo or wooden skewers in
water to prevent them from getting scorched during grilling. Do not use
metal skewers.
-- Sausages tend to burst when they are being grilled. To prevent this,
punch a few holes in them with a fork.
-- Fresh meat gives better grilling results than frozen or defrosted meat.
Do not put salt on the meat until after you have grilled it. This helps to
keep the meat juicy. For the best result, make sure the pieces of meat
you prepare are not too thick (approx. 1.5cm).
This table grill is not suitable for grilling breadcrumbed food.
Cleaning
Never use abrasive cleaning agents and materials, as this damages the
non-stick coating of the plate.
1Set the temperature control to the ‘OFF’ position.
2Unplug the appliance and let it cool down.
3Pull the thermostat unit out of the appliance (Fig. 8).
4Wipe the thermostat unit with a damp cloth.
Do not immerse the thermostat unit with mains cord in water or any
other liquid.
5Remove excess oil from the grilling plate with a piece of kitchen
paper before you remove the grilling plate for cleaning.
6Lift the grilling plate from the base by its handgrips (Fig. 9).
Note: If the thermostat unit is still inserted into the appliance, you cannot
remove the grilling plate.
7Soak the grilling plate in hot water with some washing-up liquid for
five minutes or drizzle some lemon juice onto the grilling plate.
This loosens any caked food or grease.
8Slide the drip tray out of the base (Fig. 10).
Note:The drip tray can only be slid out of the base in one way.
9Clean the base and the drip tray with a damp cloth.
10Clean the grilling plate and spatula/tongs with a soft cloth or sponge
in hot water with some washing-up liquid or in the dishwasher.
11Dry the grilling plate, drip tray and spatula/tongs.
The inside of the thermostat unit socket must be completely dry before
you reinsert the thermostat unit into it. To dry the socket, wipe the inside
with a dry cloth. If necessary, shake out excess water first.
12Reassemble the appliance.
Storage
1Leave the thermostat unit in the grill. Wind  the cord and fix it with
the twist tie (Fig. 11).
2Store the grill in upright position on a dry and level surface (Fig. 12).
Note: Make sure that the stoppers are at the bottom, so that the drip tray
cannot fall out of the appliance.
Environment
-- Do not throw away the appliance with the normal household waste at
the end of its life, but hand it in at an official collection point for
recycling. By doing this, you help to preserve the environment (Fig. 13).
Guarantee & service
If you need service or information or if you have a problem, please visit
the Philips website at www.philips.com/support or contact the Philips
Consumer Care Centre in your country. You find its phone number in the
worldwide guarantee leaflet. If there is no Consumer Care Centre in your
country, go to your local Philips dealer.
Food table (Fig. 14)
dEUTSCH
Einführung
Herzlichen Glückwunsch zu Ihrem Kauf und willkommen bei Philips! Um das
Kundendienstangebot von Philips vollständig nutzen zu können, sollten Sie
Ihr Produkt unter www.philips.com/welcome registrieren.
Mit Ihrem neuen Grill können Sie eine Vielzahl leckerer Speisen zubereiten,
wobei die Auffangschale für fast rauchfreies Grillen sorgt. Die große
Grillfläche macht das Grillen mit diesem Gerät besonders einfach.
Allgemeine Beschreibung (Abb. 1)
ACool-Touch-Handgriffe
B Spülmaschinenfeste Grillplatte
CGerätebasis
DAuffangschale
EThermostatbuchse
FThermostat
G Temperaturregler mit Ein-/Aus-Position und Kontrolllampe
H Netzkabel mit Kabelbinder
I 2-in-1 Grillzange
Wichtig
Lesen Sie diese Bedienungsanleitung vor dem Gebrauch
des Geräts aufmerksam durch, und bewahren Sie sie für
eine spätere Verwendung auf.
Gefahr
-- Tauchen Sie den Thermostat mit Netzkabel nicht in
Wasser oder andere Flüssigkeiten.
Warnhinweis
-- Prüfen Sie vor Inbetriebnahme, ob die Spannungsangabe
auf der Unterseite des Geräts mit der örtlichen
Netzspannung übereinstimmt.
-- Verwenden Sie das Gerät nicht, wenn der
Netzstecker, das Netzkabel oder das Gerät selbst
defekt oder beschädigt sind.
-- Um Gefährdungen zu vermeiden, darf ein defektes
Netzkabel nur von einem Philips Service-Center,
einer von Philips autorisierten Werkstatt oder einer
ähnlich qualifizierten Person durch ein
Original-Ersatzkabel ersetzt werden.
-- Schließen Sie das Gerät nur an eine geerdete
Steckdose an.
-- Achten Sie darauf, dass das Netzkabel nicht in der
Nähe heißer Flächen verläuft.
-- Lassen Sie das Netzkabel nicht über den Rand der
Arbeitsfläche hängen, auf der das Gerät steht.
-- Dieses Gerät kann von Kindern ab 8 Jahren und
Personen mit verringerten physischen, sensorischen oder
psychischen Fähigkeiten oder Mangel an Erfahrung und
Kenntnis verwendet werden, wenn sie bei der
Verwendung beaufsichtigt werden oder Anweisung zum
sicheren Gebrauch des Geräts erhalten und die Gefahren
verstanden haben. Reinigung und Pflege des Geräts
dürfen nicht von Kindern durchgeführt werden,
außer Sie sind älter als 8 Jahre und beaufsichtigt.
Bewahren Sie das Gerät und das Kabel außerhalb der
Reichweite von Kindern unter 8 Jahren auf.
-- Kinder dürfen nicht mit dem Gerät spielen.
-- Lassen Sie das eingeschaltete Gerät niemals unbeaufsichtigt.
-- Dieses Gerät ist nicht dafür geeignet, über einen externen
Timer oder ein separates Fernbedienungssystem
gesteuert zu werden.
-- Lassen Sie die Zange nie auf der heißen Grillplatte
liegen.
Achtung
-- Stecken Sie immer zuerst den Thermostat in das
Gerät, bevor Sie den Gerätestecker an eine Steckdose
anschließen.
-- Verwenden Sie nur den mitgelieferten Thermostat.
-- Achten Sie darauf, dass die Innenseite der
Thermostatbuchse vollkommen trocken ist, bevor Sie
den Thermostat anschließen.
-- Stellen Sie das Gerät auf eine ebene und feste
Oberfläche, und halten Sie rund um das Gerät
ausreichend Platz frei.
-- Stellen Sie sicher, dass die Auffangschale während des
Grillens immer richtig platziert ist.
-- Stellen Sie sicher, dass die Auffangschale mindestens
bis zur MIN-Markierung mit Wasser gefüllt ist,
bevor Sie das Gerät verwenden.
-- Heizen Sie die Platte immer vor, bevor Sie Grillgut
darauf legen.
-- Die zugänglichen Oberflächen können bei e
ingeschaltetem Gerät heiß werden!
-- Vorsicht vor Fettspritzern beim Grillen von fettem
Fleisch und Würstchen!
-- Ziehen Sie nach jedem Gebrauch den Netzstecker
aus der Steckdose.
-- Schalten Sie das Gerät nach Gebrauch immer aus,
und ziehen Sie den Netzstecker aus der Steckdose,
bevor Sie den Thermostat aus der Thermostatbuchse
entnehmen.
-- Reinigen Sie das Gerät nach jedem Gebrauch.
-- Lassen Sie das Gerät vollständig abkühlen, bevor Sie die
Platte entfernen, das Gerät reinigen und wegstellen.
-- Berühren Sie die Platte nicht mit spitzen oder
scheuernden Gegenständen, um Beschädigungen der
Antihaft-Beschichtung zu vermeiden.
-- Stellen Sie sicher, dass Sie die Grillplatte wieder
korrekt einsetzen, nachdem Sie sie abgenommen haben.
-- Dieses Gerät ist nur für den Gebrauch in Innenräumen
vorgesehen. Verwenden Sie das Gerät nicht im Freien.
Elektromagnetische Felder
Dieses Philips Gerät erfüllt sämtliche Normen bezüglich
elektromagnetischer Felder (EMF). Nach aktuellen wissenschaftlichen
Erkenntnissen ist das Gerät sicher im Gebrauch, sofern es ordnungsgemäß
und entsprechend den Anweisungen in dieser Bedienungsanleitung
gehandhabt wird.
Vor dem ersten Gebrauch
1Entfernen Sie alle Aufkleber, und wischen Sie das Gehäuse des Geräts
mit einem feuchten Tuch ab.
2Reinigen Sie das Gerät und die Platte gründlich (siehe “Reinigung”).
Das Gerät benutzen
Hinweis: Beim ersten Gebrauch kann das Gerät etwas Rauch entwickeln.
Das ist normal und kein Grund zur Beunruhigung.
1Schieben Sie die Auffangschale in die Gerätebasis (Abb. 2).
Hinweis: Die Auffangschale kann nur in einer Richtung in die Gerätebasis
geschoben werden.
2Füllen Sie die Auffangschale bis zur minimalen Wasserstandsanzeige
(MIN) (Abb. 3).
-- Das Wasser in der Auffangschale verhindert das Verbrennen von
Lebensmittelpartikeln.
-- Um das Reinigen zu erleichtern, können Sie die Auffangschale mit
Alu-Folie auslegen, bevor Sie sie mit Wasser füllen.
-- Achten Sie beim Auslegen der Auffangschale darauf, dass die Folie nicht
über die Ränder der Schale hinaus ragt, damit die erforderliche
Belüftung nicht blockiert wird.
3Setzen Sie die Grillplatte in die Schlitze der Gerätebasis (Abb. 4).
Hinweis: Die Grillplatte lässt sich nur in einer Richtung in die Gerätebasis einsetzen.
4Stecken Sie den Thermostat in die Thermostatbuchse an der Seite des
Geräts.  (Abb. 5)
5Stellen Sie den Temperaturregler auf die für das Grillgut erforderliche
Temperatur (siehe Abschnitt “Grillzeiten” in diesem Kapitel).
,, Die Kontrolllampe leuchtet auf.
6Legen Sie die Zutaten mithilfe der Zange auf die Grillplatte, wenn die
Kontrolllampe erlischt.
Seien Sie vorsichtig, die Grillplatte ist heiß!
Hinweis:Verwenden Sie die gezackte Seite der Zange für den gerippten und die
glatte Seite für den flachen Abschnitt der Platte..
,, Während des Grillvorgangs leuchtet die Bereitschaftsanzeige
gelegentlich auf. Dadurch wird signalisiert, dass das Heizelement
ein- und wieder ausgeschaltet wird, um die benötigte Temperatur
beizubehalten.
7Wenden Sie das Grillgut von Zeit zu Zeit mit der mitgelieferten
Zange.
8Nehmen Sie das Grillgut von der Grillplatte, wenn es fertig gegart ist.
Verwenden Sie die Zange, um das Grillgut von der Platte zu nehmen.
Verwenden Sie keine Gegenstände aus Metall oder spitze bzw. scheuernde
Utensilien.
9Um optimale Ergebnisse zu erzielen, entfernen Sie überschüssiges Fett
mit Haushaltspapier von der Grillplatte. Lösen Sie hartnäckige Reste
und Fett mit der mitgelieferten Zange, bevor Sie eine weitere Portion
zum Grillen auf die Grillplatte legen.
10Wenn die Kontrolllampe erlischt, können Sie eine weitere Portion
zum Grillen auf die Grillplatte legen.
Grillzeiten
In der Tabelle am Ende dieser Bedienungsanleitung finden Sie eine Reihe von
Speisen, die Sie mit dem Tischgrill zubereiten können. Gleichzeitig gibt die Tabelle
Auskunft über die empfohlene Temperatur und die Grillzeiten. Die zum Vorheizen
des Geräts erforderliche Zeit ist in den angegebenen Grillzeiten nicht enthalten.
Grillzeit und Grilltemperatur hängen von der Art (z. B. Fleisch), der Dicke und der
Temperatur des jeweiligen Grillguts ab – und natürlich auch von Ihren persönlichen
Vorlieben. Sie können sich auch an den Hinweisen auf dem Thermostat orientieren.
Tipps
-- Die gerippte Fläche der Grillplatte eignet sich hervorragend für die
Zubereitung von Fleisch und Geflügel (Abb. 6).
-- Die flache Oberfläche eignet sich ideal für die Zubereitung von Fisch,
Eiern, Speck, Pilzen, Tomaten, Zwiebeln usw. sowie zum Warmhalten von
Speisen (Abb. 7).
-- Sie können den Tischgrill ebenfalls als Wärmeplatte verwenden. Der
Thermostat garantiert, dass Ihre Speisen bei konstanter Temperatur
warm gehalten werden. Bedecken Sie die gerippte Fläche der Grillplatte
mit Alu-Folie (glänzende Seite nach oben), und stellen Sie den
Temperaturregler auf die Stufe 2 oder 3.
-- Am besten eignet sich zartes Fleisch zum Grillen.
-- Steaks oder Rippchen werden noch zarter, wenn sie über Nacht
mariniert werden.
-- Wenden Sie das Grillgut während des Grillens mit der mitgelieferten
Zange, um sicherzustellen, dass es saftig bleibt und nicht austrocknet.
Verwenden Sie keine Metallgegenstände wie Gabeln oder Grillzangen,
um die Antihaft-Beschichtung nicht zu beschädigen.
-- Wenden Sie das Grillgut nicht zu häufig. Sind beide Seiten braun
gebraten, sollte die Grilltemperatur verringert werden, damit das
Grillgut gleichmäßiger gegart wird und nicht austrocknet.
-- Beim Auftauen tiefgefrorener Lebensmittel wickeln Sie diese zunächst
in Aluminiumfolie und stellen den Temperaturregler auf Stufe 3 oder
4. Wenden Sie das Gut von Zeit zu Zeit. Die erforderliche Auftauzeit
hängt vom Gewicht der Lebensmittel ab.
-- Bei der Zubereitung von Satée, Huhn, Schweine- oder Kalbsfleisch
braten Sie das Fleisch zunächst bei hoher Temperatur (Stufe 5) an.
Zum Garen des Grillguts können Sie die Temperatur ggf. eine Stufe
niedriger einstellen.
-- Bei der Zubereitung von Satée oder Kebab weichen Sie Bambus- bzw.
Holzspieße in Wasser ein, um ein Anbrennen beim Grillen zu
vermeiden. Verwenden Sie keine Metallspieße.
-- Da Würstchen meistens beim Grillen platzen, empfiehlt es sich,
vorher mit einer Gabel einige Löcher in die Würstchen zu stechen.
-- Frisches Fleisch führt zu besseren Ergebnissen als tiefgefrorenes oder
aufgetautes Fleisch. Salzen Sie das Fleisch erst nach dem Grillen.
So bleibt es saftiger. Beste Ergebnisse erzielen Sie, wenn das Grillfleisch
nicht zu dick ist (ca. 1,5 cm).
Dieser Tischgrill eignet sich nicht zum Grillen von panierten Lebensmitteln.
Pflege
Reinigen Sie die Platte niemals mit Scheuermitteln oder
Scheuerschwämmen, um die Antihaft-Beschichtung nicht zu beschädigen.
1Stellen Sie den Temperaturregler in die Position “AUS”.
2Ziehen Sie den Netzstecker, und lassen Sie das Gerät abkühlen.
3Ziehen Sie den Thermostat aus dem Gerät (Abb. 8).
4Wischen Sie den Thermostat mit einem feuchten Tuch ab.
Tauchen Sie den Thermostat mit Netzkabel nicht in Wasser oder andere
Flüssigkeiten.
5Entfernen Sie Fett-/Ölrückstände mit Haushaltspapier von der
Grillplatte, bevor Sie sie zum Reinigen abnehmen.
6Heben Sie die Grillplatte an den Handgriffen von der
Gerätebasis (Abb. 9).
Hinweis: Die Grillplatte kann nur entfernt werden, wenn der Thermostat aus
dem Gerät genommen ist.
7Weichen Sie die Grillplatte 5 Minuten in heißem Spülwasser ein, oder
schütten Sie etwas Zitronensaft darüber. Hartnäckige Reste und Fett
werden dadurch gelöst.
8Ziehen Sie die Auffangschale aus der Gerätebasis (Abb. 10).
Hinweis: Die Auffangschale kann nur in einer Richtung aus der Gerätebasis
gezogen werden.
9Reinigen Sie die Gerätebasis und die Auffangschale mit einem
feuchten Tuch.
10Reinigen Sie Grillplatte und die Zange mit einem weichen Tuch oder
Schwamm in heißem Spülwasser oder im Geschirrspüler.
11Trocknen Sie die Grillplatte, die Auffangschale und die Zange.
Die Innenseite des Thermostats muss vollkommen trocken sein, bevor Sie
ihn wieder einsetzen. Zum Trocknen der Thermostatbuchse wischen Sie
die Innenseite mit einem trockenen Tuch aus. Schütteln Sie überschüssiges
Wasser ggf. vorher aus.
12Setzen Sie das Gerät wieder zusammen.
Aufbewahrung
1Lassen Sie den Thermostat im Grill, wickeln Sie das Kabel auf, und
fixieren Sie es mit dem Kabelbinder (Abb. 11).
2Stellen Sie den Grill senkrecht auf einer trockenen und ebenen
Unterlage ab (Abb. 12).
Hinweis: Achten Sie darauf, dass sich die Stopper unten befinden, damit die
Auffangschale nicht aus dem Gerät fallen kann.
Umwelt
-- Werfen Sie das Gerät am Ende der Lebensdauer nicht in den normalen
Hausmüll. Bringen Sie es zum Recycling zu einer offiziellen Sammelstelle.
Auf diese Weise tragen Sie zum Umweltschutz bei (Abb. 13).
Garantie und Kundendienst
Benötigen Sie weitere Informationen oder treten Probleme auf, besuchen
Sie bitte die Philips Website www.philips.com/support, oder setzen Sie
sich mit einem Philips Service-Center in Ihrem Land in Verbindung.
Die Telefonnummer finden Sie in der internationalen Garantieschrift. Sollte
es in Ihrem Land kein Service-Center geben, wenden Sie sich bitte an Ihren
Philips Händler.
Grillzeiten-Tabelle (Abb. 14)