1
10To continue grilling, place the next batch of food on the grilling plate
when the heating-up light goes out.
Grilling times
In the table at the end of this booklet you find some types of food you can
cook on this table grill. The table shows which temperature to select and
how long the food has to be grilled. The time required to heat up the
appliance has not been included in the grilling times indicated in the table.
The grilling time and temperature depend on the type of food that you
prepare (e.g. meat), its thickness and its temperature and also on your own
taste. You can also refer to the indications on the thermostat unit.
Tips
-- The ribbed section of the grilling plate is ideal for preparing meat and
poultry (Fig. 6).
-- The flat section of  the grilling plate is ideal for preparing fish, eggs,
ham, mushrooms, tomatoes, onions, etc. It is also handy for keeping food
hot (Fig. 7).
-- You can also use the table grill as a thermostatically controlled hotplate
that automatically keeps your dishes at the required temperature.
Cover the ribbed section of the plate with aluminium foil with the shiny
side facing upwards. Then set the temperature control to position 2 or 3.
-- Tender pieces of meat are best suited for grilling.
-- Pieces of meat such as steaks or spare rib chops become more tender
if marinated overnight.
-- Turn the food from time to time with the spatula/tongs provided to
ensure that it remains juicy inside and does not dry out. Do not use any
metal tools like forks or grill tongs as they damage the non-stick coating
of the grilling plate.
-- Do not turn the grilled food too frequently. When the items are brown
on both sides, grill them at a lower temperature to ensure they do not
dry out and are cooked more evenly.
-- If you want to defrost frozen food, wrap the frozen food in aluminium foil
and set the temperature control to position 3 or 4. Turn the food from
time to time. The defrosting time depends on the weight of the food.
-- When you prepare satay, chicken, pork or veal, first sear the meat at a
high temperature (position 5). If necessary, you can then set the
temperature control one position lower and grill the food until it is done.
-- When you make satay or kebab, soak bamboo or wooden skewers in
water to prevent them from getting scorched during grilling. Do not use
metal skewers.
-- Sausages tend to burst when they are being grilled. To prevent this,
punch a few holes in them with a fork.
-- Fresh meat gives better grilling results than frozen or defrosted meat.
Do not put salt on the meat until after you have grilled it. This helps to
keep the meat juicy. For the best result, make sure the pieces of meat
you prepare are not too thick (approx. 1.5cm).
This table grill is not suitable for grilling breadcrumbed food.
Cleaning
Never use abrasive cleaning agents and materials, as this damages the
non-stick coating of the plate.
1Set the temperature control to the ‘OFF’ position.
2Unplug the appliance and let it cool down.
3Pull the thermostat unit out of the appliance (Fig. 8).
4Wipe the thermostat unit with a damp cloth.
Do not immerse the thermostat unit with mains cord in water or any
other liquid.
5Remove excess oil from the grilling plate with a piece of kitchen
paper before you remove the grilling plate for cleaning.
6Lift the grilling plate from the base by its handgrips (Fig. 9).
Note: If the thermostat unit is still inserted into the appliance, you cannot
remove the grilling plate.
7Soak the grilling plate in hot water with some washing-up liquid for
five minutes or drizzle some lemon juice onto the grilling plate.
This loosens any caked food or grease.
8Slide the drip tray out of the base (Fig. 10).
Note:The drip tray can only be slid out of the base in one way.
9Clean the base and the drip tray with a damp cloth.
10Clean the grilling plate and spatula/tongs with a soft cloth or sponge
in hot water with some washing-up liquid or in the dishwasher.
11Dry the grilling plate, drip tray and spatula/tongs.
The inside of the thermostat unit socket must be completely dry before
you reinsert the thermostat unit into it. To dry the socket, wipe the inside
with a dry cloth. If necessary, shake out excess water first.
12Reassemble the appliance.
Storage
1Leave the thermostat unit in the grill. Wind  the cord and fix it with
the twist tie (Fig. 11).
2Store the grill in upright position on a dry and level surface (Fig. 12).
Note: Make sure that the stoppers are at the bottom, so that the drip tray
cannot fall out of the appliance.
Environment
-- Do not throw away the appliance with the normal household waste at
the end of its life, but hand it in at an official collection point for
recycling. By doing this, you help to preserve the environment (Fig. 13).
Guarantee & service
If you need service or information or if you have a problem, please visit
the Philips website at www.philips.com/support or contact the Philips
Consumer Care Centre in your country. You find its phone number in the
worldwide guarantee leaflet. If there is no Consumer Care Centre in your
country, go to your local Philips dealer.
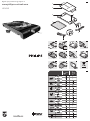
Food table (Fig. 14)
dEUTSCH
Einführung
Herzlichen Glückwunsch zu Ihrem Kauf und willkommen bei Philips! Um das
Kundendienstangebot von Philips vollständig nutzen zu können, sollten Sie
Ihr Produkt unter www.philips.com/welcome registrieren.
Mit Ihrem neuen Grill können Sie eine Vielzahl leckerer Speisen zubereiten,
wobei die Auffangschale für fast rauchfreies Grillen sorgt. Die große
Grillfläche macht das Grillen mit diesem Gerät besonders einfach.
Allgemeine Beschreibung (Abb. 1)
ACool-Touch-Handgriffe
B Spülmaschinenfeste Grillplatte
CGerätebasis
DAuffangschale
EThermostatbuchse
FThermostat
G Temperaturregler mit Ein-/Aus-Position und Kontrolllampe
H Netzkabel mit Kabelbinder
I 2-in-1 Grillzange
Wichtig
Lesen Sie diese Bedienungsanleitung vor dem Gebrauch
des Geräts aufmerksam durch, und bewahren Sie sie für
eine spätere Verwendung auf.
Gefahr
-- Tauchen Sie den Thermostat mit Netzkabel nicht in
Wasser oder andere Flüssigkeiten.
Warnhinweis
-- Prüfen Sie vor Inbetriebnahme, ob die Spannungsangabe
auf der Unterseite des Geräts mit der örtlichen
Netzspannung übereinstimmt.
-- Verwenden Sie das Gerät nicht, wenn der
Netzstecker, das Netzkabel oder das Gerät selbst
defekt oder beschädigt sind.
-- Um Gefährdungen zu vermeiden, darf ein defektes
Netzkabel nur von einem Philips Service-Center,
einer von Philips autorisierten Werkstatt oder einer
ähnlich qualifizierten Person durch ein
Original-Ersatzkabel ersetzt werden.
-- Schließen Sie das Gerät nur an eine geerdete
Steckdose an.
-- Achten Sie darauf, dass das Netzkabel nicht in der
Nähe heißer Flächen verläuft.
-- Lassen Sie das Netzkabel nicht über den Rand der
Arbeitsfläche hängen, auf der das Gerät steht.