1
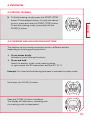
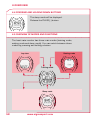
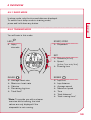
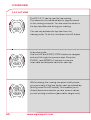
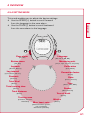
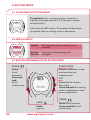
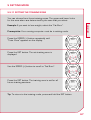
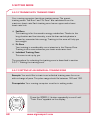
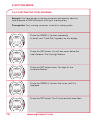
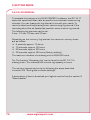
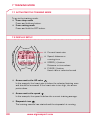
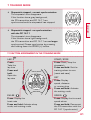
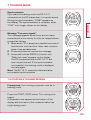
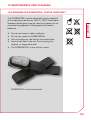
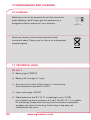
NL
ES
IT
FR
US/GB
DE
running COMPUTER
RUNNING COMPUTER
SPEED – DISTANCE – Lap Count
www.sigmasport.com
PT
RC 14.11
CONTENTS
1
Foreword52
2
Packaging contents52
3
Safety guidelines53
4
4.1
4.2
4.2.1
4.2.2
4.3
4.4
4.5
4.5.1
4.5.2
4.5.3
4.5.4
Overview54
Activating the running computer
54
Attaching the R3 transmitter
54
Attaching the chest belt
54
Attaching the HipClip
55
Before training
56
Pressing and holding down buttons
57
Overview of modes and functions
58
Sleep mode
59
Training mode
59
Lap view
60
Setting mode
61
5
Setting mode62
5.1
Activating the setting mode
62
5.2
Display setup
62
5.3
Button assignment in the setting mode
62
5.4
Brief guide to device settings
63
5.5
Establishing device settings
63
5.5.1
Setting the language
63
5.5.2
Setting the measuring unit
63
5.5.3Calibration
63
5.5.4
Correction factor
63
5.5.5
Setting the date
64
5.5.6
Setting the time
65
5.5.7
Setting the gender
66
5.5.8
Setting the date of birth
66
5.5.9
Setting the weight
66
5.5.10
Setting the max. HR
66
5.5.11
Setting the training zone
67
5.5.12
Training with training zones
68
5.5.13
Setting up an individual training zone
68
5.5.14
Setting the total distance
70
5.5.15
Setting the total running time
71
5.5.16
Setting the total calories
71
5.5.17
Setting the contrast
71
5.5.18
Log interval
72
5.5.19Logbook
73
50
www.sigmasport.com
CONTENTS
5.5.20
5.5.21
Setting the button tones
Turning the zone alarm on and off
73
73
7
7.1
7.2
7.3
7.4
7.5
7.6
7.7
7.8
7.9
7.10
Training mode80
Activating the training mode
80
Display setup
80
Button assignment in the training mode
81
Functions while training
82
Radio link with the R3 transmitter
82
Starting a training session
83
Interrupting a training session
84
Ending a training session
84
Training values after training
85
Resetting and saving the training values
85
8
8.1
8.2
8.3
8.3.1
8.3.2
8.3.3
8.3.4
Training with laps86
Using lap training
86
Summary of the last lap
87
Lap view
87
Activating the lap view mode
88
Display setup
88
Button assignment for the lap view
89
Displaying values for individual laps
90
9
9.1
Data transfer90
Connecting the RC 14.11 to the docking station watch
91
US/GB
6
Calibration and correction factor74
6.1
Why calibrate?
74
6.2
Calibration function
74
6.3
Activating calibration
75
6.4Calibrating
76
6.4.1
Preparing for calibration
77
6.4.2
Carrying out calibration runs
78
6.5
Correction factor
79
10
Maintenance and cleaning92
10.1
Changing the battery
92
10.2
Washing the Comfortex+ textile chest belt
93
10.3Disposal
94
11
Technical data94
12
Warranty
97
51
1 FOREWORD
Thank you for purchasing the SIGMA SPORT® RC 14.11 running
computer. Your new running computer will be a faithful training partner
for many years to come. You can use your running computer for many
different activities, including:
kk
kk
kk
kk
Running
Walking and Nordic Walking
Hiking
Swimming (HR measurement only)
The RC 14.11 running computer is a technically advanced instrument
that measures not only your heart rate but also your distance and
speed.
Please read these instructions carefully to familiarize yourself with the
many functions of your new running computer and prepare for their use.
SIGMA SPORT® wishes you the best of fun with your running computer.
2 PACKAGING CONTENTS
RC 14.11 running computer
incl. battery
Battery compartment tool
For activating the battery and battery changes.
Tip: If you lose this tool, the battery compartment
can also be opened with the aid of a ballpoint pen.
Comfortex+ chest belt
For heart rate measurement and attaching the R3
transmitter
52
www.sigmasport.com
2 PACKAGING CONTENTS
R3 transmitter incl. battery
For measuring your speed and heart rate.
The R3 transmitter sends coded digital signals to
your RC 14.11.
US/GB
HipClip for R3 transmitter
To train without heart rate measurement but with
speed.
Data Center 2
Software for analyzing your training data.
Docking station with USB connection
For reading the RC 14.11 training data in
the Data Center 2 software on the computer.
Please install the Data Center 2 software
before connecting the docking station!
3 SAFETY GUIDELINES
kk
kk
kk
Consult your doctor before starting training in order to avoid health
risks. This particularly applies if you suffer from any cardiovascular
diseases or have not done any sport for a long time.
Please do not use the running computer for diving;
it is only suitable for swimming.
Do not press any buttons while under water.
53
4 OVERVIEW
4.1 Activating the running computer
Before you can train with your new RC 14.11,
you need to activate it. To do this, use the
appropriate tool to set the battery compartment
to ON.
Your RC 14.11 will automatically change to setting
mode. Use the PULSE (-) and SPEED (+) buttons
to scroll through the basic settings. Press the SET
button to confirm your entry. Set the basic settings
such as the language, measuring unit, date and time.
Press and hold the SET button to exit the
setting mode.
For further information, please see section 5 “Setting
mode”.
4.2 Attaching the R3 transmitter
You can wear the R3 transmitter either on the chest belt or the HipClip.
kk Worn on chest belt
It measures the heart rate, speed and distance.
kk Worn on HipClip
It measures the speed and distance, but not the heart rate.
4.2.1 Attaching the chest belt
Press the R3 transmitter into the snaps of the chest
belt.
Important: Detach the R3 transmitter from the belt
after training in order to save the battery. The transmitter is always active if a current is flowing between
the two contacts. This is the case when the chest belt
is worn on the skin, or, for instance, if the chest strap
and/or the R3 transmitter lies on a wet towel. When
the LED flashes, the R3 transmitter is on.
54
www.sigmasport.com
4 OVERVIEW
4.2.1 Attaching the chest belt
Adjust the length of the belt.
US/GB
Important: The belt should fit snug, but not too tight.
Place the belt below the chest muscle or breasts.
Important: The R3 transmitter faces forward.
Wet the surface of the laminated electrodes,
which rest on the skin
Important: The heart rate measurement is only
reliable if the laminated electrodes are moist.
4.2.2 Attaching the HipClip
Snap the R3 transmitter into the HipClip.
Important: Detach the R3 transmitter from the
HipClip after training in order to save the battery.
The transmitter becomes active when it is clipped
on the HipClip or if current can flow between the
contacts (press buttons). When the LED flashes,
the R3 transmitter is on.
Note: The R3 transmitter can only be used in one
direction.
Attach the HipClip to the center of your pants.
Important: Speed and distance are only measured
correctly if you wear the HipClip on the front center.
55
4 OVERVIEW
4.3 Before training
Before you can start training, you need to prepare
the running computer in the following manner:
1 Put on the chest belt or HipClip and the
RC 14.11.
2 Activate the RC 14.11 by pressing and holding
down any button.
3 The running computer automatically switches
to training mode. Wait until your heart rate is
displayed before you start training.
4 Start training.
Press the START/STOP button to start training.
56
www.sigmasport.com
4 OVERVIEW
4.3 Before training
To finish training, simply press the START/STOP
button. The stopwatch stops. To reset the values
to zero, press and hold the START/STOP button.
To exit the training mode, press and hold the
PULSE (-) button.
US/GB
5
4.4 Pressing and holding down buttons
The buttons on the running computer perform different actions
depending on how long you press them:
kk
kk
Press button briefly
Activate or scroll through functions.
Press and hold
Switch to another mode, reset training values,
or synchronize the R3 transmitter and the RC 14.11.
Example: You have finished training and want to activate the sleep mode.
Hold down the PULSE (-) button.
Keep the PULSE (-) button held down.
The display will flash twice, indicating that
the training mode is deactivated.
57
4 OVERVIEW
4.4 Pressing and holding down buttons
The sleep mode will be displayed.
Release the PULSE (-) button.
4.5 Overview of modes and functions
The heart rate monitor has three main modes (training mode,
setting mode and sleep mode). You can switch between these
modes by pressing and holding a button.
Setting mode
Lap view
Training mode
Sleep mode
58
www.sigmasport.com
4 OVERVIEW
4.5.1 Sleep mode
US/GB
In sleep mode, only the time and date are displayed.
To switch from sleep mode to training mode,
press and hold down any button.
4.5.2 Training mode
You will train in this mode.
LAP
START/STOP
kk Laps/
intervals
kk Stopwatch
SET
kk
kk
kk
Distance (in km)
Speed
(in km/h or min/km)
Running time
PULSE
SPEED
kk
kk
kk
kk
kk
kk
kk
kk
kk
kk
kk
kk
Average heart rate
Maximum heart rate
Calories
Remaining log time
Total Kcal*
*Note: To provide you with a clearer
overview while training, the total
values are only displayed if the
stopwatch is not running.
Lap time
Lap distance
Average speed
Maximum speed
Time
Total distance*
Total running time*
59
4 OVERVIEW
4.5.3 Lap view
The RC 14.11 can be used for lap training.
The values for the individual laps or legs are saved
in the running computer. You can view the values in
the lap view after and during your training.
You can only activate the lap view from the
training mode. To do this, hold down the LAP button.
In lap view mode:
Use the LAP and START/STOP buttons to navigate
and scroll through the previous laps. Press the
PULSE (-) and SPEED (+) buttons to view the
heart rate and distance values for each lap.
While training, the running computer briefly shows
you a summary of the last lap for each completed lap
(briefly press the LAP button). This enables you to
directly determine whether you are close to values
you are striving to achieve (pace table, target time).
60
www.sigmasport.com
4 OVERVIEW
4.5.4 Setting mode
Zone alarm
US/GB
This mode enables you to adjust the device settings.
kk Use the SPEED (+) button to scroll forward
from the language to the zone alarm.
kk Use the PULSE (-) button to scroll backward
from the zone alarm to the language.
Language
(On, Off)
(ES, FR, IT, GB, DE)
Button tones
Measuring unit
(On, Off)
(km/h, mph, min/km, min/mile)
Logbook
Calibration
(Cancel, Delete)
(Run/Walk)
Log interval
Correction factor
(5, 10, 20 or 30 sec.)
(Enter)
Contrast
Date
(5 levels)
(Enter, Format)
Total Kcal
Time
(Enter)
(Enter, 12h, 24h)
Total running time
Gender
(Enter)
(Male, Female)
Total distance
Year of birth
(Enter)
(Enter)
Training zone
(Fat Burn, Fit Zone,
Individual)
Weight
Max. heart rate
(Enter)
(Calculated from gender,
age and weight.
Correction possible)
61
5 SETTING MODE
5.1 Activating the setting mode
Prerequisite: Your running computer must be in
training mode (see section 4.5 “Overview of modes
and functions”).
Hold down the SET button. The display will flash twice
to indicate that the setting mode is now active.
5.2 Display setup
1st line
SET indicates that the setting mode
is active.
3rd line/ Submenu or the setting to be
4th linechanged.
5.3 Button assignment in the setting mode
PULSE
START/STOP
Press:
Scroll
backward
Press and
hold:
Scroll
continuously
Press: In calibration mode,
start and stop the
measurement
SET
Press: Select function
Save value
Press and hold: Exit setting
mode (in calibration mode,
cancel calibration)
SPEED
LIGHT
Press:
Light on
62
www.sigmasport.com
Press: Scroll forward
Press and hold: Scroll
continuously
5 SETTING MODE
Device settings such as language, measuring unit, correction factor, gender,
date of birth, weight, max. HR, contrast, log interval, logbook, button tones
and zone alarm are all set in the same manner: Select the device setting,
change the value and save the modified setting.
Prerequisite: Your running computer must be in setting mode (section 5.1).
1 Press the PULSE (-) or SPEED (+) button
repeatedly until you reach the desired device setting.
2 Press the SET button. The device setting value flashes.
3 Press the PULSE (-) or SPEED (+) button
repeatedly until the desired value is displayed.
4 Press the SET button. The new device setting is saved.
You can now scroll to a different device setting.
5.5 Establishing device settings
5.5.1 Setting the language
Follow the steps described in section 5.4 “Brief guide to device settings”.
5.5.2 Setting the measuring unit
Follow the steps described in section 5.4 “Brief guide to device settings”.
5.5.3 Calibration
The calibration is described in a separate section.
See section 6 “Calibration and correction factor”.
5.5.4 Correction factor
The correction factor is described in a separate section.
See section 6 “Calibration and correction factor”.
63
US/GB
5.4 Brief guide to device settings
5 SETTING MODE
5.5.5 Setting the date
Prerequisite: Your running computer must be in setting mode.
Press the SPEED (+) button repeatedly until “Date”
appears on the display.
Press the SET button. “Year” is displayed and below it
the preset year flashes.
Press the PULSE (-) or SPEED (+) button repeatedly
to set the year.
Press the SET button. “Month” is displayed.
Press the PULSE (-) or SPEED (+) button repeatedly
to set the month.
Press the SET button. “Day” is displayed.
Press the PULSE (-) or SPEED (+) button repeatedly
to set the day.
Press the SET button. A date format is displayed.
Use the PULSE (-) or SPEED (+) button to choose
a different date format.
Press the SET button. The data setting is saved.
64
www.sigmasport.com
5 SETTING MODE
5.5.6 Setting the time
US/GB
Example: Winter time has changed to summer time and you want to
adjust the time on your heart rate monitor.
Prerequisite: Your running computer must be in setting mode.
Press the SPEED (+) button repeatedly until “Clock”
appears on the display.
Hold down the SET button. “24H” is displayed and
flashes.
Use the PULSE (-) or SPEED (+) button to choose
between 12-hour and 24-hour format.
Press the SET button. The time is displayed.
The hours entry flashes.
Press the SPEED (+) button. The hour increases
by one. Press the PULSE (-) button to decrease the
displayed hour by one.
Press the SET button. The minute entry flashes.
Press the SET button. The new time is saved.
65
5 SETTING MODE
5.5.7 Setting the gender
Follow the steps described in section 5.4 “Brief guide to device settings”.
This device setting is taken into account when calculating
the maximum heart rate and calories. You should therefore ensure
that you set this value correctly.
5.5.8 Setting the date of birth
Follow the steps described in section 5.4 “Brief guide to device settings”.
This device setting is taken into account when calculating
the maximum heart rate and calories. You should therefore ensure
that you set this value correctly.
5.5.9 Setting the weight
Follow the steps described in section 5.4 “Brief guide to device settings”.
This device setting is taken into account when calculating
the maximum heart rate and calories. You should therefore ensure
that you set this value correctly.
5.5.10 Setting the max. HR
Follow the steps described in section 5.4 “Brief guide to device settings”.
The maximum heart rate (max. HR) is determined by the
running computer on the basis of your gender, weight and date of birth.
Caution: On changing this value, you also change the training zones.
Only change the max. HR value if it has been determined by a reliable
test, such as performance diagnostics, max. HR test, etc.
66
www.sigmasport.com
5 SETTING MODE
5.5.11 Setting the training zone
You can choose from three training zones. The upper and lower limits
for the zone alarm are determined by the zone that you select.
US/GB
Example: If you want to lose weight, select the “Fat Burn”.
Prerequisite: Your running computer must be in setting mode.
Press the SPEED (+) button repeatedly until
“Train. Zone” appears on the display.
Press the SET button. The set training zone is
displayed.
Use the SPEED (+) button to scroll to “Fat Burn”.
Press the SET button. The training zone is set for all
future training sessions.
Tip: To return to the training mode, press and hold the SET button.
67
5 SETTING MODE
5.5.12 Training with training zones
Your running computer has three training zones. The preset
training zones “Fat Burn” and “Fit Zone” are calculated from the
maximum heart rate. Each training zone has an upper and a lower
heart rate limit.
kk
kk
kk
Fat Burn
This training is for the aerobic energy metabolism. Thanks to the
long duration and low intensity, more fat than carbohydrates is
burned or converted into energy. Training in this zone will help you
lose weight.
Fit Zone
Your training is considerably more intensive in the Fitness Zone.
Training in this zone enhances your basic endurance level.
Individual Training Zone
This zone is set up by you.
The procedure for selecting the training zone is described in section
5.5.11 “Setting the training zone”.
5.5.13 Setting up an individual training zone
Example: You would like to train in an individual training zone for a run
with a change of pace. The pulse range should lie between 120 and 160.
Prerequisite: Your running computer must be in setting mode.
Press the SPEED (+) button repeatedly to scroll until
“Train. Zone” appears on the display.
68
www.sigmasport.com
5 SETTING MODE
US/GB
Press the SET button. The set training zone is
displayed.
Use the SPEED (+) button to scroll to “Individual”.
Press the SET button. “Lower limit” is displayed.
The registered value flashes.
Press the PULSE (-) button repeatedly until the value
is set to 120.
Press the SET button. “Upper limit” is displayed.
The registered value flashes.
Press the SPEED (+) button repeatedly until the value
is set to 160.
Press the SET button. The upper and lower
limits are set.
69
5 SETTING MODE
5.5.14 Setting the total distance
Example: You have bought a running computer and want to take the
total distance of 560 kilometers from your training diary.
Prerequisite: Your running computer must be in setting mode.
Press the SPEED (+) button repeatedly
to scroll until “Total Dist.” appears on the display.
Press the SET button. You will see zeros below the
total distance. The first digit flashes.
Press the SET button twice. The digit for the
hundreds flashes.
Press the SPEED (+) button five times until 5 is
displayed.
Press the SET button. The 5 is set and the tens flash.
70
www.sigmasport.com
5 SETTING MODE
5.5.14 Setting the total distance
US/GB
Press the PULSE (-) button repeatedly until 6 is
displayed.
Press the SET button. The 6 is set and the digit
flashes.
Press the SET button. The setting is saved.
5.5.15 Setting the total running time
Follow the steps described in section 5.5.14 “Setting the total distance”.
5.5.16 Setting the total calories
Follow the steps described in section 5.5.14 “Setting the total distance”.
5.5.17 Setting the contrast
Follow the steps described in section 5.4 “Brief guide to device settings”.
Note: The contrast changes directly.
71
5 SETTING MODE
5.5.18 Log interval
To evaluate the training in the Data Center 2 software, the RC 14.11
saves the speed and heart rate at specific time intervals, known as log
intervals. You can change the log interval in line with your needs. To
record multiple and long training units, select a long log interval. If the
recording should be as detailed as possible, select a short log interval.
The following log intervals can be set:
5 sec., 10 sec., 20 sec. and 30 sec.
Depending on the memory/log interval, the maximum memory times
are as follows:
kk 5 seconds, approx. 15 hours
kk 10 seconds, approx. 30 hours
kk 20 seconds, approx. 60 hours
kk 30 seconds, approx. 90 hours (Factory setting)
The maximum duration of a training unit is 99:59:59 hours.
Tip: The function “Remaining log” can be found in the RC 14.11’s
training menu. This indicates the current log capacity in hours.
The memory interval can be set by following the steps described
in section 5.4 “Brief guide to device settings”.
A description of how to download your logbook can be found in section 9
“Data transfer”.
72
www.sigmasport.com
5 SETTING MODE
5.5.19 Logbook
US/GB
The data stored in the logbook can be deleted here. Data stored in the
logbook can only be viewed using the Data Center 2 software. Deleting
the logbook does not affect any other data. It is only possible to delete
the entire logbook; training units cannot be individually deleted.
To delete the logbook, select the entry “logbook” in setting mode and then
press the SET button. “Cancel” flashes. Press SET again to cancel the
process. Press SPEED (+) to select “Delete”. Confirm the deletion by
pressing the SET button. The logbook has now been irretrievably deleted.
5.5.20 Setting the button tones
Follow the steps described in section 5.4 “Brief guide to device settings”.
5.5.21 TURNING THE ZONE ALARM ON AND OFF
Follow the steps described in section 5.4 “Brief guide to device settings”.
73
6 CALIBRATION AND CORRECTION FACTOR
6.1 Do I have to calibrate?
Calibration is not obligatory. If the deviation from the determined
distance is 5% or less, no calibration is necessary. If the deviation
is far more than 5%, we recommend calibrating your device.
The precise calibration process is described in the section below.
6.2 Calibration function
The running computer has a calibration function. To calibrate, put on
the R3 transmitter and the running computer and run a known distance.
You can measure a distance in advance with a bike computer or run
on a 400-meter track. After you have run the distance, adjust the
measured value to the actual distance run.
As your running or walking styles change as you change speed,
the calibration is carried out for both a slow and fast speed.
For the sensor positions chest and hips, you can perform two
calibrations:
kk Walking
kk Running
Important: Perform the calibration at least twice over a distance
of 800 m (800 m slow and 800 m fast).
74
www.sigmasport.com
6 CALIBRATION AND CORRECTION FACTOR
6.3 Activating calibration
US/GB
Prerequisite: The device must be in training mode.
You are wearing the R3 transmitter and the running computer.
Hold down the SET button until the setting mode is
activated.
Press the SPEED (+) button repeatedly until the
“Calibration” function appears.
Press the SET button. The RC 14.11 determines the
position of the R3 sensor (chest or hip) and starts
the calibration function. The RC 14.11 guides you
through the calibration.
75
6 CALIBRATION AND CORRECTION FACTOR
6.4 Calibration
Calibration is carried out for two speeds:
kk
kk
Slow running or slow walking
Run as slow as you would run in your slowest training.
Fast running or fast walking
Run at the fastest pace that you would run in an endurance run
or a long tempo run (over 3000 m).
The two speeds should ideally differ by 30%.
Tip: If you only use the device for running and with heart rate
measurement (chest position) and therefore never wear it on
the hip, you only need to calibrate for the sensor position “Chest”
and for “Running”.
76
www.sigmasport.com
6 CALIBRATION AND CORRECTION FACTOR
6.4.1 Preparing for calibration
1 Put on the chest belt or attach the HipClip.
US/GB
2 Go to a measured distance of at least 800 meters.
Tip: The inside lane of a track is 400 meters.
3 Select “Calibration” in the setting mode.
4 Press the SET button. The running computer detects whether
you are wearing the HipClip or the chest belt. The function “Running”
is displayed.
Tip: If you want to calibrate the RC 14.11 for walking,
select the function “Walking” with the SPEED (+) button.
5 Press the SET button. Instructions for what you have to do are
shown on the running computer’s display.
77
6 CALIBRATION AND CORRECTION FACTOR
6.4.2 Carrying out calibration runs
1 Always start 20 meters from the starting line of the measured
distance (flying start).
2 As you cross the starting line, press the START/STOP button.
The measurement for the slow calibration run begins.
3 After you have run the measured distance,
press the START/STOP button again.
4 Now adjust the displayed value to the actual distance run by
pressing the PULSE (-) or SPEED (+) button.
5 Press the SET button. The slow calibration run is saved.
6 The alternating prompt “Run (walk) fast/press Start” now
appears on the display. Repeat steps 1– 5 to calibrate the fast run.
Note: After you have performed the first calibration, the calibration
menu will change. If you re-access it, you can distinguish between the
following options at the start: ON, OFF and NEW. Select ON to run
in training mode with calibrated values. Select OFF to run with an
uncalibrated RC 14.11. Select NEW to re-calibrate the RC 14.11.
78
www.sigmasport.com
6 CALIBRATION AND CORRECTION FACTOR
6.5 Correction factor
US/GB
If you get good values with or without calibration, which vary only
minimally in one direction, you can manually correct these values
using the correction factor.
Example:
You know that you have run exactly 2000 m but the running computer
always shows a little more, e.g. 2037 m. The factory setting for the
correction factor is 1.000 and does not effect a change.
Please calculate the correction factor as follows:
kk New correction factor = 1.000 x 2000 / 2037
kk New correction factor = 0.982
old correction factor (1.000) x actual distance (2000)
displayed distance (2037)
Please enter this new correction factor. For the setting, please see
section 5.4 “Brief guide to device settings”.
79
7 TRAINING MODE
7.1 Activating the training mode
To go to the training mode:
kk From sleep mode
Press and hold any button.
kk From setting mode
Press and hold the SET button.
7.2 Display setup
kk Current heart rate
kk Speed, distance or
running time
kk
kk
kk
SPEED (+) button:
Distance or time values
PULSE (-) button:
Heart rate or calories burned
Arrow next to the HR value
In the example, the heart rate is below the selected training zone
and should be increased. If the heart rate is too high, the arrow
points down.
kk Arrow next to the speed
In the example, the speed is below the current training average.
kk Stopwatch icon
The training session has started and the stopwatch is running.
80
www.sigmasport.com
kk
Stopwatch stopped - correct synchronization
The stopwatch icon disappears.
If the function has a gray background,
the R3 transmitter and RC 14.11 are
synchronized and the stopwatch has stopped.
kk
Stopwatch stopped - no synchronization
with the RC 14.11
The stopwatch icon disappears.
If the function has a light background,
the R3 transmitter and RC 14.11 are no longer
synchronized. Please synchronize by pressing
and holding down the SPEED (+) button.
US/GB
7 TRAINING MODE
7.3 Button assignment in the training mode
LAP
START/STOP
Press:
Take the
lap time
Press and
hold:
Open the
lap view
Press: Start/stop the
stopwatch
Press and hold: Set the
training values to zero
(reset and save)
PULSE
SPEED
Press: Display the
heart rate
Press and hold: Activate sleep
mode; exit training mode
Press: Display the time and
speed values
Press and hold: Reconnect
the R3 transmitter with the
RC 14.11 (synchronize)
SET
Press: Display
speed, distance
or running time
Press and hold: Activate
the setting mode
81
7 TRAINING MODE
7.4 Functions while training
The running computer measures many different training statistics but
cannot display them all at once. You can therefore view other functions
at the press of a button.
Press the SET button to switch between speed,
running time and distance in the middle line.
Use the PULSE (-) or SPEED (+) buttons to select
which function you want to see in the lower display
area.
Note: Calories, distance and average and maximum values are only
calculated when the stopwatch is running.
7.5 Radio link with the R3 transmitter
The RC 14.11 receives the heart rate, speed and distance from the
R3 transmitter by means of a coded digital transmission.
The coding ensures that other signals from other transmitters are
ignored and only the signals from your chest belt are received.
82
www.sigmasport.com
7 TRAINING MODE
US/GB
Synchronization
If you start the training mode, the RC 14.11
reconnects to the R3 transmitter; it is synchronized.
During the synchronization, “SYnC” appears on
the display. The synchronization is complete, when
“SYnC” is no longer shown on the display.
Message “Too many signals”
This message appears when there are too many
transmitters in the vicinity. In order to resynchronize,
proceed as follows:
1Move about 10 m away from possible sources of
interference, such as other heart rate monitors,
power lines and antennas.
2 Press any button to remove the message.
3 Press and hold the SPEED (+) button until
“Radio link reset” appears on the display.
The R3 transmitter and the RC 14.11 are
now re-synchronized. If the synchronization
is successful, the training mode is displayed
normally again.
Note: The RC 14.11 cannot be disturbed after
a successful synchronization
7.6 Starting a training session
Prerequisite: Your running computer must be in
training mode.
Press the START/STOP button. The running time
begins.
A stopwatch icon appears at the bottom of the
display and the name of the measured value has
a light background.
83
7 TRAINING MODE
7.7 Interrupting a training session
You can pause and restart your training any time.
Press the START/STOP button. The stopwatch icon
disappears. The stopwatch stops.
Press the START/STOP button again. The stopwatch
icon reappears. The stopwatch restarts.
7.8 Ending a training session
You have finished your training run and also want to
end your training session on your running computer.
Immediately press the START/STOP button. This
prevents your average values or running time from
being distorted.
Hold down the PULSE (-) button. You switch to
sleep mode. Only the time and date are displayed so
as to save the battery. The current training values
remain saved.
Note: If you have stopped training, your running
computer goes into sleep mode after five minutes.
84
www.sigmasport.com
7 TRAINING MODE
7.9 Training values after training
Prerequisite: You must be in training mode.
US/GB
After training, you can view the measured values in the training mode
at your leisure. Use the SET, PULSE (-) and SPEED (+) buttons to scroll
through the individual values. In addition to the current training values,
the running computer also shows summed values such as:
kk Total running time
kk Total distance
kk Total calories
Note: Total values are available only when the stopwatch is stopped.
7.10 Resetting and saving the training values
Before you begin a new training session, you should set the training
values to zero as the running computer will otherwise continue to
count the values. The summed total values for distance, time and
calories remain saved. Resetting the training data to zero automatically
stores it in the logbook.
Prerequisite: You must be in training mode.
Press and hold the START/STOP button. The display
flashes twice and all values are reset. You will then
see the training mode again.
85
8 TRAINING WITH LAPS
8.1 Using lap training
Example: You regularly run two laps around a lake and want to do so
in different times. The RC 14.11 lap training function enables you to
determine the values for each lap.
1 Prerequisite:
You must be in training mode.
The stopwatch is not running and is set to zero.
2 Start first lap.
Press the START/STOP button. The stopwatch
starts; the values are recorded.
3 Start next lap.
Press the LAP button. A new lap starts.
The display flashes.
Tip: While “Last lap” is flashing, a summary of the
last lap is shown. Use the SET button to show further
values.
4 Stop the training after the last lap.
Press the START/STOP button.
Tip: You can also use lap training when competing.
If you start a new lap at the end of each kilometer,
you can compare the values for each kilometer after
your run.
86
www.sigmasport.com
8 TRAINING WITH LAPS
8.2 Summary of the last lap
US/GB
If you start a new lap, the current lap is ended and the
message “Last lap” flashes. A summary of the last lap
is shown for five seconds.
Summary of the last lap
Average heart rate
Lap distance (km), lap speed (km/h, min/km),
running time
Scroll using the SET button
Lap time
Use the SET button to show further values:
kk km – distance of the last lap
kk km/h or min/km – average speed
during the last lap
kk Running time – total training time
8.3 Lap view
The training values for the individual laps can be seen in the lap view.
87
8 TRAINING WITH LAPS
8.3.1 Activating the lap view mode
Prerequisite: Your running computer must be in
training mode.
Hold down the LAP button. The display will flash twice
to indicate that the lap view mode is now active.
8.3.2 Display setup
kk Lap number
kk Value
88
www.sigmasport.com
8 TRAINING WITH LAPS
8.3.3 Button assignment for the lap view
LAP 8
LAP 9
LAP 10
LAP 5
US/GB
LAP 6
LAP 7
LAP 4
LAP 3
LAP 2
LAP 1
HEART RATE
VALUES
SPEED
VALUES
kk Average heart rate
kk Maximum heart rate
kk Calories
kk Lap time
kk Lap distance
kk Average speed
kk Maximum speed
kk Time since start
kk Distance since
start
89
8 TRAINING WITH LAPS
8.3.4 Displaying values for individual laps
You can re-view the different measured values for the individual laps.
Prerequisite: Your running computer must be in training mode.
1
2
3
4
5
Hold down the LAP button until the lap view opens.
A value from the last lap is displayed.
Select a lap.
Press the LAP or the START/STOP button to scroll through
the laps.
View several heart rate values for the selected lap.
Press the PULSE (-) button.
View several speed values for the selected lap.
Press the SPEED (+) button.
Exit lap view.
Hold down the LAP button. The training mode is displayed.
9 Data Transfer
IMPORTANT: to download the logbook and thus the training data from
the last training session, you must have reset this training session and
the RC 14.11 must be in sleep mode.
A description of how to reset and save the training data on your
RC 14.11 can be found in section 7.10 “Resetting the training values”.
90
www.sigmasport.com
9 DatA transfer
9.1 Connecting the RC 14.11 to the docking station watch
US/GB
Prerequisites: the SIGMA DATA CENTER has already
been installed and the docking station watch is connected to your computer via a free USB port.
The docking station watch has an LED that helps you
correctly connect the RC 14.11. The LED illustrates
the following situations:
Solid red:
docking station watch is
connected to your computer.
Solid green:
you have correctly connected
yourRC 14.11 to the docking
station watch.
Flashing green:
the data is being transferred
from the RC 14.11 to the
SIGMA DATA CENTER.
Tip: if you need help operating the SIGMA DATA CENTER,
you can access the online help by clicking the button
with the question mark (found in the bottom left-hand
edge of the software).
Note: once all data has been transferred, remove your
RC 14.11 from the docking station watch to protect
its battery.
91
10 MAINTENANCE AND CLEANING
10.1 Changing the battery
The running computer uses a CR2032 battery
(ref. no. 00342) and the R3 sensor uses a CR2450
battery (ref. no. 20316).
Prerequisite: You have a new battery and the battery
compartment tool.
1 Use the battery compartment tool to turn the
cover anti-clockwise until the arrow points to
OPEN. Alternatively, you can also use a ballpoint
pen.
2 Remove the cover.
3 Remove the battery.
4 Insert the new battery. The plus sign points
upward. Important: Ensure the polarity is correct!
5 Replace the cover. The arrow points to OPEN.
6 Use the battery compartment tool to turn the
cover clockwise until the arrow points to ON
(on the R3 transmitter, to Close).
7 Correct the time and date.
Important: Dispose of old batteries properly
(see section 9.4).
92
www.sigmasport.com
10 MAINTENANCE AND CLEANING
10.2 Washing the Comfortex+ textile chest belt
kk
kk
kk
kk
kk
US/GB
The Comfortex+ textile chest belt can be washed
in the washing machine at +40°C/104°F hand wash.
Standard detergents may be used, but please do not
use bleaching agents or detergents with bleach
additives.
Do not use soap or fabric softener
Do not dry clean the Comfortex+
Do not tumble dry the belt or the transmitter
Lay the belt flat to dry out. Do not wring out,
stretch, or hang when wet
The Comfortex+ must not be ironed
Comfortex+ textile chest belt
93
10 MAINTENANCE AND CLEANING
10.3 Disposal
Batteries must not be disposed of with the household
waste (Battery Law)! Please give the batteries to a
designated delivery station for their disposal.
LI
LI =
Lithium Ionen
Electronic devices must not be disposed of with
household waste. Please give the device to a designated
disposal agency.
11 TECHNICAL DATA
RC 14.11
kk Battery type: CR2032
kk Battery life: Average of 1 year
kk Accuracy of the clock: Higher than ± 1 second/day
at an ambient temperature of 20°C.
kk Heart rate range: 40-240
kk
94
Watertightness: the RC 14.11 is watertight up to 3 ATM
(corresponds to a test pressure of 3 bar). The RC 14.11 is suitable
for swimming. Please note: Do not press the buttons underwater
as water can enter the housing. Avoid using in sea water as
malfunctions can occur.
www.sigmasport.com
11 TECHNICAL DATA
FCC Information
kk
kk
kk
kk
US/GB
This equipment has been tested and found to comply with the limits for
a Class B digital device, pursuant to Part 15 of the FCC Rules. These
limits are designed to provide reasonable protection against harmful
interference in a residential installation. This equipment generates, uses,
and can radiate radio frequency energy and, if not installed and used in
accordance with the instructions, may cause harmful interference to
radio communications. However, there is no guarantee that interference
will not occur in a particular installation. If this equipment does cause
harmful interference to radio or television reception, which can be
determined by turning the equipment off and on, the user is encouraged
to try to correct the interference by one or more of the following
measures:
Reorient or relocate the equipment.
Increase the separation between the equipment and receiver.
Connect the equipment into an outlet on a circuit different from
that to which the receiver is connected.
Consult an authorized dealer or service representative for help.
95
11 TECHNICAL DATA
11 TECHNICAL DATA
R3 Transmitter
kk Battery type: CR2450
kk Battery life: Average of 2 years
kk Distance accuracy: Most runners obtain less than 5% variation in
the calibrated state. The result can also be further optimized by the
correction factor. The accuracy specifications assume constant
conditions.
kk
Watertightness: the R3 transmitter is watertight up to 1 ATM
(corresponds to a test pressure of 1 bar). The R3 transmitter
and the Comfortex+ are suitable for swimming. Avoid using in
sea water as malfunctions can occur.
Comfortex+ textile chest belt
kk Belt material: Polyamide with elastane
96
www.sigmasport.com
12 Warranty
12 Warranty
Warranty
US/GB
We are liable for damages in accordance with the statutory regulations
in respect to our contractual partners. Batteries are excluded from the
warranty. For warranty claims, please contact the retailer from whom
you purchased your running computer or send your running computer
together with receipt of purchase and all accessory parts, with sufficient
postage paid, to:
SIGMA-Elektro GmbH
Dr.- Julius -Leber-Straße 15
D-67433 Neustadt/Weinstraße
Germany
Tel. + 49 (0) 63 21-9120-118
E-mail: [email protected]
If your warranty claim is valid, you will receive a replacement device.
A claim only exists for the current model at this time. The manufacturer
reserves the right to make technical changes.
97
running COMPUTER
RC 14.11
SIGMA-Elektro GmbH
Dr. - Julius - Leber - Straße 15
D - 67433 Neustadt /Weinstraße
Tel. + 49 (0) 63 21- 9120 - 0
Fax. + 49 (0) 63 21- 9120 - 34
E - mail:[email protected]
SIGMA SPORT USA
North America
3487 Swenson Avenue
St. Charles, IL 60174, U.S.A.
Tel. +1 630 - 761 - 1106
Fax. +1 630 - 761 - 1107
Service-Tel. 888-744-6277
SIGMA SPORT ASIA
Asia, Australia, South America, Africa
10F, No.192, Zhonggong 2 nd Rd.,
Xitun Dist., Taichung City 407, Taiwan
Tel. +886-4- 2358 3070
Fax. +886-4- 2358 7830
www.sigmasport.com