1
Register your product and get support at
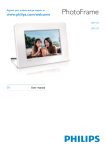
PhotoFrame
SPF1208
EN
User manual
Eng lish
Contents
1 Important
Safety
Safety precautions and maintenance
Notice
End of life disposal
Recycling Information for Customers
Banned Substance Declaration
2 Your PhotoFrame
Introduction
What’s in the box
Overview of your PhotoFrame
3 Get started
Install the stand
Connect power
Turn on the PhotoFrame
Turn off the PhotoFrame
Transfer photos
4 Display photos
Manage slideshow and photos
2
2
2
2
2
3
3
4
4
4
5
6
6
6
7
7
7
9
9
5 Browse and manage photos
10
6 Clock and calendar
11
7 Adjust settings
12
8 Upgrade the PhotoFrame
13
9 Product information
14
10 Frequently asked questions
15
11 Glossary
16
Need help?
Please visit www.philips.com/welcome where
you can access a full set of supporting materials
such as user manual, the latest software updates
and answers to frequently asked questions.
EN
1
1 Important
Safety
Safety precautions and maintenance
2
Never touch, push, rub or strike the
screen with hard objects as this may
damage the screen permanently.
When the product is not used for long
periods, unplug it.
Before you clean the screen, turn off and
unplug the power cord. Only clean the
screen with a soft, water-damp cloth.
Never use substances such as alcohol,
chemicals or household cleaners to clean
the product.
Never place the product near naked
direct sunlight.
Never expose the product to rain or
water. Never place liquid containers, such
as vases, near the product.
Never drop the product. When you drop
the product, it will be damaged.
Ensure that you install and use services or
software only from trustworthy sources
free of virus or harmful software.
This product is designed for indoor use only.
Only use the supplied power adaptor for
the product.
EN
Notice
Warranty
No components are user serviceable. Do not
open or remove covers to the inside of the
product. Repairs may only be done by Philips
Failure to do so shall void any warranty, stated
or implied.
Any operation expressly prohibited in
this manual, any adjustments, or assembly
procedures not recommended or authorised
in this manual shall void the warranty.
The making of unauthorized copies of
copy-protected material, including computer
recordings, may be an infringement of
copyrights and constitute a criminal offence.
This equipment should not be used for such
purposes.
End of life disposal
Your new product contains materials that
can be recycled and reused. Specialized
companies can recycle your product to
increase the amount of reusable materials
and to minimize the amount to be
disposed of.
on how to dispose your old monitor from
your local Philips dealer.
(For customers in Canada and U.S.A.)
Dispose the old product in accordance to
local-state and federal regulations.
For additional information on recycling contact
www.eia.org (Consumer Education Initiative).
Philips establishes technically and
economically viable objectives to optimize
the environmental performance of the
organization’s product, service and activities.
From the planning, design and production
stages, Philips emphasizes the importance of
making products that can easily be recycled.
At Philips, end-of-life management primarily
entails participation in national take-back
initiatives and recycling programs whenever
possible, preferably in cooperation with
competitors.
There is currently a system of recycling up and
running in the European countries, such as
The Netherlands, Belgium, Norway, Sweden
and Denmark.
In U.S.A., Philips Consumer Lifestyle North
America has contributed funds for the
Electronic Industries Alliance (EIA) Electronics
Recycling Project and state recycling initiatives
for end-of-life electronics products from
household sources. In addition, the Northeast
Recycling Council (NERC) - a multi-state
recycling market development - plans to
implement a recycling program.
!
"#$
be taken back by Environment Protection
Administration (EPA) to follow the IT product
recycling management process, detail can be
found in web site www.epa.gov.tw.
Banned Substance
Declaration
Eng lish
Recycling Information for Customers
This product complies with RoHs.
EN
3
2 Your
PhotoFrame
Congratulations on your purchase, and
$%#&
support that Philips offers, register your product
at www.philips.com/welcome.
Introduction
With Philips Digital PhotoFrame, you can display
JPEG photos in high quality directly from your
memories cards.
What’s in the box
Philips Digital PhotoFrame
Stand
AC-DC power adaptor
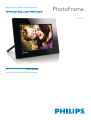
Register your product and get support at
www.philips.com/welcome
PhotoFrame
User Manual
User manual
4
EN
Eng lish
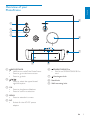
Overview of your
PhotoFrame
i
a
b
c
d
MENU
h
/MS/MS Pro
g
e
a
b
BACK|POWER
Hold to turn on/off the PhotoFrame
Press to go to the home screen
Press to go back
/ / /
Press to select the upper/lower/
right/left option
f
f
g
SD/MMC/MS/MS Pro
Slot for an SD/MMC/MS/MS Pro
card
Kensington lock
h Stand hole
i Wall mounting hole
c OK
Press to play/pause slideshow
d MENU
Press to enter/exit a menu
e DC
Socket for the AC-DC power
adaptor
EN
5
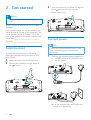
3 Get started
3
Turn the stand anti-clockwise 45 degrees
to the position and lock it to the
'&
Caution
Use the controls only as stated in this user
manual.
Always follow the instructions in this chapter in
sequence.
If you contact Philips, you will be asked for the
model and serial number of this apparatus. The
model number and serial number are on the
back of the apparatus. Write the numbers here:
Model No. __________________________
Serial No. ___________________________
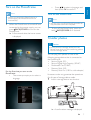
Connect power
Note
Install the stand
#'
attach the supplied stand to the back of the
PhotoFrame.
1
2
Insert the stand into the PhotoFrame.
When you position the PhotoFrame, ensure
that the power plug and outlet are easily
accessible.
1
Connect the supplied power adaptor to:
the DC socket of the PhotoFrame
the AC outlet
Position the indication on the stand to
the position.
» A few seconds later, the PhotoFrame
turns on automatically.
6
EN
Note
Press / to select a language, and
then press OK
Eng lish
Turn on the PhotoFrame
Turn off the PhotoFrame
When you connect the PhotoFrame to a
power supply, the PhotoFrame turns on
automatically.
1
Note
You can only turn off the PhotoFrame after all
When the PhotoFrame is turned off and
connected to the power supply, you can
press BACK|POWER to turn on the
PhotoFrame.
» A few seconds later, the home screen
is displayed.
copy and save actions are complete.
To turn off the PhotoFrame, press and
hold BACK|POWER for 2 seconds.
Transfer photos
Caution
Do not remove a storage device from the
PhotoFrame when you are transferring photos
from the storage device.
PhotoFrame:
The screen prompts you to select a
language.
You can play JPEG photos on one of the
following storage device that is connected to
the PhotoFrame:
Secure Digital (SD)
Secure Digital High Capacity (SDHC)
Multimedia Card (MMC)
Memory Stick (MS)
Memory Stick Pro (MS Pro, with adaptor)
However, we do not guarantee the operations
for all types of storage device media.
1
Insert a storage device into the slot.
» "
&
EN
7
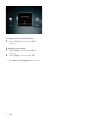
To copy photos to the PhotoFrame:
1
Select [Yes], and then press OK to
To display photos directly:
1
Select [No], and then press OK to
2
Select [Play], and then press OK.
To remove a storage device, pull it out.
8
EN
1
2
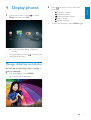
In the home menu, press / to select
[Play] and then press OK.
Press / to select an icon, and then
press OK.
: Zoom in a photo
: Rotate a photo
: Select a display mode.
: Save a photo
: Delete a photo
To exit the menu bar, press MENU again.
» Photos are displayed in slideshow
mode.
During slideshow, press / to display the
next/previous photo.
Manage slideshow and photos
You can take the following steps to manage a
photo in slideshow.
1
During slideshow, press MENU.
» A menu bar is displayed.
EN
9
Eng lish
4 Display photos
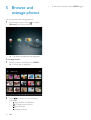
5 Browse and
manage photos
You can browse and manage photos.
1
In the home menu, press / to select
[Browse], and then press OK.
» The album thumbnails are displayed.
To manage photos:
1
Select a photo, and then press MENU.
» A menu bar is displayed.
2
Press / to select an icon, and then
press OK.
: Play photos in slideshow
: Change source device
: Save a photo
: Delete a photo
10
EN
To exit the menu bar, press MENU again.
Eng lish
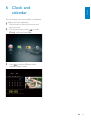
6 Clock and
calendar
You can display clock and calendar in slideshow
or display the clock separately.
1
Ensure that you have set the time and
date correctly.
2
In the home menu, press / to select
[Clock], and then press OK.
3
Press / to select different clock/
calendar display mode.
EN
11
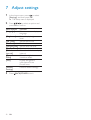
7 Adjust settings
1
In the home menu, press / to select
[Settings], and then press OK.
» The setup menu is displayed.
2
Press / / / to select an option and
press OK
Menu options
[Language]
[Brightness]
[Set Time]
[Set Date]
[Set Off-Time]
[Set On-Time]
[Slideshow
Interval]
[Transition
Effect]
[Info]
[Default
Settings]
Function
Select on-screen display
language.
Select display brightness
level.
Set the clock time.
Set the date.
Set the auto-off time.
Set the auto-on time.
Select the slideshow display
interval.
Select the slideshow
transition effect.
Display the general
information of the
PhotoFrame.
Restore default settings.
3
Press BACK|POWER to exit.
12
EN
Eng lish
8 Upgrade the
PhotoFrame
Caution
Do not power off the PhotoFrame during
upgrade.
If there is a software update, you can download
the latest software from www.philips.com/
support to upgrade your PhotoFrame. The
earlier software is unavailable on line.
1
2
Visit www.philips.com/support.
3
Download the latest software onto the
root directory of an SD card.
4
5
Insert the SD card into the PhotoFrame.
6
Search for your PhotoFrame and go to
the software section.
Turn on the PhotoFrame
» "
&
Select [Yes], and then press OK to
» When the upgrade is complete, the
PhotoFrame reboots.
EN
13
9 Product
information
Note
Product information is subject to change
without prior notice.
Picture/Display
Viewing angle: @ C/R > 10, 120°
(H)/100° (V)
Lifetime, to 50% brightness: 20000 hr
Aspect ratio: 4:3
Panel visible resolution: 800 x 600
+
;<==?Q==
Brightness (minimum): 160 cd/m²
Contrast ratio (typical): 500:1
Photo format supported:
X[\]^`={+X[\
Up to 64 Megapixels)
Progressive JPEG photo (Up to 1024
x 768 pixels)
Storage media
Memory card types:
Secure Digital (SD)
Secure Digital (SDHC)
Multimedia Card (MMC)
Memory Stick (MS)
Memory Stick Pro (MS Pro)
Built-in memory capacity: 512 MB
Dimensions & Weight
Set dimensions without stand (W x H
x D): 225 x 184.5 x 34 mm
Set dimensions with stand (W x H x D):
225 x 184.5 x 114.5 mm
Weight without stand: 0.42 kg
Power
Power mode supported: AC powered
[
&;|
Average consumption (system on): 4 W
Power adaptor:
14
EN
Manufacturer: Philips Consumer
Lifestyle International B.V.
Model number: DSA-3RNA-05 FUK
Input: AC 100-240V~50-60Hz 0.3A
Output: DC 5V
0.65A
Temperature
Operation: 0°C - 40°C/32°F - 104°F
Storage: -10°C - 60°C/14°F - 140°F
Is the LCD screen touch-enabled?
The LCD screen is not touch-enabled. Use the
buttons on the back to control the PhotoFrame.
Can I switch different slideshow photos by
using different memory cards?
Yes. When a memory card is connected to
the PhotoFrame, you can play photos on the
&
$
Will the LCD be damaged, if I keep showing
the same photo for a long time?
No. The PhotoFrame can display the same
photo continuously for 72 hours without any
damage to the LCD screen.
Why does my PhotoFrame not show some of
my photos?
The PhotoFrame supports only JPEG photos.
Ensure that these JPEG photos are not
damaged.
Can I use the PhotoFrame during its display
auto-off periods?
Yes. You can press and hold to wake up the
PhotoFrame.
you could switch between different photos
by using different storage devices on the
PhotoFrame.
Eng lish
10 Frequently
asked questions
After I insert a memory card and transfer all
folder structure saved on the PhotoFrame is
different from the original structure on the
memory card. Why?
The PhotoFrame can only read a folder
structure up to 3 levels and write on only
1-level folder structure. In that case, photos
on a memory card, which are in folders with
the same name but in different levels, will be
saved in the same folder on the PhotoFrame.
For example, photos in folders “\AA”, “\01\
AA” and “\02\AA” on a memory card will all
be copied into the folder named “\AA” on the
PhotoFrame.
What is the best resolution of photos to be
displayed on the PhotoFrame?
The best resolution is 432 x 270, 864 x 540,
or a similar aspect ratio.
Why does the PhotoFrame automatically turn
off?
If you enable the SmartPower function, the
PhotoFrame automatically turns off at the
preset time. For details, see section “Set
display auto on/off”.
Why does the PhotoFrame not go into autooff status after I set it?
Ensure that you set the current time, autooff time, and auto-on time correctly. The
PhotoFrame automatically turns off its display
exactly at the auto-off time. If the time has
already passed for the day, it starts to enter
next day.
Can I increase the memory size to store more
pictures on the PhotoFrame?
No. The internal memory of the PhotoFrame
?
?
}$
EN
15
11 Glossary
Memory Stick
{&"&
storage on cameras, camcorders and other
handheld devices.
A
Aspect ratio
Aspect ratio refers to the length to height
ratio of TV screens. The ratio of a standard
#|;$
or wide TV is 16:9. The letter box allows you
to enjoy a picture with a wider perspective on
a standard 4:3 screen.
J
JPEG
A very common digital still picture format.
A still-picture data compression system
proposed by the Joint Photographic Expert
Group, which features small decrease in image
quality in spite of its high compression ratio.
'
&?
‘.jpg’ or ‘.jpeg.’
K
Kbps
Kilobits per second. A digital-data-rate
measurement system which is often used
with highly compressed formats such as AAC,
DAB, MP3 etc. The higher the amount, the
better the quality generally is.
Kensington lock
A Kensington Security Slot (also called a
K-Slot or Kensington lock). Part of an antitheft system. It is a small, metal-reinforced
hole found on almost all small or portable
computer and electronics equipment,
particularly on expensive and/or relatively light
ones, such as laptops, computer monitors,
desktop computers, gaming consoles, and
video projectors. It is used for attaching a
lock-and-cable apparatus, in particular those
from Kensington.
16
M
EN
MMC Card
{{"&
provides storage for cellphones, PDAs and
#
memory for read/write applications or ROM
chips (ROM-MMC) for static information, the
latter widely used for adding applications to a
Palm PDA.
S
SD Card
{&"&
card that provides storage for digital cameras,
cellphones and PDAs. SD Cards use the same
32 x 24mm form factor as the MultiMediaCard
(MMC), but are slightly thicker (2.1mm vs.
1.4mm), and SD Card readers accept both
formats. Cards up to 4GB are available.
T
Thumbnail
A thumbnail is reduced-size versions of a
picture that is used to make it easier to
recognize an them. Thumbnails serve the
same role for images as a normal text index
does for words.
© 2011 Koninklijke Philips Electronics N.V.
All rights reserved.
UM_V2.0