1
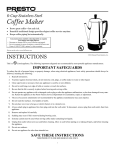
Pizza Oven
• The easy way to bake your favorite
frozen pizza—regular or rising crust.
Perfect for 7- to 12-inch pizzas.
• Individually controlled upper and
lower heating elements.
Estas instrucciones también están disponibles en español.
Para obtener una copia impresa:
• Descargar en formato PDF en www.GoPresto.com/espanol.
• Envíe un mensaje de correo electrónico a [email protected].
• Llame al 1-800-877-0441, oprima 2 y deje un mensaje.
Visit us on the web at www.GoPresto.com
Instructions
This is an
©2013 National Presto Industries, Inc.
Listed appliance. The following important safeguards are recommended by most portable appliance manufacturers.
IMPORTANT SAFEGUARDS
To reduce the risk of personal injury or property damage, when using electrical appliances, basic safety precautions should always be
followed, including the following:
1. Read all instructions.
2. Do not touch hot surfaces. Use handles or knobs.
3. To protect against electrical shock, do not immerse cord, plug, or any part of the Pizza Oven in water or other liquid.
4. Close supervision is necessary when any appliance is used by or near children.
5. Do not leave Pizza Oven unattended while in use.
6. Use extreme caution when rotating pizza and when removing pizza and hot baking rack from the Pizza Oven.
7. Unplug from outlet when not in use and before cleaning. Allow Pizza Oven to cool before cleaning.
8. To disconnect, turn timer to “0” (OFF position), then remove plug from wall outlet.
9. Do not operate any appliance with a damaged cord or plug or in the event the appliance malfunctions or has been damaged in
any manner. Return the appliance to the Presto Factory Service Department for examination, repair, or electrical or mechanical
adjustment.
10. The use of accessory attachments not recommended by the appliance manufacturer may cause injuries.
11. Do not use outdoors.
12. Do not let cord hang over edge of table or counter or touch hot surfaces.
13. Do not place on or near a hot gas or electric burner or in a heated oven.
14. During baking, allow 4 inches of open space around the exterior of the Pizza Oven for air circulation.
15. Oversize foods or metal utensils must not be inserted in the Pizza Oven as they may create a fire or risk of electric shock.
16. A fire may occur if the Pizza Oven is covered by or touching flammable materials, including curtains, draperies, walls, and the
like, when in use. Do not store any item on top of the appliance.
17. Do not clean with metal scouring pads. Pieces can break off the pad and touch electrical parts, creating a risk of electric shock.
18. Extreme caution should be exercised when using containers constructed of anything other than metal or ovenproof glass.
1
19.
20.
21.
22.
23.
Extreme caution must be used when moving an appliance containing hot oil or other hot liquids.
Do not store any materials, other than manufacturer's recommended accessories, in this oven when not in use.
Do not place any paper, cardboard, plastic, or similar materials inside the Pizza Oven.
Do not cover crumb tray or any part of the oven with metal foil. This will cause the oven to overheat.
Do not use appliance for other than intended use.
SAVE THESE INSTRUCTIONS
This product is for household use Only.
Important Cord and Plug Information
A short power supply cord is provided to reduce the risk resulting from becoming entangled in or tripping over a longer cord. DO NOT
USE WITH AN EXTENSION CORD.
This appliance has a polarized plug (one blade is wider than the other). To reduce the risk of electric shock, this plug is intended to fit
into a polarized outlet only one way. If the plug does not fit fully into the outlet, reverse the plug. If it still does not fit, contact a qualified
electrician. Do not attempt to modify the plug in any way.
Connect the power supply cord to a 120VAC electrical outlet only.
Getting Acquainted
● Remove all packing material and become familiar with the Pizza Oven parts (Fig. A).
● The baking rack handle folds in when not in use for convenient storage. To unfold the handle for use, pull the right end of the
handle out away from the Pizza Oven until it is perpendicular with the oven and locked in place.
● Before first use, wash the baking rack with a warm, soapy cloth. Rinse and dry thoroughly. Do not immerse the baking rack
face panel or the Pizza Oven in water or other liquids.
● To activate the Pizza Oven, always turn the timer dial past “6” and then turn it back or forward to the desired time. When the
set time has expired, the timer will ding once and the unit will stop heating.
● The signal light will be illuminated whenever the unit is heating. Note: The Pizza Oven exterior gets hot during use.
● To turn the Pizza Oven OFF, turn the timer dial to “0”.
Fig. A
Heating element control
Removable
baking rack
Baking rack
face panel
Folding
baking
rack handle
Timer
Handle release
button
“0” (OFF
position)
How To Use
Signal
light
Hinged
crumb tray
1. Place the Pizza Oven on a flat, dry surface away from the counter top edge and plug into a 120VAC electrical wall outlet.
Caution: Whenever operating the Pizza Oven, allow 4 inches of open space around the exterior of the Pizza Oven for air
circulation. Never operate the Pizza Oven without the baking rack.
2.
Before the first use, heat the Pizza Oven without a pizza to allow any manufacturing residue to burn off. Allow the
Pizza Oven to heat for approximately 4 minutes. Do this by turning the heating element control to DUAL and the timer dial past
“6” and then back to “4”. You may notice during initial use a slight odor or smoking as the manufacturing residue burns off.
3.
To bake a pizza, preheat the Pizza Oven for 3 minutes with the heating element control set at DUAL. Remember, to activate
the Pizza Oven you must turn the timer dial past “6” and then back or forward to the desired time.
2
4. Remove the pizza from the package and cardboard disk.
5. After preheating, pull the baking rack partially out of the Pizza Oven and carefully place the pizza on the rack. Use caution as
the rack and oven exterior will be hot. Push the rack back into the oven.
6. Refer to the Pizza Cooking Chart below. Set the timer for the halfway point of the suggested cooking time for the type of pizza
you are baking. For instance, if the chart indicates to cook 18 to 24 minutes, turn the timer to 9. When the time expires, carefully
pull the baking rack partially out of the oven and rotate the pizza a quarter turn using a fork or tongs. Then push the rack back
into the oven and set the timer for the remaining time.
When the timer goes off, check the pizza for doneness. If additional baking time is needed, simply reset the timer to the desired
time. Select the UPPER setting on the heating element control if you would like the cheese and toppings more done; select the
LOWER setting on the heating element control if you would like the crust more brown.
All pizzas will cook differently. Cook until the crust is golden brown and the cheese is melted.
7. When pizza appears done, turn the timer to “0” if it is not at “0” already.
8. Carefully pull the baking rack out of the oven and slide the pizza onto the cardboard disk or a pizza pan.
Set the hot baking rack on a heat resistant surface.
9. Allow the pizza to cool for 3 to 5 minutes and cut into serving pieces.
10. Let the oven cool completely before cleaning or storing.
To reheat pizza slices, allow the Pizza Oven to preheat for 3 minutes with the heating element control set at DUAL. After preheating,
turn the heating element control to UPPER and place the pizza slices on the center of the baking rack. Set the timer for 6 to 12 minutes.
Use the shorter time if reheating thin crust, single topping pizza and the longer time if reheating thicker crust, multiple topping pizza.
For best results, check the pizza after 6 minutes.
Pizza Cooking Chart
The following times are for cooking 12-inch pizzas. The times are approximate. Use the shorter times for single topping pizzas and the
longer times for pizzas with extra toppings or vegetable toppings. When the cheese is melted and bubbling, the pizza is done. At the end
of the cooking time if you would like a crispier crust, turn the heating element control to LOWER; if you would like the toppings more
done, turn the control to UPPER. Then reset the timer by turning it beyond “6” and then back to 1 or 2 minutes and cook until pizza is
done to your satisfaction. To avoid overcooking, do not leave unit unattended.
Type of Pizza
Approximate Cooking Time*
Regular Crust
18–26 minutes
Rising Crust
25–35 minutes
Thin Crust
13–21 minutes
*During your first use with each type of pizza, start with the shorter baking time in the indicated range. Then open the
oven and check the pizza. Extend the time as needed to bake the pizza the way you like it. Note the full time; thereafter,
use that time as a guide to bake pizza in the future.
Cooking times will vary depending on household voltage. The higher the voltage, the shorter the cooking time; the
lower the voltage, the longer the cooking time.
Care and Cleaning
Your Pizza Oven should be cleaned regularly for best performance. Regular cleaning will also reduce the risk of fire hazard. Be sure the
timer is at “0” (OFF position) and unplug. Allow the Pizza Oven to cool completely before cleaning.
Exterior of Pizza Oven
Occasionally wipe the outside of the Pizza Oven with a damp cloth and dry thoroughly. Never immerse the Pizza Oven in water or other
liquid. Do not use steel wool scouring pads or abrasive cleaners on the outside of the Pizza Oven.
Baking Rack
Wash the baking rack with a hot, soapy cloth. Rinse and dry thoroughly. If necessary, clean the wire portion of the rack with a nylon
mesh pad to remove any food residue. Do not immerse the baking rack face panel in water or any other liquid as water may enter
the interior of the panel and become trapped inside.
To fold the baking rack handle in for compact storage, press the handle release button and rotate the handle in towards the Pizza Oven.
3
Crumb Tray
To open the crumb tray for cleaning, tip the Pizza Oven on its back and hold the Pizza Oven so that it is in an upright position. Pull down
on the crumb tray knob located on the underside of the Pizza Oven and rotate the tray towards you.
While holding the Pizza Oven upright, wipe the tray and interior of the Pizza Oven with a damp, soapy cloth. If necessary, use a nylon
mesh pad to remove stubborn stains.
Dry the Pizza Oven thoroughly and return the crumb tray to the closed position. While pushing down on the knob, push the tray back
into the unit.
Consumer Service Information
If you have any questions regarding the operation of your Presto® appliance or need parts for your appliance, contact us by any of
these methods:
• Call 1-800-877-0441 weekdays 8:00 AM to 4:00 PM (Central Time)
• Email us through our website at www.GoPresto.com/contact
• Write: National Presto Industries, Inc.
Consumer Service Department
3925 North Hastings Way, Eau Claire, WI 54703-3703
When contacting the Consumer Service Department, please indicate the model number and the series code for the Pizza Oven. These
numbers can be found on the back of the oven.
Please record this information:
Model Number ___________________
Series Code ___________________
Date Purchased ___________________
Inquiries will be answered promptly by telephone, email, or letter. When emailing or writing, please include a phone number and a time
when you can be reached during weekdays if possible.
The Presto Factory Service Department is equipped to service PRESTO® appliances and supply genuine PRESTO® parts. Genuine PRESTO®
replacement parts are manufactured to the same exacting quality standards as PRESTO® appliances and are engineered specifically to
function properly with its appliances. Presto can only guarantee the quality and performance of genuine PRESTO® parts. “Look-alikes”
might not be of the same quality or function in the same manner. To ensure that you are buying genuine PRESTO® replacement parts,
look for the PRESTO® trademark.
Canton Sales and Storage Company
Presto Factory Service Department
555 Matthews Dr.
Canton, MS 39046-3251
PRESTO® Limited Warranty
(Applies Only in the United States and Canada)
This quality PRESTO appliance is designed and built to provide many years of satisfactory performance under normal household use.
Presto pledges to the original owner that should there be any defects in material or workmanship during the first year after purchase, we
will repair or replace it at our option. Our pledge does not apply to damage caused by shipping. Outside the United States and Canada,
this limited warranty does not apply.
®
To obtain service under the warranty, please call our Consumer Service Department at 1-800-877-0441. If unable to resolve the problem,
you will be instructed to send your PRESTO® appliance to the Presto Factory Service Department for a quality inspection; shipping costs
will be your responsibility. When returning an appliance, please include your name, address, phone number, and the date you purchased
the appliance as well as a description of the problem you are encountering with the appliance.
We want you to obtain maximum enjoyment from using this PRESTO® appliance and ask that you read and follow the instructions
enclosed. Failure to follow instructions, damage caused by improper replacement parts, abuse, misuse, or neglect will void this pledge.
This warranty gives you specific legal rights, and you may also have other rights which vary from state to state. This is Presto’s personal
pledge to you and is being made in place of all other express warranties.
NATIONAL PRESTO INDUSTRIES, INC.
Eau Claire, WI 54703-3703
Form 76-149B
4