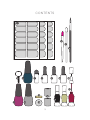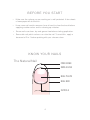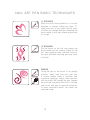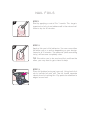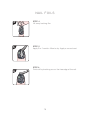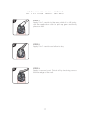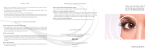
1
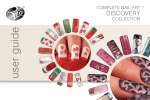
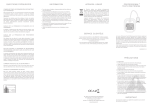
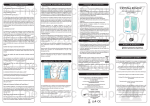
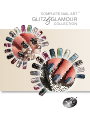
COMPLETE NAIL ART ™
GLITZ GLAMOUR
COLLECTION
PRECAUTIONS
• Read all instructions thoroughly and retain for future
reference.
• Do NOT use this product for any other purpose other than
those specified in these instructions.
!
• Do NOT use if you have open cuts on or around the cuticle,
or fungal nail infections.
• This product can be used by children aged 8 years and
above and persons with reduced physical, sensory or
mental capabilities or lack of experience and knowledge if
they have been given supervision or instruction concerning
the use of the product in a safe way and understand the
hazards involved.
• Keep out of reach of children.
• Avoid contact with the eyes, in case of contact, rinse
immediately with plenty of water and seek medical advice.
• For external use only.
• Do NOT breathe vapours, use in a well ventilated area.
• Highly Flammable. Keep away from sources of ignition.
• If redness or other signs of adverse reaction occur
discontinue use immediately.
INTR ODUCTION
Whether you’re a novice or a well practised nail artist, you
can add real glitz and glamour to your nails with this specially
selected range of nail art. The combination of nail foils, metalix
wraps, rhinestone gems and glitter, with the magical magnetic,
shattered look crackle and metallic polishes makes the
possibilities truly endless.
1
CONTENTS
1
3 x nail Metalix wraps
0
2-in-1 topcoat
2
Hoof stick
!
Crackle polish
3
Application stick
@
Crackle base varnish
4.
Base brush
£
Gold glitter
5.
Magnet
$
Rhinestone gems
6
Magnetic polish
%
2 x rolls of nail foils
7
Nail prep
^
3 x nail art pens
8
Cuticle oil
&
Fine line brush
9
Foil adhesive
*
Detailing pen
2
CONTENTS
1
2
3
4
5
6
7
8
9
0
*
&
£
%
^
!
@
$
3
BEFORE YOU START
• Make sure the surface you are working on is well protected. A few sheets
of newspaper will do the trick.
• H
ave some nail varnish remover close at hand to clean the brush before
applying another colour and for clearing up mistakes.
• Ensure nails are clean, dry and grease free before starting application.
• S
ome dark nail polish colours can stain the nail. To avoid this, apply a
basecoat of 2-in-1 before painting with your chosen colour
KNOW YOUR NAILS
The Natural Nail
Free Edge
Smile Line
Nail Plate
Nail Bed
Cuticle
4
P repare the natural nail
1
STEP 1
Remove any jewellery. File and shape nails to a
uniform length if necessary. Wash and dry hands or
feet thoroughly, paying particular attention to the nails.
2
STEP 2
Gently push back the cuticles with the Hoof Stick
and remove ALL residual skin cells from the nail plate
surface. Skin cells contain oils and moisture which will
weaken the bond of the polish on the nail plate.
3
STEP 3
We recommend lightly buffing over the nail plate with a
sanding block to remove surface shine and any ridges.
Brush away dust using a tissue, take care to remove
all dust particles.
4
STEP 4
Brush over the nail plate with Nail Prep to remove any
oils. NOTE: leave Nail Prep to evaporate fully before
applying your chosen nail art.
5
CRACKLE POLISH
1
STEP 1
Start by applying a coat of 2-in-1 varnish. This will help
to prolong the life of your polish and prevent staining
of the natural nail plate
APPLYING THE SILVER BASE POLISH
2
STEP 2
Starting in the centre and approximately 1mm
from the cuticle, brush the silver base polish towards
the tip. Then proceed with the sides.
IMPORTANT:
with polish.
3
Do
not
overload
the
brush
STEP 3
Apply a thin second coat for an even, rich colour and
finish off by brushing across the free edge of the nail.
Do NOT apply too much pressure, as the brush will fan,
leaving brush marks on the surface.
IMPORTANT: Allow your nails to dry for 30 minutes
before proceeding.
6
CRACKLE POLISH
APPLYING CRACKLE POLISH
You will achieve different results
by applying either a thin, medium
or thick EVEN layer of crackle
polish over the nail.
Thick layer Medium layer Thin layer
4
STEP 4
Starting in the centre and approximately 1mm
from the cuticle, brush the crackle polish towards
the tip. Then proceed with the sides. Once the nail is
complete, recap the bottle.
5
STEP 5
Leave Crackle polish to dry for at least 30 minutes
allowing the crackle effect to develop.
6
STEP 6
Once polish is dry apply an even layer of 2-in-1 Varnish,
remembering to cap the free edge.
7
MAGNETIC POLISH
1
STEP 1
Start by applying a coat of 2-in-1 varnish. This will help
to prolong the life of your polish and prevent staining
of the natural nail plate
2
STEP 2
Starting in the centre and approximately 1mm from the
cuticle, brush the magnetic polish towards the tip. Then
proceed with the sides. Allow 10 minutes to dry
IMPORTANT: Do not overload the brush with polish.
3
STEP 3
Apply a second coat.
NOTE: The magnet only works with wet/freshly painted
nails, so when applying the second coat you need to
work on one nail at a time.
8
MAGNETIC POLISH
4
STEP 4
Hold the magnet directly over the nail, resting the small
lip on the magnet on the finger just above the cuticle.
Hold in place for 10-15 seconds.
NOTE: The centre of the design is in the centre of the
magnet, so make sure the magnet is in the centre of
your nail.
5
STEP 5
Remove the magnet, move onto the next nail and
repeat steps 3 - 5.
IMPORTANT: If you get any polish on the magnet
remove with a tissue IMMEDIATELY. Do NOT use nail
varnish remover as this will affect the surface of the
magnet.
6
STEP 6
Allow a minimum of 60 minutes for the Magnetic Polish
to dry before applying the 2-in-1 Varnish.
NOTE: If 2-in-1 Varnish is applied before the Magnetic
Varnish has fully dried it will drag the design created
on the nail.
9
nail art pens
The double ended applicator features detailing pen and fine line brush. Also
on the base of each bottle is a pin for unblocking any polish in the shaft of the
detailing pen.
Revealing the pen
Simply pull the top off. No turning is required.
Revealing the brush
Holding the base in one hand, and the top in the other,
unscrew the top anti-clockwise and reveal the brush.
using the pin
The pin is located on the underside of the bottle. Removing the sticker will release it. Use it to push down
the nib of the pen should it become blocked or dry up.
Re-attach to bottle after use.
10
nail art pens
1
STEP 1
Using the base brush apply a base colour. This can
be any of the Nail Art colours provided or your chosen
nail polish.
NOTE: Best results are obtained when thin layers of
polish are applied. Do not overload the brush with
polish
2
STEP 2
Start in the centre and approximately 1mm from the
cuticle and brush towards the tip.
3
STEP 3
Then proceed with the sides. Once the nail is complete,
recap the bottle and allow your nails to dry before
proceeding.
11
nail art pen basic techni q ues
Dots
Dots are produced by using the detailing
pens. Place the pen on the nail with light
pressure and lift straight up. Larger dots
can be created by building up with a circular
motion. To bring the polish to the tip of the
pen, squeeze the bottle gently.
strokes
To create tapered strokes, put the brush
down on the nail and using a quick ‘flicking’
action, brush across the nail. For a standard
stroke, move the brush across the nail slowly,
applying gentle pressure.
Teardrops
With the brush touching the nail, apply
slight pressure so the hairs spread to the
required size. Move the brush across the nail,
releasing pressure as you go, and allow the
stroke to finish at a point. ‘Comma’ shapes
can be created in a similar fashion, sweep
the brush down and to one side in a circular
motion, releasing pressure as you go.
12
nail art pen basic techni q ues
‘C’ Strokes
Move the brush anti-clockwise in a circular
direction as though writing the letter ‘C’.
Apply pressure as you reach the left point
at which you change direction sweeping the
brush round to the right releasing pressure
as you go.
‘S’ Strokes
Put the brush on the nail and sweep the
brush down the nail moving slightly to the
left, then applying more pressure move to
the right and then releasing pressure, back
to the left.
Swirls
Using the pen or the brush in an upright
position, apply light pressure and with
a circular motion move it outwards and
clockwise. Applying slightly more pressure
with the brush will change the look, though
too much will cause the swirl to fill in. Moving
your brush and pen in opposite directions
to those described above, will create the
reversed image.
13
nail foils
1
STEP 1
Start by applying a coat of 2-in-1 varnish. This stage is
important as foils do not adhere well to the natural nail.
Allow to dry for 30 minutes.
2
STEP 2
Apply a thin coat of foil adhesive. You can cover either
the entire nail or a section depending on your design. Leave for 8-10 minutes. The adhesive (while remaining
tacky) will become completely clear.
Tip: We advise you to do one hand first and then the
other, you may want to get a friend to help.
3
STEP 3
Place foil (pattern facing up) over nail. Using hoof stick
rub to transfer foil onto nail. The foil should separate
cleanly from its backing film. Pay particular attention to
edges around nail.
14
nail foils
4
STEP 4
Lift away backing film.
5
STEP 5
Apply 2-in-1 varnish. Allow to dry. Apply a second coat. 6
STEP 6
Finish off by brushing across the free edge of the nail.
15
nail M E T A L I X w rap
1
Before applying your Nail Metalix Wraps have both a
pair of nail scissors and a nail file easily to hand.
STEP 1
Find the Nail Metalix that best fits the nail plate, if
necessary trim whilst still on the backing sheet.
2
STEP 2
Carefully remove the Nail Metalix from the
backing sheet, lifting from the straight edge.
Align the curved end 0.5mm from the cuticle line. Press
onto the centre of the Nail Metalix to anchor in place.
NOTE: Placing the Nail Metalix too close to the cuticle
and nail groove will cause lifting.
3
STEP 3
Using the cuticle pusher, press firmly over the entire nail
plate from the middle outwards. Ensure all air bubbles
and creases are pushed out.
NOTE: Tuck any excess Nail Metalix under the nail for
filing off later.
4
STEP 4
File off the excess Nail Metalix from the free edges of
your nails. In a smooth downwards movement, using
firm pressure and long strokes
NOTE: Hold the nail file at 90 degrees to the free edge
to avoid scuffing the surface.
16
applying nail gems
1
STEP 1
Apply 2-in-1 varnish to the area, while it is still tacky,
use the application stick to pick up gem and firmly
place on nail.
2
STEP 2
Apply 2-in-1 varnish and allow to dry.
3
STEP 3
Apply a second coat. Finish off by brushing across
the free edge of the nail.
17
applying glitter
Glitter is applied to wet polish. It can be either applied onto the whole area of the
nail, or selected areas.
1
STEP 1
Choose a background colour for the glitter (this can
be the same as your base colour) and paint the area
you wish the glitter to cover. All other areas must be
completely dry.
2
STEP 2
While the polish is still wet, sprinkle glitter onto the
nail. Have a piece of paper under the nail to catch
any excess glitter. This can then be returned to the jar.
Remove excess glitter by tapping the nail.
3
STEP 3
Apply clear 2-in-1 top coat varnish to protect the glitter
design.
18
A F T E R C A R E A N D advice
•
Some practice will be required for applying nail art techniques to the nails
on your writing hand. You may want to get a friend to help.
•
To help make your design last longer apply a layer of 2-in-1 topcoat, once
it is completely dry. Always cap the free edge, as this is where the design
endures most wear and tear.
•
Clean the base brush with ordinary nail polish remover immediately after
use.
•
Ensure the tops are put back on all the pens and varnishes so they won’t dry
out.
•
Keep nail varnish bottles cool, dry and away from sources of ignition. Store
with adequate ventilation.
•
To remove your nail art, use nail polish remover.
Note: If you are wearing false nails or nail extensions, do not use a polish
remover that contains acetone, as this may damage the extensions.
•
Store away from direct sunlight.
•
To prolong the life of your new nails do NOT use detergents, such as
washing powders or washing-up liquid, or bleach without wearing rubber
gloves.
CRACKLE POLISH
The crackle pattern has not developed
•
Leave Crackle polish to dry for at least 30 minutes before applying 2-in-1
Varnish, to allow the crackle effect to develop.
MAGNETIC POLISH
The pattern doesn’t show
•
The magnet only works with wet/freshly painted nails.
•
Allow 60 minutes before applying 2-in-1 Varnish to prevent the design
from dragging over the nail.
19
A F T E R C A R E A N D advice
nail foils The foil isn’t sticking
•
Foils do not adhere well to the natural nail. Always apply a nail polish or
2-in-1 varnish before foil application.
•
Nail polish has not dried properly before applying foil adhesive.
•
If the foil adhesive is still wet or has not turned clear the foil will not stick
successfully.
•
Foil adhesive has been left too long before foil application.
The nail foil patchy
•
Foil adhesive has been left too long before foil application.
•
Foil adhesive was applied too thinly.
The foil rubbing off the edge of the nail
•
Always seal your designs with 2 coats of 2-in-1 varnish. When sealing with
2-in-1 varnish brush over and cap the free edge of the nail.
nail M E T A L I X W R A P S
The wraps are lifting from the edge
•
Be sure NOT to apply moisturisers during the application process or near
the nail plate after application.
•
Ensure that nail prep is applied to eliminate any oils.
•
It is necessary to apply plenty of pressure onto Nail Metalix during
application.
•
Make sure that you have left a gap of at least 0.5mm between the edge
of Nail Metalix and the cuticle.
•
Excess Nail Metalix may have been filed off incorrectly. It is important to
file excess Nail Metalix at 90 degrees to the free edge and in a downward
motion only.
20
A F T E R C A R E A N D advice
There are creases appearing at the sides wraps
•
Apply plenty of pressure onto Nail Metalix during application, paying
particular attention to the side walls.
•
Stretching Nail Metalix over the nail plate will help form a smooth curve
over the nail.
•
Make sure that you have left a gap of at least 0.5mm between the edge
of Nail Metalix and the cuticle.
Customer Care
If you have any questions or experience any difficulties, please call our Rio
Careline on +44 (0) 1242 702345 or email us at: [email protected]
To reorder additional accessories, please visit www.riobeauty.com or contact
your local distributor.
21
22
23
www.riobeauty.com
UK
UK
Rio, Dezac and Complete Nail Art Glitz & Glamour Collection are trademarks
of The Dezac Group Ltd © The Dezac Group Ltd 2012
Manufactured by The Dezac Group Ltd PO Box 17, Cheltenham, England GL53 7ET
1-IN-NADG-UK/1.1