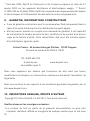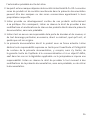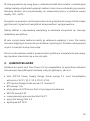
1
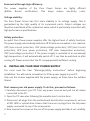
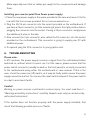
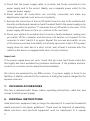
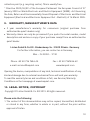
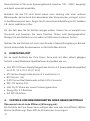
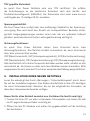
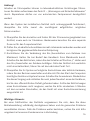
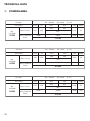
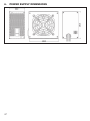
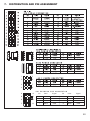
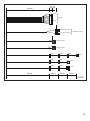
1
1. INDEX
ENGLISH
Introduction ................................................... ............................................5
Warnings and safety instructions ................................................... ...........5
Compatibility ................................................... ..........................................6
Beneits and special features of your new power supply ..........................6
Installing your new power supply ................................................... ...........7
Troubleshooting ................................................... ......................................8
Attachements .................................................. ..........................................9
Disposal instructions ................................................... ..............................9
Warranty*, manufacturer‘s data ................................................... ..........10
Legal notice, Copyright................................................... .........................10
Technical data................................................... ...................................... 45
DEUTSCH
Einleitung ................................................... .............................................. 12
Warnungen und Sicherheitshinweise................................................... ....12
Kompatibilität ................................................... ....................................... 13
Vorteile und Besonderheiten ihres neuen Netzteils ................................ 13
Installation ihres neuen Netzteils ................................................... .........14
Fehlerbehebung................................................... .................................... 15
Zubehör .................................................. ................................................. 17
Entsorgungshinweise................................................... ............................ 17
Garantie*, Herstellerangaben ................................................... .............. 17
Rechtliche Hinweise, Copyright ................................................... ............18
Technische Daten ................................................... ................................ 45
2
FRANÇAIS
Introduction ................................................... .......................................... 19
Avertissements et consignes de sécurité ................................................ 19
Compatibilité ................................................... ........................................ 20
Avantages et particularités de votre nouveau bloc d’alimentation..........21
Installation de votre nouveau bloc d’alimentation ................................... 22
Dépistage des pannes ................................................... ..........................23
Accessoires ................................................... .......................................... 24
Consignes pour la gestion des déchets ................................................... 24
Garantie*, informations constructeur ................................................... ...25
Indications légales, droits d'auteur ................................................... ......25
Données techniques ................................................... ............................ 45
POLSKI
Wprowadzenie ................................................... ...................................... 27
Ostrzeżenia i wskazówki dotyczące bezpieczeństwa ..............................27
Kompatybilność ................................................... .................................... 28
Zalety oraz właściwości państwa nowego zasilacza................................ 29
Instalacja nowego zasilacza ................................................... .................29
Usuwanie usterek ................................................... ................................. 30
Akcesoria ................................................... .............................................. 32
Wskazówki dotyczące utylizacji .................................................. .............32
Gwarancja*, dane producenta ................................................... .............32
Informacje prawne, Prawa autorskie .................................................. ....33
Dane techniczne ................................................... .................................. 45
3
E S PA Ñ O L
Introducción ................................................... .........................................35
Advertencias e indicaciones de seguridad ..............................................35
Compatibilidad ................................................... .....................................36
Ventajas y particularidades de su nueva fuente de alimentación ...........37
Instalación de su nueva fuente de alimentación ..................................... 38
Solución de errores ................................................... .............................. 39
Accesorios ................................................... ........................................... 40
Indicaciones para su retirada ................................................... .............. 40
Garantía*, datos del fabricante................................................... ............. 41
Nota legal, Copyright ................................................... ........................... 41
Datos técnico ................................................... ...................................... 45
* F U L L W A R R A N T Y I N F O R M AT I O N »
Limited Warranty ................................................... ...................................43
T E C H N I C A L D ATA »
Label ................................................... ................................................... . 45
Voltage regulation................................................... ................................ 46
Operating conditions ................................................... ........................... 46
Minimal load ................................................... ........................................ 46
Dimensions .................................................. ............................................ 47
Distribution and Pin assignment................................................... .......... 48
Connectivity and cable lengths ................................................... ............49
Glinde, June 2013
4
1.
INTRODUCTION
We are delighted that you have chosen to use a be quiet! power supply from our
Pure Power Series in your PC. Please read and follow all the information contained
in these instructions carefully prior to installation. The power supply is only
guaranteed to function properly if the instructions are followed thus providing
you with maximum satisfaction with this product. Should you have any further
question, please contact our customer service. See contact information in item
Manufacturer’s details.
2.
WARNINGS AND SAFETY INSTRUCTIONS
Never unscrew or disassemble the power supply. It may hold elements containing
high voltages after long periods of disuse and which could cause serious injury.
A power supply must only be opened by an authorised technician!
Caution! Only use the supplied cable set. Using cables that were not included (e.g.
cables of older power supply unit series) may lead to defects!
The warranty shall be void if the power supply is opened by an unauthorised
technician and/or the warranty seal is broken. Never handle the power supply
with wet or damp hands when in operation. Never insert objects into the openings/
fans of the power supply. Operation is only permitted indoors! Outdoor use may
lead to severe damage.
Do not carry out work on the power supply if it is connected to the mains. Always
turn the mains switch to of and pull out the mains plug.
In the event of a short circuit in the device, remove the mains cable and do not
use the device.
If there are traces of smoke, damaged cables and exposure to liquids, the power
supply must immediately be disconnected from the mains and must not be used.
This power supply is covered for a voltage range between 100 – 240 V~ and can
be used universally.
5
Do not operate the PC directly next to a heater or another source of heat, as this
reduces the lifespan of all components and may lead to failures.
Ensure that there is suicient ventilation in the PC case, for example by adding
additional fans.
Should you want to clean your power supply, disconnect it completely from the
mains and do not use damp cloths or cleaning detergent. Clean the power supply
from the outside using a dry cloth.
Allow hour before using the power supply after it has been in an ambient air
environment as otherwise condensation water could accumulate in the power
supply.
3.
COMPATIBILITY
The be quiet! Pure Power series power supplies are compatible with all recent
popular power supply and motherboard speciications such as:
■ Intel ATX12V Power Supply Design Guide Version 2.4 (and downwardly
compatible to V2.31, V2.3, V2.2, V2.01, V2.0 )
■ ATX System Design Guide Version 2.2 and Version 2.1
■ BTX Version 1.0a
■ E-ATX Server Dual Motherboards via 8-Pin Connector
■ EPS12V Version 2.92
■ Intel C6/C7 Status for the new processor generation
■ Energy Star 5.2 guidelines
■ ErP 2013 guidelines
4.
BENEFITS AND SPECIAL FEATURES OF YOUR NEW POWER
SUPPLY
TÜV tested safety:
be quiet! Pure Power power supplies are TÜV certiied. They fulill the demands made
on electrical safety pursuant to the Equipment and Product Safety Act (EN60950).
Documents can be viewed on www.tuv.com and by entering the 10 digit ID No.
6
Economical through high eiciency:
The power supplies of the Pure Power Series are highly eicient
(80Plus Bronze certiication). This helps reduce electricity costs.
Voltage stability:
The Pure Power Series has irst class stability in its voltage supply. This is
guaranteed by the high quality of its component parts. Output voltages are
therefore maintained at the optimal set value, which is particularly important with
high performance speciications.
Safety protection:
be quiet! Pure Power power supplies ofer the highest level of safety functions.
The power supply automatically switches of if limits are exceeded or not reached.
OCP (over-current protection, UVP (under-voltage protection), SCP (short circuit
protection), OPP (over power protection), OTP (over temperature protection),
OVP (overvoltage protection). If the power supply is operated at an excessively
high temperature, it will automatically switch of. It can then be switched on after
cooling of. Please ensure that the PC is equipped with suicient cooling.
5.
INSTALLING YOUR NEW POWER SUPPLY
You must read the item “Warnings/safety instructions” before beginning
installation. You will need a screwdriver to it the power supply in your PC.
Only use the screws supplied with the power supply, as these have the suitable
thread.
First remove your old power supply. To do this, proceed as follows:
1. Carefully disconnect your PC from any power sources and pull out all cables
connected to the PC.
2. Open the PC case also following the manufacturer‘s instructions.
3. Disconnect all plugs from the motherboard and all other components, such as
a FDD, HDD or optical drive. Ensure that there are no plugs from the old power
supply connected to any of the components.
4. Now remove the screws on the rear of the power supply and take it out carefully.
7
Make especially sure that no cables get caught in the components and damage
them.
Installing your new be quiet! Pure Power power supply:
1. Place the new power supply in the space provided in the case and mount it to the
rear with the four screws provided. Do not use excessive force.
2. Plug the 20/24 pin connector into the socket provided on the motherboard. If
you have a 24 pin connector, put the remaining 4 pins in the right position before
plugging the connector into the socket. If using a 20 pin connector, simply leave
the additional 4 pins on the side.
3. Now connect the 4 pin connector, also called the P4 connector, into the socket
provided on the motherboard. This connector is going to supply your PC with
additional power.
4. If required, plug the PCIe connector to your graphic card.
6.
TROUBLESHOOTING
Please note:
In ATX systems, the power supply receives a signal from the motherboard when
switched on, without which it cannot run. For this reason, please ensure that the
power switch connector (usually located on the front panel) is correctly connected
to the motherboard using either the motherboard or case manual. If this is the
case, check the power (on/of) switch, as it may be faulty which means the power
supply cannot be started. You can use the reset switch instead of the power switch
in order to avoid such faults.
Careful!
Working on power sources could lead to serious injury. You must read item 2 –
“Warnings and safety instructions” carefully. Repairs must only be carried out by
authorised technicians!
If the system does not function properly with the power supply installed, irst
check the following possible sources of faults:
8
A. Check that the power supply cable is correctly and irmly connected to the
power supply and to the socket. Ideally, use a separate power outlet for the
computer power supply.
B. Check whether all connections are correctly connected and make any
adjustments required, such as incorrect polarity.
C. Examine the connection of the on/of switch from the case to the motherboard.
Have the motherboard manual on hand if needed! Switch the power supply on by
turning the switch to position “I” and press the on/of switch on the case. If the
power supply still does not turn on, continue to the next item.
D. Check your system for possible short circuits or faulty hardware, making sure
you switch of the computer and disconnect all devices not required for the
computer to start. Switch it on again. Repeat this process and switch on one
of the devices you have found likely to be faulty upon each restart. If the power
supply does not react due to a short circuit, wait at least 5 minutes after the
restart as the device is equipped with short circuit protection.
Important:
If the power supply does not work, check that you have read these instruction
thoroughly and have excluded the problems mentioned. If the problem persists,
contact our customer service department immediately.
All returns are examined by our RMA service. If a power supply is found to be
faultless, it shall be returned to the customer. A testing fee may be charged for the
expense incurred.
7.
INCLUDED ACCESSORIES
This tem is delivered with: Power cables, operating instructions, cable ties, and
screws to attach power supply.
8.
DISPOSAL INSTRUCTIONS
Used electronic equipment may no longer be disposed of in unsorted household
waste pursuant to European guidelines*. These must be disposed of separately.
Waste electronic and electrical equipment must be transferred to a special
9
collection point (e.g. recycling centre). This is usually free.
* Directive 2002/96/EC of the European Parliament the European Council of 27
January 2003 on Waste Electronic and Electric Equipment (WEEE). Act Governing
the Sale, Return and Environmentally Sound Disposal of Electronic and Electrical
Equipment (Electrical and Electronic Equipment Act - ElektroG) of 16 March 2005.
9.
■
■
WARRANTY, MANUFACTURER‘S DATA
3 year manufacturer’s warranty for consumers (original purchase from
authorised be quiet! dealers only)
Warranty claims can only be processed if you quote the serial number, model
description and enclose a copy of your purchase receipt from an authorised be
quiet! dealer.
Listan GmbH & Co.KG . Biedenkamp 3a . 21509 Glinde . Germany
For further information, you can contact us in Germany
Mon – Fri 09:00 – 17:30
Phone +49 40 736 7686-44
Fax + 49 40 7367686-69
e-mail: [email protected]
www.bequiet.com
Opening the device, manipulations of any kind, technical modiications of any
kind and damage due to external mechanical force will void your warranty.
To read the warranty terms and conditions in full, see Service/Warranty
Conditions on the homepage at www.bequiet.com.
10. LEGAL NOTICE, COPYRIGHT
Copyright © Listan GmbH & Co. KG 2013. All rights reserved.
Please note the following:
1. The content of this documentation may not be copied, transmitted, distributed
or stored in any form, whether in whole or in part, without the prior written
approval of Listan.
10
2. be quiet! is a registered trademark of Listan GmbH & Co. KG. Other product and
company names mentioned in this documentation may be trademarks or trade
names of their respective owners.
3. In accordance with its policy, Listan continually develops its products further.
Listan therefore reserves the right to make changes and improvements to any of
the products described in this documentation without prior notice.
4. Listan is under no circumstances responsible for the loss of data and income
or for any speciic, incidental, indirect or direct damage, however this may be
incurred.
5. The content of this documentation is presented in its most updated form.
Listan neither expressly nor implicitly assumes any liability for the accuracy or
completeness of the content of this documentation, including, but not limited to
the implicit guarantee of market suitability and the appropriateness for a certain
purpose, unless applicable laws or case law prescribe such liability. Listan
reserves the right to make changes to this documentation or to withdraw the
documentation at any time without prior notice.
11
1.
EINLEITUNG
Wir freuen uns, dass Sie sich dazu entschlossen haben, ein be quiet! Netzteil der Pure
Power Serie in Ihrem PC einzusetzen. Lesen Sie bitte vor der Inbetriebnahme alle
Punkte in dieser Anleitung sorgfältig durch und beachten Sie diese. Nur dann ist ein
ordnungsgemäßer Betrieb des Netzteils sichergestellt und Sie werden lange Freude
andiesem Produkt haben. Falls Sie weitere Fragen haben, richten Sie diese gerne
an unseren Kundenservice. Siehe hierzu Kontaktdaten unter "Herstellerangaben".
2.
WARNUNGEN UND SICHERHEITSHINWEISE
Schrauben Sie das Netzteil niemals auf. Im Inneren beinden sich Bauteile, die
auch bei längerem Nichtgebrauch hohe Spannungen aufweisen können und zu
lebensbedrohlichen Verletzungen führen können.
Ein Netzteil darf nur von autorisiertem Fachpersonal geöfnet werden!
Achtung! Verwenden Sie nur den mitgelieferten Kabelsatz! Das Verwenden von
nicht mitgelieferten Kabeln (z.B. Kabel älterer Netzteilserien) kann zu einem
Defekt führen!
Die Garantie erlischt durch Öfnen von nicht autorisiertem Fachpersonal und
bei beschädigtem Garantiesiegel. Nehmen Sie niemals das Gerät mit nassen
oder feuchten Händen in Betrieb. Stecken Sie nie Gegenstände in die Öfnungen
oder den Lüfter des Netzteiles. Der Betrieb ist nur in Innenräumen erlaubt! Der
Außeneinsatz kann zu schweren Schäden führen.
Führen Sie keine Arbeiten am Netzteil durch, wenn sich dieses unter Netzspannung
beindet. Immer den Netzschalter auf „0“ stellen und den Netzstecker herausziehen.
Bei einem Kurzschluss im Gerät, entfernen Sie das Netzkabel und nehmen Sie es
nicht erneut in Betrieb.
Bei Rauchspuren, beschädigten Kabeln und Einwirkung von Flüssigkeiten
ist das Netzteil sofort vom Stromnetz zu trennen und danach nicht mehr in
Betrieb zu nehmen.
12
Dieses Netzteil ist für einen Spannungsbereich zwischen 100 – 240V~ ausgelegt
und damit universell einsetzbar.
Betreiben Sie den PC nicht direkt neben einer Heizung oder einer anderen
Wärmequelle, da hierdurch die Lebensdauer aller Komponenten verringert und es
zu Ausfällen kommen kann. Sorgen Sie für ausreichende Belüftung im PC-Gehäuse
z.B. durch zusätzliche Lüfter.
Für den Fall, dass Sie Ihr Netzteil reinigen wollen, trennen Sie es komplett vom
Stromnetz und benutzen Sie keine feuchten Tücher oder Reinigungsmittel.
Reinigen Sie das Netzteil nur von außen mit Hilfe eines trockenen Tuches.
Nehmen Sie das Netzteil erst nach einer Stunde in Raumluftumgebung in Betrieb,
da sich anderenfalls Kondenswasser im Netzteil bilden könnte.
3.
KOMPATIBILITÄT
Die be quiet!-Netzteile der Pure Power Serie sind mit allen aktuell gängigen
Netzteil- sowie Mainboard-Speziikationen kompatibel wie u.a.:
■
■
■
■
■
■
■
■
4.
Intel ATX 12V Power Supply Design Guide Version 2.4 (sowie abwärtskompatibel
zu V2.31, V2.3, V2.2, V2.01, V2.0)
ATX System Design Guide Version 2.2 und Version 2.1
BTX Version 1.0a
E-ATX Server Dual Mainboards mittels 8-Pin-Connector
EPS 12V Version 2.92
Intel C6/C7 Status der neuen Prozessorgeneration
Energy Star 5.2 Richtlinie
ErP 2013 Richtlinie
VORTEILE UND BESONDERHEITEN IHRES NEUEN NETZTEILS
Ökonomisch durch hohe Eizienz (Wirkungsgrad):
Die Netzteile der Pure Power Serie verfügen über eine sehr hohe Eizienz (80Plus
Bronze Zertiizierung). Diese hilft die Stromkosten zu verringern.
13
TÜV geprüfte Sicherheit:
be quiet! Pure Power Netzteile sind vom TÜV zertiiziert. Sie erfüllen
die Anforderungen an die elektrische Sicherheit nach dem Geräte- und
Produktsicherheitsgesetz (EN60950). Die Dokumente sind unter www.tuv.com
und Eingabe der 10-stelligen ID-Nr. einsehbar.
Spannungsstabilität:
Die Pure Power Serie verfügt über eine erstklassige Stabilität in der Spannungsversorgung. Dies wird durch den Einsatz von hochqualitativen Bauteilen sichergestellt. Ausgangsspannungen werden somit sehr nah am optimalen Sollwert
gehalten, was besonders bei hoher Leistungsanforderung wichtig ist.
Sicherungsfunktionen:
be quiet! Pure Power Netzteile bieten hohe Sicherheit durch viele
Sicherungsfunktionen. Das Netzteil schaltet automatisch ab, wenn Grenzwerte
über- bzw. unterschritten werden.
OCP (Überstromschutz) , UVP (Unterspannungsschutz), SCP (Kurzschlusssicherung),
OPP (Überlastschutz), OTP (Temperatursicherung), OVP (Überspannungssicherung ).
Falls das Netzteil mit zu hoher Temperatur betrieben werden sollte, schaltet es sich
automatisch ab. Sie können es dann nach dem Abkühlen wieder einschalten. Bitte
vergewissern Sie sich, dass der PC mit einer ausreichenden Kühlung ausgestattet ist.
5.
INSTALLATION IHRES NEUEN NETZTEILS
Lesen Sie unbedingt den Punkt „Warnungen / Sicherheitshinweise“ durch, bevor
Sie mit der Installation beginnen. Zum Einbau des Netzteils in Ihren PC benötigen
Sie einen Schraubendreher. Benutzen Sie nur die mitgelieferten Schrauben, da
diese über das passende Gewinde verfügen.
Bauen Sie Ihr altes Netzteil zunächst aus. Verfahren Sie hierfür wie folgt:
1. Trennen Sie Ihren PC von allen vorhandenen Stromquellen und ziehen Sie alle
am PC angeschlossenen Kabel vorsichtig ab.
2. Öfnen Sie das PC Gehäuse und achten Sie gegebenenfalls auf die Anleitung
des Herstellers.
14
3. Trennen Sie alle Stecker vom Mainboard und allen weiteren Komponenten,
wie FDD, HDD oder optischen Laufwerken. Achten Sie bitte darauf, dass kein
Stecker des alten Netzteiles mit einer Komponente verbunden ist.
4. Nun entfernen Sie die Schrauben an der Rückseite des Netzteils und nehmen es
vorsichtig heraus. Achten Sie hierbei besonders darauf, dass sich keine Kabel an
Komponenten verfangen und diese beschädigen.
Der Einbau Ihres neuen be quiet! Pure Power Netzteils:
1. Setzen Sie das neue Netzteil nun an den vorgesehenen Platz im Gehäuse und
schrauben Sie es an der Rückseite mit den vier mitgelieferten Schrauben fest.
Verwenden Sie keine übermäßige Kraft.
2. Stecken Sie den 20/24 Pin Stecker in die vorgesehene Buchse am Mainboard.
Wenn Sie über einen 24 Pin Anschluss verfügen, dann bringen Sie die
zusätzlichen 4 Pins in die richtige Position, bevor Sie den Stecker mit der Buchse
verbinden. Beim Einsatz eines 20 Pin Steckers klappen Sie die zusätzlichen 4
Pins einfach an die Seite.
3. Nun stecken Sie den 4 Pin Stecker, auch P4 Stecker genannt, in die vorgesehene
Buchse auf dem Mainboard. Dieser Stecker wird Ihre CPU in Zukunft zusätzlich
mit Strom versorgen.
4. Bei Bedarf stecken sie den PCIe Stromstecker an Ihre Graikkarte.
6.
FEHLERBEHEBUNG
Bitte beachten Sie:
Bei ATX-Systemen erhält das Netzteil zum Einschalten ein Signal vom
angeschlossenen Mainboard. Nur dann kann es in Betrieb genommen
werden. Daher prüfen Sie bitte, entweder mit Hilfe des Mainboards oder des
Gehäusehandbuches, ob der Stecker des Power Switches (Einschalttaste, beindet
sich meistens an der Frontblende) korrekt am Mainboard angeschlossen ist. Ist
dies der Fall, prüfen Sie bitte den Power (Ein/Aus-) Schalter, denn es kommt vor,
dass er defekt ist, so dass das Netzteil hiermit nicht gestartet werden kann. Hier
können Sie anstelle des Power Switches den Reset Switch verwenden, um diese
Fehlermöglichkeiten auszuschließen.
15
Achtung!
Arbeiten an Stromquellen können zu lebensbedrohlichen Verletzungen führen.
Lesen Sie daher aufmerksam den Punkt 2 – „Warnungen und Sicherheitshinweise“
durch. Reparaturen dürfen nur von autorisiertem Fachpersonal durchgeführt
werden!
Wenn das System bei installiertem Netzteil nicht ordnungsgemäß funktioniert,
überprüfen Sie bitte zuerst die nachfolgend aufgeführten möglichen
Fehlerursachen:
A. Überprüfen Sie den korrekten und festen Sitz der Stromversorgungskabel zum
Netzteil, sowie auch zur Steckdose. Idealerweise benutzen Sie eine separate
Dose nur für das Computernetzteil.
B. Prüfen Sie, ob sämtliche Anschlüsse korrekt miteinander verbunden wurden und
korrigieren Sie gegebenenfalls diese bei Fehlpolung.
C. Kontrollieren Sie die Verbindung des Ein-/Ausschalters vom Gehäuse zum
Mainboard. Halten Sie bei Bedarf das Handbuch Ihres Mainboards bereit.
Schalten Sie das Netzteil ein, indem Sie den Schalter auf Position „I“ stellen und
den Ein-/Ausschalter am Gehäuse betätigen. Falls das Netzteil sich weiterhin
nicht einschalten lässt, fahren Sie mit dem nächsten Punkt fort.
D. Überprüfen Sie Ihr System auf mögliche Kurzschlüsse oder defekte Hardware,
indem Sie den Rechner ausschalten und alle nicht für den Start des Computers
benötigten Geräte vom System trennen. Schalten Sie ihn wieder ein. Wiederholen
Sie diesen Vorgang und schließen Sie nach jedem Neustart eines der Geräte an,
bis Sie den ofensichtlichen Defekt gefunden haben. Sollte das Netzteil wegen
eines Kurzschlusses nicht reagieren, warten Sie bitte mindestens 5 Minuten
mit dem erneuten Einschalten, da das Gerät mit einer Kurzschlusssicherung
ausgestattet ist.
Wichtiger Hinweis:
Bei einer Fehlfunktion des Netzteils vergewissern Sie sich, dass Sie diese
Betriebsanleitung vollständig durchgelesen haben und die genannten Probleme
ausschließen können. Falls die Probleme weiter bestehen, setzen Sie sich bitte
umgehend mit unserem Kundenservice in Verbindung.
16
Alle eingehenden Rücksendungen werden von unserem RMA-Service geprüft.
Falls sich ein Netzteil als fehlerfrei herausstellen sollte, wird es an den Kunden
zurückgeschickt. Darüber hinaus kann eine Prüfpauschale für den entstandenen
Aufwand erhoben werden.
7.
ZUBEHÖR
Zum Lieferumfang gehören: Kaltgerätekabel, Bedienungsanleitung, Kabelbinder,
Schrauben zur Netzteilbefestigung.
8.
ENTSORGUNGSHINWEISE
Gebrauchte Elektronikgeräte dürfen gemäß europäischer Vorgaben* nicht
mehr zum unsortierten Hausabfall gegeben werden. Sie müssen getrennt
entsorgt werden. Das Elektro-Altgerät muss einer speziellen Sammelstelle (z.B
Recyclinghof) zugeführt werden. Dies ist in der Regel für Sie kostenlos.
* Richtlinie 2002/96/EG des europäischen Parlaments und des Rates vom
27. Januar 2003 über Elektro-/ Elektronik-Altgeräte. Gesetz über das
Inverkehrbringen, die Rücknahme und die umweltverträgliche Entsorgung von
Elektro- und Elektronikgeräten (Elektro- und Elektronikgerätegesetz - ElektroG)
vom 16. März 2005.
9.
GARANTIE, HERSTELLERANGABEN
3 Jahre Herstellergarantie für Endkonsumenten (nur Ersterwerb vom
autorisierten be quiet! Händler
Eine Garantieabwicklung ist nur in Verbindung mit Angabe der Seriennummer
und Modellbezeichnung, sowie einer beigefügten Kopie des Kaufbelegs eines
autorisierten be quiet!-Händlers möglich.
■
■
Listan GmbH & Co. KG . Biedenkamp 3a . 21509 Glinde . Germany
Für weitere Unterstützung erreichen Sie uns innerhalb Deutschlands unter der
kostenlosen Service Hotline, Mo. – Fr. 09:00 – 17:30 Uhr
17
Tel. 0800 – 0736736
Fax: 040-7367686-69
E-Mail: [email protected]
Internet: www.bequiet.com
Das Öfnen des Gerätes, Manipulationen jeglicher Art, bauliche Veränderungen
jeglicher Art, sowie Beschädigungen durch äußere Mechanische Einwirkungen
führen zum totalen Garantieverlust.
Die ausführlichen Garantiebedingungen können im Bereich "Service" unter www.
bequiet.com eingesehen werden.
10. RECHTLICHE HINWEISE, COPYRIGHT
Copyright © Listan GmbH & Co. KG 2013. Alle Rechte vorbehalten.
Bitte beachten Sie die folgenden Hinweise:
1. Der Inhalt dieser Dokumentation darf ohne vorherige schriftliche Genehmigung
durch Listan in keiner Form, weder ganz noch teilweise, vervielfältigt,
weitergegeben, verbreitet oder gespeichert werden.
2. be quiet! ist eine eingetragene Marke der Firma Listan GmbH & Co. KG. Andere
in dieser Dokumentation erwähnte Produkte- und Firmennamen können Marken
oder Handelsnahmen ihrer jeweiligen Eigentümer sein.
3. Listan entwickelt entsprechend ihrer Politik die Produkte ständig weiter.
Listan behält sich deshalb das Recht vor, ohne vorherige Ankündigungen
jedem der in dieser Dokumentation beschriebenen Produkte Änderungen und
Verbesserungen vorzunehmen.
4. Listan ist unter keinen Umständen verantwortlich für den Verlust von Daten
und Einkünften oder für jedweder besonderen, beiläuigen, mittelbaren oder
unmittelbaren Schäden, wie immer diese auch zustande gekommen sind.
5. Der Inhalt dieser Dokumentation wird so präsentiert, wie er aktuell vorliegt. Listan
übernimmt weder ausdrücklich noch stillschweigend irgendeine Gewährleistung
für die Richtigkeit oder Vollständigkeit des Inhalts dieser Dokumentation,
einschließlich, aber nicht beschränkt auf die stillschweigende Garantie der
Markttauglichkeit und der Eignung für einen bestimmten Zweck, es sei denn,
anwendbare Gesetze oder Rechtssprechung schreiben zwingend eine Haftung vor.
Listan behält sich das Recht vor, jederzeit ohne vorherige Ankündigung Änderungen
an dieser Dokumentation vorzunehmen oder die Dokumentation zurückzuziehen.
18
1.
INTRODUCTION
Nous vous remercions d’avoir choisi la gamme d’alimentations Pure Power de
be quiet! pour votre PC.
Nous vous invitons à lire attentivement ce manuel avant l’installation de votre
bloc. Ain de vous donner entière satisfaction, nous vous rappelons que le bon
fonctionnement de votre alimentation est uniquement garanti dans le cadre d’une
utilisation conforme aux instructions. Si vous avez des questions, nous vous
invitons à contacter notre service client, dont vous trouverez les coordonnées
complètes dans le paragraphe « Informations constructeur ».
2.
AVERTISSEMENTS ET CONSIGNES DE SECURITE
Ne dévissez jamais le bloc d’alimentation. Les composants situés à l‘intérieur
peuvent présenter des tensions élevées et provoquer des blessures pouvant
mettre votre vie en danger, même longtemps après la dernière utilisation.
Seul du personnel qualiié et habilité est autorisé à ouvrir un bloc d‘alimentation !
La garantie est annulée in en cas d‘ouverture par du personnel non habilité et
lorsque le cachet de garantie est endommagé. Ne mettez jamais l‘appareil en
service lorsque vous avez les mains mouillées ou humides. N‘insérez jamais
d‘objet dans les oriices / le ventilateur du bloc d‘alimentation.
Le fonctionnement est uniquement autorisé à l’intérieur de bâtiments ! L‘utilisation
en extérieur peut provoquer de graves dommages.
Attention ! N‘utilisez que les câbles fournis avec l‘appareil. L‘utilisation d‘autres
câbles que ceux fournis (par exemple ceux fournis avec des blocs secteurs plus
anciens) peut entraîner des défaillances !
Ne procédez à aucune modiication du bloc d‘alimentation lorsqu‘il est branché sur
le secteur. Mettez toujours l’interrupteur secteur en position „0“ et débranchez la
prise secteur. En cas de court-circuit dans l‘appareil, retirez le câble d‘alimentation
et ne le remettez pas en marche.
19
Si vous constatez des traces de fumée, des câbles endommagés et des dégâts
provoqués par des liquides, débranchez immédiatement le bloc d‘alimentation du
secteur et ne l‘utilisez plus.
Ce bloc d‘alimentation est conçu pour une plage de tension comprise entre 100 et
240 V~ il est donc d’entrée universelle.
Assurez-vous que votre PC ne se trouve pas à proximité d’un chaufage ou d’une
autre d‘une source de chaleur, car ceci pourrait réduire la durée de vie de tous les
composants et provoquer des pannes.
Assurez une ventilation suisante dans le boîtier du PC, notamment par le biais de
ventilateurs supplémentaires.
Si vous souhaitez nettoyer votre bloc d‘alimentation, débranchez-le entièrement
du secteur et n‘utilisez pas de chifon humide, ni de détergent. Nettoyez-le
uniquement de l‘extérieur, à l‘aide d‘un chifon sec.
Laissez votre bloc d‘alimentation s‘habituer pendant une heure à la température
ambiante avant de le mettre en service, ain d‘éviter la formation de condensation
dans le bloc d‘alimentation.
3.
COMPATIBILITE
Les blocs d’alimentation Pure Power L8 sont compatibles avec la plupart des
spéciications des cartes mères et des alimentations :
■ Intel ATX 12V Power Supply Design Guide Version 2.4 (et rétro compatibles avec
V2.31, V2.3, V2.2, V2.01, V2.0 )
■ ATX System Design Guide Version 2.2 et Version 2.1
■ BTX Version 1.0a
■ E-ATX Server Dual Motherboards via 8-Pin Connector
■ EPS 12V Version 2.92
■ Intel C6/C7 Status pour les nouvelles générations de processeurs
■ Directive Energy Star 5.2
■ Directive ErP 2013
20
4. AVANTAGES ET PARTICULARITES DE VOTRE NOUVEAU
BLOC D’ALIMENTATION
Stabilité des tensions :
La gamme Pure Power présente une excellente stabilité, obtenue grâce à
l‘utilisation de composants de très haute qualité. Les tensions de sortie sont ainsi
maintenues dans des valeurs proches de la valeur optimale, ce qui est essentiel
lorsque des performances élevées sont exigées.
Sécurité certiiée TÜV :
Les blocs d’alimentation be quiet! Pure Power sont certiiés par le TÜV. Ils
répondent aux exigences de sécurité électrique en conformité avec la loi sur la
sécurité des matériels techniques et produits de consommation (EN60950). Les
documents se trouvent à l’adresse www.tuv.com, pour vous renseigner, saisissez
le numéro d’identiication de 10 caractères.
Economique grâce à un excellent rendement :
Les blocs d‘alimentation de la gamme Pure Power ofrent une eicacité très élevée
(certiication 80Plus Bronze), contribuant à la réduction de la consommation et des
frais d’électricité.
Fonctions de sécurité :
Les blocs d’alimentation be quiet! Pure Power présentent un excellent niveau de
protection grâce à de nombreuses fonctions de sécurité. Le bloc d’alimentation
s’éteint automatiquement dès que les valeurs, limites inférieures ou supérieures,
sont dépassées : OCP (protection contre les surintensités), UVP (protection contre
les sous-tensions), SCP (protection contre les courts-circuits), OPP (protection
contre les surcharges), OTP (protection contre les températures trop élevées),
OVP (protection contre le survoltage). Si la température du bloc d‘alimentation
en fonctionnement est trop élevée, il s‘éteint automatiquement. Vous pouvez le
remettre sous tension une fois refroidi. Veillez à ce que le refroidissement de votre
PC soit suisant.
21
5.
INSTALLATION DE VOTRE NOUVEAU BLOC D’ALIMENTATION
Lisez la section „ Avertissements / consignes de sécurité „ avant de procéder à
l‘installation. Pour la mise en place du bloc d‘alimentation sur votre PC, il vous
faut un tournevis. Utilisez uniquement les vis livrées avec le produit, car elles
présentent le iletage requis.
Démontez tout d‘abord votre ancien bloc d‘alimentation. Pour ce faire,
veuillez procéder ainsi :
1. Débranchez votre PC de toutes les sources de courant et déconnectez avec
prudence tous les câbles reliés au PC.
2. Ouvrez le boîtier du PC et respectez, le cas échéant, les instructions du fabricant.
3. Débranchez tous les connecteurs de la carte mère, ainsi que de tous les autres
composants tels que disquettes, disques durs et autres lecteurs optiques.
Veillez à ce qu‘aucun connecteur de l‘ancien bloc d‘alimentation ne soit relié à
un composant.
4. Retirez à présent les vis se trouvant à l‘arrière du bloc d‘alimentation et sortez-le
prudemment. Pour ce faire, veillez particulièrement à ce qu‘aucun câble ne soit
emmêlé aux composants et ne les endommage.
Installation de votre nouveau bloc d’alimentation be quiet! Pure Power :
1. Disposez à présent le nouveau bloc d‘alimentation à l‘emplacement prévu dans
le boîtier et vissez-le solidement à la face arrière, à l’aide des quatre vis fournies.
N'exercez aucune force excessive.
2. Branchez le connecteur 20/24 broches dans la iche femelle prévue à cet efet
sur la carte mère. Si vous disposez d’une connexion, placez les quatre broches
supplémentaires dans la position correcte avant de brancher le connecteur
dans la iche femelle. En cas d‘utilisation d‘un connecteur 20 broches, rabattez
simplement les 4 broches supplémentaires sur le côté.
3. Branchez à présent le connecteur 4 broches, également appelé connecteur P4,
dans la iche femelle prévue à cet efet sur la carte mère. Ce connecteur va
désormais alimenter votre processeur en courant.
4. Si besoin, branchez le connecteur PCIe à votre carte graphique.
22
6.
DEPISTAGE DES PANNES
Attention :
Sur les systèmes ATX, le bloc d’alimentation reçoit un signal de la carte mère
connectée, sans lequel il ne peut être mis en service. Veuillez donc vériier, à l’aide
du manuel de la carte mère ou du boîtier, si la iche de l’interrupteur d’alimentation
(l’interrupteur de mise en marche se trouve généralement sur la face avant) est
correctement connectée à la carte mère. Si c’est le cas, veuillez alors contrôler
l’interrupteur d’alimentation (marche/arrêt) car il peut être défectueux. Vous
pouvez ici utiliser l’interrupteur de réinitialisation à la place de l’interrupteur
d’alimentation ain d’exclure ces risques de défauts.
Attention !
Les travaux sur les sources de courant peuvent provoquer des blessures pouvant
mettre votre vie en danger. Lisez donc attentivement la section 2 – « Avertissements
et consignes de sécurité ».
Les réparations doivent uniquement être efectuées par du personnel qualiié et
habilité !
Si le système ne fonctionne pas correctement avec le bloc d‘alimentation installé,
veuillez d‘abord vériier les éventuelles sources d‘erreur suivantes :
A. Vériiez si le câble d‘alimentation électrique est correctement et solidement
relié au bloc d‘alimentation, ainsi qu‘à la prise. Si possible, utilisez une prise
séparée uniquement pour le bloc d‘alimentation de l‘ordinateur.
B. Vériiez si toutes les connexions ont été reliées correctement les unes aux
autres et corrigez-les, le cas échéant, par exemple en cas de polarité erronée.
C. Contrôlez la connexion de l‘interrupteur marche/arrêt du boîtier à la carte
mère. En cas de besoin, consultez le manuel de votre carte mère. Mettez le bloc
d‘alimentation sous tension en plaçant l‘interrupteur sur la position „I“ et en
actionnant l‘interrupteur marche/arrêt du boîtier. Si le bloc d‘alimentation ne
s‘allume toujours pas, passez au point suivant.
23
D. Vériiez que votre système ne présente pas d‘éventuels courts-circuits et
qu'il n'y ait pas de matériel défectueux. Pour ce faire, éteignez l‘ordinateur et
débranchez du système tous les appareils qui ne sont pas nécessaires pour le
démarrage de l‘ordinateur. Remettez-le sous tension. Répétez cette procédure
et rebranchez l‘un des appareils après chaque redémarrage, jusqu‘à ce que
vous ayez trouvé d‘où vient la panne apparente. Si le bloc d‘alimentation ne
réagit pas en raison d‘un court-circuit, attendez au moins cinq minutes avant
de redémarrer l‘ordinateur, car l‘appareil est équipé d‘une protection contre les
courts-circuits.
Remarque importante :
Si le bloc d’alimentation ne fonctionne pas, assurez-vous d’avoir lu ce guide
d’utilisation intégralement, ain d’avoir écarté les problèmes mentionnés. Si les
problèmes persistent, veuillez-vous mettre immédiatement en relation avec notre
service après-vente.
Tous les retours sont vériiés par notre service RMA. Si un bloc d’alimentation
s’avère exempt de tout défaut, il est renvoyé au client. En outre, un montant
forfaitaire de vériication peut être exigé pour les frais engendrés.
7.
ACCESSOIRES
Sont également fournis : câble avec terre, instructions d’utilisation, attache câbles,
vis destinées à la ixation du bloc d‘alimentation.
8.
CONSIGNES POUR LA GESTION DES DECHETS
Les appareils électroniques usagés ne peuvent plus, selon les directives
européennes*, être jetés avec les déchets ménagers. Ils doivent être triés. En
France, il est interdit, au vue de la législation**, de jeter un appareil usagé avec les
ordures ménagères non triées. Les communes ont prévu à cet efet des lieux de
collecte, auprès desquels vous pourrez remettre vos appareils gratuitement. Il est
également possible qu'une collecte soit mise en place pour ramasser les appareils
usagés chez les particuliers.
24
* Directive 2002/96/CE du Parlement et du Conseil européens en date du 27
janvier 2003 sur les appareils électriques et électroniques usagés. ** Décret
n°2005-829 du 20 juillet 2005 relatif à la composition des équipements électriques
et électroniques et à l’élimination des déchets issus de ces équipements.
9.
■
■
GARANTIE, INFORMATIONS CONSTRUCTEUR
3 ans de garantie constructeur pour le consommateur inal (uniquement dans le
cadre d’un achat initial auprès d‘un distributeur be quiet! agréé).
Ain de pouvoir prendre en compte votre demande de garantie, il est impératif
de transmettre le numéro de série du bloc, la référence du produit ainsi qu’une
copie de la facture d’achat. Votre alimentation doit avoir été achetée auprès
d’un distributeur agréé be quiet!.
Listan France . 65 avenue Georges Politzer . 78190 Trappes
Du lundi au vendredi de 9h00 à 17h30
Tél : 0800 469 209
E-mail du sav:
[email protected]
www.bequiet.com
Nous vous rappelons par ailleurs que l’ouverture du bloc ainsi que toutes
modiications techniques ou interventions extérieures entraînent l’annulation de
la garantie.
Nous vous invitons à vous reporter à nos conditions générales de garantie, sur le
site www.bequiet.com .
10. INDICATIONS LEGALES, DROITS D‘AUTEUR
Copyright © Listan GmbH & Co. KG 2013. Tous droits réservés.
Veuillez observer les consignes suivantes :
1. Le contenu de tout ou partie de la présente documentation ne peut être
reproduit, distribué, difusé ou enregistré de quelque manière que ce soit sans
25
l‘autorisation préalable écrite de Listan.
2. be quiet! est une marque déposée de la société Listan GmbH & Co. KG. Les autres
noms de produits et de sociétés mentionnés dans la présente documentation
peuvent être des marques ou des noms commerciaux appartenant à leurs
propriétaires respectifs.
3. Listan procède au développement continu de ses produits conformément
à sa politique. Par conséquent, Listan se réserve le droit de procéder à des
modiications et améliorations de chacun des produits décrits dans la présente
documentation, sans avis préalable.
4. Listan n‘est en aucun cas responsable de la perte de données et de revenus, ni
de tout dommage particulier, accessoire, direct ou indirect, quel qu‘il soit, et
quelle que soit son origine.
5. La présente documentation décrit le produit sous sa forme actuelle. Listan
décline toute responsabilité expresse ou tacite pour l‘exactitude et l‘intégralité
du contenu de la présente documentation, y compris, sans s‘y limiter, de
la garantie tacite de l‘aptitude à la commercialisation et à un objectif déini,
sauf dans les cas où la législation applicable ou la jurisprudence impose une
responsabilité. Listan se réserve le droit de procéder à tout moment à des
modiications de la présente documentation, sans avis préalable, ou de retirer
la documentation.
26
1.
WPROWADZENIE
Cieszymy się, że zdecydowali się Państwo na zamontowanie w swoim komputerze
zasilacza be quiet! serii Pure Power. Przed instalacją prosimy zapoznać się z
informacjami zawartymi w niniejszej instrukcji. Przestrzeganie instrukcji zapewni
prawidłowe funkcjonowanie produktu. W przypadku dalszych pytań prosimy o
kontakt z obsługą klienta. Informacje kontaktowe znajdują się w punkcie: Dane
producenta.
2.
OSTRZEŻENIA I WSKAZÓWKI DOTYCZĄCE
BEZPIECZEŃSTWA
Nigdy nie należy rozkręcać zasilacza. Wewnątrz zasilacza znajdują się elementy,
które nawet po długiej przerwie w użytkowaniu mogą być pod wysokim napięciem
i powodować obrażenia zagrażające życiu.
Zasilacz może
specjalistyczny!
być
otwierany
wyłącznie
przez
autoryzowany
personel
Uwaga! Należy używać wyłącznie dostarczonego zestawu kabli. Używanie kabli
innych niż dostarczone (np. kabli starszych serii zasilaczy) może doprowadzić do
usterki!
Gwarancja wygasa w przypadku otwarcia urządzenia przez osoby nieupoważnione
oraz w przypadku uszkodzenia plomby gwarancyjnej. Nie należy włączać urządzenia
mokrymi lub wilgotnymi rękami. Nie należy wtykać żadnych przedmiotów w
wypustki/wentylator zasilacza.
Użytkowanie urządzenia jest dozwolone wyłącznie w zamkniętych pomieszczeniach!
Praca zasilacza na zewnątrz może prowadzić do poważnych szkód.
Nie należy manipulować przy zasilaczu, gdy jest on podłączony do sieci. Należy zawsze
ustawiać wyłącznik sieciowy w pozycji „0” oraz wyjąć wtyczkę z gniazdka. W razie
zwarcia w urządzeniu należy odłączyć kabel sieciowy i nie uruchamiać go ponownie.
27
W razie pojawienia się smug dymu, uszkodzenia kabli lub kontaktu z substancjami
ciekłymi należy natychmiast wyłączyć zasilacz z sieci i nie uruchamiać go ponownie.
Niniejszy zasilacz jest przystosowany do uniwersalnej pracy w obszarze napięć
między 100 - 240V~.
Komputer nie powinien stać bezpośrednio obok grzejnika lub innego źródła ciepła,
gdyż skraca to żywotność wszystkich komponentów i sprzyja awariom.
Należy zadbać o odpowiednią wentylację w obudowie komputera np. stosując
dodatkowe wentylatory.
W celu oczyszczenia zasilacza należy go całkowicie wyłączyć z sieci. Nie należy
stosować wilgotnych ściereczek ani środków czyszczących. Zasilacz należy jedynie
czyścić z zewnątrz suchą ściereczką.
Przed uruchomieniem zasilacz powinien leżeć godzinę w temperaturze pokojowej,
aby zapobiec utworzeniu się w nim skroplin.
3.
KOMPATYBILNOŚĆ
Zasilacze be quiet! serii Pure Power L8 są kompatybilne ze wszystkimi aktualnie
stosowanymi specyikacjami zasilaczy oraz płyt głównych, jak m.in.
■
■
■
■
■
■
■
■
Intel ATX12V Power Supply Design Guide wersja 2.4 (oraz kompatybilne
wstecznie z V2.31, V2.3, V2.2, V2.01, V2.0).
ATX System Design Guide wersja 2.2 i wersja 2.1
BTX wersja 1.0a
płyty główne E-ATX Server Dual z 8-pinowym konektorem
EPS12V wersja 2.92
nowa generacja procesorów Intel C6/C7
wytyczne Energy Star 5.2
dyrektywa ErP 2013
28
4.
ZALETY ORAZ WŁAŚCIWOŚCI PAŃSTWA NOWEGO ZASILACZA
Bezpieczeństwo sprawdzone przez tüv:
Zasilacze be quiet! Pure Power posiadają certyikat TÜV. Urządzenia te spełniają
wymagania dotyczące bezpieczeństwa urządzeń elektrycznych zgodnie z
Przepisami prawnymi o bezpieczeństwie urządzeń i produktów (EN60950).
Dokumenty można przeglądać na stronie www.tuv.com po wprowadzeniu
10-cyfrowego numeru identyikacyjnego.
Oszczędność dzięki wysokiej efektywności (sprawności):
Zasilacze serii Pure Power wykazują bardzo dużą efektywność (certyikacja 80Plus
Bronze). Przyczynia się to do spadku kosztów energii elektrycznej.
Stabilność napięcia:
Zasilacze serii Pure Power zapewniają doskonałą stabilność zasilania napięciowego.
Jest to możliwe dzięki zastosowaniu wysokogatunkowych komponentów. Napięcia
wyjściowe osiągają wartość bardzo przybliżoną optymalnej wartości zadanej, co
jest szczególnie istotne przy wysokich wymaganiach wydajności.
Funkcje bezpieczeństwa:
Zasilacze be quiet! Pure Power zapewniają bezpieczeństwo dzięki wielu funkcjom
bezpieczeństwa. Zasilacz wyłącza się automatycznie w przypadku przekroczenia
górnych lub dolnych wartości granicznych.
OCP (zabezpieczenie przed zbyt wysokim prądem), UVP (zabezpieczenie przed zbyt
niskim napięciem), SCP (zabezpieczenie przeciwzwarciowe), OPP (zabezpieczenie
przeciążeniowe), OTP (zabezpieczenie temperaturowe), OVP (zabezpieczenie przed
zbyt wysokim napięciem). Zasilacz wyłącza się automatycznie, jeżeli pracuje
w zbyt wysokiej temperaturze. Po schłodzeniu zasilacz może zostać ponownie
włączony. Należy się upewnić, że komputer jest wyposażony w wystarczający
system chłodzenia.
5.
INSTALACJA NOWEGO ZASILACZA
Przed rozpoczęciem instalacji należy koniecznie przeczytać punkt „Ostrzeżenia /
wskazówki bezpieczeństwa“.
29
W celu wbudowania zasilacza w komputer potrzebny jest śrubokręt.Należy użyć
śrub dostarczonych wraz z zasilaczem, gdyż mają one odpowiednie gwinty.
Najpierw należy odłączyć stary zasilacz. W tym celu należy postępować
następująco:
1. Odłączyć komputer od wszystkich źródeł prądu, a następnie ostrożnie wyciągnąć
wszystkie kable podłączone do komputera.
2. Następnie otworzyć obudowę komputera stosując się do poleceń producenta.
3. Odłączyć wszystkie wtyczki od płyty głównej i wszystkich innych komponentów,
jak stacji dyskietek, dysku twardego oraz napędów optycznych. Należy się
upewnić, że żadna wtyczka starego zasilacza nie jest połączona z żadnym
komponentem systemu.
4. Następnie usunąć śruby z tylniej strony zasilacza i ostrożnie go wyjąć. Należy
zwrócić szczególną uwagę na to, aby kable nie wplątały się i nie uszkodziły
komponentów systemu.
Montaż nowego zasilacza be quiet! Pure Power:
1. Umieścić nowy zasilacz w odpowiednim miejscu wewnątrz obudowy i
przymocować jego tylną stronę do obudowy czterema dostarczonymi śrubami.
Nie należy stosować nadmiernej siły.
2. Włożyć 20/24-igłową wtyczkę w odpowiednie gniazdo na płycie głównej. Jeżeli
dostępne jest łącze 24-igłowe należy ustawić 4 dodatkowe igły we właściwej
pozycji przed podłączeniem wtyczki do gniazdka. Przy użyciu wtyczki 20-igłowej
należy położyć 4 dodatkowe igły na bocznej stronie.
3. Następnie włożyć 4-igłową wtyczkę (inna nazwa: P4) w odpowiednie gniazdo na
płycie głównej. Ta wtyczka będzie zasilała w przyszłości jednostkę CPU.
4. Jeśli jest to wymagane, podłącz kartę graiczną do złącza PCIe.
6.
USUWANIE USTEREK
Uwaga:
W systemie ATX zasilacz otrzymuje sygnał z podłączonej płyty głównej. Brak
sygnału uniemożliwia uruchomienia urządzenia. Dlatego należy się upewnić,
z pomocą podręcznika użytkownika płyty głównej lub obudowy, czy wtyczka
30
włącznika/wyłącznika (włącznik znajduje się przeważnie na osłonie przodu) została
poprawnie podłączona do płyty głównej. W takim przypadku należy sprawdzić
włącznik/wyłącznik zasilania, ponieważ często dochodzi do jego uszkodzenia,
w wyniku czego uruchomienie zasilacza nie jest możliwe. W tej sytuacji zamiast
przełącznika zasilania w celu wykluczenia możliwości błędu należy użyć przycisku
Reset.
Uwaga!
Praca przy źródłach prądu może prowadzić do urazów zagrażających życiu. Należy
uważnie przeczytać punkt 2 – „Ostrzeżenia i wskazówki bezpieczeństwa“
Zasilacz może być naprawiany wyłącznie przez fachowy personel!
Jeżeli system z zainstalowanym zasilaczem nie funkcjonuje prawidłowo, należy
sprawdzić najpierw poniższe możliwe przyczyny błędów.
Ewentualne przyczyny błędów:
A. Sprawdzić, czy kabel zasilania jest prawidłowo i trwale podłączony do zasilacza
oraz do gniazdka.Zalecamy używanie odrębnego gniazdka tylko dla zasilacza
komputera.
B. Upewnić, czy wszystkie łącza zostały prawidłowo ze sobą połączone i ewentualnie
skorygować błędy, np. w przypadku przypadkowej zamiany kierunków kabla.
C. Sprawdzić połączenie włącznika/wyłącznika obudowy z płytą główną. W
razie potrzeby warto mieć pod ręką podręcznik użytkownika płyty głównej!
Włączyć zasilacz przez ustawienie przełącznika na pozycji „I“ oraz przyciśnięcie
włącznika/wyłącznika na obudowie. Jeżeli zasilacz w dalszym ciągu nie został
włączony, należy przejść do następnych punktów.
D. Sprawdzić, czy w systemie nie występują ewentualne zwarcia lub czy sprzęt nie
jest uszkodzony. W tym celu należy wyłączyć komputer i odłączyć wszystkie
urządzenia, które nie są konieczne przy starcie komputera. Następnie ponownie
włączyć komputer. Należy powtórzyć tę czynność podłączając po każdym
ponownym uruchomieniu jedno z urządzeń, do momentu znalezienia usterki.
Jeżeli zasilacz nie reaguje z powodu zwarcia, należy odczekać przynajmniej 5
minut zanim zostanie on ponownie włączony, gdyż urządzenie jest wyposażone
w zabezpieczenie zwarcia.
31
Ważna wskazówka:
Jeżeli zasilacz nie działa należy przeczytać niniejszą instrukcję obsługi w całości i
upewnić się, czy wymienione w niej ewentualne problemy mogą zostać wykluczone.
Jeżeli problemy nie zniknęły prosimy o niezwłoczny kontakt z naszym Działem
Obsługi Klienta.
Wszystkie nadchodzące do nas przesyłki zwrotne są kontrolowane przez nasz
serwis RMA. Jeżeli okaże się, że przysłany zasilacz działa poprawnie zostanie on
odesłany do klienta. Ponadto klient może zostać obciążony powstałymi kosztami.
7.
AKCESORIA
W skład zestawu wchodzą: przewody zasilające, instrukcja obsługi, opaski na
kable, śruby mocujące zasilacz.
8.
WSKAZÓWKI DOTYCZĄ CE UTYLIZACJI
Zgodnie z europejskimi przepisami* niedozwolone jest wyrzucanie zużytych
urządzeń elektronicznych do zwykłych pojemników na śmieci. Urządzenia te
należy utylizować oddzielnie. Zużyte urządzenie elektryczne należy dostarczyć do
specjalnego punktu zbiórki (np. punkt recyclingu). Z reguły jest to bezpłatne.
* Dyrektywa 2002/96/WE Parlamentu Europejskiego oraz Rady Europejskiej z dnia
27 stycznia 2003 w sprawach zużytego sprzętu elektrycznego i elektronicznego.
Ustawa o wprowadzeniu w obieg, odbiorze i bezpiecznym dla środowiska
przetwarzaniu sprzętu elektrycznego i elektronicznego (Ustawa o sprzęcie
elektrycznym i elektronicznym) z dnia 16 marca 2005.
9.
■
■
GWARANCJA, DANE PRODUCENTA
3 letnia gwarancja producenta dla klienta końcowego
Roszczenia gwarancyjne mogą być przetwarzane tylko i wyłącznie po podaniu
numeru seryjnego, nazwy modelu oraz dołączeniu dowodu zakupu od
autoryzowanego dystrybutora be quiet!
32
Listan GmbH & Co. KG Biedenkamp 3a . 21509 Glinde. Niemcy
Na terenie Polski szersze wsparcie mogą Państwo uzyskać:
Pn. - Pt. w godzinach 09:00 – 17.00
Tel. 22 664 20 58
Faks 022 666 30-41
e-mail: [email protected]
www.bequiet.com
Otwarcie urządzenia, jakiekolwiek manipulacje, modyikacje techniczne wszelkiego
rodzaju i szkody wynikające z zewnętrznej siły mechanicznej powodują utratę
gwarancji.
Szczegółowe warunki gwarancji, dostępne są w zakładce Serwis/Warunki gwarancji
na stronie głównej w www.bequiet.com.
10. INFORMACJE PRAWNE, PRAWA AUTORSKIE
Copyright © Listan GmbH & Co. KG 2013. Wszelkie prawa zastrzeżone.
Należy przestrzegać poniższych wskazówek:
1. Zabronione jest powielanie, przekazywanie, rozpowszechnianie lub zapis treści
tej dokumentacji w dowolnej formie, w całości lub częściowo bez uprzedniego
pisemnego zezwolenia irmy Listan.
2. Be quiet! jest zarejestrowaną marką irmy Listan GmbH & Co. KG. Inne
wymienione w niniejszej dokumentacji produkty oraz nazwy irm mogą stanowić
marki lub nazwy handlowych konkretnych właścicieli.
3. Listan stale rozwija politykę produktów. Listan zachowuje prawo do dokonywania
zmian i udoskonaleń każdego z opisanych w niniejszej dokumentacji produktów,
bez wcześniejszego uprzedzenia.
4. Listan nie ponosi w żaden sposób odpowiedzialności za stratę danych i
dochodów, a także za szczególne, przypadkowe, pośrednie lub bezpośrednie
szkody, niezależnie od drogi ich powstania.
5. Treść niniejszej dokumentacji jest zaprezentowana zgodnie z aktualnym
stanem. Listan nie ponosi wyraźnej ani domniemanej odpowiedzialności za
prawidłowość i kompletność treści niniejszej dokumentacji, włącznie, jednak bez
33
ograniczenia do domniemanej gwarancji wartości handlowej oraz przydatności
do konkretnego celu, chyba że stosowne ustawodawstwo lub sądownictwo
nakazują przymusową odpowiedzialność. Listan zachowuje prawo dokonania
zmian tej dokumentacji lub jej wycofania bez uprzedniego zawiadomienia.
34
1.
INTRODUCCIÓN
Estamos encantados de que haya decidido utilizar una fuente de alimentación be
quiet! de nuestra Serie Pure Power para su PC. Por favor, lea y siga atentamente toda
la información contenida en este manual de instrucciones antes de la instalación.
Sólo se garantiza el funcionamiento correcto de la fuente de alimentación, si se
siguen las instrucciones adecuadamente. Lo que le proporcionará la máxima
satisfacción con el producto. Si tiene alguna pregunta, por favor, póngase en
contacto con nuestro servicio de atención al cliente (ver información del contacto
del fabricante en las características del producto).
2.
ADVERTENCIAS E INDICACIONES DE SEGURIDAD
No desenrosque nunca el fuente de alimentación. En el interior hay piezas que
pueden haber generado una alta corriente aunque no hayan sido utilizadas durante
mucho tiempo y pueden producir graves lesiones.
Los fuentes de alimentación sólo deberán ser abiertos por personal especializado
autorizado.
Atención! Use sólo el conjunto de cables suministrado! El uso de otro tipo de
cables (como por ejemplo, el una fuente de alimentación más antigüa) puede dañar
la unidad!
La Garantía quedará anulada si el aparato es abierto por personal no autorizado
o si el sello de garantía está dañado. No coja nunca el aparato en funcionamiento
con las manos mojadas o húmedas. No introduzca nunca objetos por los oriicios/
ventilador del fuente de alimentación.
Su uso está indicado exclusivamente en interiores. Si se utiliza en exteriores se
pueden provocar graves daños.
No realice ningún tipo de trabajo en el fuente de alimentación cuando esté en
tensión. Ponga siempre el enchufe en “0” y desenchúfelo en caso necesario).
35
Si se produce un cortocircuito en el aparato, retire el cable de alimentación y no lo
vuelva a poner en funcionamiento.
Si hay indicios de humo, cables dañados o se ha visto afectado por líquidos,
desenchúfelo inmediatamente y no vuelva a ponerlo en funcionamiento.
Esta fuente de alimentación está diseñada para su uso con una corriente entre 100
y 240V~, de modo que es universal.
No sitúe su PC al lado de la calefacción u otra fuente de calor, ya que se reduciría
la vida de todos los componentes y podrían producirse fallos.
Procure que la caja del PC esté bien ventilada; por ejemplo, mediante ventiladores
adicionales.
En caso de que desee limpiar su fuente de alimentación, desenchúfelo totalmente
y no use paños húmedos ni detergentes. Limpie la fuente de alimentación sólo
desde el exterior con ayuda de un paño seco.
Ponga la fuente de alimentación en funcionamiento cuando lleve una hora en un
entorno ventilado; de lo contrario, se podría generar agua de condensación en el
fuente de alimentación.
3.
COMPATIBILIDAD
Los bloques de alimentación de la serie Pure Power L8 son compatibles con todas
las especiicaciones convencionales actuales de bloques de alimentación y placas
base como:
Intel ATX12V Power Supply Design Guide, versión 2.4 (así como con las versiones
anteriores V2.31, V2.3, V2.2, V2.01, V2.0).
■
■
■
■
■
ATX System Design Guide, versión 2.2 y 2.1
BTX, versión 1.0a
E-ATX Server Dual Mainboards con conector de 8 pines
EPS12V, versión 2.92
Estado de Intel C6/C7 de la nueva generación de procesadores
36
■
■
4.
Directivas Energy Star 5.2
Directiva ErP 2013
VENTAJAS Y PARTICULARIDADES DE SU NUEVA FUENTE
DE ALIMENTACIÓN
Economía a través de su alta eiciencia (rendimiento):
Las fuentes de alimentación de la serie Pure Power son muy eicaces (certiicación
80Plus Bronze). De este modo, los costes energéticos son menores.
Seguridad certiicada por TÜV:
Las fuentes de alimentación Pure Power poseen la certiicación TÜV. Cumplen
los requisitos de seguridad eléctrica establecidos por la Ley de Seguridad de
Dispositivos y Productos (EN60950). La documentación se puede consultar a
través de www.tuv.com, introduciendo los diez dígitos del número de identiicación.
Estabilidad de la tensión:
Las fuentes de alimentación de la serie Pure Power disponen de una estabilidad
única en el suministro de corriente. Esta está garantizada por el uso de piezas de
alta calidad. Así se mantienen la corriente de salida muy cerca del valor nominal
óptimo, lo que resulta muy importante cuando se exige una gran potencia.
Funciones de seguridad:
Las fuentes de alimentación be quiet! Pure Power ofrecen una gran seguridad
gracias a diversas funciones. La fuente de alimentación se apaga automáticamente
cuando se sobrepasan o no se alcanzan los límites establecidos. OCP (protección
contra sobreintensidad), UVP (protección contra hipotensión), SCP (fusible
contra cortocircuitos), OPP (protección contra sobrecarga), OTP (fusible para
la temperatura), OVP (Protección por sobrecargas de voltaje). Si se trabaja
con una temperatura demasiado alta, la fuente de alimentación se desconecta
automáticamente. Puede conectarla de nuevo cuando se haya enfriado. Asegúrese
de que el PC está equipado con suiciente refrigeración.
37
5.
INSTALACIÓN DE SU NUEVA FUENTE DE ALIMENTACIÓN
Lea el punto “Advertencias e indicaciones de seguridad” antes de comenzar
con la instalación. Para montar la fuente de alimentación en su PC necesita un
destornillador. Utilice sólo los tornillos suministrados, ya que disponen de la rosca
correcta.
Primero, desmonte su antigua fuente de alimentación. Para ello, proceda del
siguiente modo:
1. Separe su PC de todas las fuentes de energía existentes y desenchufe con
cuidado todos los cables conectados al PC.
2. Abra la caja del PC siguiendo las instrucciones del manual del fabricante.
3. Desenchufe todos los conectores de la placa base, así como todos componentes
restantes como disquetera, disco duro o unidades ópticas. Compruebe que
los conectores de la fuente de alimentación antigua no queden conectados a
ningún componente.
4. Ahora, retire los tornillos de la parte trasera de la fuente de alimentación y
extráigala con cuidado. Tenga cuidado de que no se enganchen cables a los
componentes y los dañen.
Montaje de su nueva fuente de alimentación be quiet! Pure Power:
1. Coloque ahora la nueva fuente de alimentación en el lugar previsto de la caja
y atorníllela a la parte trasera con los cuatro tornillos suministrados. No es
necesario realizar una fuerza excesiva.
2. Inserte el conector de 20/24 pines en la clavija prevista para ello de la placa
base. Si dispone de una conexión de 24 pines, coloque los 4 pines adicionales
en la posición correcta antes de insertar el conector en la clavija. Si se usa un
conector de 20 pines, simplemente abata los 4 pines adicionales.
3. Ahora, inserte el conector de 4 pines, también llamado conector P4, en la clavija
prevista para ello de la placa base. Este conector también se encargará de
suministrar corriente a su CPU.
4. Si es necesario enchufe el conector PCI a su tarjeta gráica.
38
6.
SOLUCIÓN DE ERRORES
Advertencia:
En el caso de sistemas ATX, al encenderse, la fuente de alimentación recibe la
señal de la placa base conectada, sin la cual no se pone en marcha. Por lo tanto,
compruebe, con ayuda del manual de la placa base o de la caja, si el interruptor
de alimentación (tecla de encendido que, normalmente, se encuentra en la parte
frontal) está conectado correctamente a la placa base. En ese caso, compruebe el
interruptor de conexión/desconexión, ya que muchas veces está defectuoso y, por
tanto, la fuente de alimentación no puede iniciarse. Puede utilizar el interruptor de
reinicio en lugar del interruptor de alimentación para descartar estas posibilidades
de error.
Atención:
Los trabajos con fuentes de corriente pueden provocar lesiones mortales. Por
tanto, lea atentamente el Punto 2: “Advertencias e indicaciones de seguridad”.
Las reparaciones deberán ser realizadas únicamente por personal especializado
autorizado.
Si el sistema no funciona correctamente con la fuente de alimentación
instalada, compruebe primero las posibles causas de error siguientes:
Posibles causas de error:
A. Compruebe que el cable de alimentación está colocado correctamente en la
fuente de alimentación y en el enchufe. A ser posible, utilice una toma diferente
para la fuente de alimentación del ordenador.
B. Compruebe si todas las conexiones están unidas correctamente entre sí y
corríjalas si es necesario, p.ej. en caso de falsa polaridad.
C. Compruebe la unión del interruptor de conexión/desconexión desde la caja a la
placa base. Tenga preparado el manual de su placa base por si fuera necesario.
Conecte la fuente de alimentación poniendo el interruptor en la posición “I”
y pulse el interruptor de conexión/desconexión de la caja. Si sigue sin poder
conectar la fuente de alimentación, proceda con el siguiente punto.
39
D. Compruebe su sistema por si hubiera cortocircuitos o hardware defectuoso,
para ello desconecte el equipo y desenchufe del sistema todos los dispositivos
que no sean necesarios para iniciar el ordenador. Conéctelo de nuevo. Repita
este proceso y vaya conectando los dispositivos de uno en uno cada vez que
reinicie hasta que encuentre el posible defecto. Si la fuente de alimentación
no reacciona debido a un cortocircuito, espere al menos 5 minutos antes de
conectarlo de nuevo, porque el dispositivo está equipado con una protección
contra cortocircuitos.
Nota importante:
Si la fuente de alimentación no funciona, asegúrese de haber leído completamente
el manual de instrucciones y haber descartado los problemas en él mencionados.
Si los problemas persisten, póngase en contacto inmediatamente con nuestro
servicio de atención al cliente.
Nuestro servicio RMA comprobará todos los reenvíos. Si una de las fuentes de
alimentación resulta no tener ningún error, se reenviará al cliente. También se
podrá cobrar un mínimo por los gastos de comprobación generados.
7.
ACCESORIOS
El contenido de la caja incluye: cables de dispositivos de refrigeración, instrucciones
de uso, abrazadera para cables y tornillos para ijar la fuente de alimentación.
8.
INDICACIONES PARA SU RETIRADA
Los dispositivos electrónicos no se pueden desechar con la basura doméstica,
conforme a las normativas europeas*. Se tienen que desechar de forma separada.
Es preciso llevar los dispositivos eléctricos viejos a lugares de recogida especiales
especíicos para ello (por ejemplo, a un punto limpio). Normalmente, esto no le
supondrá ningún desembolso.
40
* Directiva 2002/96/CE del Parlamento Europeo y el Consejo del 27 de enero
de 2003 sobre dispositivos eléctricos y electrónicos usados. Ley sobre la
comercialización, devolución y eliminación ecológica de dispositivos eléctricos
y electrónicos (ley de dispositivos eléctricos y electrónicos) del 16 de marzo de
2005.
9.
GARANTÍA, DATOS DEL FABRICANTE
3 años de garantía proporcionados por del fabricante (para compras realizadas
solamente en distribuidores autorizados be quiet!)
La gestión de la garantía sólo se podrá realizar con el número de serie,
la descripción del modelo y una fotocopia de la factura de compra de un
distribuidor autorizado be quiet!
■
■
Listan GmbH & Co. KG Biedenkamp 3a . 21509 Glinde. Alemania
Si necesita más ayuda, póngase en contacto con nosotros a través de la línea
de atención al cliente (se habla inglés), de lunes a viernes de 9 a 17.30 horas
Tel. +49-40-7367686-44
Fax +49-40-7367686-69
[email protected]
www.bequiet.com
La apertura de los dispositivos, las manipulaciones o modiicaciones técnicas de
cualquier tipo y los daños debido a agentes externos, anularán la garantía.Para
conocer los términos y condiciones de garantía, consulte condiciones de Servicio/
Garantía en la página web: www.bequiet.com.
10. NOTA LEGAL, COPYRIGHT
Copyright © Listan GmbH & Co. KG 2013. Todos los derechos reservados.
Tenga en cuenta las siguientes indicaciones:
1. El contenido de esta documentación no se puede reproducir, entregar, publicar
o guardar de ninguna forma, ni total ni parcialmente, sin el previo permiso por
escrito de Listan.
41
2. be quiet! es una marca registrada de la empresa Listan GmbH & Co. KG. Otros
nombres de productos y empresas aparecen en esta documentación son marcas
o nombres comerciales de sus respectivos propietarios.
3. Listan, de acuerdo con su política, sigue avanzando en el desarrollo de sus
productos. Por lo tanto, Listan se reserva el derecho de realizar modiicaciones
y mejoras, sin previo aviso, en los productos descritos en esta documentación.
4. Bajo ningún concepto, Listan será responsable de la pérdida de datos o
información ni de daños especiales, ocasionales, directos o indirectos,
independientemente de cómo se produzcan.
5. El contenido del presente documento se muestra tal como consta actualmente.
Listan no asume ninguna garantía, ni expresa ni tácitamente, sobre la
corrección o integridad del contenido de esta documentación, incluyendo, sin
limitación, la garantía tácita de la adaptación al mercado y la compatibilidad
para un in determinado, a no ser que una ley aplicable o jurisdicción prescriban
una responsabilidad. Listan se reserva el derecho a realizar modiicaciones
en el presente documento en cualquier momento o a retirarlo. Retirer la
documentation.
42
LIMITED WARRANTY
Per the terms and conditions of this limited warranty as given below, be quiet!
warrants its new products to be free of defects resulting from faulty materials and
faulty manufacturing for the length of the warranty period.
I. APPLICABILITY
This non-transferable warranty is applicable to newly purchased, previously
unopened be quiet! products and is enforceable by only the original consumer
purchaser. Proof of purchase is required for warranty service, so should be
retained. be quiet! does not provide warranty registration services.
II. WARRANTY PERIOD
For eligible products, parts and labor are warranted for the appli-cable warranty
period from the date of purchase. The applicable warranty period varies by product
model, and is identiied in your user documentation, on the product package, or
as listed below. Should any of these warranty periods difer, the longest speciied
warranty period will apply. Replaced products will be warranted for the remainder
of the original warranty period or thirty days, whichever is longer.
III. EXCLUSIONS
The following are not covered by the warranty:
1. Normal wear and tear.
2. Any product which has been modiied without permission from be quiet!, or on
which the serial number or warranty sticker has been defaced, modiied, or removed.
3. Damage, deterioration or malfunction resulting from:
Accident, abuse, misuse or improper use, neglect, connection to an improper
voltage source, unauthorized product modiication, or failure to follow instructions
included with the product.
Fire, water, lightning, or other acts of nature.
Repair or attempted repair by anyone not authorized by be quiet!.
Shipping or transport damage (claims must be made with the carrier).
Any other cause which does not relate to a defect in materials or manufacturing
workmanship.
43
4. Cartons, cases, batteries, cabinets, tapes, accessories or other consumables
used with this product.
5. be quiet!, Inc. does not warrant that this product will meet your requirements. It
is your responsibility to determine the suitability of this product for your purpose.
6. Removal or installation charges.
7. Shipping charges.
8. Any incidental charges.
IV. EXCLUSION OF DAMAGES
be quiet!‘s sole obligation and liability under this warranty is lim-ited to the repair
or replacement of a defective product at its option. be quiet! shall not, in any event,
be liable for any special, incidental, indirect, or consequential damages whatsoever,
including but not limited to loss of proits, revenue, or data (whether direct or
indirect), damages resulting from interruption of service and loss of business, or
for liability in tort relating to this product or resulting from its use or possession,
even if be quiet! has been advised previously of the possibility of such damages.
V. LIMITATIONS OF IMPLIED WARRANTIES
There are no other warranties, expressed or implied, including but not limited to
those of merchantability or itness for a particular purpose. The duration of implied
warranties is limited to the warranty length speciied in Paragraph II.
VI. LOCAL LAW AND YOUR WARRANTY
This warranty gives you speciic legal rights. You may also have other rights granted
under local law. These rights may vary.
VII. NO OTHER WARRANTY
No be quiet! employee, dealer, or other agent is authorized to make any
modiication, extension, or addition to this warranty.
VIII. TO OBTAIN TECHNICAL SUPPORT OR WARRANTY SERVICE
Please see your product owner’s manual or visit the Online Support section at
www.bequiet.com for details and contact information. You will need to provide
proof of purchase for warranty service.
44
TECHNICAL DATA
1.
POWERLABEL
AC Input
DC Output
BQ
L8-700W
700W
Max. Current
100 - 240Vac
3,3V
25A
5V
Max. Combined
Power
Max. Current
150W
45
-12V
5VSB
0,3A
3A
636W
3,6W
15W
-12V
5VSB
0,3A
3A
3,6W
15W
-12V
5VSB
0,3A
3A
3,6W
15W
700W
100 - 240Vac
3,3V
25A
5V
50 - 60Hz
12V1
12V2
30A
30A
8 - 5A
18A
Max. Combined
Power
140W
540W
600W
AC Input
500W
30A
45A
DC Output
BQ
L8-500W
35A
10 - 5A
20A
AC Input
600W
12V2
53A
DC Output
BQ
L8-600W
50 - 60Hz
12V1
Max. Current
100 - 240Vac
3,3V
24A
5V
50 - 60Hz
12V1
12V2
28A
20A
15A
8 - 5A
38A
Max. Combined
Power
120W
456W
500W
2.
3.
4.
VOLTAGE REGULATION
DC Output
3.3V
5V
12V1
12V2
-12V
5VSB
Tolerance
+/- 5%
+/- 5%
+/- 5%
+/- 5%
+/- 10%
+/- 5%
Ripple/Noise (max.)
50mV
50mV
120mV
120mV
120mV
50mV
OPERATING CONDITIONS
Environment
Temperature
Rel. Humidity
Operation
0 ~ 40°C
up to 85% (non-condensing)
Storage
-40 ~ 70°C
up to 95% (non-condensing)
MINIMALLOAD
500W 700W
5.
3.3V
5V
12V1
12V2
-12V
5VSB
0A
0A
0.1A
0A
0A
0A
SPLITTINGS
12V1
12V2
700W
FDD, HDD, PCIe1, PCIe2,
SATA, 24pin
PCIe3, PCIe4,
CPU (P4 + P4)
600W500W
FDD, HDD, PCIe1, SATA, 24pin
PCIe2, CPU (P4 + P4)
46
6.
47
POWER SUPPLY DIMENSIONS
7.
DISTRIBUTION AND PIN ASSIGNMENT
1
5
2
6
3
7
4
8
1
4
2
5
3
6
7
8
PCI EXPRESS VGA CONNECTOR
Pin
Color
Signal
Pin
Yellow
+12VDC
1
4
Yellow
2
5
+12VDC
Yellow
3
6
+12VDC
Black
COM
7
8
Color
Black
Black
Black
Black
Signal
COM
COM
COM
COM
48
8.
CONNECTIVITY AND CABLE LENGTHS
450 mm
50 50
mm mm
4-pin
24-pin
20-pin
12V P4-connector
12V P8-connector
12V P4-connector
PCIe (6+2-pin)
PCIe (6+2-pin)
PCIe (6+2-pin)
PCIe (6+2-pin)
S-ATA
S-ATA
HDD
FDD
450 mm
HDD
HDD
S-ATA
SATA
150 mm
150 mm
HDD
SATA
150 mm
700W & 600W
49
450 mm
50 50
mm mm
4-pin
24-pin
20-pin
12V P4-connector
12V P8-connector
12V P4-connector
PCIe (6+2-pin)
PCIe (6+2-pin)
S-ATA
S-ATA
HDD
FDD
450 mm
HDD
HDD
S-ATA
SATA
150 mm
150 mm
HDD
SATA
150 mm
500W
50