1
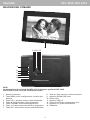
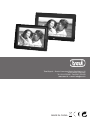
DPL 2220 10.2" 16:9 DPL 2218 8" 4:3 FOTO FRAME DIGITALE Manuale d'uso e collegamento DIGITAL PHOTO FRAME Instruction Manual ITALIANO DPL 2220 / DPL 2218 DESCRIZIONE COMANDI 1 2 34 5 6 78 9 10 11 12 13 14 NOTA La disposizione dei comandi del DPL 2218 è identica a quella del DPL 2220. Il DPL 2218 non ha il foro per l'affissione al muro. 8.Tasto , file successivo / tasto direzionale 9. Ingresso SD/MMC/MS Card 10. Presa cuffia 11. Ingresso USB 2.0 12. Presa mini-USB per collegamento al pc 13. Ingresso DC, presa alimentazione 14.Piedistallo 1. Sensore infrarosso 2. Tasto MENU, menù configurazione / arresto riproduzione 3. Tasto VOL+, aumento volume / tasto direzionale 4.Tasto , file precedente / tasto direzionale 5. Tasto STANDBY, accensione/spegnimento 6.Tasto /II, tasto selezione/conferma / play/pausa 7. Tasto VOL-, diminuzione volume / tasto direzionale 2 DPL 2220 / DPL 2218 ITALIANO DESCRIZIONE TELECOMANDO 1 11 2 3 4 5 6 7 12 13 14 15 16 8 9 17 18 19 20 10 1. Tasto MUTE, esclusione dell'audio. 2. Tasto PHOTO, tasto diretto per la visualizzazione delle foto nella memoria/supporto selezionato. 3. Tasto MUSIC, tasto diretto per l'ascolto della musica nella memoria/supporto selezionato. 4. Tasto PLAY/PAUSE /II, riproduzione/pausa riproduzione. 5.Tasto , tasto direzionale. 6.Tasto , tasto direzionale. 7. Tasto ENTER, tasto selezione/conferma. 8. Tasto SETUP, tasto diretto per l'accesso al menù di configurazione. 9. Tasto VOL+, aumenta volume. 10. Tasto VOL-, diminuisce volume. 11. Tasto STANDBY, accensione/spegnimento. 12. Tasto MOVIE, tasto diretto per la visualizzazione dei filmati nella memoria/supporto selezionato. 13. Tasto EXIT, 14.Tasto , tasto direzionale. 15.Tasto , tasto direzionale. 16. Tasto CALENDAR, visualizzazione data/orario. 17. Tasto PREV , file precedente. 18. Tasto REW , indietro veloce. 19. Tasto NEXT , file successivo.. 20. Tasto FF , avanti veloce. ACCENSIONE/SPEGNIMENTO 1. Collegare l'alimentatore 230V - 50Hz in dotazione alla presa di corrente domestica, l'altra estremità del cavo alla presa DC (13) posta sul lato del Photo Frame. 2. Per attivare il Photo Frame in modalità Stand-by premere il tasto STANDBY (11) del telecomando. 3. Per riattivare il Photo Frame dalla funzione Stand-by, ripremere il tasto STANDBY (11) del telecomando. NOTA Se non viene effettuata alcuna azione o non viene inserito nessun dispositivo, dopo 1 minuto partirà automaticamente la visualizzazione delle foto della memoria interna. 3 ITALIANO DPL 2220 / DPL 2218 MENU PHOTO FRAME Accendendo l'apparecchio, compare il menù principale del Photo Frame. Nel menù trovate le seguenti funzioni: FOTO permette di visualizzare le immagini MUSICA permette di riprodurre file audio tramite gli altoparlanti FOTO+MUSICA permette di riprodurre le immagini con un sottofondo musicale FILM permette di riprodurre filmati video MODIFICA permette di modificare i file presenti nei vari supporti CONFIGURAZIONE permette di settare le impostazioni del Photo Frame CALENDARIO permette di impostare il calendario del Photo Frame OROLOGIO permette di impostare l'orario del Photo Frame ALLARME permette di impostare la sveglia del Photo Frame AUTO-ACCENSIONE permette di impostare l'autoaccensione/l'autospegnimento del Photo Frame PREFERITI permette di visualizzare le immagini impostate come preferite E-BOOK permette di visualizzare i file di testo FUNZIONE FOTO 1. Inserire una SD/MMC/MS Card (9), o un dispositivo usb (11), nei rispettivi vani. 2. Accendere il Photo Frame. 3. Dal menù principale selezionare la funzione FOTO tramite i tasti direzionali e premere il tasto ENTER (7) del telecomando per confermare. 4. Selezionare il supporto dal quale visionare le foto (SD/MMC o USB). 5. Sul display comparirà la scritta "Caricamento..." e dopo qualche secondo compariranno in sequenza tutte le vostre fotografie. NOTA: Collegare l'SD/MMC/MS Card o il dispositivo usb a Photo Frame spento, altrimenti potrebbe non essere riconosciuto o si rischia che ne venga danneggiato il contenuto. PAUSA RIPRODUZIONE 1. Durante la riproduzione premere il tasto PLAY/PAUSE (4) del telecomando per attivare la pausa. 2. Premerlo nuovamente per ripristinare la normale riproduzione. ARRESTO RIPRODUZIONE 1. Premere il tasto EXIT (13) del telecomando per arrestare la riproduzione; verranno visualizzate le foto all'interno dell'SD/MMC/MS Card o del dispositivo usb. 2. Premerlo nuovamente per tornare al menù principale. FUNZIONE MUSICA 1. Inserire una SD/MMC/MS Card (9), o un dispositivo usb (11), nei rispettivi vani. 2. Accendere il Photo Frame. 3. Dal menù principale selezionare la funzione MUSICA tramite i tasti direzionali del telecomando e premere il tasto ENTER (7) del telecomando per confermare. 4. Selezionare il supporto dal quale riprodurre la musica (SD/MMC o USB). 5. La riproduzione partirà automaticamente. Sul display comparirà un menù da dove è possibile selezionare i brani da riprodurre tramite i tasti direzionali del telecomando e avviare la riproduzione premendo il tasto ENTER (7). REGOLAZIONE VOLUME 1. Premere i tasti VOL+ (9) o VOL- (10) del telecomando per aumentare o diminuire il volume. ESCLUSIONE AUDIO 1. Premere una volta il tasto MUTE (1) del telecomando per escludere completamente l'audio. 2. Premerlo di nuovo per ripristinarlo. SALTO TRACCIA 1. Premere i tasti NEXT (19) o PREV (17) del telecomando per passare alla traccia successiva o precedente. 4 DPL 2220 / DPL 2218 ITALIANO RICERCA VELOCE 1. Premere i tasti FF (20) o REW (18) del telecomando per avanzare o indietreggiare velocemente la riproduzione della traccia in ascolto; sul display compariranno in sequenza le scritte 2x - 4x - 8x - 16x - 32x che equivalgono alla velocità. 2. Premere il tasto PLAY/PAUSE (4) del telecomando per riprendere la normale riproduzione. PAUSA RIPRODUZIONE 1. Durante la riproduzione premere il tasto PLAY/PAUSE (4) del telecomando per attivare la pausa. 2. Premerlo nuovamente per ripristinare la normale riproduzione. ARRESTO RIPRODUZIONE 1. Premere il tasto EXIT (13) del telecomando per arrestare la riproduzione. 2. Premerlo nuovamente per tornare al menù principale. FUNZIONE FOTO + MUSICA (visualizzazione immagini con sottofondo musicale) 1. Inserire una SD/MMC/MS Card (9), o un dispositivo usb (11), nei rispettivi vani. 2. Accendere il Photo Frame. 3. Dal menù principale selezionare la funzione FOTO+MUSICA tramite i tasti direzionali del telecomando e premere il tasto ENTER (7) per confermare. NOTA: Le immagini e i file audio devono essere nella stessa directory (cartella). 4. Selezionare il supporto dal quale riprodurre la musica (SD/MMC o USB). 5. Sul display compariranno le foto con sottofondo musicali. REGOLAZIONE VOLUME, ESCLUSIONE AUDIO, PAUSA RIPRODUZIONE e ARRESTO RIPRODUZIONE fare riferimento ai rispettivi paragrafi del capitolo FUNZIONE MUSICA. FUNZIONE FILM 1. Inserire una SD/MMC/MS Card (9), o un dispositivo usb (11), nei rispettivi vani. 2. Accendere il Photo Frame. 3. Di fabbrica il Photo Frame è programmato per avviare automaticamente i video presenti sul supporto dopo l'accensione; se ciò non dovesse avvenire o se si volesse avviare un video dopo aver riprodotto foto o musica procedere come segue: dal al menù principale selezionare la funzione FILM tramite i tasti direzionali del telecomando e premere il tasto ENTER (7) del telecomando per confermare. 4. Selezionare il supporto dal quale riprodurre i filmati. 5. La riproduzione partirà automaticamente. Premere il tasto EXIT (13) per far comparire un menù da dove è possibile selezionare i video da riprodurre tramite i tasti direzionali del telecomando e avviare la riproduzione premendo il tasto ENTER (7). REGOLAZIONE VOLUME, ESCLUSIONE AUDIO, PAUSA RIPRODUZIONE E ARRESTO RIPRODUZIONE fare riferimento ai rispettivi paragrafi del capitolo FUNZIONE MUSICA. FUNZIONE MODIFICA 1. Inserire una SD/MMC/MS Card (9), o un dispositivo usb (11), nei rispettivi vani. 2. Accendere il Photo Frame. 3. Dal menù principale selezionare la funzione MODIFICA tramite i tasti direzionali del telecomando e premere il tasto ENTER (7) del telecomando per confermare. 4. Selezionare il tipo di modifica (Copia o Elimina). COPIA FILE Sulla sinistra è indicato il supporto dal quale copiare le immagini. NOTA: Il dispositivo usb ha la priorità sulla SD/MMC/MS Card, nel caso che entrambi i supporti siano presenti verrà visualizzato il contenuto del dispositivo usb 1. Selezionare il file delll'immagine da copiare tramite i tasti direzionali e confermare con il tasto ENTER (7): il file verrà evidenziato con una cornice gialla. 2. Selezionare la voce "Salva" tramite i tasti direzionali e confermare con il tasto ENTER (7). 3. Attendere il completamento del salvataggio nella memoria interna. 5 ITALIANO DPL 2220 / DPL 2218 ELIMINAZIONE FILE Sulla sinistra è indicato il supporto dal quale copiare le immagini. NOTA: Il dispositivo usb ha la priorità sulla SD/MMC/MS Card, nel caso che entrambi i supporti siano presenti verrà visualizzato il contenuto del dispositivo usb 1. Selezionare la voce "Elimina" tramite i tasti direzionali e confermare con il tasto ENTER (7). 2. Selezionare il file delll'immagine da eliminare tramite i tasti direzionali : il file verrà evidenziato con una cornice gialla. 3. Premere il tasto PLAY/PAUSE /II (4) per eliminare il file selezionato, oppure selezionare Elimina Tutto tramite il tasto direzionale e confermare con il tasto ENTER (7) per eliminare tutte le immagini. FUNZIONE CONFIGURAZIONE 1. Dal menù principale selezionare la funzione CONFIGURAZIONE tramite i tasti direzionali del telecomando e premere il tasto ENTER (7) per confermare. 2. Per muoversi all'interno della funzione SETUP utilizzare i tasti direzionali del telecomando e premere il tasto ENTER (7) per confermare. 3. Sul display comparirà un menù con le seguenti funzioni: Impostazioni foto -Tempo intervallo - Permette di regolare l'intervallo di transizione tra una foto e l'altra. -Effetto transizione - Permette di impostare l'effetto di transizione tra un'immagine e l'altra. -Mostra tipo - Permette di impostare la visualizzazione dell immagini a dimensione originale o a schermo intero. -Modalità Scivolo o Slide Mode - Permette di impostare la visualizzazione delle immagini in quattro modalità diverse: Normale: le immagini vengono visualizzate in base alle impostazioni di "Effetto transizione" e "Mostra tipo". Motion: le immagini vengono visualizzate in movimento. Data & Ora: le immagini vengono visualizzate insieme ad orologio e calendario. Pop Tip: le immagini vengono visualizzate in base alle impostazioni di "Effetto transizione" e "Mostra tipo" insieme ad orologio e calendario. -Esplora - Permette di impostare la visualizzazione delle immagini in modalità di arresto contenute nel dispositivo usb o nella SD/MMC Card ad anteprima o a lista. Riproduzione auto. -Foto - Permette di attivare la riproduzione automatica delle immagini una volta avviata la funzione. -Musica - Permette di attivare la riproduzione automatica della musica una volta avviata la funzione. -Film - Permette di attivare la riproduzione automatica de filmati una volta avviata la funzione. -Riproduzione automatica o Startup- Permette di impostare o meno quale funzione riprodurre automaticamente una volta acceso il Photo Frame. Imp. Schermo -Luminosità - Permette di regolare la luminosità dell'immagine in base a tre livelli predefiniti: Normale, Luminoso, Leggero. -Contrasto - Permette di regolare il contrasto dell'immagine. -Lumosità TFT - Permette di regolare la luminosità dello schermo. -Contrasto TFT - Permette di regolare il contrasto dello schermo. -Saturazione TFT - Permette di regolare la saturazione dello schermo. Imp. personalizzata -Lingua a video - Permette di impostare la lingua del menù (OSD). -Codifica - Permette di impostare la visualizzazione del nome dei file in base a due tipi di codifica: Europa occindentale ed Europa centrale. -Modalità ripeti - Permette di attivare la funzione di ripetizione dei file in modalità singola/solo cartella/tutti i file. -USB Source - Permette di impostare quale memoria/supporto viene rilevato una volta che si collega il Photo Frame al computer: SD/MMC o MS (dispositivo usb). -Default o Predefinito- Permette di ripristinare le funzioni di fabbrica. -Exit - Uscita dalla funzione CONFIGURAZIONE e ritorno al menù principale. 6 DPL 2220 / DPL 2218 ITALIANO FUNZIONE CALENDARIO 1. Dal menù principale selezionare la funzione CALENDARIO tramite i tasti direzionali del telecomando e premere il tasto ENTER (7) per confermare. 2. Per muoversi all'interno della funzione CALENDARIO utilizzare i tasti direzionali del telecomando e premere il tasto ENTER (7) per confermare. 3. Sul display comparirà un menù con le seguenti funzioni: -Visualizza - Visualizza il calendario: tramite i tasti direzionali si scorrono i mesi, mentre tramite i tasti direzionali si scorrono gli anni. -Imposta Data - Permette di impostare la data: si selezionano l'anno, il mese e il giorno tramite i tasti direzionali , e si modificano tramite i tasti direzionali . Confermare le impostazioni selezionando OK e premendo il tasto ENTER (7). -Esci - Uscita dalla funzione CALENDARIO e ritorno al menù principale. FUNZIONE OROLOGIO 1. Dal menù principale selezionare la funzione OROLOGIO tramite i tasti direzionali del telecomando e premere il tasto ENTER (7) per confermare. 2. Per muoversi all'interno della funzione OROLOGIO utilizzare i tasti direzionali del telecomando e premere il tasto ENTER (7) per confermare. 3. Sul display comparirà un menù con le seguenti funzioni: -Visualizza - Permette di visualizare l'orario in modalità diverse: Orologio (orologio digitale) e Orologio analogico. -Imposta ora - Permette di impostare l'orario: si selezionano l'ora, i minuti e i secondi tramite i tasti direzionali , e si modificano tramite i tasti direzionali . Confermare le impostazioni selezionando OK e premendo il tasto ENTER (7). -Esci - Uscita dalla funzione OROLOGIO e ritorno al menù principale. FUNZIONE ALLARME 1. Dal menù principale selezionare la funzione ALLARME tramite i tasti direzionali del telecomando e premere il tasto ENTER (7) per confermare. 2. Per muoversi all'interno della funzione ALLARME utilizzare i tasti direzionali del telecomando e premere il tasto ENTER (7) per confermare. 3. Sul display comparirà un menù con le seguenti funzioni: Abilita - Permette di attivare o disattivare l'allarme. Im posta ora - Permette di impostare l'orario dell'allarme: si selezionano l'ora e i minuti tramite i tasti direzionali , e si modificano tramite i tasti direzionali . Confermare le impostazioni selezionando OK e premendo il tasto ENTER (7). Esci - Uscita dalla funzione ALLARME e ritorno al menù principale. FUNZIONE AUTO-ACCENSIONE 1. Dal menù principale selezionare la funzione AUTO-ACCENSIONE tramite i tasti direzionali del telecomando e premere il tasto ENTER (7) per confermare. 2. Per muoversi all'interno della funzione AUTO-ACCENSIONE utilizzare i tasti direzionali del telecomando e premere il tasto ENTER (7) per confermare. 3. Sul display compare un menù con le seguenti funzioni: Abilita accensione - Permette di attivare o disattivare l'autoaccensione in base all'orario. Abilita spegnimento - Permette di attivare o disattivare l'autospegnimento in base all'orario. Imposta ora Accensione - Permette di impostare l'orario dell'autoaccensione: si selezionano l'ora e i minuti tramite i tasti direzionali , e si modificano tramite i tasti direzionali . Confermare le impostazioni selezionando OK e premendo il tasto ENTER (7). Spegnimento - Permette di impostare l'orario dell'autospegnimento: si selezionano l'ora e i minuti tramite i tasti direzionali , e si modificano tramite i tasti direzionali . Confermare le impostazioni selezionando OK e premendo il tasto ENTER (7). Exit - Uscita dalla funzione AUTO-ACCENSIONE e ritorno al menù principale. 7 ITALIANO DPL 2220 / DPL 2218 FUNZIONE PREFERITI Nella funzione PREFERITI si visualizzano le immagini inserite nella memoria interna. Per copiare le immagini o cancellarle fare riferimento alla funzione MODIFICA. FUNZIONE E-BOOK 1. Inserire una SD/MMC/MS Card (9), o un dispositivo usb (11), nei rispettivi vani. 2. Accendere il Photo Frame. 3. Dal menù principale selezionare la funzione E-BOOK tramite i tasti direzionali e premere il tasto ENTER (7) del telecomando per confermare. 4. Selezionare il supporto dal quale visionare i file di testo (SD/MMC o USB). 5. Sul display comparirà un menù da dove potete selezionare i file di testo da visionare tramite i tasti direzionali del telecomando e premere il tasto ENTER (7) per iniziare la visualizzazione. 6. Premere i tasti direzionali del telecomando per scorrere il testo di una riga. 7. Premere i tasti NEXT (19) o PREV (17) del telecomando per passare alla pagina successiva o precedente. CARATTERISTICHE TECNICHE Alimentazione: DPL 2220 - DC 9V 1,5A DPL 2220 - DC 5V 1A Dimensioni: DPL 2220 - 280x190x24mm (senza piedistallo) DPL 2218 - 220x175x24mm (senza piedistallo) Schermo: DPL 2220 - LED 10.2" 16:9 - 259 mm di diagonale DPL 2218 - LED 8" 4:3 - 203 mm di diagonale Area di visualizzazione: DPL 2220 - 223x126mm DPL 2218 - 163x122mm Ingressi USB 2.0 / SD/MMC Card Formato immagini JPG - BMP - GIF Formato audio MP3 - WMA - WAV Formato video AVI - MPG - MP4 - 3GP - VOB Formato testoTXT Assorbimento max: DPL 2220 - 7W DPL 2218 - 5W Batteria telecomando: (1xCR2025 3V) Avvertenze per il corretto smaltimento del prodotto. Il simbolo riportato sull'apparecchiatura indica che il rifiuto deve essere oggetto di "raccolta separata" pertanto il prodotto non deve essere smaltito insieme ai rifiuti urbani. L'utente dovrà consegnare il prodotto presso gli appositi "centri di raccolta differenziata" predisposti dalle amministrazioni comunali, oppure consegnarlo al rivenditore contro acquisto di un nuovo prodotto. La raccolta differenziata del rifiuto e le successive operazioni di trattamento, recupero e smaltimento favoriscono la produzione di apparecchiature con materiali riciclati e limitano gli effetti negativi sull'ambiente e sulla salute causati da una gestione impropria del rifiuto. Lo smaltimento abusivo del prodotto comporta l'applicazione di sanzioni amministrative. 8 DPL 2220 / DPL 2218 ITALIANO Foreword Digital photo frame---grasp your happy time in a twinkling. Without neither a computer nor being printed, the wonderful moment will reappear. Welcome to choose the digital photo frame produced by our company, please read the Operation Instructions carefully before using the machine in order to enjoy the product. Main Functions Picture Playing MP3 Playing MP4 Movie Playing Calendar, Clock, Alarm, Power-on/off Setting Technical Specification 10.2〞TFT-LCD Screen With Resolution of 1024*600 Support Format: JPEG、MP1、MP2、MP3、MP4 、VOB、WMA、AVI、DIVX Support SD, MS, MMC Cards Support USB and Hot Plug Built-in Memory Calendar, Clock, Alarm, Power-on/off Setting 9 ENGLISH DPL 2220 / DPL 2218 1. Operating Instructions 1.1 Button Descriptions on Remote Control (1) POWER ON/OFF Button (2) MUTING Button (3) . (4) PHOTO Button (5) MUSIC Button (6) MOVIE Button (7) PAUSE/PLAY Button (8) EXIT Button (9) UP Button (10) (11) (12) (13) (14) (15) (16) (17) (18) (19) (20) (21) RIGHT Button LEFT Button ENTER Button DOWN Button CALENDAR Button SETUP Button VOL+ Button PREVIOUS Button REWIND Button VOL- Button NEXT Button FAST FORWARD Button 10 DPL 2220 / DPL 2218 ENGLISH 1.2 Button Descriptions on Machine ENTER To confirm EXIT To return to the main menu To move the cursor right or revolve RIGHT picture clockwise To move the cursor left or revolve picture LEFT counterclockwise To move the cursor down or revolve DOWN picture right and left To move the cursor up or revolve picture UP up and down 2. Use for the First Time 2.1 A main menu will appear on the screen when the system is switched on for the first time. There are 11 functions, namely, 【Photo】, 【Music】, 【Photo + Music】, 【Movie】, 【Setup】, 【Calendar】, 【Clock】, 【Alarm】, 【AutoPower】, 【Edit】 and 【Favorite】.Users can use the direction buttons to choose the desired function and press ENTER to confirm. 2.2 The product supports USB and memory cards. When reading equipments, the system will first detect the USB, then a memory card. If both of the devices exist in the meantime, USB is the defaulted equipment that is first read by the system. 11 ENGLISH DPL 2220 / DPL 2218 3.【Setup】Function Choose 【Setup】 in the main menu and press ENTER button to enter into the setup mode. In addition, press SETUP button on the remote control in other functions, the machine can also enter into the setup mode. The picture below is the initial appearance of the setup mode. The following is the introductions of all kinds of functions under setup mode. 3.1 Photo Setting Choose the first option by the cursor to set up pictures. 3.1.1 Interval Time Setting Choose “Interval Time” on the screen. There are 7 items for you to choose, namely, 5 seconds, 10 seconds, 15 seconds, 30 seconds, 1 minute, 3 minutes and OFF. 3.1.2 Transition Effect Setting Choose “Transition Effect” on the screen to set up its included items. There are totally 16 kinds of modes. 3.1.3 Show Type Setting Choose “Show Tape” on the screen. Users can choose “Fit Screen” or “Full Screen”. 3.1.4 Browse Setting Choose “Browse” on the screen. There are “Thumbnail” and “File Manager” two options for your choice. Under “Thumbnail” mode, choose【Photo】function to enter into pictures browse mode directly. Under “File Manager” mode, choose 【Photo】 function to enter into files browse mode directly. 12 DPL 2220 / DPL 2218 ENGLISH 3.2 Auto-play Setting Choose the second option by the cursor to set up the Autoplay setting. 3.2.1 Photo Setting Choose “Photo” by the cursor. Users can use this option to turn on or off the 【Photo】auto-play function. If the photo autoplay is on, the machine will play pictures automatically when the user choose the function of 【Photo】; If the photo autoplay is off, it will enter into “File manager” or “Thumbnail” mode for the user to browse pictures. 3.2.2 Music Setting Choose “Music” by the cursor. Users can use this option to turn on or off the 【Music】 auto-play function. If the music auto-play is on, it will play music automatically when entering into 【Music】 function; If the music auto-play is off, users must press ENTER to choose the desired file by themselves. 13 ENGLISH DPL 2220 / DPL 2218 3.2.3 Movie Setting Choose “Movie” by the cursor. Users can use this option to turn on or off the 【Movie】 auto-play function. If the movie auto-play is on, it will play movie automatically when entering into 【Movie】 function; If the movie auto-play is off, it will enter into movie file browse for users to browse movie. 3.3 Display Setting Choose the third option by the cursor to set up the display setting. 3.3.1 Brightness Setting Choose “Brightness” by the cursor to adjust the brightness of the picture. There are “Normal”, “Bright” and “Soft” for your choice. 14 DPL 2220 / DPL 2218 ENGLISH 3.3.2 Contrast Setting Choose “Contrast” by the cursor to adjust the contrast rate of the picture. From -4 to +4, there are 9 grades. The greater the number is, the higher the contrast rate is. 3.3.3 TFT Brightness Choose “TFT Brightness” by the cursor to adjust the brightness of the screen. From -7 to +7, there are 15 grades. The greater the number is, the brighter the screen is. 3.3.4 TFT Contrast Setting Choose “TFT Contrast” by the cursor to adjust the contrast rate of the screen. From -7 to +7, there are 15 grades. The greater the number is, the higher the contrast rate is. 3.3.5 TFT Saturation Choose “TFT Saturation” by the cursor to adjust the saturation of the screen. From -7 to +7, there are 15 grades. The greater the number is, the higher saturation is. 15 ENGLISH DPL 2220 / DPL 2218 3.4 Custom Setup Choose the forth option by the cursor to set up the system. 3.4.1 OSD Language Choose “OSD Language” by the cursor to select the language of the system. 3.4.2 Encoding Setting Choose “Encoding” by the cursor. Two options “Western European” and “Central European” are for users to choose. 3.4.3 Logo Type Setting Choose “Logo Type” by the cursor. There are two options “Default” and “Favorite” for you to choose. 3.4.4 Repeat Mode Choose “Repeat Mode” by the cursor to set up the repeat mode. Four items “Off”, “One”, “Folder” and “All” are included. Off: to cancel the repeat mode One: to repeat the playing file Folder: to repeat the playing file folder All: to repeat all the files in the storage mediu 16 DPL 2220 / DPL 2218 ENGLISH 3.4.5 Default Setting Choose “Default” by the cursor. This option let the user return to the initial defaulted state. All of the settings will return to the initial system setup when this option is chosen. 3.5 Exit Setting Choose the fifth option by the cursor to exit and press ENTER to return to the main menu. 4.【Photo】Function 4.1 Choose 【Photo】in the main menu. Press ENTER and the machine will examine automatically whether the machine connects any storage device (USB, memory cards). If not, it will return to the main menu. 4.2 After connecting with a storage device and reading correctly, it will enter into the user’s chosen mode. Picture 1 shows that users choose “File Manager” mode to handle 【Photo】 playing; while Picture 2 shows that users choose “Thumbnail” mode to handle 【Photo】 playing. 17 ENGLISH DPL 2220 / DPL 2218 Picture 1Picture 2 4.3 Under 【Photo】mode, the system just support picture display, and the format is JPG. 4.4 If the photo auto-play is on, the machine will display the photo automatically when entering 【Photo】function. 5.【Music】Function 5.1 Choose 【Music】in the main menu. Press ENTER and the machine will examine automatically whether the machine connects any storage device (USB, memory cards). If not, it will return to the main menu. 18 DPL 2220 / DPL 2218 ENGLISH 5.2 After connecting with a storage device and reading correctly, it will use “File Manager” mode to handle playing music. 5.3 Under 【Music】mode, the system just support music playing , and the formats are MP2, MP3 and WMA. 5.4 If the music auto-play is on, the machine will play the music automatically when entering 【Music】function. 6.【Photo + Music】Function 6.1 Choose【Photo + Music】in the main menu. Press ENTER and the machine will examine automatically whether the machine connects any storage device (USB, memory cards). If not, it will return to the main menu. 19 ENGLISH DPL 2220 / DPL 2218 6.2 Under 【Photo + Music】mode, the system just support photo and music playing , and the formats are JPG, MP2, MP3 and WMA. 6.3 If the photo and music auto-play is on, the machine will play the photo and music automatically when entering 【Photo + Music】function. 7.【Movie】Function 7.1 Choose【Movie】in the main menu. Press ENTER and the machine will examine automatically whether the machine connects any storage device (USB, memory cards). If not, it will return to the main menu. 7.2 After connecting with a storage device and reading correctly, it will use “File Manager” mode to handle playing movie. 20 DPL 2220 / DPL 2218 ENGLISH 7.3 Under 【Movie】mode, the system support movie playing , and the formats are DAT, MPG, VOB and MP4. 7.4 If the movie auto-play is on, the machine will play the movie automatically when entering 【Movie】function. 8.【Calendar】 Function 8.1 Display Choose【Calendar】in the main menu, and press ENTER to confirm. Then select “Display” and press ENTER to enter into the calendar. 8.2 Week Inquiry Users can press direction buttons to adjust month or year in order to inquire about the week. 8.3 Date Setting After choosing【Calendar】in the main menu, press ENTER to enter into calendar setting mode. Select “Set Date” and press ENTER to confirm. Use direction buttons to adjust the date. Press “OK” or “Cancel” after above settings to exit. Press “Exit” to return to the main menu. 21 ENGLISH DPL 2220 / DPL 2218 9.【Clock】 Function 9.1 After choosing【Clock】in the main menu, press ENTER to enter into clock setting mode. 9.1.2 The “Display” function get users to choose “Clock” or “Clock & Calendar” display on the screen. Choose “Clock” and press ENTER to confirm, like picture above. 22 DPL 2220 / DPL 2218 ENGLISH 9.1.3 Choose “Clock & Calendar” and press ENTER to confirm, like picture above. 9.2 Set Time This function will get users to set the time. Select “Set Time” and press ENTER to enter into the time setting. Use direction buttons to adjust the time. Press “OK” or “Cancel” after above settings to exit. Press “Exit” to return to the main menu. 23 ENGLISH DPL 2220 / DPL 2218 10.【Alarm】 Function After choosing【Alarm】in the main menu, press ENTER to enter into alarm setting mode. 10.1 Alarm On / Off Setting Choose “Enable” to select alarm on or off function. 10.2 Set Time This function will get users to set the time. Select “Set Time” and press ENTER to enter into the time setting. Use direction buttons to adjust the time. Press “OK” or “Cancel” after above setting to exit. Press “Exit” to return to the main menu. 24 DPL 2220 / DPL 2218 ENGLISH 10.3 Alarm Ring-down A reminded picture will appear on the screen when the alarm is on. Press any key to exit. 11.【Auto-Power】Function After choosing【Auto-Power】in the main menu, press ENTER to enter into auto-power setting. 11.1 Power On Enable Choose “Power On Enable” to select power-on on or off function. 11.2 Power Off Enable Choose “Power Off Enable” to select power-off on or off function. 11.3 Set Time Select “Set Time” and press ENTER to enter into the time setting for power-on or power-off. There are “Power On” and “Power Off” to choose. Use direction buttons to adjust the time. Press “OK” or “Cancel” after above settings to exit. Press “Exit” to return to the main menu. 25 ENGLISH DPL 2220 / DPL 2218 12.【Edit】Function After choosing【Edit】in the main menu, press ENTER to enter into picture edit mode. Users can select “Copy”, “Delete” and “Exit”. 12.1 Copy Picture In this function, the user can copy pictures in the storage device as screen saver pictures. Press【UP/DOWN】key to select pictures. A red outline frame shows that the picture has been chosen. Press ENTER again will cancel the selection. After the choosing processes, press 【LIFT/RIGHT】 to select “Save” and then press ENTER to save the desired picture. 26 DPL 2220 / DPL 2218 ENGLISH 12.2 Delete Picture In this function, the user can delete pictures which have saved as screen saver pictures. Select “Delete” and press ENTER to enter into picture deletion mode. Use【LIFT/RIGHT】 key to select desired pictures, then press ENTER to delete the picture. Users can also delete all pictures by selecting “Delete All”. 13.【Favorite】 Function After choosing【Favorite】in the main menu, press ENTER to enter into screen saver mode. Then press ENTER to pause or play the screen saver picture. Press EXIT to exit the screen saver mode. 14. Function Switchover Press EXIT on the remote control to return to the main menu. Use direction keys to switch over all the functions. The functions are【Photo】, 【Music】, 【Photo + Music】, 【Movie】, 【Setup】, 【Calendar】, 【Clock】, 【Alarm】, 【AutoPower】, 【Edit】 and 【Favorite】. 27 ENGLISH DPL 2220 / DPL 2218 15. Trouble Shooting Symptoms Familiar reason and solution The digital power adapter isn’t plugged correctly, please plug the frame can not The power adapter and make sure the connection is all right. be switched on. The card isn’t inserted correctly. There is no picture, music or video file in the memory card. The formats of files are different. Examine the method of your plug-in. The screen can Don’t insert the card into the slot coarsely. not be started Make sure there is at least one picture, music or video up. file in the memory card. Compatible picture format is JPEG Compatible music format is MP3 Compatible video format are DAT, MPG, VOB and MP4. The screen can not show pictures when you choose “PHOTO” function. A small video picture on the screen The file format is not supported. There isn’t any picture in the memory card. Make sure there is at least one picture in the memory card. Compatible picture format is JPEG. Notice: The digital frame is only compatible with JPEG format and do not support other formats like TIFF、BMP or GIF. Resolution of the picture is low. The scenario of pictures taken by most digital cameras is 320×240 or lower one, while the best video picture scenario is 640×480. Dark spots It’s normal, for different digital cameras use different appear around scenario or pixel to shot pictures. the picture 28 DPL 2220 / DPL 2218 ENGLISH 29 NOTE DPL 2220 / DPL 2218 30 DPL 2220 / DPL 2218 NOTE Precautions for correct disposal of the product. The symbol shown on the equipment indicates that waste must be disposed of in "separate collection" and so the product must not be disposed of together with urban waste. The user must take the product to special "separate waste collection centres" provided by local government, or deliver it to the retailer against the purchase of a new product. Separate collection of waste and subsequent treatment, recycling and disposal operations promotes the production of equipment with recycled materials and limits negative effects on the environment and on health caused by improper handling of waste. Illegal disposal of the product leads to the enforcement of administrative penalties. 31 Trevi S.p.A. - Strada Consolare Rimini-San Marino, 62 47924 Rimini (RN) Italy Tel. 0541/756420 - Fax 0541/756430 www.trevi.it - e-mail: [email protected] MADE IN CHINA