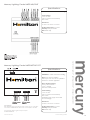
1
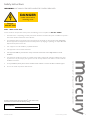
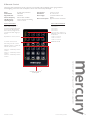
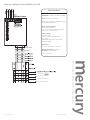
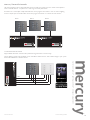
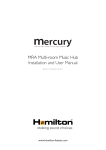
multi-room audio • lighting controls • energy management
Lighting Control System
Installation and User Manual
Revision A4 • R Hamilton & Co Ltd. 2014
www.hamilton-litestat.com
Contents
Introduction
3
Safety Information 4
Installation and Set Up 5-6
Technical Information 7
Control Plate Options 8
Mounting and Installing the Mercury Dimming System Page Installing the Control Plates IR Remote Control Accessories Technical Data Sheets 9-10
11-13 14
15-23
MDP4 X 600 + VFR 15
MDR - 1 X 1000 16
MDR - 1 X 5000 16
MDR - 4X10A + VFR 17
MDR - 6X POWER 18
MDR - 4 X10V 19
MDR - 4 X 1-OINT 20
MDR - NET-BOOST 20
MDR - 6 X DMX
21
MDR - 4 X 2A ASW 22
MDR - 2 X 2A BLINDS - SW 23
24-25
General Schematic 26
Notes
27
Disclaimer and Warranty
28
multi-room audio • lighting controls • energy management
Fault Finding Guide ®
Issued Date: June 2014
i-LX User Guide REV_A4 E&OE
2
Introduction
Thankyou for purchasing your Mercury lighting control system. Please read this user guide before installing this product.
Technical support is available at [email protected]
Control your lighting mood
•
•
•
Simple mood control from the touch of a button.
Control your lighting via your wall plate, Mercury App or touch screen.
Timed events, daylight linking and home and away features.
The Mercury lighting control system is stylish and saves energy. With energy prices increasing, lighting control is more
popular and more affordable. Our Lighting control system can be used to enhance any environment and is commonly
used in:Hotels
Restaurants
Residential
Office meeting rooms
Cinemas
Pubs and clubs
Conference and lecture theatres
School halls
Garden lighting which includes control of water features.
•
The Mercury control system allows scenes and moods to be programmed from each keypad.
•
LED 1-10V drivers, blinds/screens, fans, garden lighting and gates can all be controlled from the touch of a button.
•
Keypads can be linked on a simple CAT5 NETWORK. Screened cable is recommend.
•
Special control plates can be made to allow MASTER OFF or LAST SETTING which are commonly used by a front door or
placed in the main bedroom.
•
Rooms can be split via partition key switches.
•
PIRs can trigger moods as well, turning the lights off when the room is not in use.
•
Control via RS232 can be used to interface to touch screens and projectors.
In the box
Mercury Lighting System (MDP4X600), Includes wall plates when part of (DK1 Kit)
Wall mounting template.
Wall mounting kit including 3x M8 40mm dome head screws & 3 brown rawl plugs.
If any of the items above were not included in the master pack please contact Hamilton- Litestat on (01747) 860088
and ask for technical support:
Email:
[email protected] .
Thank you again for purchasing your Mercury® Lighting System.
multi-room audio • lighting controls • energy management
In 2015 most tungsten lamps will be discontinued. Our Mercury system works with most good GU10 LED lamps as
well as 1-10v LED dimmable drivers. Contact us for more information on compatible lamps tested.
®
Issued Date: June 2014
i-LX User Guide REV_A4 E&OE
3
Safety Instructions
WARNING: LIVE MAINS IS EXPOSED WHEN THE COVER IS REMOVED
DANGER
Isolate mains before
removing cover
Danger
220-240 Volts
220V - 240V AC 50-60Hz
For the continuous safe operation of this product, the following must be complied with AT ALL TIMES.
Read Instructions – all operating and safety instructions should be read before the system is installed or operated –
instructions should be retained for future reference.
2.
Care should be taken to prevent the chance of ingression of dust, liquids or other foreign bodies spilling/falling
into the equipment. The equipment should not be exposed to any dripping or splashing - no objects filled with
liquid should be placed on the unit.
3.
This equipment must be installed by a qualifed electrician.
4.
This equipment must be earthed at all times.
5.
This equipment must be protected from damp and humid environments and is only suitable for interior
installation.
6.
The equipment should be mounted on a suitable wall or within a cabinet with adequate ventilation away from
any heat source. To prevent injury this apparatus must be securely attached to the wall in accordance with the
installation instructions.
7.
For any installation queries please see the Hamilton Litestat website or contact Hamilton’s technical support.
8.
No user servicable components within the unit.
For future reference please write your Mercury® serial number below,
the number can be found inside the Mercury® casing.
multi-room audio • lighting controls • energy management
1.
Serial Number:
®
Issued Date: June 2014
i-LX User Guide REV_A4 E&OE
4
Install and Set Up
Safety Intructions
DANGER 220V - 240VAC 50 - 60Hz WARNING - live mains is exposed when the cover is removed.
Tools
To install your system you will need:
•
•
•
6mm masonry drill bit and drill
Large Phillips head screw driver
Small flat head screw driver
Dimensions
All dimensions are shown in millimetres (mm)
MDP4X600+VFR (See data sheets for DIN rail mounted products)
Dimensions:
H 450mm x W 205mm x D 69mm
Weight:
5.3kg
multi-room audio • lighting controls • energy management
®
Issued Date: March 2014
i-LX User Guide REV_A4 E&OE
5
Installation
1.
The Mercury control system should be installed by a competent and qualifed electrical contractor, in compliance with
BS7671 IEE wiring regulations.
2.
WARNING. Ensure the power supply to equipment is fully isolated before connecting, dis-connecting equipment or making any changes to DIP SWITCH settings.
3.
Using the fixing kit provided and installation template mark the 3 required screw hole positions ensuring the
system is square. Leave a gap of at least 30mm at the top and enough room around the system for adequate
ventilation.
4. Each remote dimmer pack must be connected to earth.
The Mercury dimming pack must be mounted on a suitable wall or within a cabinet with adequate ventilation
away from any heat source.
Care should be taken to prevent the chance of ingression of dust, liquids or other foreign bodies spilling/falling
into the equipment. The equipment should not be exposed to any dripping or splashing and kept away from
water pipes.
The MAINS power feed may come from either an earthed domestic or a switched fused spur, (both) must be
protected by an earthed fused link rated at max 3A in accordance with BS1362 and installed by a competent
and qualified electrical contractor. The mains feeding the Mercury dimmer must be taken from a suitable RCBO
or MCB which is solely dedicated to supply the individual dimmer.
Connect SELV network cable. The Mercury network is linked via a CAT5 screened cable. The maximum circuit
length is 1000 meters. If 1000m of CAT5 cable is exceeded a power supply can be added to end of circuit to
boost voltage. We recommend a maximum of 60 control plates can be used on a network without the need
for a data amp. (Unlimited with an amp). Ensure IEE wiring regulations are followed and segregate SELV cable
from mains. This also reduces the chance of interference.
9. POWER OFF BEFORE SETTING DIP SWITCHES.
Pack 2
Room 1 Channels 5 - 8
Pack 3
Room 1 Channels 9 - 12
mdp4x600+vfr
mdp4x600+vfr
mdp4x600+vfr
www.hamilton-litestat.com
CAT5 Cable
www.hamilton-litestat.com
DIP Switch Setting in control pack
DIP Switch Setting in control pack
ON
ON
1 2 3 4 5 6 7 8
Wall plates set to this setting
will control channels 1-4
1 2 3 4 5 6 7 8
1 2 3 4 5 6 7 8
Wall plate set to this setting
will control channels 9-12
1 2 3 4 5 6 7 8
Wall plate set to this setting
will control channels 13-16
1 2 3 4 5 6 7 8
ON
1 2 3 4 5 6 7 8
ON
1 2 3 4 5 6 7 8
ON
1 2 3 4 5 6 7 8
ON
mercury®
DIP Switch Setting in control pack
ON
ON
Wall plates set to this setting
will control channels 5-8
Wall Plate Rear
mdp4x600+vfr
CAT5 Cable
www.hamilton-litestat.com
CAT5 Cable
DIP Switch Setting in control pack
Pack 4
Room 1 Channels 13 - 16
www.hamilton-litestat.com
Pack 1 Factory Default
Room 1 Channels 1 - 4
mercury®
mercury®
mercury®
Wall Plate Rear
Wall Plate Rear
Wall Plate Rear
Whilst the power is off, allocate dimmers to zones/channel.
multi-room audio • lighting controls • energy management
Simple multiple circuit pack connection
®
Issued Date: March 2014
i-LX User Guide REV_A4 E&OE
6
Control Options
WALL MOUNTED PLATE
Mechanical Button
MERCURY® IR REMOTE
Glass Capacitive Touch
Touch Screen
MERCURY® APP
IR Remote Control
MERCURY APP
The Mercury MDR-EBRIDGE is required to enable the Mercury App. Please see page 26 & refer
to the MDR-EBRIDGE instructions.
Additional devices which can be used to expand your Mercury Lighting System. (Devices sold separately)
Mercury Air
PIR Motion Detector
(Remote Motion Sensor)
MWM-RMS
Mercury Air
DIN Rail Mounted
Wirless Receiver
MDR-1CHRR
Mercury Air
4 Channel Wireless Transmitter
Switch Plate
MWM-4CHRT-WH-W
multi-room audio • lighting controls • energy management
The Hamilton Mercury® App is available for download on iTunes, for information or how to set up please see our
website www.hamilton-litestat.com.
®
Issued Date: June 2014
i-LX User Guide REV_A4 E&OE
7
TECHNICAL INFORMATION
Ratings:
Environment:
Loads:
220V - 240V AC50/60Hz
-10°C to 45°C
90% humidity non-condensing Resisitive
LV with selected electronic
transformers
Selected LEDs*
Wiring:
CAT 5/6 UTP cable
(unscreened 4x twisted pairs)
CAT 5/6 STP cable
(screened 4x twisted pairs)
SELV supply (<15Vdc)
To control outstations or plates
Installation
DIMENSIONS
All dimensions are shown in millimetres (mm).
Dimensions:
Weight:
450 x 205 x 69 mm
4.5kg
multi-room audio • lighting controls • energy management
TOOLS
To install your system you will need:
•
•
•
6mm masonry drill bit and drill
Large Phillips head screw driver
Small flat head screw driver
®
Issued Date: June 2014
i-LX User Guide REV_A4 E&OE
8
Mounting and Installing the Mercury® Dimming System
The System is designed to hang vertically and is supplied with a fixing kit and template showing the required position
for the screws. (124mm apart and 54mm below where the top of the system will sit.)
1) Using the fixing kit provided and installation template
mark the 3 required screw holes positions ensuring the
system is square. Leave a gap of at least 30mm at the
top and enough room around the system for adequate
ventilation.
2. Drill the 3 holes with 6mm masonry drill bit.
3. Insert 6mm brown raw plugs.
5. Remove system from box and packaging
6. Align keyhole slots on the reverse of system with
fixing screws.
multi-room audio • lighting controls • energy management
4. Screw top 2x M8 40mm dome head screws supplied
in fixing kit into raw plugs with Philips screwdriver
leaving between 5mm and no more than 10mm of the
screw protruding the wall surface as not to damage
internal components.
®
Issued Date: June 2014
i-LX User Guide REV_A4 E&OE
9
7. Lower system onto screws until it slots into position.
Ensure the system is firmly in place.
10. Insert final screw in position 3 through the extrusion
to hold the bottom of system tight to the wall.
multi-room audio • lighting controls • energy management
®
Issued Date: March 2014
i-LX User Guide REV_A4 E&OE
10
Installation of Wall Plates
Once your cables have the correct connector attached. Pull the
wire through the plastic mounting bracket.
Mount the plastic bracket into a single 35mm wall box that
conforms to BS4664.
Remove Vetro frame from packaging.
Ensure notch is aligned with the bottom of the glass plate.
Carefully use a small flat head screwdriver to attach the glass
plate (marked with an arrow)
Remove control plate from packaging.
Connect control plate and push into the fixing bracket and
frame for a secure fit.
multi-room audio • lighting controls • energy management
Push Vetro frame onto the mounting bracket that has been
fixed in the back box.
®
Issued Date: June 2014
i-LX User Guide REV_A4 E&OE
11
OVERVIEW - Capacitive Touch Controller
The Mercury® 4S+4C is a wall mounted control plate used to control the lighting levels in a room fed from
a MDP4X600+VFR dimming system. The lighing 4S+4C provides scene selection and circuit control, backlit
capacitance buttons and an IR receiver. Controllers will fit into any single wall box (BS4662) with a minimum
depth of 35mm.
SPECIFICATION
Dimensions: Weight: Termination: Max cable length:
86x86x32 (HxWxD)
340g
4 way rise and clamp terminal
Radial up to 1KM. End of line 120� termination resistor required.
Circuit control
buttons 5-8
Scene selection
buttons 1-4
Press once to
select desired
pre-programmed
scene. LED will
light to show
current scene.
1
5
2
6
3
7
4
8
Raise and lower
the lighting levels
to the required
setting.
9 IR Emitter
STORE SCENES AT A TOUCH:
Adjust the lighting levels by touching the
a prolonged press will raise/lower the light level.
2.
Once you’ve selected the desired light level for all four circuits. Touch and hold scene one. The LED will flash
five times. Keep your finger on the
then goes out.
(bulb symbol) on the plate. A brief press will turn the lights on/off,
(scene symbol) until the LED stops fashing and goes solid briefy
3. Your new scene is now stored. Repeat above to store further scenes 2,3 and 4. No commissioning work is required.
CAT5/6 Cable from MDP4x600+VFR
CAT5/6 - 4 twisted pairs
V+ CH CL VFor connection of additional controls
use CAT5/6 cable wired in parallel
Note: if other dimmer packs are included
within the same system, link all with CAT
5/6 cable.
Master Wall Plate
Slave Wall Plate
multi-room audio • lighting controls • energy management
1.
®
Issued Date: June 2014
i-LX User Guide REV_A4 E&OE
12
OVERVIEW - Mechanical Button Controller
The Mercury® 4S+4C is a wall mounted control plate used to control the lighting in a room that is fed from a
MDP4X600+VFR lighting control system. The control plate is white LED back lit with IR receiver and comes pre-set
as a 4 button scene recall. Controllers will fit into any single wall box (BS4662) with a minimum depth of 35mm.
Specification
Dimensions: Weight: Termination: Max cable length:
86x86x32 (HxWxD)
340g
4 way rise and clamp terminal
Radial up to 1KM. End of line 120� termination resistor required.
Scene selection
buttons 1-4
Press once to
select desired
pre-programmed
scene. LED will
light to show
current scene.
Circuit control
buttons 5-8
1
5
2
6
3
7
4
8
Raise and lower
the lighting levels
to the required
setting.
9
IR Emitter
Store scenes at the touch of a button:
Adjust the lighting levels using the circuit buttons
raise/lower the light level.
. A brief press will turn the lights on/off, a prolonged press will
2.
Once you’ve selected the desired light level for all four circuits press and hold down scene button one
. The LED will
flash five times. Keep your finger on the scene button until the LED stops flashing and goes solid briefly then goes out.
3.
Your new scene is now stored. Repeat above to store further scenes on buttons 2,3 and 4. No commissioning work is required.
Please note that each recall
button will toggle all the lights within the zone to OFF, so the bottom scene
button does not have to be stored to OFF.
CAT5/6 Cable from MDP4x600+VFR
CAT5/6 - 4 twisted pairs
V+ CH CL VFor connection of additional controls
use CAT5/6 cable wired in parallel
Note: if other dimmer packs are included
within the same system, link all with CAT
5/6 cable.
Master Wall Plate
Slave Wall Plate
INSTALLATION
The 4S+4C installs into a standard UK single gang 35mm metal or dry lining wall box. For best installation have the
CAT5e cable enter from above the back box. Terminate the CAT5e cable.
multi-room audio • lighting controls • energy management
1.
For installation steps please refer to the capacitive touch installation minus steps 4 - 6.
®
Issued Date: June 2014
i-LX User Guide REV_A4 E&OE
13
IR Remote Control
Credit card sized convenient IR remote control. For use with both audio and lighting systems giving individual
channel lighting control and scene recall options, volume raise and lower, skip and repeat.
Range:
Case Material:
Keypad Material:
Infrared Frequency:
Humidity Range:
Operating Temp.:
20-30ft (6-9m) Standard
ABS Plastic
Membrane
38KHz others available
10% to 90% non-condensing
+5°C to +40°C
Storage Temp.:
Dimensions:
Power Supply:
Power Consumption:
Circiut control buttons
To raise/lower circuit 1. Press
button 1 then use the up
to increase the light level and the
down to lower the light level of
that circuit. Keep doing this until
you achieve the level of light you
require.
-40°C to +70°C
94 x 60 x 8 mm
1xCR2025 Lithium Coin
Battery
Approx. 50mA at IR transmit
Scene recall control buttons
For scene briefly press button
1 for scene 1
2 for scene 2
3 for scene 3
4 for scene 4
If you press the + button first
followed by scene button 1 will
recall scene 5
+ then 2 = scene 6
+ then 3 = scene 7
+ then 4 = scene 8
Repeat this for circuits 2,3 and 4
All circuits to off
To control circuits 5, 6 or 8
First briefly press the + button
followed by the No.: 1 button, this
will now control circuit 5.
Circuit 6 = + followed by the No.
2 button
Circuit 7 = + followed by the No.
3 button
Circuit 8 = + followed by the No.
4 button
multi-room audio • lighting controls • energy management
Controls for Mercury®
audio system
®
Issued Date: June 2014
i-LX User Guide REV_A4 E&OE
14
Mercury Lighting Control MDP4X600+VFR
Specifications
WARNING - Isolate mains before installing.
Power: 220-240v AC 50/60Hz
Power Terminal Capacity:
2.5mm2 solid conductor
1.5mm2 stranded 16A output protection
3A MCBs
Control Wiring:
4 core 12v DC
(CAT 5 screened recommended)
Max 1000m
Additional power supply can be fitted
to increase length.
Dimensions:
H 457mm x W 205mm x D 78mm
Ambient Temperature: 0 to 35Cº
Humidity: Non permissable
Volt Free Input
DC Output
IP30 - Indoor only
multi-room audio • lighting controls • energy management
®
Issued Date: March 2014
i-LX User Guide REV_A4 E&OE
15
Mercury Lighting Control MDR1X5000
Specifications
WARNING - Isolate mains before installing.
Power: 220-240v AC 50/60Hz
MDR6XPOWER required. Mains input
must come via 20amp RCBO if located in a
domestic application.
Maximum Loads: 5000W/4000VA or
1250W of LED
Power Terminal Capacity:
2.5mm2 solid conductor
1.5mm2 stranded
DIN rail mounted product
Control Wiring:
4 core 12v DC
(CAT 5 screened recommended)
Max 1000m
Additional power supply can be fitted
to increase length.
Dimensions:
H 75mm x W 93mm x D 127mm
Ambient Temperature: 0 to 35Cº
Humidity: Non permissable
IP30: Indoor only
Mercury Lighting Control MDR1X1000
Live OUT to Load
WARNING - Isolate mains before installing.
Power: 220-240v AC 50/60Hz
MDR6XPOWER required. Mains input
must come via 20amp RCBO if located in a
domestic application.
Maximum Loads: 1000W/700VA or 250W
of LED
Power Terminal Capacity:
2.5mm2 solid conductor
1.5mm2 stranded
DIN rail mounted product
Control Wiring:
4 core 12v DC
(CAT 5 screened recommended)
Max 1000m
Additional power supply can be fitted
to increase length.
Dimensions:
H 59mm x W 70mm x D 90mm
multi-room audio • lighting controls • energy management
Specifications
Ambient Temperature: 0 to 35Cº
Humidity: Non permissable
IP30: Indoor only
®
Issued Date: March 2014
i-LX User Guide REV_A4 E&OE
16
Mercury Lighting Control MDR4X10A+VFR
Specifications
WARNING - Isolate mains before installing.
Power: 220-240v AC 50/60Hz
Mains input must come via RCBO if located
in a domestic application.
Power Terminal Capacity:
2.5mm2 solid conductor
1.5mm2 stranded 16A output protection
10A MCBs (1 x 3A for VFR)
Control Wiring:
4 core 12v DC
(CAT 5 screened recommended)
Max 1000m
Additional power supply can be fitted
to increase length.
Dimensions:
H 457mm x W 205mm x D 78mm
Volt Free Input
DC Output
Ambient Temperature: 0 to 35Cº
Humidity: Non permissable
IP30 - Indoor only
multi-room audio • lighting controls • energy management
Live SW OUT
Live SW OUT Circuit 3
Live SW OUT Circuit 2
Live SW OUT Circuit 1
®
Issued Date: March 2014
i-LX User Guide REV_A4 E&OE
17
Mercury Lighting Control MDR6XPOWER
Specifications
WARNING - Isolate mains before installing.
Power: 220-240v AC 50/60Hz
MDR6XPOWER required. Mains input
must come via 3 amp RCBO if located in a
domestic application.
Powers: 6 devices
Power Terminal Capacity:
2.5mm2 solid conductor
1.5mm2 stranded
DIN rail mounted product
Control Wiring:
4 core 12v DC
(CAT 5 screened recommended)
Max 1000m
Additional power supply can be fitted
to increase length.
Dimensions:
H 75mm x W 93mm x D 127mm
DIP Switch Settings for MDR6XPOWER
Ambient Temperature: 0 to 35Cº
Humidity: Non permissable
IP30: Indoor only
Power OFF before changing
1 = Boot mode
2 = Reset device
Zone Address - Binary Coded
1
2
3
4
Off
Off
Off
Off
None
Off
Off
Off
On
+2
Off
Off
On
Off
+4
Off
Off
On
On
+6
On
On
On
On
+32 Max
5
6
7
8
Off
Off
Off
Off
Off
Off
Off
On
Zone 1
On
On
Off
Off
Zone 12
Network
Set
multi-room audio • lighting controls • energy management
Channel Offset
®
Issued Date: March 2014
i-LX User Guide REV_A4 E&OE
18
Mercury Lighting Control MDR4X10V
Specifications
WARNING - Isolate mains before installing.
Power: 1-10V 4 channel
Analogue dimmer
Switching required from suitable relay
- S ee MDR4X10A
Power Terminal Capacity:
2.5mm2 solid conductor
1.5mm2 stranded
DIN rail mounted product
Control Wiring:
4 core 12v DC
(CAT 5 screened recommended)
Max 1000m
Additional power supply can be fitted
to increase length.
Dimensions:
H 59mm x W 53mm x D 90mm
Ambient Temperature: 0 to 35Cº
Humidity: Non permissable
IP30: Indoor only
DIP Switch Settings for MDR6XPOWER
Power OFF before changing
1 = Boot mode
Zone Address - Binary Coded
2
3
4
Off
Off
Off
None
5
6
7
8
Off
Off
Off
Off
Network
Set
Off
Off
On
+4
Off
On
Off
+8
Off
Off
Off
On
Zone 1
Off
On
On
+12
On
On
Off
Off
Zone 12
On
Off
On
+20 Max
multi-room audio • lighting controls • energy management
Channel Offset
®
Issued Date: March 2014
i-LX User Guide REV_A4 E&OE
19
Mercury Lighting Control MDR-4XI/OINT
Specifications
WARNING - Isolate mains before installing.
Control Wiring:
4 core 12v DC
(CAT 5 screened recommended)
Max 1000m
Dimensions:
H 15mm x W 30mm x D 42mm
Ambient Temperature: 0 to 35Cº
Humidity: Non permissable
IP30: Indoor only
Specifications
WARNING - Isolate mains before installing.
Power: 220-240v AC 50/60Hz
Mains input must come via 2amp RCBO if
located in a domestic application.
Power Terminal Capacity:
2.5mm2 solid conductor
1.5mm2 stranded
DIN rail mounted product
Control Wiring:
4 core 12v DC
(CAT 5 screened recommended)
Max 1000m
Additional power supply can be fitted
to increase length.
Dimensions:
H 59mm x W 53mm x D 90mm
MDRNETBOOST
Each MDP4X600+VFR or other dimmer device can power up to 5 control plates
over 1000m. A MDRNETBOOST allows an extra 5 control plates to be added.
If circuit exceeds 1000m a signal boost may be required.
See MDRDATABOOST.
multi-room audio • lighting controls • energy management
Mercury Lighting Control MDR-NET-BOOST
Ambient Temperature: 0 to 35Cº
Humidity: Non permissable
IP30: Indoor only
®
Issued Date: March 2014
i-LX User Guide REV_A4 E&OE
20
Mercury Lighting Control MDR6XDMX
Specifications
WARNING - Isolate mains before installing.
Power: Requires MDR6XPOWER
Power Terminal Capacity:
2.5mm2 solid conductor
1.5mm2 stranded
DIN rail mounted product
Control Wiring:
4 core 12v DC
(CAT 5 screened recommended)
Max 1000m
Additional power supply can be fitted
to increase length.
Dimensions:
H 59mm x W 53mm x D 90mm
Ambient Temperature: 0 to 35Cº
Humidity: Non permissable
IP30: Indoor only
DIP Switch Settings for MDR6XPOWER
Power OFF before changing
1 = Boot mode
Channel Offset
Zone Address - Binary Coded
3
4
5
6
7
8
Off
Off
Off
None
Off
Off
Off
Off
Network
Set
Off
Off
On
+4
Off
On
Off
+8
Off
Off
Off
On
Zone 1
Off
On
On
+12
On
On
Off
Off
Zone 12
On
Off
On
+20 Max
multi-room audio • lighting controls • energy management
2
®
Issued Date: March 2014
i-LX User Guide REV_A4 E&OE
21
Mercury Lighting Control MDR4X2ASW
Specifications
WARNING - Isolate mains before installing.
Power: MAX 2Amp 230V AC
Power Terminal Capacity:
2.5mm2 solid conductor
1.5mm2 stranded
DIN rail mounted product
Control Wiring:
4 core 12v DC
(CAT 5 screened recommended)
Max 1000m
Additional power supply can be fitted
to increase length.
Dimensions:
H 59mm x W 53mm x D 90mm
Ambient Temperature: 0 to 35Cº
Humidity: Non permissable
IP30: Indoor only
DIP Switch Settings for MDR6XPOWER
Power OFF before changing
1 = Boot mode
Zone Address - Binary Coded
2
3
4
Off
Off
Off
None
Off
Off
On
+4
Off
On
Off
+8
Off
On
On
+12
On
Off
On
+20 Max
5
6
7
8
Off
Off
Off
Off
Off
Off
Off
On
Zone 1
On
On
Off
Off
Zone 12
Network
Set
multi-room audio • lighting controls • energy management
Channel Offset
®
Issued Date: March 2014
i-LX User Guide REV_A4 E&OE
22
Mercury Lighting Control MDR2X2ABLINDSW
Specifications
WARNING - Isolate mains before installing.
Power: MAX 2Amp 230V AC
(2Amp 24V DC)
Power Terminal Capacity:
2.5mm2 solid conductor
1.5mm2 stranded
DIN rail mounted product
O/P 1&2 to blind 1
O/P 3&4 to blind 2
(3 core mains and earth to each blind)
Control Wiring:
4 core 12v DC
(CAT 5 screened recommended)
Max 1000m
Additional power supply can be fitted
to increase length.
Dimensions:
H 59mm x W 53mm x D 90mm
Ambient Temperature: 0 to 35Cº
Humidity: Non permissable
IP30: Indoor only
DIP Switch Settings for MDR6XPOWER
Power OFF before changing
1 = Boot mode
Zone Address - Binary Coded
2
3
4
Off
Off
Off
None
Off
Off
On
+4
Off
On
Off
+8
Off
On
On
+12
On
Off
On
+20 Max
5
6
7
8
Off
Off
Off
Off
Off
Off
Off
On
Zone 1
On
On
Off
Off
Zone 12
Network
Set
multi-room audio • lighting controls • energy management
Channel Offset
®
Issued Date: March 2014
i-LX User Guide REV_A4 E&OE
23
Fault finding guide V1
Most site visits are avoidable as problems are normally due to cable breaks and wrong connections. These
questions and comments will help find faults/problems and provide a solution.
If the conclusion results in a faulty item the returns procedure should be followed. Please contact sales for a returns
authorisation reference number.
LOAD WILL NOT SWITCH OFF/ ON OR DIM.
•
Is power switched on? If Yes, Turn all power OFF to system and Reboot. The system requires shutdown for 10
seconds to re-set.
•
The control network could have a break in one of the cables or connected incorrectly. Continuity should be
checked on 12v CANH CANL (data) and 0v. The contractor can remove a control plate and use a short
piece of cable to connect directly to Mercury dimmer pack to determine if cable has a break.
•
Check that load is connected. (Lamps may have failed) the contractor can move lamps around whilst observing
the minimum and maximum loads on Mercury dimmer. Ensure circuit is isolated whilst changing lamps.
•
Check if MCB or RCBO has tripped. Reset if necessary.
•
The fault (not switching off/on) can happen if DIP switch settings are changed whilst Mercury system is LIVE.
Turn power OFF to all the dimmer packs on the network and check settings before powering up.
•
Check output from Mercury dimmer is on correct channel.
LAMP OUTPUT CHANGES WHEN CONTROL BUTTONS ARE NOT PRESSED
•
The load could be incorporated into a lighting “scene”. Re-programme scene to remove channel.
•
The control plate could be installed upside down. If you have an 8 button Mercury control plate the buttons on
the left hand side should be programmed “scenes”.
PROGRAMME A MOOD OR SCENE
Press the top left button to recall a “scene”. Press again and it should toggle all the lights within zone or room to
OFF. The buttons on the right hand side of the control plate should be programmed as ON/OFF with a quick press
for each circuit and hold button to dim lighting.
MERCURY DIMMER PACK BUZZES
•
It is quite normal for a dimmer pack to buzz. No audible noise will be heard from the control plates. Locate
the Mercury dimmer pack remotely where it will be less of a disruption.
•
If controlling low voltage transformers or LED lamps please contact the sales office to check compatibility.
Note - not all lamps that are branded as dimmable are suitable with lighting control. We can test any lamps for
compatibility. Please contact sales for a request form.
multi-room audio • lighting controls • energy management
To programme a scene, use the buttons on the right hand side to create a “mood” or scene. Press and hold a
“scene” button on the left hand side for 5 seconds to store. Whilst this is happening the LEDS on the keypad should
all be flashing. When LEDs stop flashing the “mood or scene” will be stored. Repeat process until all “moods or
scenes” are stored. Note - Each “mood or Scene” button toggles to ALL OFF.
®
Issued Date: June 2014
i-LX User Guide REV_A4 E&OE
24
Fault finding guide V1 continued
LEDS OR LAMPS 'FLICKER'
•
Observe minimum and maximum rating of Mercury dimmer pack. De-rating by 75% is recommend when
dimming LED lamps. Note – Some LEDs require a synthetic load to stabilize the dimmers waveform. A
simple check can be done by adding a mains rated GU10 – 50watt lamp to the circuit (whilst power is
removed.) This can prevent flickering in most cases. Load resistors can be used and can be purchased from RS.
Note – These get hot and require a metal enclosure for safety purposes.
•
Some LED’s become unstable when dimmed to a low level. Please ensure when setting lamp levels that all the
lamps “re-strike” when lighting are turned off and back on again.
•
The low voltage transformer may not be compatible, under loaded, overloaded or could even be getting
too hot. Ensure lamps are not too close to transformer. As a guide line 20 Watt low voltage lamps are not
suitable for dimming with most transformers. We recommend 35va or 50 va lamps are used with parameters
of transformers.
•
When d imming CFL lamps it is recommended by the lamp manufacturers that the lamps are left on at 100%
for 100 hours before dimming. This does not need to be done as 100 hours without turning lights off. (10 to 15
hours per day until time is up is ok). The lamps may state that they can be dimmed to 5% or 10%.
Usually with lighting control a stable level is around 35% to 50%. The dimmer may need to be returned for
re-programming to set the minimum level.
KEYPAD LED’S FLASHING
•
This could be a simple loose connection on the CANH CANL terminals or cables may be in wrong terminals.
•
The Keypad could be in programming mode. Push another button on plate to reset to normal function.
•
Check that the keypads buttons are not stuck or jammed.
KEYPADS LED’S NOT ILLUMINATED
•
This could be a wiring fault. Please check connections on 12v CANH CANL 0v throughout whole control
network. (Normally a break or wrong connection on 12v or 0v).
HAND HELD IR DEVICE NOT WORKING
The batteries could need changing.
•
Range is 8m to 10m (in line of sight) Please note IR requires a direct signal.
•
The IR receiver should be mounted a minimum of 2m away from any high frequency fluorescent ballasts.
multi-room audio • lighting controls • energy management
•
®
Issued Date: March 2014
i-LX User Guide REV_A4 E&OE
25
Mercury General Schematic
The Mercury lighting system is fully addressable and can be split over several rooms. You can link control plates to
create a network and 2 or 3 way dim from a wide range of control plate finishes.
Each button on a control plate is fully addressable and can be programmed to select a scene or control a lighting
circuit in a simple 'press and hold' fashion. We can also programme buttons as a 'Master OFF and 'Restore'.
Room 1
Room 2
Room 3
4 CORE DATA BUS NETWORK
Keypads linked with CAT5 screened cable (continue through the earth at one end only).
Mercury lighting control, audio and blinds can be controlled via iPhone or iPad. Add a MDR-E-bridge to your system.
Router not available from Hamilton Litestat.
multi-room audio • lighting controls • energy management
12V
CAN H
CAN L
0V
®
Issued Date: March 2014
i-LX User Guide REV_A4 E&OE
26
Notes
. . . . . . . . . . . . . . . . . . . . . . . . . . . . . . . . . . . . . . . . . . . . . . . . . . . . . . . . . . . . . . . . . . . . . . . . . . . . . . . . . . . . . . . . . . .
....................................................................................................
....................................................................................................
....................................................................................................
....................................................................................................
....................................................................................................
....................................................................................................
....................................................................................................
....................................................................................................
....................................................................................................
....................................................................................................
....................................................................................................
....................................................................................................
....................................................................................................
....................................................................................................
....................................................................................................
....................................................................................................
....................................................................................................
....................................................................................................
....................................................................................................
....................................................................................................
....................................................................................................
....................................................................................................
....................................................................................................
....................................................................................................
....................................................................................................
multi-room audio and lighting controls
....................................................................................................
....................................................................................................
....................................................................................................
....................................................................................................
....................................................................................................
....................................................................................................
®
Issue Date: June 2014
i - LX - User Guide REV _A4 E&OE
27
Disclaimer
1.
This equipment is intended for domestic and commercial use including hotels and retail shops.
2.
No decorative, abrasive or domestic cleaning products should come into contact with the equipment
(further information is available on request).
3.
It should not be used in areas of high humidity (bathrooms etc.) nor within reach of a water source.
4.
This equipment should be connected to a mains supply of the appropriate voltage (indicated on the product).
5.
Care should be taken not to overload the equipment maximum amperage is indicated on the product.
6.
No liability can be accepted if the product is installed or used in any other way than for which it was designed.
Limited Warranty
7.
The equipment is guaranteed against faulty workmanship or materials for a period of twelve months and
will be repaired or replaced free of charge on condition that it is returned to the Customer Services
Department and that:
(i)
(ii)
(iii)
(iv)
(v)
The equipment has not been overloaded or connected to a supply other than 230/240 volts 50Hz.
The installation procedure has been carried out correctly.
The equipment has not been taken apart or repaired by any un-authorised person. The
Bill of Sale (dated) accompanies the equipment for repair or replacement.
The product has not been exposed to decorative or cleaning materials or been stored or installed in
area’s of high humidity.
This guarantee does not affect the statutory rights of the consumer. In no circumstances can the Company accept
responsibility for any loss or damage said to arise from the use of this product.
The equipment is manufactured in accordance with the relevant British and European Standards where applicable.
multi-room audio • lighting controls • energy management
CUSTOMER SERVICES DEPT.
Quarry Industrial Estate, Mere,
Wiltshire BA12 6LA
Tel: 01747 860088
Email: [email protected]
All equipment is manufactured under an accredited
BS EN ISO 9001:2008 - Quality Management System.
All products listed conform to current British or European standards and the product information is correct at the time of going to press.
It is the policy of the company to continually improve products as part of our development programme. Therefore, we reserve the right
to alter designs and dimensions without prior notice.
All accessories are manufactured under an accredited BS EN ISO 9001: 2008 Quality Management System.
Illustrations and diagrams are reproduced within the limitations of reproductions and printing processes, and are not binding.
Due to manufacturing processes we cannot guarantee an exact colour match and shadings of certain plate and product finishes.
Correct as at June 2014 • File Reference: i-LX (User Guide) Rev A
Issued Date: June 2014
®
Mercury® is a trademark or registered trademark of Hamilton Litestat iPhone, iPod, iPod classic, iPod nano, iPod shuffle, and iPod
touch are trademarks of Apple Inc., registered in the U.S. and other countries. The Bluetooth®
word mark and logos are
registered trademarks owned by Bluetooth®
SIG, Inc.
i-LX User Guide REV_A4 E&OE
28