1
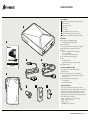
corsair.com/voyagerair
User Manual
MOBILE WIRELESS STORAGE WITH ETHERNET
VOYAGER AIR USER MANUAL | ENGLISH | 022712
SPECIFICATIONS
BOX CONTENTS
A Voyager Air drive (with built-in rechargeable battery)
B Quick Start Guide
C USB to DC power cable
D USB 3.0 cable
E Accessory bag
F Car power adapter (12V DC to 5V-2.0A DC)
G Wall power adapter (110V/220V to 5V-2.0A DC)
H Snap-in plugs for wall power adapter (region-specific)
A
HARDWARE
n Drive Capacity: 500GB/1TB (depending
on model purchased) before formatting
n Drive Format: NTFS
HFS+ supported for Mac users (requires user reformat)
n High-speed USB 3.0 (compatible with USB 2.0)
n Battery
− 6200 mAH rechargeable Lithium-Ion battery
(not user-replaceable)
− Up to 7 hours of continuous streaming.
n Up to 5 simultaneous HD video streams
n Wi-Fi
− 2.4 GHz 802.11 b/g/n
− Maximum wireless range: 90 feet (30 meters)
n RJ45 Gigabit Ethernet
B
C
D
MOBILE WIRELESS STORAGE WITH ETHERNET
STOCKAGE SANS FIL MOBILE AVEC ETHERNET
MOBILES DRAHTLOSES SPEICHERN ÜBER ETHERNET
QUICK START GUIDE
GUIDE DE DÉMARRAGE RAPIDE
SCHNELLSTARTANLEITUNG
SUPPORTED OPERATING SYSTEMS
The Voyager Air can be used with the following
operating systems:
n USB 3.0 or USB 2.0 port and one of the following:
− Windows 8, Windows 7, Windows Vista, Windows XP
− Mac OS 9 or OS X
n Wi-Fi (802.11 b/g/n) with Voyager Air app
− iOS 5.1 and above
− Android 2.2.3 and above
E
F
G
H
SUPPORTED FILE TYPES
The Voyager Air should support all the file types that are
supported by the applications already installed on your computer
or mobile device. Some third-party applications on mobile
devices will not accept streamed data, but require that files be
downloaded to the Local folder before opening or playing them.
These include (but are not limited to):
VIDEO: .mp4, .mov (iOS only), .m4v (iOS only)
AUDIO: .mp3, .m4a (iOS only)
IMAGE: .jpg, .png
DOCUMENTS: .doc, .xls, .ppt, .pdf
VOYAGER AIR USER MANUAL | ENGLISH | 01
HARDWARE OPERATION
Starting and Shutting Down
Using Voyager Air Wirelessly
D. Resetting the Wi-Fi Password
To turn on the Voyager Air, slide the power switch (located on
the left side of the front panel) to the right. A blue Power icon will
light up. Turn the Voyager Air off by sliding the switch to the left.
A. Starting and Shutting Down Wi-Fi
If you have enabled a Wi-Fi password but do not remember it,
you can follow these steps to reset the password:
Using Voyager Air With USB
NOTE: The Wi-Fi functionality will take one to two minutes to
become available after the switch is turned on.
The Voyager Air drive supports high-speed USB 3.0, and is
backward-compatible with USB 2 as well.
Connect the drive to your PC or Mac using the included USB
cable, then turn on the Voyager Air. The drive must be turned
on for the USB connection to work.
Before disconnecting the drive, be sure to eject it (using the
system tray utility on Windows or the eject command on a Mac)
to prevent potential data corruption. Then, turn it off and
disconnect the USB cable.
NOTE: When the Voyager Air is connected via USB, Ethernet
and Wi-Fi connectivity are disabled.
Using Voyager Air with Ethernet
The Voyager Air has a high-performance Gigabit Ethernet port.
Connect it using an Ethernet cable to a network router or switch
and it will be accessible from all of the devices on your home
network.
With the drive turned on, slide the Wi-Fi switch (located on
the right side of the front panel) to the left. A blue Wi-Fi icon
will light up. Turn Wi-Fi off by sliding the switch to the right.
1. Make sure the Voyager Air drive is turned on.
2. Turn the drive over and locate the small hole
on the bottom (near one of the feet).
3. Insert a paper clip into the hole, press and release.
This will reset the Wi-Fi password.
NOTE: This reset will not impact anything stored on the drive.
B. Making the Wireless Connection
Connect wirelessly to your Voyager Air from your tablet,
smartphone, or notebook computer by looking for “VoyagerAir”
in the list of wireless networks available to your device.
If you are connected wirelessly from a tablet or smartphone,
the easiest way to access and enjoy the contents of the drive
is to use the free Voyager Air app, available for iOS and Android
devices. You can also use a SAMBA-compatible utility app to
connect to the drive.
If you are connected wirelessly from a Windows computer,
open “Computer” from the desktop and click on the “Network”
icon. You should see the image of a computer with the name
“VoyagerAir.” Double-click on this image to display a folder
named “Voyager_Air”. To assign a drive letter, right-click on
this folder and choose “Map network drive‥.”.
E. Browser-Based Settings
In addition to using the Voyager Air app, you can view and
change the settings of the drive using a web browser from a
tablet, smartphone or computer that is connected wirelessly
to the drive.
The details of modifying Voyager Air settings are available in the
app software section of this Manual. While the appearance of the
settings screen is different when using browser-based settings,
the functionality is the same.
If you are connected wirelessly from a Mac computer, open
the Finder and looked for “VoyagerAir” in the left panel under
“Shared.” Click on it to display a folder named “Voyager_Air.”
Double-click on that folder to access the files and folders on
the drive.
Note: When you are connected wirelessly to the Voyager Air
it has the IP Address 192.168.77.1
C. Wi-Fi Password Protection
It is STRONGLY suggested that you enable password protection
for your Voyager Air. After launching the app, navigate to the
Settings screen, look for the “Password:” setting, press the
“Enable” button, then enter a password (and re-enter it ensure
it’s what you want). The password needs to be 8 to 63 characters
long, with no spaces or special characters.That password will then
be required to make a wireless connection to the drive.
VOYAGER AIR USER MANUAL | ENGLISH | 02
HARDWARE OPERATION
Voyager Air Battery
Updating the Firmware
A. Power Indications
To identify the version of firmware that Voyager Air is running, go
to the Settings screen in the Voyager Air app (when connected to
the drive) and look for the value after “Drive:”
The Voyager Air battery has been designed to provide up
to seven hours of use. Streaming to more than one user, or
streaming HD video, can reduce this estimated battery life.
On the other hand, accessing music, photos, and other
documents instead of videos can result in a longer battery life.
The drive has icons that indicate power and battery state:
Battery Icon
a. Red: <5% estimated battery power remaining
b. Amber: <75% estimated battery power remaining
c. Green: > 75% estimated battery power remaining
To update the firmware, download the new version from the
Corsair website. Move it to the “root” folder on the Voyager Air
(this is easiest using the USB connection). Restart the drive and
connect to it again using the Voyager Air app. On the Settings
screen you should see “Update Ready.” Connect the Voyager Air
to DC power (this is required to update the firmware) then press
the Install button. After the drive restarts, you will see the Wi-Fi
icon blinking for a short time. When the icon stops blinking, or
stays illuminated continuously if the Wi-Fi switch is on, you can
re-connect to the drive.
DC power icon
The drive is plugged in and recharging
(not running on battery power)
The Voyager Air software also has power indicators
(at the bottom of each screen):
Red
< 10% estimated battery power remaining
Yellow
< 50% estimated battery power remaining
Green
50% or more estimated battery power remaining
Bolt Icon
The drive is plugged in/recharging
(not running on battery power)
B. Recharging the Battery
Use the included wall adapter or car adapter to charge Voyager
Air at the fastest possible rate. Connecting via USB will also
charge the battery, but it will be slower.
Note: In order to prevent overcharging and maintain product
safety, the Voyager Air will automatically stop charging after six
hours. This should be more than enough time for the Voyager Air
to fully recharge.
Note: If the Voyager Air is continuously plugged in and turned
on, it will automatically restart the charging circuit if it detects
that the battery level drops below 75% of remaining power.
VOYAGER AIR USER MANUAL | ENGLISH | 03
USING THE VOYAGER AIR APP
Wirelessly Connecting a Mobile Device
Navigating with the Voyager Air App
C. App Differences for Tablets and Smartphones
To use the Voyager Air app to access the Voyager Air drive you
must first be connected to it. If you launch the app without being
connected to the drive you will see only the Local files (those
downloaded previously from the drive to the mobile device) and
a subset of Settings.
A. Navigation Basics
The Voyager Air app uses the available screen differently when
it is running on a Smartphone than when it is running on a Tablet.
When running on a tablet, the Voyager Air app has controls
that allow you to customize the display. These include switching
between List View and Thumbnail View, and changing the
alphabetic sort order of the displayed files and folders.
To make the wireless connection:
a. Turn on Wi-Fi: slide the Wi-Fi switch, located on the right
front of the Voyager Air, to the left. A blue Wi-Fi icon will
light up.
b. Open smartphone or tablet Wi-Fi connection.
i. iOS users:
Choose Settings › Wi-Fi
ii. Android users:
Choose Settings › Wireless & Network › Wi-Fi Settings
There are four main sections to the app.
a. Folders – files and folders on the Voyager Air drive
b. Local – files downloaded from the Voyager Air and
stored locally on the mobile device.
c. Recent – most recently accessed files
d. Settings – change settings for the drive or app
Select a folder to open it. The name of the folder will be displayed
at the top of the screen, and the “Back” button will display the
name of the previous folder (or, on some devices , the word
“Back”). Touching the “Back” button navigates back to the
previous folder.
D. List View and Thumbnail View
Switch between List View and Thumbnail View by tapping the
small square (with lines or dots) on the lower right-hand side
of screen.
c. After the wireless network list updates select “VoyagerAir”.
d. Enter the wireless password if you have enabled one.
B. Disconnected Mode
e. Go to Home on your smartphone or tablet and open the
Voyager Air app.
If the app is displaying just two sections - Folders and Settings and if the icon at the bottom of the screen looks like the image
below, you are not wirelessly connected to the drive. You can
access those files you previously downloaded to your device as
Local, but you cannot access the Voyager Air drive in this mode.
Check your tablet or smartphone Wi-Fi Settings to make sure
you are connected to the drive.
E. Changing the Sort Order
To Sort files by alphabetical order tap the arrow with an A on
the lower, right-hand side of your screen. You may Sort from
A-Z or Z-A.
VOYAGER AIR USER MANUAL | ENGLISH | 04
USING THE VOYAGER AIR APP
F. Edit Button
Edit
G. Create New Folder
Opening and Viewing Files with the Voyager Air App
The Create New Folder icon at the bottom of the screen will allow
you to create a new folder. The folder will be created at the
location displayed in the app.
A. Popup Menu Choices
Touching the Edit Button in the upper right of the app screen
enables the user to select one or more files and folders, and
displays three option buttons at the bottom of the screen:
Delete
Move
Resume
Play
Copy
Play With
H. Upload to Drive
Selecting one or more files and folders will update these three
buttons to show the number of items selected. Pressing a button
will initiate the button action.
Note: If the user has enabled Edit Lockout (in “Settings”)
the Edit button will not be visible.
Selecting a file pops up a menu with a set of choices:
The Upload to Drive icon at the bottom of the screen will allow
you move files from your mobile device to the Voyager Air.
Navigate to the desired destination first, then press the icon and
select the files to upload. The files will be uploaded to the current
location.
Download
Rename
Resume
For video files only, this will resume playback from the
location in the video where viewing was previously stopped.
Play/Open/View
Uses the default player/viewer on your mobile device to
open the file.
Note: iOS limits the files available for uploading to just photos
and videos taken with your mobile device camera. Android
devices do not have this limitation.
Play/Open/View With
With documents or some other special files this command
allows the user to use a different installed app to open the
selected file. The list of apps displayed depends on which
compatible installed apps your mobile device is aware of,
and is not controlled by the Voyager Air app.
Download
Downloads the selected file to the Local folder, into one of
four subfolders: Video, Music, Photos, or Documents.
Rename
Use the on-screen keyboard to type in the new file name for
the selected file.
VOYAGER AIR USER MANUAL | ENGLISH | 05
USING THE VOYAGER AIR APP
B. Video Player
C. Music Player
D. Photo Viewer
The default video player for your mobile device has on-screen
controls that include a progress bar across the top of the screen,
and controls for pausing, rewinding and fast-forwarding playback.
The music player starts playing the selected music file, using
metadata in the music file itself (if available) to determine the
artist name, album name, song title, and album cover artwork.
The photo viewer displays the selected photo.
Playback of video files purchased from iTunes automatically
opens a Safari browser window. This is necessary for playback of
protected files. Your mobile device (iPad or iPhone) must also be
synced with iTunes to enable you to play protected files.
It will continue to play all of the songs in the same folder as
the selected file, in order by file name, until reaching the end
of the list.
Flick forward or back, or use the buttons at the bottom of
the screen, to view other photos in the same folder as the
selected photo.
The player screen includes controls for volume level, to repeat
playback, and to shuffle playback of those songs within the folder.
Note: When displaying a photo in full resolution for the first
time it will often take a second or two for the photo to download
wirelessly to your device. You will see the initial rough image
sharpen as this happens.
The music player will continue to play in the background of your
mobile device, allowing you to navigate to another app while
listening to your music.
E. Opening Documents
Voyager Air uses the default viewers for the documents that
your mobile device knows how to open.
Note: Some file types may not open. Check your device’s
documentation for a list of files that are supported.
© 2008 Blender Foundation / www.bigbuckbunny.org
VOYAGER AIR USER MANUAL | ENGLISH | 06
VOYAGER AIR SETTINGS
Navigate to Settings
in the Voyager Air
App to make changes
to the drive or app.
Wireless Channel
Change the drive name
Driver Name: Voyager Air
Change
Wireless Channel: 11
Change
Push the Change button, then enter the new drive name using the
on-screen keyboard. It must be 4 to 15 characters with no spaces
or special characters.
Your Voyager Air is set by default to channel 11. If you are
receiving signal interference try changing the wireless channel
by pressing the Change button, then selecting another channel.
After changing the drive name the Voyager Air wireless server
must restart, so you will need to reconnect (via Wi-Fi Settings on
your tablet or Smartphone), using the new drive name, before
continuing to use the Voyager Air app. This can take one or two
minutes before it is complete, so please be patient.
After changing the wireless channel the Voyager Air wireless
server must restart, so you will need to reconnect (via Wi-Fi
Settings on your tablet or Smartphone) before continuing to
use the Voyager Air app. This can take one or two minutes
before it is complete, so please be patient.
Battery Power
Wi-Fi Passthru
Power: Battery 85%
Passthru: Disabled
The remaining battery life will be shown in a percentage format
(e.g. 85%).
Connected Users
Connected Users: 5
This function allows you to see how many people are accessing
your Voyager.
Set Password
Password: Disabled
Enable
Enable
Enabling Wi-Fi Passthru connects the Voyager Air to another
wireless network and turns the Voyager Air into a wireless hub,
sharing that internet access with the devices connected to it.
Push the Enable button to see a list of available wireless
networks. Select one and enter a password if required. The
Voyager Air wireless server will then restart, so you will need
to reconnect (via Wi-Fi Settings on your tablet or Smartphone)
before continuing to use the Voyager Air app. This can take
one or two minutes before it is complete, so please be patient.
For some public hotspots it may then be necessary to open
a web browser on your device (after reconnecting wirelessly
to the Voyager Air) to enable full internet access.
Note: If the wireless network you are connecting to requires a
password, you will also need to have a password enabled on the
Voyager Air in order to connect (and prevent creating a security
vulnerability on that network).
Press the Enable button, then enter your new password using the
on-screen keyboard. It must be 8 to 63 characters with no spaces
or special characters.
After enabling or changing a password the Voyager Air wireless
server must restart, so you will need to reconnect (via Wi-Fi
Settings on your tablet or Smartphone), using the new password,
before continuing to use the Voyager Air app. This can take one
or two minutes before it is complete, so please be patient.
VOYAGER AIR USER MANUAL | ENGLISH | 07
VOYAGER AIR SETTINGS
Application Version
Edit Lockout
Edit Lockout:
OFF
Application: Android Tablet 1.01.525
The Edit Lockout feature allows you to turn off the Edit functions
(Delete, Move or Copy) for files and folders on the drive. Example:
If multiple users are enjoying the Voyager Air and you want to
make sure there are no changes made by anyone but yourself.
The Application setting shows the currently-installed version of
the app software. Updates, when available, can be downloaded
from the iTunes App Store, Google Play, or the Amazon App
Store.
Drive Firmware
VoyagerAir Account (Android only)
Drive: 1.0.05 [Update Ready]
Install
The Drive setting shows the currently-installed version of firmware
on the Voyager Air drive.
When it restarts the Voyager Air looks for the presence of a new
firmware file in its highest-level (root) folder. If one is available, it
will display “Update Ready” and an Install button (as shown
above).
The Reset button may assist in troubleshooting, as it forces the
app to make a connection to the remote Voyager Air drive. The
Change button and dialog is reserved for system testing and
debugging and has no user-accessible features.
Voyager Air App Settings (iOS only)
This dialog is reserved for system testing and debugging and has
no user-accessible features.
Update the firmware by pressing the Install button. The Voyager
Air drive must be plugged in to power, and must have enough
free space to be able to successfully install the update.
After the drive restarts, you will see the Wi-Fi icon blinking. This
indicates that the firmware update is in progress. When the icon
stops blinking (or, if the Wi-Fi switch is on, stays illuminated
continuously) you can then reconnect to the drive, via Wi-Fi
Settings on your tablet or Smartphone, and continuing to use the
Voyager Air app. This process can take several minutes before it is
complete, so please be patient.
VOYAGER AIR USER MANUAL | ENGLISH | 08
TROUBLESHOOTING
Cannot connect wirelessly to the Voyager Air
A song, video or other file won’t play
Video playback is choppy or freezing
Make sure the Voyager Air is turned on, Wi-Fi is turned on (the
icon is blue), and that the Voyager Air is not connected to a
computer via USB. It can take one or two minutes for the drive
and Wi-Fi server to start when turned on.
Make sure that your device supports the selected file format.
You can copy any kind of file to the Voyager Air, but the device
to which you stream your media files will only play formats it
supports. Voyager Air does not transcode (convert) the files
you copy to the drive. See the specifications of your tablet or
smartphone for a complete list of supported file types.
The most likely cause of poor video playback performance
is interference with the wireless connection. Try changing the
Wi-Fi Channel (see Voyager Air Settings > Wireless Channel
in this Manual).
If you want to convert video files so they can be played on your
tablet or smartphone you will need to transcode the files before
copying them to Voyager Air. There are a number of third-party
utilities (many of them free) available to do so.
I’m using Wi-Fi Passthru and abruptly lost the wireless
connection to Voyager Air
Note: The Wi-Fi server does not work when the drive is
connected via USB.
Make sure to select VoyagerAir (or the name you assigned to the
drive) from your tablet or smartphone wireless network list. If it
does not appear, you may be beyond the wireless range. Normal
wireless range is 90 feet, but obstructions such as walls may
weaken the wireless signal.
I forgot my wireless password
If you have enabled a Wi-Fi password but do not remember it,
you can follow these steps to reset the password:
1. Make sure the Voyager Air drive is turned on.
2. Turn the drive over and locate the small hole on
the bottom (near one of the feet).
A video file purchased from iTunes® is on the Voyager Air but it
won’t play
Videos purchased from iTunes are protected with DRM (Digital
Rights Management) technology. You must sync your iPad,
iPhone, or iPod Touch with your iTunes account for protected
files to play from Voyager Air.
Wi-Fi Passthru requires that the Voyager Air drive use the
same wireless channel as the network it is connecting to. Some
wireless networks will change the active channel they are using
automatically if too much interference is detected, which means
that Voyager Air must also change to that channel. This may
unfortunately mean loss of the wireless connection, and could
require reconnecting to the Voyager Air using Wi-Fi Settings
on your tablet or smartphone.
Note: When you choose to play an iTunes purchased video in
the Voyager Air app it will open and play in the Safari browser.
This is a requirement of the DRM protection technology.
3. Insert a paperclip into the hole, press and release.
This will reset the Wi-Fi password.
NOTE: This reset will not impact anything stored on the drive.
VOYAGER AIR USER MANUAL | ENGLISH | 09
Corsair encourages customers to recycle used
electronic hardware and rechargeable batteries.
This device complies with Part 15 of the FCC Rules.
Operation is subject to the following two conditions:
(1) this device may not cause harmful interference, and
(2) this device must accept any interference received,
including interference that may cause undesired operation.
UNITED STATES
IMPORTANT NOTE: FCC Radiation Exposure Statement
This equipment complies with FCC radiation exposure limits
set forth for an uncontrolled environment. This equipment
should be installed and operated with minimum distance 20cm
between the radiator & your body. This transmitter must not be
co-located or operating in conjunction with any other antenna
or transmitter.
CANADA
IMPORTANT NOTE: (For mobile device use)
Radiation Exposure Statement: This equipment complies
with IC radiation exposure limits set forth for an uncontrolled
environment. This equipment should be installed and operated
with minimum distance 20cm between the radiator & your body.
© 2013 Corsair Components, Inc. All Rights Reserved.
All rights reserved. The Corsair logo is a registered trademark,
and Voyager Air is a trademark of Corsair in the United States
and/or other countries. All other names and products are
trademarks and property of their respective owners.
3
EMAIL: [email protected]
FORUM: forum.corsair.com
USA and CANADA: (800) 205-7657
FACEBOOK: facebook.com/corsairmemory
TWITTER: twitter.com/corsairmemory
INTERNATIONAL: (510) 657-8747
BLOG: blog.corsair.com
WEB PAGE: corsair.com/voyagerair
FAX: (510) 657-8748
CORSAIR COMPONENTS, INC. • 46221 LANDING PARKWAY • FREMONT • CALIFORNIA • 94538 • USA