1
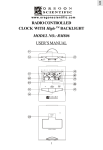
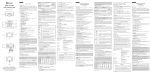
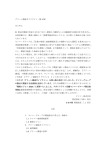
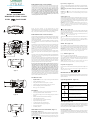
www.OregonScientificStore.com
MODEL : RM313PA
RADIO CONTROLLED
KIDS PROJECTION CLOCK OWNER
Up Arrow keys (Figure A.2)
Congratulations on your purchase one of the first auto-setting always-accurate
travel alarm clock ! You are one of the first people in America to own the world’s
smallest and most accurate alarm clocks. We want you to be very happy with this
product,but please remember this is a radio wave device and not an perfect
science. There are certain areas of the Eastern United States (see map) where
urban interference or signals from United Kingdom’s radio control tower
may distort or delay the time setting signal. Even thought these areas may
have more difficulty receiving a signal, the Kids Projection Clock contains
a very accurate quartz movement and will maintain a precise time even if
the radio signal is missed on rare occasions.
This key is used for manually setting the time, alarm time or calendar functions.
Please refer to the Manual Setting instructions in these instructions for further
information.
key also is used to reactivate the signal reception process
WARNING : The
should it become disable. Please see the Trouble Shooting section for further
information.
ZONE (Figure A.3)
KIDS PROJECTION CLOCK
WITH
button
for more
three seconds
willby
accelerate
theofsetting
to rapid
NOTE down
: Pressing
oncethe
advance
the setting
increments
1: holding
theadvance mode.
The Kids Projection Clock is designed to automatically adjust the time signal to
the user selected North American time zone - Pacific, Mountain, Central or Eastern. Pressing the ZONE button once advances the time zone setting (see US map
figure A.9). Once the desired time zone block is highlighted on the map, the time
will automatically adjust accordingly.
BACKLIGHT
WARNING : Do not press and hold the ZONE button for more than three seconds. Use the single press method to set the time zone. Holding the button will
turn off the automatic time signal reception. Please see the Trouble Shooting
section for further information.
P l e a s e a l s o d o n ’t h e s i t a t e t o c a l l 8 8 0 - 8 5 3 - 8 8 8 3 ( o r e m a i l
[email protected])if you have any question about setting up and/or using
your new Kids Projection Clock. In the meantime, all of us at Oregon Scientific
hope you enjoy this revolutionary advance in time keeping technology.
KIDS PROJECTION CLOCK CONCEPT
The split-second, precise timeliness of your new Kids Projection Clock is achieved
through its pre-tuned internal radio receiver that responds to a special 60 kHz
frequency time signal generated by the U.S. Atomic Clock, one of the most
accurate clocks in the world.
This extraordinary timepiece, located outside Boulder, Colorado, is operated by
the U.S. Department of Commerce’s National Institute of Standards and
Technology.
Your Kids Projection Clock automatically activates its receiver immediately upon
battery insertion and then six times every 24 hours and make any necessary
adjustments in its time display. It usually takes about 3-7 minutes for the clock
to receive the initial Radio Signal and adjust the time, date and day accordingly.
NOTE : You may not receive a signal immediately. Due to possible interference,
the best reception often occurs between midnight and 4 a.m.
The clock not only sets itself to synchronize its digital time and date with the
Atomic clock’s signals, but it also automatically adjusts for daylight-savings
time!
Your clock utilizes a small internal antenna that double as the bedside/desktop
stand. (Please see the section on “Signal Strength“ for optimal performance of
your Kids Projection Clock)
RESET
The successful reception of the long wave signal depends on the positioning and
location of the clock. Insufficient signal strength or external electrical noises
may prevent the unit from receiving a complete signal. The main reasons for
poor reception are heavily reinforced concrete and steel structures, and close
proximity to electrical units such as TV’s and PC monitors.
Do not become concerned if your Kids Projection Clock does not receive a
signal within the first few minutes. RF appliances or radios are most effective when placed near a window, and you may need to orient the clock or
the antenna to receive a stronger signal. Please be patient with the first
receptions of the time signal. Once the Kids Projection Clock has received a
time signal, updates are accomplished with greater ease. Please refer to the
Trouble Shooting section (at the end of this booklet) for more information.
Figure A
The technology underlying the radio-controlled Kids Projection Clock was previously dedicated only to commercial and industrial uses, including aircraft and
ship navigation, broadcasting stations, and research facilities. Oregon Scientific
was the first company to develop a consumer-level timepiece with alarm that can
truly be called the world’s most accurate clock.
ON / OFF (Figure A.4)
This button turns the alarm function on and off. Touching the ON/OFF button
one time will either turn the alarm on or off. Please refer to the Alarm Setting
instructions for further information.
NOTE : When setting the alarm time, the alarm is automatically turned on. If
the bell icon [
] is visible, the alarm is “ on ”.
Touching the ON/OFF button one time will either turn the Alarm function on or
off.
If you want to stop the daily alarm while leaving the pre-set time for the following days ’s wake-up, press the ALARM button. Pressing the ON/ OFF button to
stop the wake up alarm will deactivate the alarm function.
MODE / SET (Figure A.5)
Press the MODE key once to switch between the display of either the Day of the
Week or Seconds on the clock. Kids Projection Clock will continue to display
the selected function (Day or Seconds) until the MODE button id pressed again.
IMPORTANT : Holding the MODE key for more than three seconds turns on
the manual mode for setting the time, date, year and language (English/French/
Spanish). Please refer to this section for specific setting instructions.
(( • )) / 24hOFF (Figure A.6)
Press the (( • )) key once to show the alarm time.
The (( • )) /24hOFF icon is displayed in the lower left portion of the screen to
alert you that the display is showing the alarm time. To return to the month and
date display, press the (( • )) key once. To set the alarms please refer to the
section on setting The Alarm.
NOTE: THE Kids Projection Clock will continue to display the selected
function (Alarm Time or Date) until the (( • )) button is pressed again.
Projection on (Figure A.7)
Project on turns to enable or disable th continuous projection when adapter is in
used.
Note: this switch can only be used with the power adapter installed. For mo].
mentary projection, use the [
DESCRIPTION OF LCD DISPLAY
Please refer to Figure A for a detailed description of Kids Projection Clock LCD
display and refer to the appropriate section(s) of the these instructions for more
specific information.
TECHNICAL DATA
•
Integrated radio receiver for reception of time signal 10kW transmitter
WWVB: at 60kHz
•
Operating temperature: 35-120 ° F
•
Setting time with interference-free reception: 3-7 minutes
•
Automatic signal-reception activation: six times every 24 hours
•
HiGlo™ backlighting source: Electroluminescence
•
Battery type: 2 AA (not included)
A A U M 3 1. 5V
RESET
A A U M 3 1. 5V
Signal Strength Indicator (Figure A.8)
Indicators
On the Display
Your last signal reception was excellent and time
Synchronization with the US Atomic Clock has
Taken place.
Your last signal reception was insufficient and it
is recommended that you reposition the clock.
FEATURES
•
Figure B
Automatic setting of clock by radio signal from the US Atomic Clock
•
Time display with Hour, Minutes, Seconds and Date
•
Day of the week displayed in one of three languages (English, French or
Spanish)
•
Dramatic blue HiGlo™ electroluminescent backlight
•
Alarm with eight-minute snooze
•
Crescendo Alarm increases in volume and intensity
•
Signal Reception Strength indicator
•
U.S. Map icon shows user selected time zone
•
Automatic adjustment for Daylight Savings time
RESET
•
Projection of time image
•
Low Battery indicator
The displayed time has been manually set and is
not synchronized by the RF signal.
No indicator
Your radio reception is disabled and no signal
reception will be initiated unless it is enabled again.
Time Display (Figure A.9)
The top line of the display shows the hours, minutes and seconds (AM /PM) of
the clock. Pressing the MODE button once will switch the “Seconds’ display to
the Day of the Week. Kids Projection Clock will continue to display the selected
function (Day or Seconds) until the MODE button is pressed again.
DESCRIPTION OF FUNCTION KEYS (Figure A)
US MAP (Figure A.10)
Snooze/light (Figure A.1)
This map represents the four optional time-zone setting. The darkened of filled
zone block indicates the user selected time zone. NOTE: When The Kids Projection Clock is receiving a signal from the US Atomic Clock; outline of this map
will flash.
A light touch on the top of the snooze button activates the unique electroluminescent backlight for 5 seconds. This lite-touch feature also activates the eightminute snooze function.
Figure C
Meaning
Note: The display backlight and projection function work simultaneously. When
] is pressed both the backlight and projection func[
tion will activate.
TROUBLE SHOOTING
Month/ Date (Figure A.11)
Setting the Time
The Second line of the display shows the Mouth and the Date. Pressing the (( • ))
button once will switch the “ month and date ” to show the “alarm time ” The
Alarm time is displayed in hours and minutes (AM / PM). NOTE: The (( • ))
Clock will continue to display the selected function (Month /Date or Alarm Time)
Until the (( • )) button is pressed again.
1) Press and hold MODE button for at least three seconds. The “Hour”
segment of the clock time will begin flashing
2) While the “Hour” segment is flashing press the [ ] button to set the
desired hour time (Please note the AM/PM designation)
3) When the desired hour timeis reached press the MODE button again. The
“Minutes” segment of the clock time will begin flashing.
(( • )) Alarm Display indicator (Figure A.12)
This (( • )) icon indicates the second line of the display is showing Alarm Time.
4) While the “Minutes” segment is flashing press the [
desired minutes time.
Problem
No Display
] Alarm “ ON ” Indicator (Figure A.13)
This Bell [
[
] icon indicates that the alarm function is activated.
This [
] icon indicates that it is time to change batteries. Please refer to the
Battery Replacement Section of this manual.
To activate the projection feature:
Setting the Year
3) Briefly press the MODE button once more. The clock time will disappear
and be replaced by a flashing year (Ex. 1995). This is the year set mode.
Press the Snooze button
The projection light will illuminate for five seconds and then turn off automatically.
4) While the “Year” segment is flashing press the [
sired year.
Note: There is no option for continual display of the red projection beam with
battery only power. If the projection light ON switch is in the “on” position in
battery only mode, the projection beam is disabled.
5) When the desired year is reached briefly press the MODE button four more
times to exit the year set mode.
Projection Clock with A/C Adapter Power (Figure C)
To activate the projection feature
Confirm that batteries are of good quality,
and are installed correctly
•
If the units are new and just out of the box,
allow60- 72 hours cycle for the clock to automatically seek a signal between midnight
and 4 a.m.
•
May be caused by too much interference.
Relocate the clock or the antenna to position near a window.
•
Be certain the antenna cord is fully extended
and look for low battery indicator.
•
May be caused by interference.
•
If the problem persists, move the clock or
antenna to a new location. The ExactSet™
is equipped with a high quality clock
mechanism, which insures accuracy between signals.
•
Call Oregon Scientific at 800-853-8883
or through the internet at
[email protected]
Slide the projection light ON switch out to the “on” position
IMPORTANT : As soon as any manual change in the clock time is mode, there
is a loss of the signal strength indicator from the displayshowing the clock running manually.
NOTE : The next sucessful reception of a radio signal will override a manually
set clock time showing the clock running manually.
Setting the Month
Press and hold MODE button until the hour segment of the time display flashes.
Backlight
Press MODE button three more times until you see the month digit flash on the
display.
To activate the backlight which will illuminate the LCD panel:
Press
•
Press Mode button three more times to exit the set mode and resume normal
time keeping.
Press the Snooze button - the backlight will activate for 5 seconds, and turn
off automatically
button until the desired month appears on the display
BATTERY INSTALLATION (Figure B)
Setting the Date
To activate the unit simply slide the battery compartment door in the direction of
the arrow. Insert the batteries strictly according to the polarities shown therein.
Replace the battery compartment door.
Press and hold MODE button until the hour segment of the time display flashes
NOTE : Please do not become alarmed if the unit does mot receive signal
directly from the box. The unit will receive most dependable and interference
free signal automatically between Midnight and 4 a.m. If you have any
questions please give us a call at 800-853-8883 or reach us by email to
[email protected].
Press MODE button four more times until you see the date flash on the display.
Press Dbutton until the desired date appears on the display.
Press MODE button two more times to exit the set mode and resume normal
time keeping
IMPORTANT : As soon as any manual setting changes are made, the display
will indicate a loss of signal strength (see SIGNAL STRENGTH INDICATOR)
to indicate that the clock is now running on manual settings instead of signals
received from the Atomic Clock.
SETTING THE ALARM
1)
Press and hold the (( • )) / 24hOFF button for at least three seconds. The
“ Hour ” Segment of the alarm time will begin flashing.
Setting Language
2)
While the “ Hour ” segment is flashing press the [
] button to set the
desired hour time (please note the AM /PM designation).
Press and hold MODE button until the hour segment of the time display flashes.
3)
When the desired hour time is reached, press the (( • )) / 24hOFF button
again.
4)
The “ Minutes ” segment of the alarm time will begin flashing.
5)
While the “ Minutes ” segment is flashing press the [
desired minute time.
6)
When the desired minute time is reached press the (( • )) / 24hOFF button
again to exit the alarm time set mode.
] button to set the
NOTE : As soon as any change in the alarm time is made the alarm icon (( • ))
will automatically appear indicating that the alarm is activated.
IMPORTANT : The Kids ProjtctionClock will continue to display the
“ ALARM ” time until the (( • )) button is pressed once to return to the
“ Month/Date ” display.
TURNING THE ALARM ON or OFF
To turn the alarm on or off simply press the ON/ OFF key in any mode. When
]
the ON /OFF button is pressed once the alarm is activated (the bell icon [
will appear on the display). The alarm is deactivated when the ON/OFF button is
] disappears from the display.
pressed once and the bell icon [
When the crescendo alarm sounds, it may be turned off using one of the following methods.
1) If the SNOOZE /LIGHT key is pressed within two minutes the Snooze is
activated and the alarm will sound again in 8 minutes.
2) If the (( • )) / 24hOFF key is pressed, the alarm will not sound again until the
next day.
3) If the ON/ OFF key is pressed, the alarm is deactivated and will not sound
again until it is activated
IMFORTANT : If none of the above actions are taken, the alarm will automatically snooze once, sound again in 8 minutes, and will not sound again until the
next day.
MANUALLY SETTING: TIME,YEAR, MONTH
DATE & LANGUAGE
NOTE : It is highly unlikely you should ever have the desire (or need ) to manually set the clock time, year, month or date of The Kids Projection Clock.
However, in the event this becomes necessary please review the following.
Loss of
Signal
] button to set the de
Press the Snooze button
To activate continuous projection beam (available only with A/C power adapter).
•
Did not
receive A
time signal
2) Briefly press the MODE button and the “Minutes” segment will begin flashing.
Projection Clock with Battery Power Only
•
Check battery compartment.
•
1) Press and hold MODE button for at least three seconds. The “Hour”
segment of the clock time will begin flashing
USING THE PROJECTION CLOCK
•
IMPORTANT : As soon as any manual change in the clock time is mode, there
is a loss of the signal strength indicator from the display.
NOTE : The next sucessful reception of a radio signal will override a manually
set clock time showing the clock running manually.
] Low Battery Indicator (Figure A.14)
•
] button to set the
5) When the desired minutes time is reached, briefly press the MODE button
five more times to exit the clock time set mode.
[
Remedy
Press MODE button five more times until you see a single letter (E, F or S)
appear on the display next to the time.
button until the desired language indicator appears on the display (E
Press
for English, F for French and S for Spanish).
Press MODE button one more time to exit the set mode and resume normal time
keeping
WARRANTY : Oregon Scientific warrants this product to be free of
manufacturing defects for 90 day after purchase. This warranty does
not cover product subjected to abuse, misuse or accidental damage.
Removal or modification of The Kids Projection Clock antenna cable
voids this warranty
Defective product returns should be directed to the place of retail
Purchase. For customer support call 800-853-8883 or reach us
Through the
Internet at [email protected].
Other
Problems