Transcript
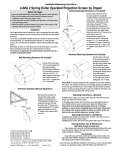
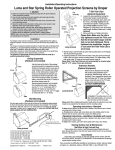
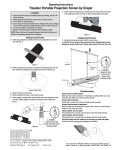
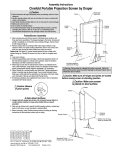
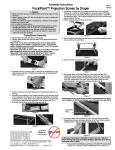
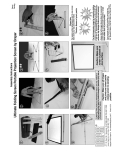
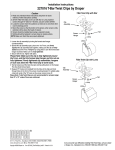
Installation/Operating Instructions
LUMA 2 Spring Roller Operated Projection Screen by Draper
Ceiling Suspended (Hardware not included)
Before You Begin
➀ Read and understand these instructions; keep them for future reference.
➁ Care in both mounting and correct operation will mean long and
satisfactory service from your Draper screen.
➂ Locate the screen where the audience can best see it, and where other
room furnishings permit.
➃ Mount the screen so that the bottom of the picture, when screen is fully
extended, will be above the heads of viewers.
Crimp
Crimp
Installation
Your Draper screen can be mounted on a wall or suspended from the ceiling
or extension brackets. It must be mounted level and with the flat back
parallel to the wall.
The screen (or extension brackets) should be mounted into studs or blocking
in the wall/ceiling, or in drywall (minimum thickness 1/2") with specified
anchors. For any other type of installation, follow all local building and safety
codes.
Steel studs, concrete or cinder block walls and all other types of non-wood
frame construction require the use of special screws or anchors.
The selection of appropriate mounting hardware should be made by a
qualified professional installer. Draper does not recommend hanging
Luma 2 screens using chains. Using chains may allow the roller to lock
in the fully extended position, and prevent the surface from retracting
into the case.
Wall Mounting (Hardware not included)
Use the holes at the back
of the mounting bracket for
flush wall mounting.
Recommended hardware:
For mounting into wood or
wall stud, use #10 x 11/4"
wood screws; for mounting
into drywall (minimum 1/2"
thick), use 3/16" toggle bolts
or 3/16" molly bolts.
Use the holes at the front of the
mounting bracket for suspended
mounting. Position and properly anchor
screw eyes or other fasteners (not
included) into ceiling joists or other
solid surface. Suspend “S” hooks (not
included) from fasteners and hook
through front mounting hole in the
endcap. For added safety, crimp both
ends of the “S” hooks so the screen
cannot come off.
Recommended hardware: For mounting
into wood or ceiling joist, use two 3/16"
x 11/4" screw eyes and 3/16" diameter
“S” hooks; for mounting into drywall
(minimum 1/2" thick), use 3/16" toggle or
molly bolts with 3/16" “S” hooks.
Please Note:
Draper does not recommend hanging Luma 2 screens using chains.
Using chains may allow the roller to lock in the fully extended position,
and prevent the surface from retracting into the case.
Recessed Mounting (Hardware not included)
Use the front mounting
hole in the endcap for
recessed mounting flush
with the ceiling. Attach angle
(not included) to screen
then position and properly
anchor screw fasteners (not
included) into ceiling joists or
other solid surface.
Recommended hardware:
For mounting into wood or
ceiling joist, use 3/16" bolts.
Extension Brackets (Optional Equipment)
Crimp
Crimp
Wall mount the brackets (not
included with screen) using
hardware recommended for
“Wall Mounting” (at right). Then,
suspend the screen from the
front mounting hole in the endcap
with “S” hooks (as in “Ceiling
Suspended”). For added safety,
crimp both ends of the “S” hooks
so the screen cannot come off.
Operating Instructions—Standard
To lower picture surface, pull screen down. Hesitate—then allow screen to
retract very slowly until it locks in place.
To raise picture surface, pull screen down and, while holding, allow for
slow retraction into the case to reduce risk of injury from falling screen.
Please Note: If the surface stops between the full up or full down
positions, it will not retract completely back into the case. Please lower
the surface to the full down position and then let it retract all the way
back into the case without stopping or slowing it down.
Operating Instructions—AutoReturn
To lower picture surface, pull screen down. Hesitate—then allow screen to
retract very slowly until it locks in place.
To raise picture surface, pull screen down gently until it stops, then release.
®
Copyright © 2012 Draper Inc.
Form Luma2_Inst12-R
Printed in U.S.A.
If you encounter any difficulties installing or servicing your screen, call your dealer
or Draper, Inc., Spiceland, Indiana, (765) 987-7999 or fax (765) 987-7142.