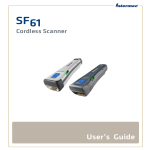
1
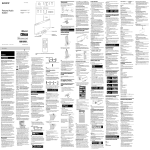
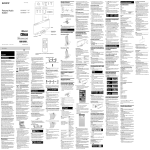
Disposal of Old Electrical & Electronic Equipment (Applicable in the European Union and other European countries with separate collection systems) 4-400-213-33(1) Personal Audio Docking System Reference Guide GB This symbol on the product or on its packaging indicates that this product shall not be treated as household waste. Instead it shall be handed over to the applicable collection point for the recycling of electrical and electronic equipment. By ensuring this product is disposed of correctly, you will help prevent potential negative consequences for the environment and human health, which could otherwise be caused by inappropriate waste handling of this product. The recycling of materials will help to conserve natural resources. For more detailed information about recycling of this product, please contact your local Civic Office, your household waste disposal service or the shop where you purchased the product. Applicable accessory: Remote control. Disposal of waste batteries (applicable in the European Union and other European countries with separate collection systems) This symbol on the battery or on the packaging indicates that the battery provided with this product shall not be treated as household waste. On certain batteries this symbol might be used in combination with a chemical symbol. The chemical symbols for mercury (Hg) or lead (Pb) are added if the battery contains more than 0.0005% mercury or 0.004% lead. By ensuring these batteries are disposed of correctly, you will help prevent potentially negative consequences for the environment and human health which could otherwise be caused by inappropriate waste handling of the battery. The recycling of the materials will help to conserve natural resources. In case of products that for safety, performance or data integrity reasons require a permanent connection with an incorporated battery, this battery should be replaced by qualified service staff only. To ensure that the battery will be treated properly, hand over the product at end-of-life to the applicable collection point for the recycling of electrical and electronic equipment. ©2012 Sony Corporation Printed in China RDP-XF300iP WARNING To reduce the risk of fire or electric shock, do not expose this apparatus to rain or moisture. To reduce the risk of fire, do not cover the ventilation of the apparatus with newspapers, tablecloths, curtains, etc. And do not place lighted candles on the apparatus. To reduce the risk of fire or electric shock, do not expose this apparatus to dripping or splashing, and do not place objects filled with liquids, such as vases, on the apparatus. Do not install the appliance in a confined space, such as a bookcase or built-in cabinet. Do not expose the batteries (battery pack or batteries installed) to excessive heat such as sunshine, fire or the like for a long time. As the main plug is used to disconnect the unit from the mains, connect the unit to an easily accessible AC outlet. Should you notice an abnormality in the unit, disconnect the main plug from the AC outlet immediately. The unit is not disconnected from the AC power source (mains) as long as it is connected to the wall outlet, even if the unit itself has been turned off. The nameplate and important information concerning safety are located on the bottom exterior of the main unit and on the surface of the AC adaptor. CAUTION NOTES ON LITHIUM BATTERY —with respect to private use, by the Legislative Decree of 1.8.2003, no. 259 (“Code of Electronic Communications”). In particular Article 104 indicates when the prior obtainment of a general authorization is required and Art. 105 indicates when free use is permitted; Bluetooth wireless technology operates within a range of about 10 meters. Maximum communication range may vary depending on obstacles (human body, metal, wall, etc.) or electromagnetic environment. The unit Steel cabinet Precautions Use of the RLAN network is governed: Notice for customers: the following information is only applicable to equipment sold in countries applying EU directives The manufacturer of this product is Sony Corporation, 17-1 Konan, Minato-ku, Tokyo, 108-0075 Japan. The Authorized Representative for EMC and product safety is Sony Deutschland GmbH, Hedelfinger Strasse 61, 70327 Stuttgart, Germany. For any service or guarantee matters, please refer to the addresses given in separate service or guarantee documents. Wipe the battery with a dry cloth to assure a good contact. Be sure to observe the correct polarity when installing the battery. Do not hold the battery with metallic tweezers, otherwise a short-circuit may occur. iPod DC out: 5 V MAX: 2.1 A Optimal performance Limited performance The following conditions may affect the sensitivity of Bluetooth communication. —There is an obstacle such as a person, metal, or wall between this unit and iPod. —A device using 2.4 GHz frequency, such as a wireless LAN device, cordless telephone, or microwave oven, is in use near the unit. —The unit is installed on a shelf made of steel. Because Bluetooth devices and wireless LAN (IEEE802.11b/g/n) use the same frequency, microwave interference may occur and resulting in communication speed deterioration, noise, or invalid connection if this unit is used near a wireless LAN device. In such a case, perform the following. —Use this unit at least 10 m away from any wireless LAN device. —If this unit is used within 10 m of a wireless LAN device, turn off the wireless LAN device. —Install this unit and iPod as near to each other as possible. Microwaves emitting from a Bluetooth device may affect the operation of electronic medical devices. Turn off this unit and iPod in the following locations, as it may cause an accident. —where inflammable gas is present, in a hospital, train, airplane, or a petrol station —near automatic doors or a fire alarm This unit supports security capabilities that comply with the Bluetooth standard to provide a secure connection when the Bluetooth wireless technology is used, but security may be insufficient, depending on the setting. Be careful when communicating using Bluetooth wireless technology. We do not take any responsibility for leakage of information during Bluetooth communication. Connection with all Bluetooth devices cannot be guaranteed. —A device featuring Bluetooth function is required to conform to the Bluetooth standard specified by Bluetooth SIG, Inc. and be authenticated. —Even if the connected device conforms to the above mentioned Bluetooth standard, some devices may not be connected or work correctly, depending on the features or specifications of the device. Depending on the device to be connected, it may require some time to start communication. Design and specifications are subject to change without notice. Troubleshooting The rechargeable battery is depleted. Connect the AC adaptor to charge the battery. Radio There is no sound. Adjust VOLUME +/− (VOL +/− on the remote). Frequency range Frequency 87.5 MHz - 108 MHz remote when the command of “MENU,” “,” “,” and “ENTER” is pressed. The power does not turn on when the AC adaptor is connected. Make sure the AC adaptor is connected to the wall outlet firmly. Frequency step 0.05 MHz Bluetooth Output Bluetooth Specification Power Class 2 Maximum communication range Line of sight approx. 10 m*1 Frequency band 2.4 GHz band (2.4000 GHz – 2.4835 GHz) Communication System Bluetooth Specification Version 2.1 + EDR (Enhanced Data Rate) Compatible Bluetooth Profiles*2 A2DP (Advanced Audio Distribution Profile) AVRCP*3 (Audio/Video Remote Control Profile) Supported codec*4 SBC (Subband Codec) *1The actual range will vary depending on factors such as obstacles between devices, magnetic fields around a microwave oven, static electricity, reception sensitivity, aerial performance, operating system, application software, etc. *2Bluetooth standard profiles provide the specifications for Bluetooth communication between devices. *3Some operations may not be available for some models of iPod. *4Codec: Audio signal compression and conversion format Input AUDIO IN jack (ø 3.5 mm stereo minijack) Impedance: 50 kΩ Average input level: 245 mV Use of this radio equipment is not allowed in the geographical area within a radius 20km from the centre of Ny-Alesund, Svalbard in Norway. Hereby, Sony Corp., declares that this equipment is in compliance with the essential requirements and other relevant provisions of Directive 1999/5/EC. For details, please access the following URL: http://www.compliance.sony.de/ Danger of explosion if battery is incorrectly replaced. Replace only with the same type. Specifications Band FM *The iPod nano (6th generation) cannot be controlled by the General For more detailed information about recycling of this product or battery, please contact your local Civic Office, your household waste disposal service or the shop where you purchased the product. The Bluetooth word mark and logos are owned by the Bluetooth SIG, Inc. and any use of such marks by Sony Corporation is under license. Other trademarks and trade names are those of their respective owners. To disconnect AC power, grasp the plug itself, not the cord. Since a strong magnet is used for the speaker, keep credit cards using magnetic coding or spring-wound watches, CRT-based TVs, or projectors, etc., away from the unit to prevent possible damage from the magnet. Do not leave the unit in a location near a heat source such as a radiator or airduct, or in a place subject to direct sunlight, excessive dust, mechanical vibration, or shock. Allow adequate air circulation to prevent internal heat build-up. Do not place the unit on a surface (a rug, a blanket, etc.) or near materials (a curtain) which might block the ventilation holes. Should any solid object or liquid fall into the unit, unplug the unit and have it checked by qualified personnel before operating it any further. During a thunderstorm, do not touch the antenna (aerial) and plug. Do not touch the unit with wet hands. Do not place the unit anywhere near water. General information General On Copyrights and Licenses iPhone, iPod, iPod classic, iPod nano, and iPod touch are trademarks of Apple Inc., registered in the U.S. and other countries. iPad is a trademark of Apple Inc. “Made for iPod,” “Made for iPhone,” and “Made for iPad” mean that an electronic accessory has been designed to connect specifically to iPod, iPhone, or iPad, respectively, and has been certified by the developer to meet Apple performance standards. Apple is not responsible for the operation of this device or its compliance with safety and regulatory standards. Please note that the use of this accessory with iPod, iPhone, or iPad may affect wireless performance. If you have any questions or problems concerning your unit, please consult your nearest Sony dealer. For all other batteries, please view the section on how to remove the battery from the product safely. Hand the battery over to the applicable collection point for the recycling of waste batteries. On Bluetooth communication —with respect to the supply to the public of the RLAN access to telecom networks and services, by the Ministerial Decree 28.5.2003, as amended, and Art. 25 (general authorization for electronic communications networks and services) of the Code of electronic communications. Note In the Reference Guide, “iPod” is used as a general reference to functions on an iPod, iPhone or iPad, unless otherwise specified by the text or illustrations. Speaker Woofer: Approx. 76 mm dia. × 2 Tweeter: Approx. 25 mm dia. × 2 Power output 20 W + 20 W (at 1% harmonic distortion) (with AC adaptor) 7 W + 7 W (at 1% harmonic distortion) (with rechargeable battery) Power source Rated external power source: DC IN 20 V (with supplied AC adaptor (AC 100 V - 240 V, 50 Hz/60 Hz) or rechargeable battery pack NH-300RDP) Battery life*: Approx. 7 hours (playback of iPod) Approx. 7 hours (FM reception) Approx. 6.5 hours (Bluetooth playback) Dimensions Approx. 356.0 mm × 168.1 mm × 121.7 mm (w/h/d) (incl. projecting parts and controls) Mass Approx. 2.6 kg Supplied accessories Remote control (with a lithium battery) (1) AC adaptor (1) AC power cord (1) Reference Guide (this document) (1) Cushion for small-size iPod (1) * Measured by Sony standards. The actual battery life may vary depending on the circumstance of the unit. Compatible iPod/iPhone/iPad models The compatible iPod/iPhone/iPad models are as follows. Update the software of the iPod/iPhone/iPad to the latest version before using it with this unit. Noise is heard. Ensure that the unit is not near in-use portable phones, etc. The power will not turn on when the AC adaptor is disconnected. The Power Off Hold function may be set. In this case, cancel the Power Off Hold function. (See “Power Off Hold function.”) The rechargeable battery may be depleted. In this case, connect the AC adaptor to charge the battery. (See “To use the AC adaptor.”) “ERROR” appears in the display and the unit turns off automatically. If this symptom occurs frequently, consult your nearest Sony dealer. When using an iPod on the Dock There is no sound. Make sure the iPod is connected firmly. Make sure that the function for iPod is activated. Operation is not performed. Make sure the iPod is connected firmly. Check that the iPod is compatible with this unit. (See “Dock Connector compatible models.”) The iPod does not charge. Make sure the iPod is connected firmly. Make sure the AC adaptor is connected firmly. Check that the iPod is compatible with this unit. (See “Dock Connector compatible models.”) Wireless music streaming compatible models iPod touch (4th generation) iPod touch (3rd generation) iPod touch (2nd generation) iPhone 4S iPhone 4 iPhone 3GS iPhone 3G iPad 2 iPad The remote does not function. The unit cannot be turned on with the remote when the AC adaptor is disconnected. In this case, press on the unit to turn it on. Replace the battery in the remote with a new one if it is weak. Make sure that you are pointing the remote at the remote sensor on the unit. Do not cover or place any objects directly in front of the (Remote sensor) receiver. Remove any obstacles in the path of the remote and the unit. Make sure the remote sensor is not exposed to strong light such as direct sunlight or fluorescent lamp light. If the problem persists, consult your nearest Sony dealer. When the battery becomes almost fully depleted, “LOW BATT” flashes and the unit will turn off. To charge the battery, connect the AC adaptor. (See “To use the AC adaptor.”) Notes The remaining battery power will not be indicated when the unit is turned off. The unit requires at least 30 minutes to charge the battery if “LOW BATT” appears. The battery indicator shows approximate remaining battery power. Operating conditions will affect the rate of battery depletion. When to replace the rechargeable battery Preparations Repeated recharging causes the duration of the battery power to decrease over time. Replace the battery pack when its duration becomes half the usual period, even after charging it fully. Power source Auto power off After playback of the music (from an iPod on the Dock, Bluetooth connection, or optional component connected to the AUDIO IN jack) has finished, and if no operation is performed for about 20 minutes, the unit will automatically turn off. Notes While the unit is turned on, if no operation is performed for more than about 30 seconds, the display turns off. In this case, press SOUND to turn on the display again. The unit cannot be turned on with the remote when the AC adaptor is disconnected. Note The rechargeable battery pack is not a commercially available product. To purchase rechargeable battery pack (NH-300RDP), consult your nearest Sony dealer. To replace the rechargeable battery 1 Remove the screw of the battery compartment at the bottom of the unit, and open the lid. To use the AC adaptor 1 Connect the supplied AC power cord to the AC adaptor. 2 Connect the AC adaptor to the DC IN 20V jack on the back of this unit firmly and plug it into a wall outlet. Note on the AC adaptor 2 Disconnect the connector of the battery pack and pull it out. Use the supplied Sony AC adaptor only. The polarity of the plugs of other manufacturers may be different. Failure to use the supplied AC adaptor may cause the unit to malfunction. When using the Bluetooth connection There is no sound. Ensure that this unit is not too far from the iPod, or this unit is not receiving interference from a wireless LAN, other 2.4 GHz wireless device, or microwave oven. Check that the Bluetooth connection is made properly between this unit and the iPod. Pair this unit and the iPod again. Keep away from metal objects or surfaces. Make sure that the Bluetooth function is activated. Sound skips or the correspondence distance is short. If a device that generates electromagnetic radiation, such as a wireless LAN, other Bluetooth device(s), or a microwave oven is nearby, move away from such sources. Remove any obstacle between this unit and the iPod or move away from the obstacle. Locate this unit and the iPod as close to each other as possible. Re-position this unit. Re-position the iPod. Connecting cannot be done. Perform pairing again. (See “To pair with an iPod.”) Check that the iPod is compatible with this unit. (See “Wireless music streaming compatible models.”) Pairing cannot be done. Bring this unit and the iPod closer together. Delete the unit from the iPod and perform pairing again. Check that the iPod is compatible with this unit. (See “Wireless music streaming compatible models.”) 3 Confirm that charging has started. When charging starts, the battery indicator appears. While charging, the charging indicator animation loops. When the unit is turned off Reception is poor. Extend the aerial to its full length, and orientate for best FM reception. When charging completes, the full battery indicator appears for a while, and then disappears. Notes If you connect the AC adaptor when the battery is fully charged, the full battery indicator appears for a while, and then disappears. If you connect the AC adaptor when the battery power is low, charging starts and the low battery and charging indicator animation loops. The TV picture is unstable. If you are listening to an FM program near a TV with an indoor aerial, move the unit away from the TV. Audio-in There is no sound. Make sure the audio connecting cable is connected firmly. Make sure that the connected optional component is in playback mode. Make sure that the Audio-in function is activated. The sound is low. Check the volume of the connected optional component. connector to the jack. 4 Replace the battery compartment lid and tighten Notes When replacing the battery pack, place a soft cloth etc., under the unit. Turn off the unit and disconnect the AC adaptor before removing the old battery pack. Charge a new battery pack before use. For details, see “To use the AC adaptor.” Remote control Before using the supplied remote for the first time, remove the insulation film. Aim the remote at the (Remote sensor) of the unit. The unit cannot be operated without the AC adaptor while the low battery indicator appears. When to replace the battery When the unit is turned on With normal use, the battery (CR2025) should last for about 6 months. When the remote can no longer operate the unit, replace the battery with a new one. side facing up When charging completes, the full battery indicator appears. Note It will take approximately 6 hours to fully charge the battery. The sound is weak or is of poor quality. If the unit is close to a TV, move it away from the TV. 3 Insert a new battery pack and connect its the screw. Radio Dock Connector compatible models iPod touch (4th generation) iPod touch (3rd generation) iPod touch (2nd generation) iPod nano (6th generation)* iPod nano (5th generation) iPod nano (4th generation) iPod nano (3rd generation) iPod classic 160GB (2009) iPhone 4S iPhone 4 iPhone 3GS iPhone 3G iPad 2 iPad Remote control To use the rechargeable battery Note If you are not going to use the remote for a long time, remove the battery to avoid any damage that may be caused by leakage or corrosion. You can operate the unit with the rechargeable battery instead of the AC adaptor. Note The maximum output volume will be lower when the AC adaptor is disconnected. To check the remaining power of the battery The remaining power of the battery will be indicated when the unit is turned on. As the remaining battery power depletes, the battery indicator decreases. Level 1 Level 2 Level 3 Level 4 Continued on the reverse side To Pause playback Power indicator Press To resume play, press again. Go to the next track (forward) Go back to the previous track (backward)* 4 Perform the pairing procedure on the iPod to detect the unit. Select “Settings General Bluetooth” and turn on the Bluetooth function. Example: iPhone 4S Locate a point while listening to (forward) or the sound (backward) while playing and hold until you find the desired point. Go back to the previous menu MENU on the remote Select a menu item or a track (up)/ (down) on for playback the remote Bluetooth indicator Execute the selected menu item or begin playback Aerial ENTER on the remote * During playback, this operation returns you to the beginning of the current track. To go back to the previous track, press twice. Supporter Notes If a pop-up message appears on the display of the iPod touch, iPhone, or iPad, see “About App.” Some operations may differ or may not be available on some models of iPod. If the battery of the iPod is extremely low, charge it for a while before operation. Sony cannot accept responsibility in the event that data recorded to an iPod is lost or damaged when using the iPod connected to this unit. For details of environmental conditions for operating an iPod, check the website of Apple Inc. 3 Press and hold BLUETOOTH and VOLUME − at the same time on the unit. “CLEAR” appears in the display. Notes You can perform step 3 to clear the list even during Bluetooth connection. This operation cannot be performed when the unit is pairing. To pair with this unit again, delete the model name of this unit from the iPod and perform pairing again. (See “To pair with an iPod.”) Operating the radio 1 Press . 2 Press FM to activate the radio function. “FM” appears in the display. A list of detected devices appears on the display. The unit is displayed as “RDP-XF300iP.” If “RDP-XF300iP” is not displayed, repeat from step 3. 5 Select “RDP-XF300iP” on the display of the iPod while the Bluetooth indicator flashes quickly. When “Connected” appears on the display of the iPod, pairing and connection are complete. Example: iPhone 4S Frequency digits appear in the display after a short period. 3 Press and hold FM until “FREQ. TUNE” appears in the display. If “PRESET TUNE” appears, press and hold FM again. When using the remote to operate the unit, you can skip this step, and directly operate step 4. 4 Press and hold TUNE + or − until the frequency digits begin to change in the display. To remove the iPod Dock Connector The unit automatically scans the radio frequencies and stops when it finds a clear station. If you cannot tune in a station, press TUNE + or − repeatedly to change the frequency step-by-step. When an FM stereo broadcast is received, “STEREO” appears. For details, see “How to handle an iPod.” To charge an iPod Docking Tray Display Remote sensor You can use the unit as a battery charger for an iPod when the power is supplied by the AC adaptor. Charging begins when the iPod is connected to the unit. The charging status appears in the display on the iPod. For details, refer to the user’s guide of the iPod. Tips for charging an iPod with the rechargeable battery With the function for iPod activated, if the battery indicator is level 1 or 2, charging will start. If the battery indicator is level 3 or 4, to start charging, press and hold iPod. (For details, see “To use the rechargeable battery.”) Charging will terminate when the unit turns off automatically. (For details, see “Auto power off.”) To terminate charging, press and hold iPod. This operation will terminate playback. To restart charging, press and hold iPod again. Operating by wireless music streaming VOLUME + (VOL + on the remote control) and buttons have a tactile dot. Operations How to handle an iPod To set an iPod Keep the iPod and the unit within 10 meters of each other for this operation. Check the following before operating the unit. The Bluetooth function of the iPod is on. Pairing of the unit and the iPod is complete. If pairing is not completed, perform pairing again. (See “To pair with an iPod.”) To turn the unit on/off Press (On/Standby). The power indicator lights up when the unit is turned on. Press VOLUME +/− (VOL +/− on the remote). Operating an iPod on the Dock 1 Press the Docking Tray on the front of the unit to open. After use, close the Docking Tray by pushing it until locked. 1 Press . 2 Press BLUETOOTH ( on the remote) to turn on Pairing What is pairing? Bluetooth devices need to be “paired” with each other beforehand. Once Bluetooth devices are paired, there is no need for pairing again, unless pairing information is deleted. Bluetooth indicator Status Bluetooth indicator (blue) Bluetooth off Off Bluetooth on but not connected Flashes slowly Pairing mode Flashes quickly Connected or communicating Lights up To pair with an iPod Keep the iPod and the unit within 1 meter of each other for this operation. 2 Set the iPod on the Dock Connector. The Dock Connector can be tilted slightly. For details, see “How to handle an iPod.” 3 Press . 4 Press iPod to activate the function for iPod. Notes An iPod in a case or cover can be set in this unit. However, if the case or cover interferes with the connection, remove the case or cover before setting the iPod on the Dock Connector. When placing or removing the iPod, hold it at the same angle as the Dock Connector on the unit. Do not pull the iPod forward too far. When placing or removing the iPod, hold the unit securely. Do not twist or bend the iPod, as this may result in connector damage. Remove the iPod when transporting it; otherwise, a malfunction may result. “iPod” appears in the display. 5 Press . The iPod begins to play back. If the iPod does not start playing back, operate directly on the iPod. You can operate the connected iPod via this unit or the iPod itself. Notes on pairing with a Bluetooth device other than iPod When pairing with a Bluetooth device other than iPod, after step 3, pass code input may be required in your Bluetooth device. In this case, input “0000.” The operation and display may differ depending on the Bluetooth device and/or software version. For details, refer to the user’s guide of the Bluetooth device. To listen to sound If the iPod does not reach the supporter on the front of the unit, attach the supplied cushion below the supporter. Adjusting the volume To remove an iPod By using the Bluetooth connection, you can listen to the sound from an iPod or other Bluetooth device with the unit wirelessly. Notes The operation and display may differ depending on the model of iPod and/or software version. For details, refer to the user’s guide of the iPod. Pairing mode is canceled after about 5 minutes. If pairing mode is canceled halfway, start over from step 3. If pairing is not complete, start over from step 3. To pair with another iPod, repeat steps 1 to 5. In step 3, if a double-beep sound is not heard or the Bluetooth indicator does not flash quickly, press and hold BLUETOOTH ( on the remote) again. If you turn off the unit or the iPod before the Bluetooth connection is complete, pairing information will not be memorized, and pairing will not be completed. 1 Press . 2 Press BLUETOOTH ( on the remote) to turn on the Bluetooth function when the Bluetooth indicator is off. “Bluetooth” appears in the display. The Bluetooth indicator flashes slowly. 3 Press and hold BLUETOOTH ( on the remote). When pairing starts, a double-beep sound will be heard and the Bluetooth indicator will flash quickly. Pairing mode of the unit is activated. the Bluetooth function. The last connected iPod will be reconnected automatically when the Bluetooth function is turned on. 3 Select your desired music, video, game, etc., to play on the iPod. For details, refer to the user’s guide of the iPod. Tips If the last connected iPod does not reconnect automatically, press BLUETOOTH ( on the remote). If it still does not reconnect, select the model name of this unit from the iPod. (Perform steps 4 to 5 in “To pair with an iPod.”) To connect an alternative iPod, which has previously been paired with this unit, press BLUETOOTH ( on the remote) to disconnect the currently connected iPod. Then select the model name of the unit from the alternative iPod you want to connect. While listening to music from an iPod via Bluetooth connection, you can charge the iPod on the Dock only if the AC adaptor is connected. If the volume level is low, adjust the volume of the unit first. If the volume is still too low, adjust the volume of the Bluetooth device. Tips If you touch or operate an iPod connected to this unit while listening to the radio, noise may occur. Avoid touching or operating the iPod in this case. If you are listening to the radio with an iPhone connected to the unit, interference with radio reception may occur. Remove the iPhone in this case. To improve the reception Extend the aerial to its full length and adjust the angle for best reception. To clear the list of models alreadypaired and memorized in the unit 1 Press . 2 Press BLUETOOTH ( on the remote) to turn on the Bluetooth function. Press or to tune in a stored station. If “FREQ. TUNE” appears, press and hold FM again. Connecting optional components You can enjoy the sound from an optional component, such as a portable digital music player, through the speakers of this unit. Be sure to turn off the power of each component before making any connections. 1 Firmly connect the line output jack of the portable digital music player (or other component) to the AUDIO IN jack on the back of the unit, using a suitable audio connecting cable (not supplied). 2 Press to turn on the unit. 3 Press AUDIO IN to activate the Audio-in function. “AUDIO IN” appears in the display. 4 Turn the connected component on. 5 Play the connected component. The sound from the connected component is output from the speakers of this unit. Notes The necessary type of audio connecting cable depends on the optional component. Be sure to use the correct type of cable. If the volume level is low, adjust the volume of the unit first. If the volume is still too low, adjust the volume of the connected component. Other useful functions Power Off Hold function You can set the Power Off Hold function to avoid unintentionally powering on while carrying the unit. To set the Power Off Hold function Remove the iPod from the Dock Connector, and then press and hold on the unit when the AC adaptor is disconnected. “HOLD” flashes twice and the display turns off. The unit cannot be turned on by pressing while the Power Off Hold function is set. To cancel the Power Off Hold function Press and hold on the unit. “RELEASE” flashes twice and the Power Off Hold function is canceled. The unit will turn on automatically. Note Adjust the direction of the aerial by holding the bottom of it. The aerial can be damaged if you move the aerial with excessive force. To set monaural sound if stereo reception is poor The unit automatically switches between stereo and monaural output, depending on reception conditions. However, if stereo reception is unstable, you can manually set for monaural output to improve the sound. Press FM to show “MONO” in the display. (To resume stereo reception, press FM again to show “STEREO” in the display.) To preset radio stations You can preset up to 20 radio stations in the unit’s memory. 1 Press FM to activate the radio function. 2 Press and hold until “AUTO PRESET” appears in the display. 3 Press . The stations are stored in memory from the lower frequencies to the higher ones automatically. Tip To go back to the previous status, press FM instead of in step 3. Tip The Power Off Hold function will be canceled if you connect the AC adaptor to the unit or set an iPod on the Dock Connector. Selecting audio emphasis (equalization) You can adjust the emphasis of the sound. Press SOUND repeatedly to select the desired audio emphasis. If a station cannot be preset automatically You may need to preset a station with a weak signal manually. 1 Tune in the station you want. 2 Press . To finish listening Terminate the Bluetooth connection by any of the following operations. Turn off the unit. Turn off the iPod. Press BLUETOOTH ( on the remote), iPod, FM or AUDIO IN. Operate the iPod to terminate the connection. For details, refer to the user’s guide of the iPod. To play preset radio stations 3 Press or to select the desired preset number, and press . The preset number flashes, then, the frequency digits show in the display. The new station replaces the old one. Tip To go back to the previous status, press FM instead of in step 3. About App A dedicated Dock App for iPod touch/iPhone/iPad available at Apple App Store. Search for “D-Sappli” and download the free App to find out more about the functions. Features D-Sappli includes various timer functions: Alarm, Music Play Timer and Sleep Timer. You can set up to 10 alarms, using songs in iPod or Preset Sound in D-Sappli for the alarm sound. Music Play Timer allows you to play/pause desired music at a desired time. Sleep Timer allows you to specify a time at which to stop music playback. Alarm, Music Play Timer and Sleep Timer work in combination with the power supply of the unit. Alarm, Music Play Timer and Sleep Timer are available only when D-Sappli is activated. D-Sappli can display a list of Radio Preset Stations programmed in this unit. You can rename the Radio Preset Stations, and change their preset numbers on the D-Sappli. Preset numbers and order will also be changed accordingly in the unit. D-Sappli also includes a clock display enlarge feature. Notes If the App to link with this unit is not downloaded to the iPod touch/iPhone/iPad, a pop-up message prompting you to download D-Sappli may appear repeatedly. Deactivate the App’s link function to stop the pop-up message. To deactivate the App’s link function: Connect the AC adaptor, and then press / to turn off the unit. Remove the iPod touch/iPhone/iPad from the Dock Connector. While holding down , also press and hold / on the unit for at least 2 seconds. (“App OFF” appears in the display to show that the App’s link function has been deactivated.) To re-activate the App’s link function, repeat the above steps. (“App ON” appears in the display to show that the App’s link function has been activated.)