1
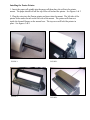
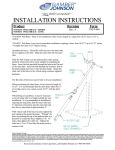
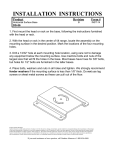
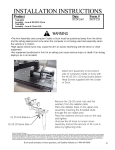
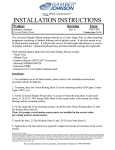
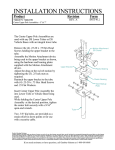
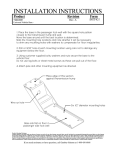
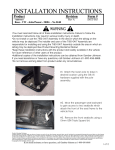
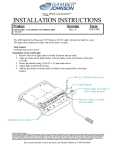
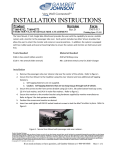
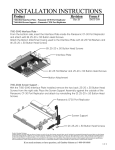
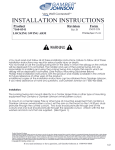
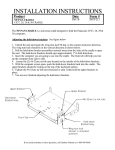
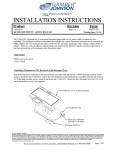
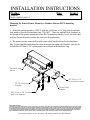
INSTALLATION INSTRUCTIONS
Product
Date
Form #
7160-0126
PENTAX PRINTER MOUNT
3-31-08
INST-388
Mounting the Pentax Printer Mount to a Gamber-Johnson DS-74 mounting
bracket:
1. Attach the printer mount to a DS-74 with the #10-32unc x 3/8" long screws and split
lock washers provided in hardware bag 7120-0427. There are multiple hole locations on
the bottom of the printer mount and in the DS-74 mounting bracket, so use the holes that
will best locate the printer mount for your specific application.
2. The printer mount comes with a cable strain relief bracket located in the hardware
bag. If your specific application has room to mount the strain relief bracket, you can do
so with the #6-32unc x 1/4" nylon patch screws found in the hardware bag.
Pentax Printer
Mount
DS-74 mounting
bracket
#6-32unc x 1/4"
nylon patch screws
Strain Relief
Bracket
#10-32unc x 3/8" Screws
and Lock Washers
Product Mounting Disclaimer
Gamber-Johnson is not liable under any theory of contract or tort law for any loss, damage, personal injury, special, incidental or consequential damages for personal injury or other damage
of any nature arising directly or indirectly as a result of the improper installation or use of its products in vehicle or any other application. In order to safely install and use Gamber-Johnson
products full consideration of vehicle occupants, vehicle systems (i.e., the location of fuel lines, brakes lines, electrical, drive train or other systems), air-bags and other safety equipment is
required. Gamber-Johnson specifically disclaims any responsibility for the improper use or installation of its products not consistent with the original vehicle manufactures specifications
and recommendations, Gamber-Johnson product instruction sheets, or workmanship standards as endorsed through the Gamber-Johnson Certified Installer Program.
If you need assistance or have questions, call Gamber-Johnson at 1-800-456-6868
Installing the Pentax Printer:
1. Insert the paper roll spindle into the paper roll then place the roll into the printer
mount. The paper should roll off the top of the roll toward the printer. See figures 1 & 2
2. Plug the wires into the Pentax printer and insert into the mount. The left side of the
printer slides under the tab on the left side of the mount. The printer will then nest
inside the formed flanges on the mount base. The top cover will hold the printer in
place. See figures 3 & 4
FIGURE 1.
FIGURE 2.
FIGURE 3.
FIGURE 4.