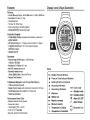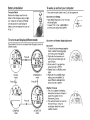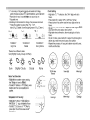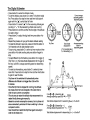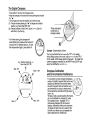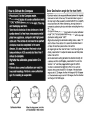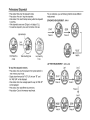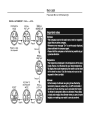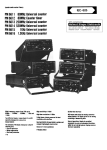
1
And the declination angles for major world cites are listed
as follow:
City
Declination Angle
Anchorage - ----- ------- 22"E
Manta -------------------- 4°W
Bombay ---------------- - l OW
Boston --------------------- 16°W
London ------------------- 4°W
Uttfe Rock -------------- aOE
Uvingston. MT ----------- 14°E
Munich -------------------- I OE
New York City ---------- 14°W
Orlando ------------------ 5°W
Oslo ----------------- ----- 2°W
Paris ---------------------- 2°W
Malfunctjon
Incorrect Compass
Reading
"Err" display in Compass
Mode
City
Declination Angle
Calgary -------- ----- ---- ISOW
Chicago ------------------ aow
Denver -------------------- looE
Jerusalem ---------------- aOE
Rio De Janeiro ---------- 21 °W
San Francisco --------- 15°E
Seattle --------- ----- ---- 19°E
Shanghai ----------------- 5°W
Toronto ------------------- IIOW
Vancouver ---------------- 200W
Washington DC -------- IOoW
Waterbury. CT ----------- 14°W
Problem
Wrong Calibration or the environment of
oparalion Is changed.
Do the Calibration again with correct
instruction stated in the user manual.
External Magnetic Intefference. such os
heavy metal. home appliance. computer
and high _
cable, etc ...
Escape from the intefferenoe or
re-<:allbretlon again.
Incorrect TemperaMe
Reading
Inteffecenoe from direct sunlight. air
conditione< or Heater vent.
Move the unit away from the Intefference.
Display readout lades and
Incorrect readinga
Poor battery or bad contacts.
Take out battery and install again or
Install a new battery.
Black Display
Temperature too hot. or display exposed
10 direct sunlight 100 long.
Display shows Irregular
figures
Take out battery and Install again.
(El1
-
Art NO.:PYLE_SPORTS-PAWI
DIGITAL
ALTIMETER
WEATHER FORECAST. COMPASS WATCH
SENSOR ECHNOLOGY, ALTIMETER, COMPASS
, BAROMETER, THERMOMETER, WEATHER FORECAST
Features
Display Icons & Keys Illustration
Altimeter
• Allitude Measuring Range: -500 to 9000 meter or -1600 to 29500 feet
• Resolution of 0.5 meter or 1 feet
• Total Altitude Gain
• Trip timer: 9hr 59min 59sec
• Current ascending or descendmg Speed
• Average ascending or descending Speed
Electronic Compass
• 3-mode display showi ng a compass arrow direction, numeric and
cardinal readouts
• with highly accuracy of +/- 10 degree and a resolution of 1 degree
• a magnetic distortion alerts "Err' when extemal magnetic
interference IS occur
• aulomatic shut-off
Barometer
• Pressure range 300 hPalmbar to 1100 hPaimbar
(4 40 psi to 16.00 psi)
• Resolution of 1 hPaimbar (0.01 psi)
• Max.! Min. memory for pressure
• Barometric weather forecast
(Sunny, Slightly Cloudy, Cloudy and Rainy)
• Pressure Trend Indicators
Professional Stopwatch with 30 Lap/ Split Memory
• 111 00 sec precision stopwatch
• Display in hours, minules, and seconds up 10 maximum of 10 hours
• Total 30 Memories for 29 LaplSplit and 1 Fastest Lap
• Fastest Lap Calculation
Thermometer Alarm Clock
• Perpetual ca lendar wth day of week
• Snooze alarm dock
• Thermometer (-1 QOC to +5O"C)
· 121 24 hr, ' C/ OF selectable
• Max.! Min. memory for Thermometer
Icons:
0101# - Weather Forecast Window
~
...
...
..
~
MAX
_N
'c
."
- Pressure Trend Indicator (Weather)
- Heading Direction (Compass)
- Ascending (Altimeter)
TI"~ - Clock mode
- Descending (Altimeter)
ALTO - Altimeter mode
-Afternoon
Co"p . Compass mode
- Battery Low
" - Alarm ON I OFF
- Maximum memory
z' - Alarm Snooze
- Minimum memory
..b } Barometer Unit
- Temperature in Celsius
ps.
- Temperature In Fahrenheit
Battery Installation
To wake up and set your computer
Computer Watch
Remove the battery cover from the
bottom of the computer using a small
coin. Install the 3V battery (CR2032)
with the position( +) pole facing the
battery cover and replace the cover as
in Fig . 1.
.0
•
To turn on and display different mode
Press button 0 to tum on and press button 0 again to switch to
differen modes.
."'.
" . <;to- • •
"rll
,U
::J .12 ••
&:'. '.;J.~.
I!!!J...A ' .11
n·~u
\
Press 0
',*4 _\-_..,._--1
•
u'C',S8 •
~6} 'c '"
STOPWATCH
mode
CLOCK
mode
Press 0
Press 0
Press 0
COMPASS
mode
ALTIMETER
mode
• Press and hold both button A and C until all segment on
Barometer Unit Setting
• Right after all segment on. the "mb' digit
will start to nicker.
• To select "mb' or · psi'. press button C
and then press buttton A to confirm .
Barometer and Weather States Adjustment
Barometer
1. To adjust the barometer and weather
states, weather forecast function
can have a good initialization.
2. Right after the barometer unit
setting, the barometer digits will
start to flicker.
3. Press button C to set and then
press button A to confirm.
4 . Repeat Step 3 to set your desire
digits.
5. Right after the barometer digits
setting, press the button C to
select different states and then
press button A to confirm.
Weather Forecast
1. The unit is capable of detecting
atmospheric pressure changes to
predict the weather for the
forthcoming 8 hours.
2. The weather forecast is meant for
the next 8 hours. It may not
necessarily reffect the current
weather situation.
, I:-T
-r~b~
1,~'..J::]l1ll:
3. The accuracy of all general pressure-based technology
weather forecast is about 70%, and therefore, cannot be held
responsible for any inconveniences so caused by an
inaccurate one.
4. According to the barometric change, the pressure trend will
indicate the weather is going fine ( Fig. 1 UP),
stabte ( Fig. 2 Stable ) a and nd going worse ( Fig. 3 Down ).
Fig. 1
Fig. 2
Fig. 3
c.::J £.
:":
- =Q
c.::J £.
;lJ:
-~~',-
TENDENCY
Going Fine
TENDENCY
Stable
--~
c.::J
-l";.
7>:':
_
--
---~''
TENDENCY
Going Worse
Clock Setting
• Right after ' C I OF selection , the "24H" digits will start to
flicker.
Press button C to select 12H or 24H hour format.
• Press bultton A to confirm and the hour digits will start to
flicker.
• To set hour, press button C to adjust the hour digits to desire
value and then press button A to confirm.
• Right after the confirmation , the minute digits will start to
flicker.
• To set minutes, press button C to adjust the minute digits to
desire value and then press button A to confirm.
• Repeat the process until you get a desire value of the year,
month and the date.
There are four different states.
Sunny, Slightly Cloudy, Cloudy and Rainy
. ,
;O~
, ..
~ -0'
,,
Sunny
Slightly Cloudy
\
\
.. \,
.S0'~
-
••••
\"
Cloudy
Rainy
12124 Hour
Format
Hour digit
Minute digit
Year digit
Month digit
Date digit
Meter I Feet Selection
• Right after the weather states setting,
the aM" digit will start to flicker.
• To select "M"(Meter) or ' FT"(Feet). press
button C and then press button A to
confirm .
Temperature Unit Seeing
• Right after the Meter I Feet selection.
the Celsius " C' digit will start to flicker.
• To select "'C"(Celsius) or "'F"(Fearh),
press button C and then press buttton
A to confirm.
, I /
-t
/
Snooze Alarm
Temperature Memory Recall and Reset
• To set alarm time, in Clock mode, press and hold button A until
the alarm hour digit start to flicker
• Press button C to adjust the hour digit and then press button A
to confirm.
• Right after the confirmation, the alarm miniute digit will start to
flicker.
• Press button C to adjust and then button A to confi rm.
• To recall maximum and minimum temperature, in Clock mode,
press button C once.
• To reset the memory, press button A right after the calling.
Press C
Press A
Maximum and minimum
temperature memo'Y
Alarm hour digft
Alarm minute digit
Activating I Deactivating Alarms
• To read alarm mode, in Clock mode, press button A to select the
alanm time display or the date display formal
• lM1en display shown the alarm time, press button C once to tum
ON the d<IJly alarm with' z' ~ " appeared.
• Press button C again will turn OFF the alarm and the alam symbol.
Barometer Memory Recall and Reset
• To reca ll maximum and minimum barometer, in Clock mode,
press button C again.
• To reset the memory, press button A right after the calling.
Press C
Date Display
Maximtxn Md minimum
temperature memory reset
Alarm Display
Press A
Alarm
ON/OFF
Acknowledging alarms
• lM1en you hear the alarm.
1. You can acknowledge it by pressing button B the alarm will stop.
NoVi the alarm symbol is displayed constanlly. The alarm will
sound at the same time next day.
2. To deactivate alarm and activate snooze function , please eith er
press the button A , C or D. Snooze symbol " z" starts to blink.
Snooze alarm repeats for 3 times with an interval of 5 minutes
each. After that the alarm will sound at the same time next day.
Maximum and minimum
barometer memory
Maximum and minimum
barometer memory reset
The Digital Altimeter
• Press button 0 to enter the Altimeter mode.
• To set the altitude. press button C to enter T (trip timer mode)
first. Press button A to stop the timer and then hold button A
again until the ' ... . symbol start to flicker
• Press button C to select"", • for the ascending altitude gain
counting or . ~. for the descending altitude loss counting
• Press button A to confinn and then the first digit of the altitude
will start to flicker
• Press button C to adjust the digit and then press button A to
confinn
• Repeat the process until you get the desire altitude reading
• To reset the altitude to sea level. press and hold the button A
for 8 seconds until all digits change to zero
• To start a trip. press button C to enter trip timer mode and then
press button A to start counting and press button A again to
stop
• To read different trip infonnations, press button C to toggle lr
(Trip Timer ). d ( the total altitude displacement for the gain or
the loss) and AS ( average ascending speed or descending
speed )
• To reset trip informations. press button C to enter trip timer
mode first. Press button A to stop the timer and then hold button
A again to reset the data.
• Trip timer will be swItched off automatIcally whan
dIfference of altitude Is no bigger than 2.5m within
5 minutes.
• Once the trip timer Is stopped for running, the altitude
trip measunnent will also stopped at the same time In
order to save current consumption .
• The only way to restert the altitude trip measurment Is to
restart the tip timer again manually.
• Based on current consumption concern, the trfp timer will
also automatically switched off when switching to time or
compass functIon.
• User should then restart the trip timer again manually In
order to minimize error.
Current average
ascending speed or
descending speed
Current
altitude
Trip Tomer
Total altitude
displacement
»)
For Ascending (......
( or Descending (~)
Average ascending
speed or
descending speed
Height
o
0
From
toO . (Ascending ...... )
d3+d4
tl
Average ascending speed (AS ...... ) Total altitude displacement for ascending (d ...... ) = dl+d2+<l3
From 0 to G . (Descending ~ ).
d3+<l4
t2
Average descending speed (AS ~) =
Total altitude displacement for descending (d ~ ) = d5+<l6+d7
The Digital Compass
.'
..
:' 1
• Press button D to enter the Compass mode
• Keep the compass in horizontal level and pointing the direction
..•
by" . . ".
• The compass will show the direction by 3 different ways.
(1). Precise direction pointing by . ...... " in degree and cardinal
readout, e.g. South East (SE) 135'
(2). Precise direction of North ( ••• ), South ( • • • ), East ( • )
and West ( • )by the rtng .
These dots depict
symbolically a
compass need le
,.:...• ,
• For Power Saving, the compass will
automatically stop measurement around 2
minutes with full direction dots on. To start
the measurement again, press button A.
N .'
Example: Determination of North
You may symbolize the icon ... as the "TIP" of an needle.
which always points to the north, and icon ••• as the "TAIL'
of the needle, which always points to the south. No matter the
current compass's orientation is, the NORTH and SOUTH can
easily be identified by ••• and • • • .
e.g. Direction pointing by A;
- Sovth East (SE) 135'
,
t
East-90'
South - l SO°
......
,;f
Sf :35· ••
'*' -A
North - o·
/'
i
Ati
"eA
West - 270·
Compass Calibration
and Environmental Interference
• It is important to know all digital compasses
wor1ls with Earth's magnetic field and is very
sensitive to different environments where
the earth magnetic fie lds is distorted. such
as interference by closing to heavy metal,
home appliance, computer and high power
cable ... etc.
• To keep a hiSh accurate heading information,
you must calibrate the compass (1) when
the magnetic distort message "Err" is
continuously displayed (2) the numeric
heading information w~h a error more than
10 degree (3) when the unit is used for the
first time in a vehicle so as to separate the
earth's field from the interference.
I
'
•
Enter Declination angle for the true North
• Declination refers to the measured difference between the magnetic
North and the North of the map. The local declination Is given on
the map margin either as easterly plus declination (El or as westef1y
minus declination CN). When orienteering, the map direction Is
corrected by subtracting the plus declination and adding the minus
declination.
• To input the value, press and hold button A to enter calibration
mode • CAL' first and press button A again to confimn to enter
declination setting mode " dEC'.
• Right after entering the declination setting mode, a letter " E"
start to flicker. Press button C to select the direction East- E
or West· W and then press button A to confirm.
• An angle digits will then start to flicker. To set the angle to be
offset, press button C to adjust to desire value an then press
button A to confirm.
• As the declination setting will affect the direction direcUy, for
a serious and final confimnation, press button C to tum the
function " on • and then press button A again to confirm.
• In order to understand the declination effect, let us quote an
example. the current direction Is N 10 degree, If the declination
angle is set to E 30 degree, the final wlli change to NE 40 degree
or If the declination angle Is set to W 30 degree, the final direction
will change to NW 340 degree
a·-,-~~~. ·V}))
.......
Calibration Mode
After the ring move, tum the
unit clockwise In two circles
Professional Stopwatch
• Press button D to enter the stopwatch mode.
• Press button A to start I stop the stopwatch.
• Press button C to record the lap memory when the stopwatch
is counting ,
• If the stopwatch saves over 30 laps, it will display FULL.
• To reset the stopwatch, press and hold button A to zero,
Lap memori es
For your reference, you can fOllowing methods to take different
measurement:
STANDARD MEASUREMENT : A-A-A
START
STOP
Press A
Press A
•
Lap
Timer-,.__
RESET
STOPWATCH
mode
Total counting time
Hold A
Lap memory
FULL
LAP TIME MEASUREMENT: A-C-C-A-A
To recall the stopwatch memory
• Press button A to stop the stopwatch , then press button C to
enter memory reca ll mode.
• Display show the record of FAST LAP, the icon ' 11[ " and
the "FRS 1 tRP " will be displayed.
• Press button A to show average speed for Lap, the ' R::E tAP '
will be displayed.
• Press button A to read different lap memories.
• Press button C to eXit the memory recall mode.
Lap 2
Lap 1
START
•
Press A
Press C
Press C
~
Lap 3
RESET
i(
HoldA
STOP
i(
Press A
Back Light
Press button B to turn ON the back light.
RECALL LAP MEMORY: C· A· A· ... ... A·C· A
STOPWATCH
MODE
RECALL
FAST LAP
Press A to stop
the stopwatch
RECALL
AVEAGE LAP
Press A
~
RECALL
FIRST LAP
press A~
RESET
RETURN TO
STOPWATCH
MODE
RECALL
LAST LAP