1
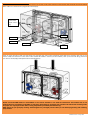
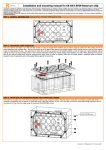
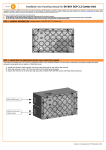
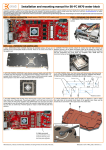
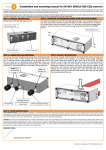
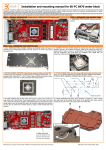
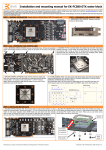
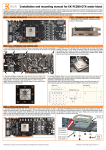
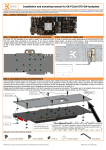
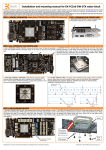
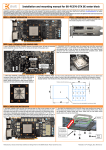
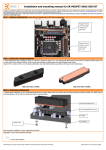
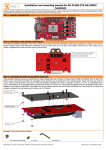
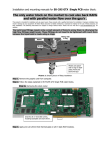
Installation and mounting manual for EK-BAY Spin DUAL Loop reservoir
This product is intended for installation only by expert users. Please consult with a qualified technician for installation. Improper installation may result in damage to your equipment. EKWB d.o.o. assumes no liability
whatsoever, expressed or implied, for the use of these products, nor their installation. The following instructions are subject to change without notice. Please visit our web site at www.ekwaterblocks.com for updates.
The barb hose fittings require only a small amount of force to screw them in; otherwise the high flow fittings might break. These fittings do not need to be tightened with much force because the
liquid seal is made using o-rings.
EKWB recommends 24 hour leak testing for all EK products before powering on the computer. This will eliminate any damages that may occur because of the users improper installation or
products imperfections.
STEP 1: GENERAL INFORMATION. Sample picture of EK-BAY Spin DUAL Loops reservoir
STEP 2: PREPARING YOUR RESERVOIR
Take your reservoir and place it on a table. If you bought extra impleres and you wish to change them, then simply unscrew all screws attached (with allen key)
to acrylic top and replace impeler. Before closing reservoir blow gently on impeler and make sure it spins flawlessly and without any unusual noises. If you
suspect disturbances, please check hole in impeler. When attaching top back to housing make sure you do not use too much force since acrylic is prone to
cracking. Usually when gasket flatens equally this means enough force has been used and sealing.
STEP 3: PLACING RESERVOIR IN YOUR CASE
Place reservoir in your DUAL 5.25" case bay with EK logo looking towards you. Make sure you attach it with enclosed screws.
Screws M3x6 DIN7985 Released on 29th of July, 2010. STEP 4: CONNECTING YOU RESERVOIR
Make sure you use the inlet hole marked on bottom picture only as inlet, not as outlet. However to make reservoir fully functional use holes as marked
bellow. Make sure outlet holes are plugged with enclosed plugs.
Predrilled holes
for 5mm LEDs
(acrylic version
only)
Outlet
Inlet
Outlet
EK Plugs
Inlet
STEP 5: FILL RESERVOIR
Fill reservoir through fill port (marked by arrow) and make sure liquid is not spilled all over your computer or any electrical devices nearby. Run your pump
shortly for couple of times to make sure water floods your tubes and other water cooling components. Repeat that step by observing water level in your
reservoir. Idealy there should be as much water to make waterfall still available in reservoir (max level indicator). When you are done with filling, please close
your reservoir with G3/8 plugs and tighten them with enclosed allen key.
STEP 5: OTHER INSTRUCTIONS
Please note that EKWB holds no responsibility of any kind if assembly is not made by instructions. This applies also for all
products that are not listed as compatible on web page. Users must by all means also consider instructions that are being made
for proper use of pump and other water cooling components provided by manufacturer(s).
HINT: Never let your pump dry running. If that happens for prolonged period of time you risk destroying bearing and rendering
pump useless.
Released on 29th of July, 2010.