1
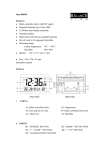
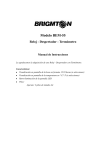
WS 8009 - Radio controlled wall clock
Instructions manual
Part A
A1: Radio controlled time
A2: Temperature
A3: Date and day of week
A4: Radio controlled icon
A5: Alarm icon
A6: Humidity
Part B
B1: “SNOOZE” button
B2: “MODE” ”SET” button
B3: “+” “12/24H” button
B4: “-” “C/F” button
B5: “ALARM ON/OFF” button
Part D
Wall mount hole
Stand
Battery compartment
Set up and radio controlled time:
• Insert 3 x C batteries (not included) by observing the correct polarity signs (+/-) inside the battery
compartment.
• After inserting the batteries, the clock automatically starts scanning the DCF frequency signal after
new batteries inserted (“ ” flash on the LCD).
“ ” flash indicate DCF signal searching.
“ ” indicate signal received successfully.
“DST” icon will turn on when the DCF have DST signal in it.
• The clock automatically scans the time signal at 3:00a.m. everyday to maintain accurate timing. For
failed reception, scanning stops (on the LCD disappear) and repeats again at 4:00a.m., 5:00a.m.,
6:00a.m.
• The clock manually scans the time signal by holding “ ” (B4) buttons for 2 seconds. For failed
reception in 10 minutes, scanning stops (“ ” on LCD disappear). And repeats again in the next hour.
e.g. if scanning at 8:20a.m. fail, it will scan again at 9:00a.m.
• Hold “ ” (B4) buttons for 3 seconds to stop scanning.
Notes:
Remove batteries and then insert batteries again to reset the unit if it does not work properly.
• Avoid placing the clock near interference sources/metal frames such as computer monitor or TV sets.
• Buttons will not function while scanning for DCF time signal unless they are well received or stopped
manually.
• Never use the clock in bathroom or any other area with high humidity
• The clock loses its time information when the battery is removed.
•
Manual time setting
1. Hold “MODE” button (B2) until Hour digit flashes.
2. Press “+” (B3) or “-” (B4) button to adjust Hour, Minutes, Second, Year, Month/Day sequence, Month,
Date, Weekday Language, Time Zone.
3. Press “MODE” button (B2) to confirm each setting.
Notes:
• There are 8 languages, English, German, French, Spanish, Italian, Dutch, Denmark and Russian for
day-of-week-display. The languages and their selected abbreviations for each day of the week are
shown in the following table.
Language
•
•
•
•
Sunday
Monday
Tuesday
Wednesday Thursday Friday Saturday
German, GER
SON
MON
DIE
MIT
DON
FRE
SAM
English, ENG
SUN
MON
TUE
WED
THU
FRI
SAT
Denmark, DAN
SON
MAN
TIR
ONS
TOR
FRE
LOR
Dutch, NET
ZON
MAA
DIN
WOE
DON
VRI
ZAT
Italian, ITA
DOM
LUN
MAR
MER
GIO
VEN
SAB
Spanish, ESP
DOM
LUN
MAR
MIE
JUE
VIE
SAB
French, FRA
DIM
LUN
MAR
MER
JEU
VEN
SAM
Russian, RU
BC
NH
BT
CP
HT
NT
CY
The Time zone is used for the countries that can receive the DCF time signal but the time zone is
different from the German time.
When the country time is faster than the German time for 1 hr, the zone should be set to +1. Then
the clock will automatically set 1 hour faster from the signal time received.
Second adjusted to zero only.
Press “+”12/24 (B3) button to set the 12/24 hour format at time display mode.
Daily alarm setting:
1. Press “MODE”(B2) to select Alarm Time Display.
2. Hold “MODE”(B2) to Alarm Time setting mode, the hour digit will flash.
3. Press or hold “+“(B3) & “-“(B4) buttons to adjust the alarm time.
4. Press “MODE”(B2) to confirm each setting.
Alarm and snooze function :
1. Press “ALARM ON/OFF” (B5) to switch alarm on/off. “ ” appears if the daily alarm turns on.
2. During alerting, press “SNOOZE” (B1) button to turn on the Snooze function and icon “Zz” flash. The
alarm snoozes for 5 minutes, then it alerts again. You can press “SNOOZE” button to active the
snooze function again when alerting.
3. Simply press other buttons to stop snooze alarm.
Thermometer:
Press “°C/°F” (B4) button to select temperature displayed in Celsius/ Fahrenheit.
Precautions
• This main unit is intended to be used only indoors.
• Do not subject the unit to excessive force or shock.
• Do not expose the unit to extreme temperatures, direct sunlight, dust or humidity.
• Do not immerse in water.
• Avoid contact with any corrosive materials.
• Do not dispose this unit in a fire as it may explode.
• Do not open the inner back case or tamper with any components of this unit.
Batteries safety warnings
• Please read all instructions carefully before use.
• Use only alkaline batteries, not rechargeable batteries.
• Install batteries correctly by matching the polarities (+/-).
• Always replace a complete set of batteries.
•
•
•
•
•
•
•
Never mix used and new batteries.
Remove exhausted batteries immediately.
Remove batteries when not in use.
Do not recharge and do not dispose of batteries in fire as the batteries may explode.
Ensure batteries are stored away from metal objects as contact may cause a short circuit.
Avoid exposing batteries to extreme temperature or humidity or direct sunlight.
Keep all batteries out of reach from children. They are a choking hazard.
Consideration of duty according to the battery law
Old batteries do not belong to domestic waste because they could cause damages of
health and environment. End-users are committed by law to bring back needed
batteries to distributors and other collecting points!