1
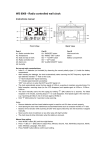
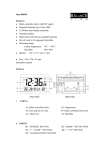
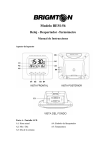
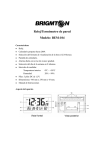
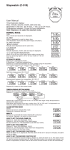
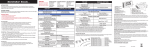
WS8007 USER MANUAL 1. Features 1.1 Time - 1.2 Temperature - Radio Controlled Time (RC-DCF) 12/24 hour time display selectable Daily Alarm function Perpetual Calendar Up to Year 2069 Day of week in 8 languages user selectable Indoor measurable range: 0°C ~+ 50°C Measures °C / °F user selectable 2. Unit Appearance Part A: A1: Radio Controlled Icon A2:Time Display A3: Date A4: Day of Week A5: Indoor Temperature Part B: B1: “MODE” button B2: “SNOOZE” button B3: “ALARM” button B4: “+/12/24” button B5: “-/C/F/ ” button B6: “RESET” button Part C: C1: Wall Mount Hole C2: Battery Compartment C3: Stand 3. Getting Started: 3.1 Main Unit: Slide open battery compartment cover [C2] Insert 4 x AA size batteries observing polarity [“+” and“ –“ marks]. Replace battery compartment cover [C2] Use a pin to press the RESET [B6] button on the rear of unit, the unit is now ready for use. 4. Time and Alarm Setting 4.1 Radio Controlled Clock: After batteries inserted, the clock automatically starts to scan the DCF time signal. Radio Control Icon“ ” flashes on the LCD. flashes, turns on, Indicating now is receiving Indicating signal received DCF signal successfully disappear, Indicating signal reception failed The clock automatically scans the time signal at 3.00 a.m. every day to maintain accurate timing. If reception fail, scanning stops (“ ” on LCD disappear) and repeats again at 4.00 a.m. 5.00a.m. and6.00a.m. The clock can be set to scan the time signal manually by holding “ ” button (B5) for 3 seconds. Each reception takes about 5 minutes. If receptions fail, scanning stops. (“ ” on LCD disappear) and repeats again on next full hour. E.g. scanning failed at 8:20a.m. It will scan again at 9:00a.m. Stop scanning by holding “ ” button (B5) for 3 seconds. “DST” shown on the LCD if it is in Daylight Saving Time Mode Note: Buttons will not function while scanning for DCF time signal unless they are well received or stopped manually. 4.2 Manual Time Setting: In time display mode, hold “MODE” button (B1) for 3 seconds to enter Clock/Calendar setting Mode. Press “+” (B4) or “-” (B5) button to adjust the setting and press “MODE” button (B1) to confirm each setting. (By keeping the “+” (B4) or “-” (B5) button pressed, could accelerate the process and reach the desired value more quickly) The setting sequence is shown as follow: Hour, Minute, Second, Year, Month/Day sequence, Month, Date, Weekday Language, Time Zone There are 8 languages for day of week: German, English, French, Italian, Dutch, Spanish, Denmark and Russian. The languages and their selected abbreviations for each day of the week are shown in the following table. Language Sunday Monday Tuesday Wednesday Thursday Friday Saturday German, GER English, ENG Denmark, DAN Dutch, NET SON SUN SON ZON MON MON MAN MAA DIE TUE TIR DIN MIT WED ONS WOE DON THU TOR DON FRE FRI FRE VRI SAM SAT LOR ZAT Italian, ITA Spanish, ESP French, FRA Russian, RU DOM DOM DIM BC LUN LUN LUN NH MAR MAR MAR BT MER MIE MER CP GIO JUE JEU HT VEN VIE VEN NT SAB SAB SAM CY Note: (1) All Setting mode will automatically exit in 15 seconds without any adjustment (2) For Time Zone: If you receive no RC-DCF frequency signal, the time zone should be set to 0. Time Zone is used in countries which can received the DCF frequency signal but the time zone is different from German Time ( i.e. GMT+1). 4.3 Daily Alarm Function: Press “ MODE” button (B1) to select to view alarm Time, “AL” shown on the display When viewing the Alarm Time, hold “MODE” button (B1) for 3 seconds to enter Alarm Time setting. Press “+” (B4) or “-” (B5) button to adjust the alarm time. Press “MODE” button (B1) to confirm the setting. 4.4 Snooze Alarm Function: Press “ALARM” Button (B3) to activate or deactivate the alarm. If the alarm is on, alarm icon " " appears on the display. Press “SNOOZE” (B2) button when alarm alerts. The alarm snoozes for 5 minutes, then it alerts again. “ ” flashes on the LCD during the snooze time. This process can be repeated 7 times. Except “SNOOZE” button, press any button to stop the alarm, or press “ALARM” (B3) to stop snooze alarm. 4.5 12/24 Hour Display mode: Press “12/24” (B4) button to select 12 or 24 hours mode. 5. Thermometer Press “°C/°F” (B5) button to select Temperature in Celsius mode/ Fahrenheit mode. If the temperature is out of the measurable range, LL.L ( beyond the minimum temperature) or HH.H (beyond the maximum temperature) will be shown on the LCD. 6. Precautions The clock loses its time information when the battery is removed. Do not expose it to direct sunlight, heavy heat, cold, high humidity or wet areas Never clean the device using abrasive or corrosive materials or products. Abrasive cleaning agents may scratch plastic parts and corrode electronic circuits 7. Specifications Unit Dimensions: Battery Requirements: Temperature Range: W368x h229 x d29mm 4x AA size batteries 0°C to 50°C