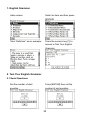
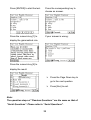
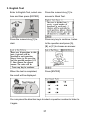
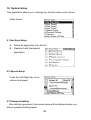
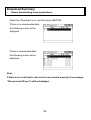
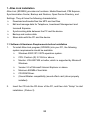
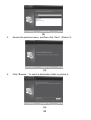
1
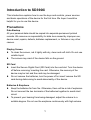
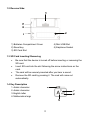
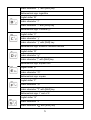
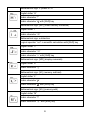
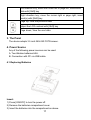
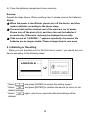
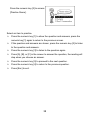
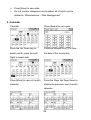
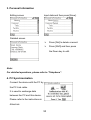
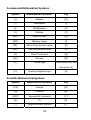
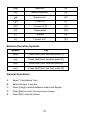
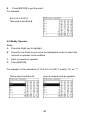
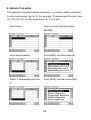
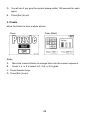
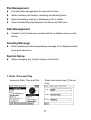
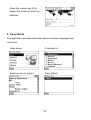
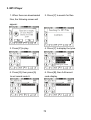
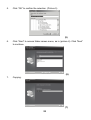
Contents Introduction to SD3900i....................................1 Chapter 1: Dictionaries .................................. 18 Chapter 2: Specialized Dictionaries.............. 31 Chapter 3: Grammar ..................................... 34 Chapter 4: Language...................................... 39 Chapter 5: Organizer ..................................... 45 Chapter 6: Calculations ................................. 54 Chapter 7: Games ........................................... 67 Chapter 8: Miscellaneous............................... 70 Chapter 9: Download ..................................... 82 Chapter 10: Contents of CD .......................... 83 Introduction to SD3900i This introduction explains how to use the keys and controls, power sources and basic operations of the device for the first time. We hope it would be helpful for you to use this device. Precautions Data Backup All your personal data should be copied into separate permanent printed records. We assume no responsibility for data loss caused by improper use, device reset, repairs, defects, batteries replacement, or failures or any other causes. Display Screen z To clean the screen, rub it lightly with dry, clean and soft cloth. Do not use volatile liquid. z The screen may crack if the device falls on the ground. SD Card z Insert the Secure Digital Card (SD Card) into the card slot. Turn the device off before removing/ inserting the card. Otherwise, the memory of the device may be lost and the card may be damaged. z Do not remove the batteries, turn the power off or insert/ remove the SD card during data saving to avoid abnormality of the device. Batteries & Earphone z Keep the batteries far from fire. Otherwise, there will be a risk of explosion. Do not connect the two terminals of the batteries together to avoid short circuit. z To prevent your hearing from being damaged, adjust the volume to a suitable degree. Do not use the earphone continuously with high volume. 1 Non Waterproof The device is non waterproof. Please keep it away from any liquid. In case it gets wet, please remove the batteries immediately, dry the surface, and send the device to our service center for checking. Do not try to repair the device by yourself. Magnetism The device is magnetic. Please do not place it with other magnetic products to avoid losing some functions. Note: Any damage caused by the above reasons is not covered by the warranty. Introduction of the device 1. Device Layout 1.1 Obverse Side: 1) Screen 2) ON/OFF key 3) Keyboard 4) Speaker 5) Microphone 2 1.2 Reverse Side: 1) Batteries Compartment Cover 2) Reset key 3) SD Card Slot 4) Mini USB Slot 5) Earphone Socket 1.3 SD Card Inserting/ Removing • Be sure that the device is turned off before inserting or removing the SD card. • Insert SD card into the slot following the arrow instructions on the card. • The card will be securely inserted after you hear a sound. • Remove the SD card by pressing it. The card will come out automatically. 1.4 Key Description 1. Arabic character 2. Arabic character 3. English letter 4. Mathematical sign 3 2. Keyboard Key Function Numeric key “1” Input symbol “! ” with [Shift] key Numeric key “2” Input symbol “@” with [Shift] key Numeric key “3” Input symbol “#” with [Shift] key Numeric key “4” Input symbol “$” with [Shift] key Numeric key “5” Input symbol “%” with [Shift] key Numeric key “6” Input symbol “?” with [Shift] key Numeric key “7” Input symbol “:” with [Shift] key Numeric key “8” Input symbol “ ” with [Shift] key Numeric key “9” Input symbol “(” with [Shift] key Numeric key “0” Input symbol “)” with [Shift] key English letter “A” Arabic ch––aracter “”ش 4 Arabic character “ ”ﻹwith [Shift] key Mathematical sign: logarithm English letter “B” Arabic character “”د Arabic character “ ”ذwith [Shift] key Mathematical sign: Factorial (!) English letter “C” Arabic character “”و Arabic character “ ”ؤwith [Shift] key Mathematical sign: scientific notation method English letter “D” Arabic character “”ي Arabic character “ ”إwith [Shift] key Mathematical sign: square root English letter “E” Arabic character “”ث Mathematical sign: square English letter “F” Arabic character “”ب Arabic character “ ”ﻻwith [Shift] key Mathematical sign: Y root of X English letter “G” Arabic character “”ل Arabic character “ ” with [Shift] key 5 Mathematical sign: X power of 10 English letter “H” Arabic character “”ا Arabic character “ ” with [Shift] key Mathematical sign: [MC] (clear memory numerals) English letter “I” Arabic character “”هـ Mathematical sign: subtraction Logical operator “not” in scientific calculation with [Shift] key English letter “J” Arabic character “”ت Arabic character “ ”ــwith [Shift] key Mathematical sign: [MR] (display numerals) English letter “K” Arabic character “”ن Mathematical sign: [M-] (memory subtract) English letter “L” Arabic character “ ” Arabic character “ ” with [Shift] key Mathematical sign: [M+] (memory add) English letter “M” Arabic character “”ة Arabic character “ ”ىwith [Shift] key 6 Mathematical sign: [AC] (clear memory numerals and calculating steps) English letter “N” Arabic character “”ك Arabic character “ ” with [Shift] key Mathematical sign: clear numerals English letter “O” Arabic character “”ح Arabic character “ ”خwith [Shift] key Mathematical sign: addition Logical operator “xor” in scientific calculation with [Shift] key English letter “P” Arabic character “”ج Mathematical sign: positive/ negative English letter “Q” Arabic character “”ض Mathematical sign: inverse English letter “R” Arabic character “”ق Mathematical sign: Y power of X English letter “S” Arabic character “”س Arabic character “ ”ﻵwith [Shift] key Mathematical sign “Sort” in Statistic Calculator with [Shift] key 7 Mathematical sign: natural logarithm English letter “T” Arabic character “”ف Mathematical sign: o° (degree), ' (minute), " (second) English letter “U” Arabic character “”ع Mathematical sign: multiplication Logical operator “or” in scientific calculation with [Shift] key English letter “V” Arabic character “”ط Arabic character “ ”ظwith [Shift] key Mathematical sign: PI (π=3.14159…) English letter “W” Arabic character “”ص Mathematical sign: X power of e (e=2.71828…) English letter “X” Arabic character “”ر Arabic character “ ”زwith [Shift] key Scientific calculator: angle conversion English letter “Y” Arabic character “”غ Mathematical sign: division Logical operator “and” in scientific calculation with [Shift] key 8 English letter “Z” Arabic character “”ء Arabic character “ ”ﺋـwith [Shift] key Scientific calculator: mode conversion Hot key Access to "Telephone" with [Shift] key Save data Access search screen with [Shift] key Switch between E-A Dictionary and A-E Dictionary Listen and repeat after the device (in the explanation screens) with [Shift] key Hot key to access "Comprehensive Dictionary" Hot key to access "Collins Advanced English Dictionary" Hot key to access "Simple Calculator" Hot key to access "MP3 Player" Hot key to access "Recorder" with [Shift] key 1) to view the words that have been looked up recently in dictionaries 2) Function key Open/ close backlight with [Shift] key Listen to English/ Arabic pronunciation Adjust volume and speed with [Shift] key ON/OFF key 9 Full stop for text Decimal point for calculator Comma for text with [Shift] key Switch focus in some applications Switch font sizes among large, medium and small with [Shift] key Exit from the current application Clear data with [Shift] key Temporarily lock the keyboard for inputting English capital letters Press [Shift] twice to lock the keyboard for inputting English capital Shift between Arabic and English display modes Delete a letter or a selected string Display calculation result with [Shift] key shift among the main applications Display local time and date with [Shift] key Input a space Select symbols with [Shift] key Move the cursor to the next line to input data Add a new line with [Shift] key Mathematical sign: [=] Up direction key; move the cursor up or scroll a line up; create new data with [Shift] key Down direction key; move the cursor down or scroll a line down; edit file with [Shift] key 10 Left direction key; move the cursor left or page left; lock/unlock data with [Shift] key Right direction key; move the cursor right or page right; insert word(s) with [Shift] key Page up; View the previous data Adjust the LCD contrast with [Shift] key Page down; View the next data 3. The Panel The device adopts 3.5 inch 240x160 FSTN screen. 4. Power Source Any of the following power sources can be used: A. Two Alkaline batteries AAA. B. Connection with PC via USB cable. 4.1 Replacing Batteries Insert: 1) Press [ON/OFF] to turn the power off. 2) Remove the batteries compartment cover. 3) Insert the batteries into the compartment as above. 11 4) Close the batteries compartment cover securely. Remove: Repeat the steps above. When reaching step 3, please remove the batteries. Notes: ① When the power is insufficient, please turn off the device, and then replace batteries according to the above steps. ② Personal data will be retained even if the device is out of power. Please turn off the device first, and then take out the batteries 3 seconds later. Otherwise, data may be displayed incorrectly. ③ If the screen of “LOADING…” appears repeatedly, this means the batteries are no longer usable. Please change them to new ones. 5. Initializing or Resetting When you turn the device on for the first time or reset it, you should set your device according to the following steps: * Select , and press [ENTER] to access the startup screen. , and press [ENTER] to initialize the device (to return to the * Select default settings). again, and all your personal data and settings will be * Select deleted. 12 * Press the Left/Right Key to select the language (English or Arabic). 6. Main Menu A. Press [More] to change the mode of display. B. Press [Lang] to shift between Arabic and English menus. C. Select an item and press [ENTER] to access. D. Press [Shift], and then Press [More] to turn the backlight on or off. E. Press [Menu] to shift among the main applications. Main Menu Press [More] to change the mode of display . 13 Note: Press the Right key to view the whole name of the item in the list mode of display if it is not completely displayed. F. Press [Shift], and then Press [Menu] to display local time and date in any screen. System local time and date: 7. Data Search Input a keyword in “Telephone, Income & Expense or Investment Management”, and then select searching range to carry on overall data search (only available in index screen and detailed view screen). A. Press [Shift] first, and then press [Save] to search. B. Press [Tab] or the Up/Down key to choose the check box, and then press [Space] to select: Telephone, Income & Expense or Investment Management. C. Input the keyword to search. D. Press [ENTER] to start searching. 14 E. The result will be displayed on the screen: ¾ Press the numeric key [1] to view the whole entry. ¾ Press the Page Down key to search the next entry. ¾ Press the Page Up key to return to the previous data. 8. Input Methods The device provides English and Arabic input methods. You can press [Lang] to switch between them. 9. USB Disk Through USB cable, you can download data from PC. Note: Do not remove the USB cable during the operation. Otherwise, the data will be lost and the device will be abnormal. 9.1 Download Operation The device provides automatic searching function and allows you to create new folders for data. 15 9.1.1 Automatic Search: * During the process of data transmission, a line will appear to show the status of transmission. * Before removing the USB: ① Make sure that the transmission of data is completed. to safely remove the USB cable. ② In PC: Click ③ Press [Esc] to exit from the application window of “Organizer-- PC Synchronization”. For Example, download an "MP3" file to the device: Step 1: Use USB cable to connect the PC with the device, and then enter the application “Organizer-- PC Synchronization”. Device PC Step 2: Copy the "MP3" file from PC disk to the removable disk of the device. 16 Step 3: ① After completing downloading the file, exit from the application “Organizer-PC Synchronization”. ② Enter "MP3 Player" application, choose [Yes], the device starts to search for the downloaded data. 17 Dictionaries Summary ) Contains 3 complete dictionaries and language usages. ) Allows changing font size in the explanation screen. ) Allows previewing definition in the preview window during smart search. ) Up to 30 cross search windows can be opened. ) Provides history records (Up to 200 records). ) Provides smart input method, secondary search, wildcard search, cross search, multi-dictionary search, pronunciation, listen and repeat, etc. Atlas Modern Dictionary E->A (Ency.): z This dictionary contains inclusive English words and phrases with their Arabic explanations. z Provides English pronunciation. z Allows switching between E->A Dictionary and A->E Dictionary. z Provides secondary search: Spelling Check and The Nearest Word. z Provides smart and wildcard search. z Allows viewing word information such as: Phrasal verbs, Plural Nouns, Synonyms, Antonyms, Comparisons, Idioms, etc. z Allows adding words to "Learning List". z Provides transcription table. Arabic→English Dictionary: z Contains a general dictionary of Arabic words and phrases with their English meanings. z Provides Arabic pronunciation. z Provides Arabic transliteration. z Allows switching between E->A Dictionary and A->E Dictionary. 18 Collins Advanced English Dictionary: z z z Contains an advanced English dictionary of English words and phrases with their English meanings. Provides English pronunciation. Provides many example sentences. Abbreviations: z Contain English abbreviations with their English and Arabic meanings. User’s Dictionary: z Enables you to create your own dictionary. Learning List z z Enables you to add your preferred words from Atlas Modern Dictionary E->A (Ency.) to it. You can clear the word(s) that you add. Global Search z z z z Searches for a desired word in all available dictionaries. Provides searching for English or Arabic words. Allows you to set Dictionaries, Type, and Helper to help you searching for words. Allows saving data. 1. Dictionary Index When you access to a dictionary, the index screen of all entries will appear. In this screen, you can press the Page Up/ Page Down key to search for a word or you can input the desired word to search for. * Press [Lang] to switch between E->A Dictionary and A->E Dictionary. * In English index screen, input the English words to search. * Press [ENTER] key to enter the explanation screen. * Press [Esc] to return to the previous screen. * Press [Tab] to close or open the preview screen. 19 * In English index screen, press [Say] to pronounce the English keyword. * In Arabic index screen, press [Say] to pronounce the Arabic keyword. Index screen : Press [Lang] to switch between E->A Dictionary and A->E Dictionary. : Press [Tab] to close or open the preview window. : Press [More] to view the words that have been looked up recently. Up to 200 words can be saved. : Press the numeric key [1] to display the copyright of the dictionary. Take “good” as an example in Atlas Modern Dictionary E->A (Ency.). Press [ENTER]. Input [g][o][o][d] in the index screen. 20 1.1 History Press [More] in the index screen to view the words that have been looked up recently (Up to 200 words can be saved). Press [Del] to delete the selected record. 2. Dictionary Explanation * Input a word to be looked up and press [ENTER] to access the explanation screen. * Press the Up/ Down key to view the explanation of the current word. * Press the Page Up/ Page Down key to view the explanation screen of the previous or next word. * 3 font sizes are available. Press [Shift], and then press [Tab] to change font size. * Cross search and search in multi-dictionary options are available for the selected words, 30 windows for cross search can be opened. * Provides listen and repeat function to practice pronouncing the words correctly. 2.1 Font Size In the explanation screen, 3 kinds of font sizes are available. Press [Shift], then press [Tab] to change the font. 21 Small font Large font 2.2 Related Data Search When [More] appears on the explanation screen, press it to view the related data. Take “good” as an example: Press [More]. Explanation screen Select the corresponding item and press [ENTER] to view. 2.3 Pronunciation * Press [Say] to listen to the pronunciation. * Press [Esc] to stop the pronunciation. * Press [Shift] first, and then press [Say] to set volume and speed. 22 Set Volume and Speed: Press [Tab] or the Up/ Down key to select an item; press the Left/ Right key to set volume and speed. Press the numeric key [1] to return to the default settings. Press [Save] to confirm. 2.4 Listen and Repeat Listen and repeat function is available in the explanation screen. Press [Shift], and then press [E←→A] to practice English pronunciation. (Recording time is about 5 seconds.) Steps: A. You will listen first to the standard pronunciation, which will be repeated twice. B. You will listen then to a beep sound. C. You will record your voice (A bar will display the recording status). D. Then you will repeat the standard pronunciation. E. And finally you can listen to your pronunciation. F. Continue? [Y]/ [N] (Select [Y] to repeat the steps D and E; select [N] to delete the recorded data). 3. Searching Methods Provides several search methods to help you find the desired word. In the index screen: 1. Smart input method. 2. Wildcard search (available in E->A and E->E dictionaries only). 3. Multi-dictionary search. 4. Secondary search (available in E->A and E->E dictionaries only). 23 In the explanation screen: 1. Word information: Phrasal verbs, Idioms, etc. 2. Cross search. 3.1 Smart Input Method Input the first or the first few letters of an English word, you can find the desired word or phrase in the dictionary list. You can use this method by two ways: ① Input the first or first few letters of a word, a list or words will be displayed for selection, choose the desired word and then press [ENTER] to confirm. ② Press the Up/ Down key to move the cursor, or press the Page Up/ Page Down key to select the desired word, and then press [ENTER] to confirm. For example, look up “good” in Collins Advanced English Dictionary. 2. Press [ENTER] to display the 1. Input [g][o][o][d]. explanation fully. 3. Press the Page Up/ Page Down key to view the previous/ next word. 24 3.2 Wildcard Search (available in E->A and E->E Dictionaries only) To look up a word that you are not sure of its spelling, input all the letters you know and replace the unknown letter(s) with “?” or “ ”. Steps: ① Input the English letters that you are sure of. ② Replace the unknown letters with “?” or “ ”. ③ Press [ENTER], the list of words that match your input will be displayed. * Press the Page Up/ Page Down key to look up in the previous/ next page. * Press the Up/ Down key to move the cursor to the desired word. ④ Press [ENTER] to access the explanation screen of the selected word. Notes: • “?” stands for an unknown letter; “ ” stands for several unknown letters. • “?” or “ ” can be input as the first letter. For example, input “d*t?r” in Atlas Modern Dictionary E->A (Ency.). 1. Input “d*t?r”. 2. Press [ENTER] to confirm, a list of words will be displayed. 25 3. Select “daughter” to access the explanation screen of the word. 3.3 Multi-Dictionary Search When an input word is not included in the current dictionary, but in other one(s), multi-dictionary is available. For example, take the word “google” in Collins Advanced English Dictionary. 1. Input “google". 2. Press [ENTER] to search. 3. Select E→A to view the definition of google in Atlas Modern Dictionary E->A (Ency.). 3.4 Secondary Search If the input word is not found, two kinds of secondary search methods are provided: 26 • Spelling Check: Displays words that are nearly similar in spelling. • The Nearest Word: Accesses the nearest word in alphabetical order. Steps: ① Input an English word, and then press [ENTER] to search. ② Press the corresponding numeric key to search. * If “Spelling Check” is selected, press the Up/ Down key to select the desired word, and then press [ENTER] to confirm. * If “The Nearest Word” is selected, it will display the explanation of the nearest word. Take the word “about” as an example, but “about” is misspelled as “abot” in Atlas Modern Dictionary E->A (Ency.). 1. Input “abot”. 2. Press [ENTER]. 3. Select “1. Spelling Check”. 4. Select “about” and press [ENTER]. 27 5. Select “2. The Nearest Word”. 3.5 Cross Search In the explanation screen of any word, when you encounter unfamiliar word you can highlighted it and cross search in the corresponding dictionaries. Up to 30 layers can be opened. The number of the layers will be displayed in the screen. ① In the explanation screen, highlight the English word(s) to be looked up: * Press the Right key to highlight a word, press [Space] to continue highlighting, and then press the direction keys to set the range. Press [Space] again to cancel. ② Press [ENTER] to search. * Press [Esc] to return to the previous screen. Take the cross search in Arabic→English Dictionary. 2. Press [ENTER]. 1. Highlight an English word. 28 3. Select E→A. 4. Highlight an Arabic word. 5. Press [ENTER]. 6. Select A→E 4. Learning List Enables you to add your preferred words from Atlas Modern Dictionary E->A (Ency.). If there is no saved data: 29 In Atlas Modern Dictionary E->A (Ency.), enter to “good” for example. 1. The explanation screen of 2. Press [More] and select [6. “good”. Add to Learning List]. 3. Press [ENTER]. 4. Access to Learning List. 5. To delete the saved word, press [Shift], and then press [Esc]. 30 Specialized Dictionaries Summary ) Provides many dictionaries, which are specialized in computer, engineering, sports, commercial, law, etc. ) Allows changing font size in the explanation screen. ) Allows previewing definition in the preview window during smart search. ) Up to 30 cross search windows can be opened. ) Provides history records (Up to 200 records). ) Provides English pronunciation. ) Provides smart input method, cross search, listen and repeat, In addition to preview window in the index screen. Comprehensive Dictionary: z Includes all words found in the available specialized dictionaries. Computer, Internet and IT Dictionary: z Contains most of the words related to computer, internet, and IT. Engineering Dictionary: z Contains most of the words used in engineering. Electrical Engineering Dictionary: z Contains most of the words related to electrical engineering. Mechanical Engineering Dictionary: z Contains most of the words related to mechanical engineering. Chemical Engineering Dictionary: z Contains most of the words used in chemical engineering. 31 Architecture and Civil Engineering Dictionary: z Contains most of the words related to architecture and civil engineering. Scientific Dictionary: z Contains most of the words related to science. Medical Dictionary: z Contains most of the words related to medicine. Commercial Dictionary: z Contains most of the words used in commerce. Law Dictionary: z Contains most of the words related to law. Political Dictionary: z Contains most of the words used in politics. Relation Dictionary: z Contains most of the words related to relations. Military Dictionary: z Contains most of the military words terms. Sports Dictionary: z Contains most of the words used in sports. 32 General Operations: A. Select “Specialized Dictionary” and press [ENTER] to access. B. Select an item to access. C. Press the Up/ Down key to select a word, and then press [ENTER] to access. D. Press [Shift] and then press [Tab] to change the font size in explanation screen. E. Highlight a word to be looked up, and then press [ENTER] to cross search. F. Press [Shift] and then press [E←→A] to listen and repeat. G. Press [Esc] to return to the previous screen. Take “Comprehensive Dictionary” as an example. Input a word and then press Index screen [ENTER] to view its explanation. Note: As for other functions, such as font size, listen and repeat, smart search, cross search, etc., please refer to "Dictionaries". 33 Grammar Summary ) Provides most of the subjects related to English grammar and syntax issues. ) Provides two kinds of tests in English grammar. ) Provides the usage of punctuation marks. ) Allows you to cross search. English Grammar z Provides Basic English grammar with explanations and tests. z Allows you to cross search. z Allows switching between Arabic and English languages. z Allows changing the font size in the explanation screen. Test Your English Grammar z Provides multiple-choice test in English grammar. English Test z Provides three-level test in which questions are presented orally. Punctuation Marks z Provides detailed explanation about punctuation marks. 34 1. English Grammar Index screen Select an item and then press [ENTER]. Take “Definition” as an example: Press the numeric key [1] to access to Test Your English Grammar. 2. Test Your English Grammar 2.1 Serial Questions Set the number of start Press [ENTER] then set the question. number of end question. 35 Press [ENTER] to start the test. Press the corresponding key to choose an answer. Press the numeric key [1] to If your answer is wrong: display the grammatical rule. Press the numeric key [5] to display the result. ¾ Press the Page Down key to go to the next question. ¾ Press [Esc] to exit. Note: The operation steps of “Random Questions” are the same as that of “Serial Questions”. Please refer to “Serial Questions”. 36 3. English Test Enter to English Test, select one Press the numeric key [1] to item and then press [ENTER]. access to Mock Test. Press the numeric key [1] to Press any key to continue. Listen start. to the question and press [A], [B], or [C] to choose an answer. When the test is completed, Press [ENTER] the result will be displayed. You can press the direction keys to select a question number to listen to it again. 37 Press the numeric key [2] to access [Practice Room]. Select an item to practice. ¾ Press the numeric key [1] to show the question and answers, press the numeric key [1] again to return to the previous screen. ¾ If the question and answers are shown, press the numeric key [2] to listen to the question and answers. ¾ Press the numeric key [3] to listen to the question again. ¾ Press [A], [B], or [C] in the screen to answer the question, the reading will stop when you choose an answer. ¾ Press the numeric key [5] to proceed to the next question. ¾ Press the numeric key [4] to return to the previous question. ¾ Press [Esc] to exit. 38 Language Summary ) Provides Dialogue, Vocabulary, English Phonetics, Irregular Verbs, etc. ) Provides cross search. ) Interactive English provides dialogues and role-play to help you mastering vocabulary, simple sentences, and usages. Dialogue z Provides important types of dialogue in English. z Allows switching between Arabic and English languages. z Provides English and Arabic pronunciation of sentences. z Provides cross search. z Provides listen and repeat. 12 Languages Dialogue z Contains different types of dialogue written and spoken in 12 languages. z Provides cross search. z Allows searching for English and Arabic words. Vocabulary z Provides the most of vocabularies in English and their Arabic meanings. z Provides cross search. z Provides pronunciation in English and Arabic. z Provides listen and repeat. Vocabulary Buildup (3 levels) z Contains 3 levels of most common English words with their Arabic meanings. z Provides cross search. 39 English Phonetics z Help you learn the pronunciation of the words by presenting their sound symbols. Interactive English z Provides different dialogues with recorded human voice of different situations to read and listen to. z You can play the role you want to and record your pronunciation for comparison. z Provides cross search. Naturalistic Learning Method z Helps you in learning English in a natural method by listening to the sentences and repeating them. Irregular Verbs z Contain verbs that have irregular forms. Irregular Plural Nouns z Contain plural nouns that have irregular forms. Phrasal Verbs z Contain most of the phrasal verbs in English language with their Arabic meanings. 40 1. Dialogue applications * Take “12 Languages Dialogue” as an example: Index screen Press the Right key to display the complete name. Select one item and press Take “Custom” as an example, [ENTER]. Press the numeric key [0] to Press [Lang] to select language. search for a word. 41 Note: Press the numeric key [1], [2], or [3] to listen to the sentence in the three languages separately, press [4], [5], or [6] to listen to all sentences in sequence in one language, and press [Lang] to change the language. 2. Pronunciation * Take “English Phonetics” as an example, English Phonetics provides standard phonetic symbol pronunciation with explanations and examples. * Press the Left/ Right key to choose Vowel, Consonant, or Special. * Press the numeric key [0] to listen to all the phonetic symbols one by one. Press the numeric keys at the end of each line to listen to the phonetic symbol and its examples. * Press the Up/ Down key, or press the Page Up/ Page Down key to select a phonetic symbol. English Phonetics 3. Interactive English Interactive English provides dialogues and role-playing to help you mastering vocabulary, example sentences, and usages. 42 Index screen Select one item to access Press the numeric key [2] to Press the numeric key [2] to view the setting access the dialogue. Press the numeric key [3] Select a role to begin role-playing. 4. English Study Applications * Take “Naturalistic Learning Method” as an example: 43 Access the Naturalistic Learning Select a level and then press Method application. [Save] or press [ENTER] to confirm. Repeat Press the numeric key [2] to stop. Press the numeric key [5] to pause. Press [Esc] to exit. 44 Organizer ) Provides Telephone, Calendar, Personal Information, and PC Synchronization. ) Allows creating information in Arabic or English. Telephone z Allows creating telephone records. z Allows inputting data in English and Arabic. z Allows copying, modifying, deleting records or creating new ones. z Allows setting custom fields. z Allows securing data from unauthorized access. z Allows adding new categories, which can be edited. Calendar z Contains an advanced Gregorian/ Hijri calendar with days, months, and years. z Provides calendars from January 1910 to December 2099. z Allows displaying 6-month calendars in one screen. Personal Information z Provides a center for the user’s personal information. z Allows securing data from unauthorized access. PC Synchronization z Allows synchronizing data between the PC and the device. 45 1. Telephone A. Access the initial screen: ¾ If there is no saved data, the device will display the following message. Press [Y] to create a new record. ¾ If there is saved data, the device will display the index screen. Press [Shift], and then press the Up key to add new record. B. Edit data: ¾ Press the Up key to select a category. ¾ Press the direction keys to move the cursor. ¾ Press [ENTER] to go to the following field. ¾ Press [Shift] and then [ENTER] to start new line in the same field. ¾ Press the Page Up/ Page Down key to display the previous/ next page. ¾ Press [Shift] and then press the Left key to lock/ unlock data: Â If you don’t select "2 Lock" in "Miscellaneous--System Setup--Password Setting", the data will be just hidden and not locked. Â If you select “2 Lock” in “Miscellaneous--System Setup--Password Setting”, the data will be locked. ¾ Press [More] and then select “Setting” to set the two items to be displayed in the index screen. 46 C. Press [Esc], the following message will be displayed. ¾ Select [Yes] to save the data. ¾ Select [No] to exit without saving. ¾ Select [Cancel] to cancel the operation and continue editing. D. Press [Save] to save the data. For example, create a new record: Access the editing screen. Input data. Press [More]. Press [ENTER] to modify the settings. ¾ You can press the Left/ Right, Up/ Down keys to select the desired items. After setting press [Save]. 47 After editing the data press [Save]. Press [T], then the related contact numbers can be displayed. 1.1 Lock/ Unlock Data The default status of a record is After inputting data press [Shift] to be unlocked then the Left key, the symbol . will appear. 1.2 Telephone Record When the button [1 Last Viewed] appears in the index screen, press the numeric key [1] to view the telephone records that are recently viewed. 48 Index screen Press the numeric key [1] to display the last viewed records. Press [ENTER]. ¾ Press [Shift], and then press the Down key to modify the record. ¾ Press [Del] to delete the record. ¾ Press the numeric key [1] to copy this record and save it as a new one. ¾ Press [Shift] first, and then press [Tab] to change font sizes. 49 1.3 Find Data Press [ENTER]. Press [Shift], and then press [Save] in the index screen and input keyword to find data. ¾ Press the numeric key [1] to access the detailed view screen. ¾ Press the Page Down key to view the next record. 1.4 Edit Category Press [Tab] or the direction keys to highlight “All Records” in the index screen, then press [ENTER]. Press the Down key, and then Press [ENTER]. select [Edit Categories]. ¾ Select a field to input data. ¾ Press [Save] to save data. 50 ¾ Up to 3 categories can be added, all of which can be deleted in “Miscellaneous -- Data Management”. 1.5 Custom Category Press [More] in the index Press [ENTER]. screen, and then select “2 Custom Category”. Press [ENTER], then the Press [ENTER] or press [Y] to following message will appear: input data. Press [Save] to save data and Press [Tab] or the direction keys return to the previous screen. to highlight the data type, then press [ENTER]. a ¾ Press the Up/ Down key to select a type. 51 ¾ Press [Save] to save data. ¾ Up to 6 custom categories can be added, all of which can be deleted in “Miscellaneous -- Data Management”. 2. Calendar Calendar Press [Space] to set a year. Press the Up/ Down key to Press the numeric key [1] to view select month; press the Left/ the date of the current day. Right to select date. Press [More] to view a 6-month Press the Page Up/ Page Down to calendar. display the previous/ next 6-month calendar. 52 3. Personal Information Editing screen Input data and then press [Save]. Detailed screen ¾ Press [Del] to delete a record. ¾ Press [Shift] and then press the Down key to edit. Note: For detailed operations, please refer to “Telephone”. 4. PC Synchronization Connect the device with the PC by the PC Link cable. It is used to exchange data between the PC and this device. Please refer to the instructions in Atlas Link. 53 Calculations Summary ) Contain different kinds of calculators, and other calculation applications. Simple Calculator z Allows performing simple calculations. Scientific Calculator z z Allows performing scientific calculations. This application provides [+] [-] [x] [÷] [AC] [More] [+/-], scientific mathematical symbols, and Boolean operation symbols can be used in scientific calculator. Scientific Drawing z Draws curves for different formulae. Multi-Line Calculator z Allows viewing the parts of the equation you are calculating. Man-Hour Calculator z Allows calculating the work time in hours or days. Cost-Profit Calculator z Allows performing cost and profit calculations. Statistics Calculator z Allows performing statistic calculations. 54 Loan Calculator z Allows performing loan calculations. Metric Conversion z Allows converting metrics. Currency Exchange z Allows exchanging any currency you select. Income & Expense z Allows you to calculate income and expense. z Allows copying, modifying, deleting records, or creating new ones. z Allows securing data from unauthorized access. Investment Management z Allows you to manage your investments. z Allows copying, modifying, deleting records, or creating new ones. z Allows securing data from unauthorized access. z Allows adding new categories which can be edited. Formulae Calculator z Allows you to calculate formulae. Equation Solving z Allows you to solve equations. Coupled Equation z Allows you to solve coupled equations. 55 Fundamental Mathematical Symbols: Symbol Mathematical Operation Key [+] Addition [O] [-] Subtraction [I] [x] Multiplication [U] [÷] Division [Y] [MC] Memory clear [H] [MR] Memory replay [J] [M-] Minus from memory value [K] [M+] Plus into memory value [L] [C] Clear/ Clear error [N] [AC] All clear [M] [%] Percentage Press [Shift] first, and then press [5] [+/-] Positive/ Negative sign [P] Scientific Mathematical Symbols Symbol Mathematical Operation Key [1/X] Inverse [Q] [X!] Factorial [B] [EXP] Exponential (constant) [C] [π] Pi [V] [º'"] Degree/ Minute/ Second [T] 56 [log] Logarithm [A] [ln] Natural logarithm [S] [ ] Square root [D] [y x] Y root of X [F] x X power of 10 [G] x Exponential [W] 2 Square [E] [10 ] [e ] [x ] [xY] Y power of X Boolean Operation Symbols Symbol Key [and] Press [Shift] first, and then press [Y] [or] Press [Shift] first, and then press [U] [not] Press [Shift] first, and then press [I] [xor] Press [Shift] first, and then press [O] General Operations: A. Select “Calculations” icon. B. Select the item to access. C. Press [Lang] to switch between Arabic and English. D. Press [Esc] to return to the previous screen. E. Press [M] to clear all values. 57 [R] 1. Simple Calculator Input screen Note: Input a numeral and press [L] (M+), and then press [Esc] to exit. When you access Simple Calculator again, the symbol [M] is still there. Press [J] (MR) to display the numeral before pressing [L] (M+). 2. Scientific Calculator Input screen Press [G] and input a numeral. Press [Enter]. Press [More] to select a mathematical symbol. 58 Take “sin” as an example: Input a numeral and then press [Enter]. ¾ Press [Z] to switch among hexadecimal, octal, binary, and decimal cyclically. ¾ Press [X] to switch among radian, percent degree and degree cyclically. ¾ Press [Shift] then [Esc] to clear all input data and return to the initial screen. 3. Scientific Drawing This application provides scientific drawing. Input screen 4. Multi-Line Calculator This application allows you to view the parts of the equation you are calculating. 4.1 Input data Steps: A. Input numerals and operators in sequence. 59 B. Press [ENTER] to get the result. For example: 8+6-2+5-3-6+20=? Take step A and then B. 4.2 Modify Operator Steps: A. Press the Right key to highlight. B. Press the Up/ Down key to move the highlighted cursor to select the numeral or operator to be modified. C. Input a numeral or operator. D. Press [ENTER]. For example: in the calculation of “8+6-2+5-3-6+20=?” modify “+5” as “-7”: Follow step A and then B. Input a numeral and an operator. 60 Press [Enter]. 4.3 Delete Data Press [M] to clear all the numerals and operations on the screen. 5. Man-Hour Calculator This application provides calculations of work time in hours or days. Steps: A. Set Start Date and End Date. B. The default values of “Days per Week”, “Hours per Day” and “Holidays” are 5, 8, and 0 respectively. The numerals can be changed. C. Press [Tab] to select [Total Days] or [Total Hours] respectively then press [ENTER] to view the results. Take calculating the Total Days and Total Hours from 1/3/2009 to 30/4/2009 as an example: Set [Start Date], [End Date], Select [Total Days] or [Total Hours], and [Holidays]. by using [Tab] and then press [ENTER] to view the results. 61 6. Statistic Calculator This application provides statistic calculations. In uniform statistic calculation, Yi is the total number (qty.) of Xi. For example, 10 persons got 60 points, then (Xi, Yi) is (10, 60). For the regressions, (Xi, Yi) is a pair. Input screen. Input a numeral and then press [ENTER]. Input more numerals. Press [Shift], and then press [S]. Select “2 Descending sort from Press [Shift], and then press [Del]. X”. 62 Press the numeric key [1] n=80+60+40+20=200 mean=10000/200=50 sum=70*80+50*60+30*40+10*20= 10000 Sorting type: ¾ Ascending sort from X – Sorts X in ascending order ¾ Descending sort from X – Sorts X in descending order ¾ Ascending sort from Y – Sorts Y in ascending order ¾ Descending sort from Y – Sorts Y in descending order Calculate: ¾ Uniform Statistic: Calculate statistical variables of Xi (number of data points, mean of X values, sample standard deviation of X, population standard deviation of X, sum of X values, and sum of x2 values) ¾ Linear Regression: Fit a linear model to data y=a+bx ¾ Logarithmic Regression: Fit a logarithmic model to data y=a+blnx x>0 ¾ Indicial Regression: Fit an indicial model to data y=abx y>0 ¾ Power Regression: Fit a power regression to data y=axb x>0, y>0 For example, Input 0.3, 0.5, 0.1, 0.3, 0.4 and Press [Shift] and then press [Del]. 0.9 in order. 63 Select “2 Linear Regression”. ¾ Press [More] to select a mathematical symbol. ¾ Press [Shift], and then press [Esc] or directly press [M] to clear all the numerals. 7. Metric Conversion This application provides metric conversion. Press [More] to select measure unit. Press [Tab] to select column and input number to calculate. 8. Income & Expense This application helps you in managing daily income and expenses. 8.1 Create New Income/ Expense Record If there is no saved data, the Press [ENTER] to create a record. following screen will be displayed: 64 Steps: A. Press the Up key to select “Date” field to set date of the new income. B. Move the selection to “Currency” field, and then press [ENTER] to select a currency. C. Move the selection to “Sum” field to input numeral. D. Input data in the “Content” and “Notes” fields. E. Press [Shift] key, and then press Left key to lock/ unlock any record: ¾ If you don’t select "2 Lock" in "Miscellaneous--System Setup--Password Setting", the data will be just hidden not locked. ¾ If you select “2 Lock” in “Miscellaneous--System Setup--Password Setting”, the data will be locked. F. Press [Save] to save the data and return to the index screen. Note: ¾ If a record is locked, it won’t be displayed on the index screen. Press [More] in the index screen to select “1 Show Private Data”, input the password, and then the data will be displayed. ¾ The operation steps of “Expense” are the same as those of “Income”. Please refer to the above steps. 8.2 Index Screen ¾ Move the selection to the arrow to open the drop-down menu and select a field to be shown. ¾ Press [Shift] and press the Up key to create a new record. ¾ Press [Del] to delete the selected data. ¾ Press the numeric key [1] to set option to calculate. 65 8.3 Setting Press [More] on the index Select “2 Setting”. screen. A. Set the digits kept after decimal. B. Press [Save] to confirm. 66 Games Summary ) Contains various types of interesting games. Connect 5 z Make a vertical, horizontal, or diagonal line of five black dots. Square Chess z Try to set black checker by adding them in the squares. 24 Points z Calculate the displayed number in a way through which the result will be 24 points. Puzzle z Rearrange the numbers correctly in the box. 1. Connect 5 Try to place five chess pieces of the same color in a vertically, horizontally, or diagonally line. Cover Press [ENTER] 67 Steps: A. You and the device will take turns to place chess pieces. Press the direction keys to select a place, and then press [ENTER] to place the chess piece. B. Press [D] to demo the game. C. Press [H] to have a hint for one step. D. Press [Shift] and then press the Up key or press [N] to start new game. E. Press [Esc] or press [Q] to quit. Note: The device wins the game if it places five chess pieces in a row first, so you have to prevent it from doing so while playing the game. 2. 24 Points Four cards will be displayed on the screen. Press [ENTER] to start Cover Steps: A. Press [A] or [B] to select a level. B. Calculate the numbers with +, -, x, /, and ( ) to make the result equal to 24. Each card can be used only once. C. Press [ENTER] to check your answer and press [More] to view the answer. 68 D. You will win if you give the correct answer within 150 seconds for each game. E. Press [Esc] to quit. 3. Puzzle Move the blocks to form a whole picture. Cover Press [Start] Steps: A. Move the numeric blocks to arrange them into the correct sequence. B. Press 3, 4, or 5 to select 3×3, 4×4, or 5×5 grids. C. Press direction keys. D. Press [Esc] to quit. 69 Miscellaneous Summary ) Contains Date, Time and City, Travel Guide, Text Reader, System Setup, etc. Date, Time and City z Displays local and world times. z Provides hundreds of world cities for selection. z Allows adjusting local or world city, date and time. z Provides setting of daylight-saving time (DST). Travel Guide z Provides information about countries, languages and currencies. MP3 Player z This application supports simultaneous conveyance of music and lyrics. z Provides A-B record node playing function of MP3. Text Reader z Allows viewing text documents. z Provides text reading. Recorder z Allows recording your voice or any sound. Chemical Elements z Provides a list of chemical elements sorted by Atomic No., Symbol, and Name in addition to Periodic Table. Roman Numerals z Provides the equivalent Roman numeral of any inputted numeral. 70 File Management z Provides data management for several functions. z Allows creating new folders, renaming and deleting them. z Allows formatting, editing or deleting any file or folder. z Allows transmitting data between the device and SD card. Data Management z Contains a list of memory contents and the available memory in the device. Greeting Message z Allows selecting the desired greeting message to be displayed when turning the device on. System Setup z Allows changing any function setup in the device. 1. Date, Time and City Access to Data, Time and City. Press the numeric key [1] to set time. 71 Press the numeric key [2] to access the screen of world city selection. 2. Travel Guide This application provides information about countries, languages and currencies. Initial screen Countries list Select an item to access. Press [More]. 72 3. MP3 Player 1. When there are downloaded 2. Press [Y] to search for files. files, the following screen will appear: 3. Press [P] to play. 4. Press [Y] to display the lyrics. 5. Press [R], then press [A] 6. Press [B], then A-B record to set record node A. node display. 73 7. Press [L] to display play list. 8. Press [C] to select play mode. ¾ Press [R] to open/ close the repetitive playing status. ¾ Press [A]/ [B] to set the start bit/ stop bit, ¾ After setting, the section between and and will be displayed. will be repeatedly played. ¾ Press [G] to turn off LCD and access the power-saving mode. ¾ Press [I]/ [O] key to adjust the volume. Notes: ¾ The function of simultaneous conveyance of music and lyrics can be realized only if the two files with the same name and extension as “.lrc” and “.mp3” are put into the same folder. ¾ When pause, the lyrics can be cross searched. 5. Text Reader If there is downloaded data, Press [More]. select one to view. 74 6. Recorder Data index of Recorder. Press the numeric key [1] to start recording. The keys in gray means that these functions are unavailable at the current status. Press the numeric key [2] to stop recording. The recorder will be saved in the default path of the device. If the space is limited, you can record in [A:] or in a particular path. 7. Chemical Elements This application provides a list of chemical elements sorted by atomic no., symbol or name in addition to the periodic table. Index screen Index screen of “Atomic No.” 75 Input the Atomic No. and then Index screen of “Symbol” press [Enter]. Input the symbol and then press Index screen of “Name” [Enter]. Input a word and then press [Enter]. Periodic Table: Press the Up/ Down key to select the desired chemical element and then press [Enter] to view its details. A. On the browsing screen, press the Up/ Down key to scroll a line by line; and press the Page Up/ Page Down key to view the previous or next data. B. Press [Esc] to exit. 76 8. Roman Numerals Input any numeral to get its equivalent in Roman numeral. Index screen Input a numeral and then press [Enter]. Press [Shift] then [Esc] to clear the numeral and input a new one. 9. File Management The operations of File Management are similar to Windows; you can delete, copy and move data, and also create new folders and rename files. Enter to the application. Press [ENTER] to access a folder. 9.1 Delete, Copy and Move File or Folder A. Press [Del] to delete the selected file or folder. B. Press the numeric key [1] to copy the selected file or folder, then access the path to paste, and then press [3]. 77 C. Press the numeric key [2] to cut the selected file or folder, access the desired path, and then press [3]. D. Press [Space] to tick several files, and then they can be deleted, copied or moved. Data exchange between device and card. 9.2 Create New Folder Creating a new folder. A. Access the path in which you want to create a new folder, and then press [More] to select “2 New Folder”. B. The default name of new folder is “MYDIR”, input a new name and then press [ENTER] to confirm. 78 9.3 Rename A. Choose a file, and then press [More] to select “3. Rename”. B. Input new file name, and then press [ENTER] to confirm. 9.4 Sorting Folders A. Press [Tab] to select “Name” or “Size”. B. Press [ENTER] to sort the folders by “Name” or “Size”. C. Select “Size” then press [Space] to sort folders by “Size”, “Property”, “Modified”, or “Created”. 9.5 Format Select disk or file to be formatted. Formatting. Note: Please select the disk format as FAT32 when the SD card size is over 64MB. 79 10. System Setup This application allows you to change any function setup in the device. Index screen 9.1 Hot Keys Setup A. Select an application from the list. B. Replace it with the desired application. 9.2 Speech Setup Press the Left/ Right key to set volume and speed. 9.3 Password Setting After setting a password, the screen below will be displayed when you access password setting again. 80 ¾ Press the numeric key [1] to edit the password. ¾ Press the numeric key [2] to lock the data. ¾ Press the numeric key [3] to clear the password. 9.4 Contrast ¾ Press the Left/ Right key to adjust the contrast. ¾ Press the numeric key [1] to return to the default setting. ¾ Press [Save] to confirm. 9.5 Favorite Application ¾ Press the Up/ Down key to select your favorite application. ¾ Press [Save] to confirm. When you turn on the device next time, the device will directly access to your favorite application. 81 Download Summary ) Allows downloading many applications. Select the “Download” icon, and then press [ENTER]: If there is no downloaded data, the following screen will be displayed: If there is downloaded data, the following screen will be displayed: Note: If there is no card found or the card is not inserted properly, the message: “Please inset SD card” will be displayed. 82 Contents of CD The attached CD-ROM provides Atlas Link (SD3900i). Insert the CD-ROM into the CD driver of the PC, and then select “Setup” to install the program. (Please refer to picture 1). (1) Notes: ¾ For Windows 2000 users, please access super administrator (Administrator) to log in. ¾ For Windows 2000 users, we suggest you to install Windows 2000 Service Pack 3 program provided by Microsoft. If Service Pack 3 is installed, you don’t have to install USB driver program. Please select “USB Driver readme” as in picture 1 and follow the instructions to install. ¾ For Windows XP users, we suggest you to install Windows XP Service Pack 2 program provided by Microsoft. 83 1. Atlas Link Installation Atlas Link (SD3900i) provides six functions: Media Download, PIM Express, Synchronization Center, Backup and Restore, Open Device Directory, and Settings. They all have the following characteristics: ¾ ¾ Download multimedia files like MP3 and text files. Edit and manage data for Telephone, Investment Management and Income& Expense. ¾ Synchronizing data between the PC and the device. ¾ Backup and restore data. ¾ Share data with the PC and the device. 1.1 Software & Hardware Requirements before Installation 1. To install Atlas Link program (SD3900i) into your PC, the following system requirements should be available: ¾ Windows 2000/ XP/ VISTA operation system. ¾ CPU: Pentium (R) III 1GHz or above. ¾ Monitor: VGA 800*600 or better, which is supported by Microsoft Windows. ¾ Version 5.5 of Microsoft Internet Explorer or above. ¾ Minimum 800MB of hard disk. ¾ CD-ROM Driver. ¾ (Sound Blaster compatibility) sound effect card (driver properly installed). 2. Insert the CD into the CD driver of the PC, and then click “Setup” to start installation. (Picture 2) 84 (2) 3. Access the welcome menu, and then click “Next”. (Picture 3) 4. Click “Browse...” to select a destination folder in picture 4. (3) (4) 85 5. Click “OK” to confirm the selection. (Picture 5) 6. Click “Next” to access folder names menu, as in (picture 6). Click “Next” (5) to continue. (6) 7. Copying. (7) 86 8. After installation is completed, click “Yes” or “No” to select whether to restart your computer now or not (we suggest you to restart your PC), and then click “Finish” to end. (Picture 8) (8) Note: To uninstall Atlas Link program, please access “Control Panel”→ “Add/Remove Programs”. (Also you can do that from “Programs”→ “Atlas Link”→ Uninstall Atlas Link) 1.2 Opening the Program To open the program, click “Start” → “Programs”→ “Atlas Link (SD3900i)”→ “Atlas Link (SD3900i)” or double click the shortcut choose the language of the program as in (picture 9). (9) 87 on the desktop. You can After choosing the language of the program, Atlas Link (SD3900i) picture will be displayed as in (Picture 10). (10) Click “PIM Express” to open PIM Express program. (Picture 11) (11) Note: To optimize Atlas Link display, please use standard font type in Windows. 1.3 Communication Data communication is one of the functions in Atlas Link (SD3900i), including: Media Download, PIM Express, Synchronization Center, 88 Backup and Restore, Open Device Directory, and Setting. - Media Download: Manages different kinds of media files and transfers them between the PC and the device. - Synchronization Center: Automatically synchronizes personal information between Atlas Link and the device. - Backup and Restore: Allows you to make a backup for your personal data in your PC and then restore the backup data from the PC into the device when needed. - Open Device Directory: Exchanges the data between the PC and the device. Note: PIM, Personal Information Management, means that the data is saved by the user. Take “Media Download” as an example to introduce the operation steps: 1. Connect the USB cable into the corresponding socket, as shown in (picture 12). (12) 2. After the USB cable is connected properly, the following screen will appear. (You can select “Organizer-- PC Synchronization”.) 89 3. Click “Media Download” in Atlas Link, as in (picture 10) to access the download screen, as in (picture 13). (13) 4. Click “My Computer” in the left frame of picture 13, select a category to download (take downloading MP3 files as an example). You can also choose downloading the media files to the device or SD card, as in (picture 14-1) 90 (14-1) 5. Select the desired MP3 files in the right frame, and then click “Download” as in (picture 14-2) to download into the device. (14-2) Note: Please do not remove the cable, close the PC Service Home program, or turn off the power while synchronizing, because it may cause system corruption and damage to your data. ¾ Synchronization Center Repeat steps 1 and 2 of “Media Download” and then click “Synchronization center”. 91 ¾ Backup and Restore Backup all the data of the device into your PC; restore the backup data from PC into the device. ¾ Open Device Directory Repeat steps 1 and 2 of “Media Download” and then move, copy, delete or append any file or folder. ¾ Settings Set “Synchronization Center, Synchronization type, PIM Trans, and System Option” respectively. Click “Settings” in the main menu of PC Service Home, and then click “Synchronization type” to set, as shown in (picture 15). (15) 1.4 PIM Express This program allows you to append, modify data and edit custom fields on the PC in PIM applications: Telephone, Investment Management and, Income & Expense. 1.4.1 Editing Data (Take “Telephone” as an example) ¾ Click “File” menu→ “Add New Record” → “Telephone” or click “New Record”→ “Telephone”. You may append Telephone data on the editing screen. (Picture 16) ¾ To modify the content, double click the entry. (Picture 16) ¾ To copy, paste or delete one or more entries, select them first. 92 (16) 1.4.2 Customizing Fields Click “Customize Fields” as in (picture 16) to add custom fields in the built-in fields. Up to 6 field types can be selected, which are: text, date, time, integer, currency, decimal, or check box, as shown in (picture 17). (17) 1.5 Import and Export You can import/ export corresponding data of Telephone from/ to PIM of your PC. 1.5.1 Importing Data (Take “Import Outlook contact” as an example) Import Outlook contacts to PC Service Home as Telephone. ¾ ¾ Click “File” menu→ “Import and Export”→ “Import Outlook contact”. Click “Next”, then “Import Outlook contact” window will be displayed, select data from the right side box to be imported, click “Import” and then click “OK” to import. (Picture 18) 93 (18) Note: The operation steps of “Export” are similar to those of “Import”. 1.6 Help When you have a difficulty in operation, please click “Help”→ “Help” menu to get the help. 94