1
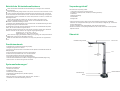
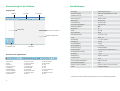
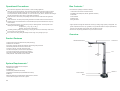
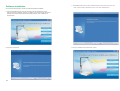
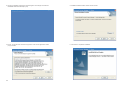
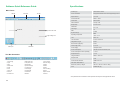
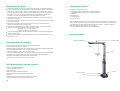
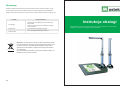
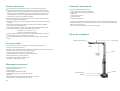
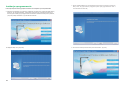
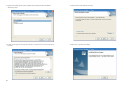
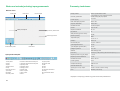
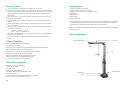
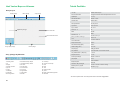
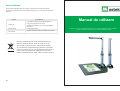
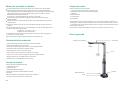
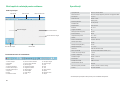
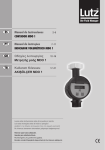
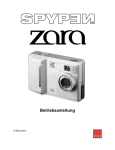
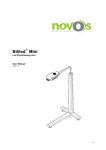
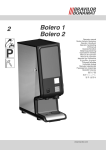
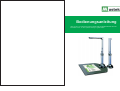
Bedienungsanleitung
Lesen Sie sich vor Inbetriebnahme dieses Geräts bitte die BEDIENUNGSANLEITUNG
aufmerksam durch, um eine optimale Leistung zu gewährleisten.
Inhaltsverzeichnis
Betriebliche Sicherheitsmaßnahmen
1
Produktmerkmale
1
Systemanforderungen
1
Verpackungsinhalt
2
Übersicht
2
Software-Installation
3-6
Kurzanleitung für die Software
7
Technische Spezifikationen
8
Problembehebung
9
Betriebliche Sicherheitsmaßnahmen
Setzen Sie das Gerät nicht direkter Sonneneinstrahlung aus, und lagern Sie es nicht direkt
neben Heizgeräten.
Wenn die Haupteinheit gereinigt werden muss, wischen Sie sie erst mit einem feuchten Tuch ab,
das in einer neutralen Reinigungslösung ausgespült und gut ausgewrungen wurde, und trocknen
Sie sie anschließend mit einem sauberen Tuch ab. Verwenden Sie keine flüchtigen Lösungsmittel
wie Farbverdünner, Benzin, Insektizide usw. auf dem Gerät, da diese es verformen, verfärben und
beschädigen könnten.
Tauchen Sie das Gerät nicht in Wasser ein, da dies eine Störung hervorrufen würde.
Lesen Sie die Betriebsanleitung und machen Sie sich vor der Inbetriebnahme mit allen
Sicherheits- und Betriebsanweisungen vertraut.
Bewahren Sie die Betriebsanleitung gut auf. Sie Sicherheits- und Betriebsanweisungen sollten
zur künftigen Bezugnahme aufbewahrt werden.
Zusatzgeräte: Verwenden Sie keine Zusatzgeräte, die nicht vom Produkthersteller empfohlen
wurden, da von diesen Gefahren ausgehen können.
Platzieren Sie dieses Produkt nicht an einem feuchten, staubigen, windigen oder vibrierenden
Standort. Verwenden Sie das Produkt in den folgenden Umgebungsbedingungen:
Temperatur: 0 oC ~ 40 oC (32 oF ~104 oF)
Luftfeuchtigkeit: 30% ~ 85% (nicht kondensiert)
Achten Sie beim Umgang (einschließlich Aufstellung und Lagerung) oder Transport der Kamera
sorgfältig darauf, nicht gegen den Kamerakopf zu stoßen.
Blicken Sie nicht direkt aus kurzer Distanz in die Lampe (LED). Dies kann zu Augenschäden
führen.
Verpackungsinhalt*
Die CamScanner-Verpackung enthält:
1. CamScanner Doc Scanner & Visual Presenter
2. Installations-CD-ROM (Treiber, Handbuch, Anwendungssoftware )
3. USB-Kabel
4. Bedienungsanleitung
5. Garantiekarte
6. Auflagematte
* Höhere Anforderungen können beim Scannen oder Bearbeiten großer Mengen von Bilddaten
erforderlich sein. Die Systemanforderungen hier sind nur Richtwerte, da allgemein gilt: Je besser der
Computer (Motherboard,
Prozessor, Festplatte, RAM, Videografikkarte), desto besser die Ergebnisse.
* Bewahren Sie Karton und Verpackungsmaterialien für den Fall auf, dass Sie sie zu einem späteren
Zeitpunkt brauchen.
Übersicht
Kamera-Arm
LED-Beleuchtung Schalter
Produktmerkmale
- Kompaktscanner mit CMOS-Sensortechnologie (5MP)
- Verfügbare Scangröße: bis zu DIN A3
- Scannt Fotos, Dokumente, Bücher und dreidimensionale Objekte mit verblüffender Klarheit und
Detailgenauigkeit
- Erkennt Dokumente automatisch und speichert sie als Dateien
- Erstellt schnell und problemlos PDF-, JPG- und DOC-Dateien
- Echte 48-Bit-Farbtiefe für lebensechte Farbreproduktion
- Stromsparendes Design für hervorragende Energieeffizienz
- Hohe Benutzerfreundlichkeit durch USB 2.0-Hochgeschwindigkeitsschnittstelle (Plug & Play)
- Visual Presenter - die ideale Lösung für Büro und Schule
Kamera
Arm
LED
Beleuchtungs
set
Systemanforderungen*
Windows/Intel-kompatibler PC
1. Pentium CPU oder höher
2. CD-ROM-Laufwerk
3. 64 MB RAM (128 MB empfohlen)
4. 250 MB freier Festplattenspeicher (300 MB empfohlen)
5. USB-Schnittstelle
6. Microsoft Windows XP, Windows 2003, Windows VISTA , Windows 7
7. Videokarte mit 16-Bit-Farbunterstützung oder mehr
1
Betriebsanzeige
USB-Schnittstelle
Basis
2
Software-Installation
Schließen Sie vor der Installation zunächst den CamScanner mittels USB-Kabel an einen Computer an.
C. Der InstallShield-Assistent hat den CamScanner Document Scanner-Treiber erfolgreich installiert.
Klicken Sie auf „Finish“, um den Assistenten zu beenden. (Für Windows XP / Vista / 7 muss dieser
Treiber nicht installiert werden.)
A. Schieben Sie die mitgelieferte CD-ROM in das CD-ROM-Laufwerk ein. Drücken Sie auf Setup.exe,
um die Installation zu starten. Falls auf Ihrem System Autorun aktiviert ist, wird das Fenster zur
Einrichtung der CamScanner- Software automatisch wie unten angezeigt geöffnet. Klicken Sie auf „
Install Driver“, um den Treiber zu installieren.
B. Klicken Sie dann auf „Next“wie unten dargestellt.
3
D. Klicken Sie nach der Treiberinstallation auf „Install Software“ (wie unten).
4
E. Wählen Sie die Installationssprache aus (in diesem Beispiel wurde Englisch verwendet).Folgen Sie
dann Schritt für Schritt den Anweisungen des Installshield-Assistenten.
G. Wählen Sie dann wie nachfolgend den Installationsordner aus.
F. Wenn das Fenster mit der Lizenzvereinbarung erscheint, wählen Sie „I accept the terms of the license
agreement.“ (s.u.).
H. Klicken Sie auf „Finish“, um die Installation abzuschließen.
5
6
Kurzanleitung für die Software
Spezifikationen
Hauptmaske
Produkttyp
Titelleiste
Menüleiste
Bildlaufleiste
Symbolleiste
Dynamischer Videobereich
Bildbearbeitungsbereich
Schnelltasten-Leiste
Statusleiste
Illustration der Symbolleiste
1: Bild scannen
2: Öffnen
3: Speichern
4: Ansicht wechseln
5: Rückgängig
6: Wiederherstellen
7: Ansicht verkleinern
8: Ansicht vergrößern
9: Normalansicht
10: Autoscan starten
11: Autoscan beenden
12: Erstes Bild
13: Vorheriges Bild
14: Nächstes Bild
15: Letztes Bild
16: Nach rechts drehen
17: Nach links drehen
18: Drehen ...
19: Bild zuschneiden
20: Bild bewegen
21: PDF
22: DOC
23: JPG
24: Scan-Einstellungen
25: Drucken
26: Bildschirm drucken
27: Über
CMOS-Sensorscanner
Sensor-Parameter
CMOS APS-Digitalbildsensor, 5 MP
Optisches Format
1/2,5 Zoll
Max. aktive Pixel
2592H x 1944V
Bildfrequenz
30 bps(VGA)
ADC-Auflösung
On-chip 12-Bit
Ansprechempfindlichkeit
0.53 V/lux-sec
Beleuchtungsstärke
Lux
50 ∽
Blickwinkel
78°
SNR
40.5 dB
Dynamikbereich
68 dB
Betriebstemperatur
-30 ºC bis +70 ºC
Linse
2G2P + IR
Blendenzahl
F 4.2 mm FNO 2.8
Auflagemaß
0,8 mm
Schnittweite(BFL)
0,8 mm
Brennweite(EFL)
F = 2,7mm
Stromversorgung
USB-Stromkabel
Stromverbrauch
150 mW bei max. Datenrate, 3,3 V
Stromstärke (bei 30 bps.)
< 15 mA
Ruhestrom
< 5 mA
Bildauflösung
2592H x 1944V A3
Ausgabeformat
YUY2
Kommunikationsschnittstelle
USB 2.0 mit UVC
AGC/AEC/Weißabgleich
Auto
Maße (L x B x H) / Gewicht
128 mm x 100 mm x 440 mm / 850 g
Farbe
Metallic-Dunkelgrau
* Leistung und Funktion dieses Produktes können sich ohne Vorankündigung ändern.
7
8
Problembehebung
Bitte überprüfen Sie zunächst die folgende Liste möglicher Probleme und ihrer jeweiligen Lösungen.
Falls Sie das (die) Problem(e) nach Zuziehung der Liste nicht lösen können, beenden Sie umgehend
die Verwendung des Produktes und wenden Sie sich an Ihren Fachhändler oder den
nächstgelegenen CamScanner-Kundendienst.
Problem
Mögliche Lösungen
• Überprüfen Sie, ob alle Kabel ordnungsgemäß
angeschlossen sind und alles angeschaltet ist.
• Vergewissern Sie sich, dass sich der Projektor oder
Computer nicht im Schlafmodus befindet.
Keine Bilder
Verschwommene Bilder
Möglicherweise ist die Linse verunreinigt.
Dunkle Bilder•
Ist das Beleuchtungsgerät eingeschaltet?
User's Manual
Before beginning to operate this unit, please read the USER'S MANUAL carefully in order to
make sure that the best possible performance is obtained
Hinweis: Dieses Symbol auf dem Produkt oder in der Anleitung
bedeutet, dass Ihr elektrisches bzw. elektronisches Gerät am
Ende seiner Nutzungsdauer nicht über den
Hausmüll entsorgt werden darf. Es gibt in der EU hierfür eigene
Sammelsysteme für Recycling-Zwecke.
Weitere Informationen erhalten Sie von Ihrer Gemeindeverwaltung
oder dem Fachhändler,bei dem Sie das Produkt gekauft haben.
9
10
Table of Contents
Operational Precautions
13
Product Features
13
System Requirements
13
Box Contents
14
Overview
14
Software Installation
11
15-18
Software Quick Reference Guide
19
Technical Specifications
20
Trouble shooting
21
12
Operational Precautions
Do not leave the equipment in direct sunshine or close to heating appliances.
When the main unit needs cleaning, wipe it first with a damp cloth that had been soaked in solution
of neutral detergent and tightly wrung; then dry it off with clean cloth. Never use volatile solvents
such as paint thinner, benzine, insecticide, etc. on the unit as they may deform, discolour and damage it.
Also do not immerse the unit in water, as it will result in breakdown.
Read Instructions All the safety and operating instructions should be read before the appliance is
operated.
Retain Instructions The safety and operating instructions should be retained for future reference.
Attachments Do not use attachments not recommended by the product manufacturer as they may
cause hazards.
Do not place this product in any humid, dusty, windy or vibrating location. Use this product in the
following environmental conditions:
Temperature: 0_C~40_C (32_F~104_F)
Humidity: 30%~85% (No condensation)
In handling (including setting up and storing) or carrying the camera, be meticulously careful not to
give an impact on the camera head.
Do not look into the lamp (LED) part directly at close range. It may damage your eyes.
Box Contents *
The CamScanner package contains the following:
1. CamScanner Doc Scanner & Visual Presenter
2. Installation CD-RAM (driver, Manual, application software )
3. USB Cable
4. User's Manual
5. Warranty Card
6. Anti-glare Sheet
* Higher requirements might be needed when scanning or editing a large quantity of image data. The
system requirements here are only a guideline, as in general the better the computer (motherboard,
processor, hard disk, RAM, video graphic card), the better the results.
* Save the box and packing materials in case you need it in the future.
Overview
Product Features
Camera Arm
LED Illumination Switch
- Compact size scanner with CMOS sensor (5MP) technology
- Available scan size: DIN A3
- Scan Photo, Document, Books and 3D objects with amazing clarity and detail.
- Automatically detected Document and save as files
- Create very fast and easy PDF, JPG and doc files.
- True 48-bit color depth for true-to-life color reproduction
- Low power consume design for great energy efficiency
- Plug & play simplicity with High-speed USB 2.0 interface
- Visual presenter - ideal solution for office & school
Camera
Arm
LED
Illumination
Set
System Requirements *
Windows/Intel Compatible Personal Computer
1. Pentium CPU or above
2. CD-ROM Drive
3. 64 MB RAM (128 MB Recommended)
4. 250 MB Free Hard Disk Space (300 MB Recommended)
5. USB Port
6. Microsoft Windows XP, Windows2003, WindowsVISTA , Window 7
7. Video card that supports 16-bit color or greater
13
Power Indicator
USB Po rt
Base
14
Software-Installation
Connect the CamScanner with a computer via USB cable first before installation.
C. TheInstallShield Wizard has successfully installed CamScanner Document Scanner Driver. Click
" Finish” to exit the wizard. ( WindowsXP / Vista / 7 do not need to install this driver)
A. Insert the CD-ROM that comes with your CamScanner into the CD-ROM drive. Press
Setup.exe to start up installation. If Autorun is enabled on your system, then the CamScanner
Software Setup window will be displayed automatically as below. Click “InstallDriver” to
install the driver.
B. Then click “next”as below:
15
D. After driver installation ”click Install Software” as below
16
E. Choose the installation language (here we take English as the example).Then follow the
Installshield Wizard instruction step by step.
G. Installation Destination Folder could be chosen as below
F. Choose “ I accept the terms of the license agreement” when License Agreement window
pop up as bellow
H. Click “Finish” to complete the installation
17
18
Software Quick Reference Guide
Specifications
Main Frame
Product type
Title bar
Tool bar
Menu bar
Sensor Parameter
5 MegaPixels CMOS Active Pixels Digital Image Sensor
Optical Format
1/2.5 inch
Active Pixels Max
2592H x 1944V
Frame Rate
30FPS(VGA)
ADC Resolution
On-chip 12-bit
Responsivity
0.53 V/Lux-sec
Illumination
View Angle
Scroll bar
Dynamic video area
Image editing area
Hotkey bar
1:scan image
2:open
3:save
4:switch view
5:undo
6:redo
7:zoom out
8:zoom in
9:normal view
SNR
10:start auto scan
11:stop auto scan
12:first image
13:previous image
14: next image
15: last image
16: rotate right
17:rotate left
18:rotate...
19:crop image
20:move image
21:PDF
22:DOC
23:JPG
24:scan setting
25:print
26:print screen
27:about
50- ∽ Lux
78°
40.5dB
Dynamic Range
68dB
Operating Temperature
-30 to +70 º C
Lens
2G2P + IR
Lens F Number
F 4.2mm F/NO 2.8
Flange Back Length
0.8mm
Back Focal Length (BFL)
0.8mm
Focal Length ( EFL)
F=2.7mm
Power Supply
USB power cable
Status bar
Tool Bar Illustration
CMOS sensor scanner
Power Consumption
150mW at maximum data rate,3.3V
Power Consumption Current (at 30fps)
< 15 mA
Suspend Current
< 5 mA
Image Resolution
2592H x 1944V A3
Output Format
YUY2
Communication Interface
USB2.0 with UVC
AGC/AEC/ White Balance
Auto
Dimension (LxWxH) / Weight
128 mm x 100 mm x 440 mm / 850g
Color
Metallic dark grey
* The performance and function of this product are subject to change without notice.
19
20
Trouble shooting
Please check the following list of possible problems and their solutions first. If you cannot solve the
problem(s) after consulting the list, stop using the product at once and contact your retailer or the
nearest CamScanner customer service.
Problem
No images
Possible solutions
Check all cables are properly connected and everything
is turned on
Make sure the projector or computer is not in sleep mode.
Blurry images
There may be dirt on the lenses.
Dark images
Is the lighting device turned on?
Mode d'emploi
Avant de tenter d'utiliser cet appareil, veuillez lire le MODE D'EMPLOI attentivement pour
garantir une performance optimale.
Note: This symbol on the product or in the instructions means that
your electrical and electronic equipment should be disposed at the
end of its life separately from your household waste. There are
separate collection systems for recycling in the EU.
For more information, please contact the local authority or your
retailer where you purchased the product.
21
22
Sommaire
Précautions d'emploi
25
Fonctionnalités du produit
25
Configuration du système requise
25
Contenu de la boîte
26
Vue d'ensemble
26
Installation du logiciel
23
27-30
Guide de référence rapide du logiciel.
31
Spécifications techniques.
32
Dépannage
33
24
Précautions d'emploi
Ne laissez pas l'équipement exposé à la lumière directe du soleil ou près d'appareils chauffants.
Lorsque l'unité principale a besoin d'être nettoyée, essuyez-la d'abord à l'aide d'un chiffon humide
trempé dans un détergent neutre. Veillez à ce que le chiffon soit bien essoré. Ensuite, séchez à
l'aide d'un chiffon propre. N'utilisez jamais de solvants volatils tels qu'un diluant, de la benzine, un
insecticide etc. sur l'unité car elle risque d'être déformée, décolorée et d'être endommagée.
Par ailleurs, n'immergez pas l'unité dans de l'eau car elle tombera alors en panne.
Lisez les instructions Toutes les directives de sécurité et d'utilisation doivent être lues avant de
faire fonctionner l'appareil.
Conservez les instructions Les directives de sécurité et de fonctionnement doivent être conservées
pour référence ultérieure.
Accessoires joints N'utilisez pas d'accessoires joints qui ne sont pas recommandés par le
fabricant du produit car ils peuvent être dangereux.
Ne placez pas ce produit dans un lieu humide, poussiéreux, sujet au vent ou à des vibrations.
Utilisez ce produit dans les conditions environnementales suivantes :
Température : 0_C~40_C (32_F~104_F)
Humidité: 30%~85% (pas de condensation)
Lors de la manipulation (dont la mise en service et le stockage) ou lors du transport de l'appareil
veillez à ne cogner le bloc.
Ne regardez pas directement, de manière rapprochée, dans la partie d'illumination (DEL) . Cela
peut blesser vos yeux.
Contenu de la boîte *
L'emballage du CamScanner contient :
1. Présentateur visuel et numérisateur de document CamScanner
2. CD-ROM d'installation (lecteur, manuel, logiciel d'application)
3. Câble USB
4. Mode d'emploi
5. Carte de garantie
6. Feuille anti-reflet
* Une configuration supérieure peut s'avérer nécessaire lors de la numérisation ou de l'édition d'une
grande quantité de données images. La configuration présente du système est fournie uniquement
à titre indicatif car en général plus l'ordinateur est puissant (carte mère, processeur, disque dur,
RAM, carte graphique vidéo), meilleurs sont les résultats.
* Conservez la boîte et l'emballage pour éventuel usage ultérieur.
Vue d'ensemble
Bras de caméra
Illumination DEL Bouton
Fonctionnalités du produit
- Scanner de taille compacte avec technologie de capteur CMOS (5MP)
- Taille de numérisation disponible : DIN A3
- Numérisation de photos, documents, livres et objets 3D d'une qualité et d'un détail impressionnants
- Document détecté automatiquement et sauvegarde comme fichier
Caméra
- Création de fichiers .doc, .JPG et .PDF très rapide et aisée
Bras
- Profondeur d'échantillonnage réelle 48 bits pour une reproduction des couleurs conforme à la réalité
- Conception de consommation faible puissance pour une excellente efficacité énergétique
- Simplicité du prêt à l'emploi avec interface USB 2.0 haute vitesse
- Présentateur visuel – solution idéale pour bureau et écoles
Ensemble
illumination
DEL
Configuration du système requise *
Ordinateur compatible Windows/Intel
1. Unité centrale Pentium ou plus
2. Lecteur CD-ROM
3. Mémoire vive 64 Mo (128 Mo recommandé)
4. Espace sur disque dur libre 250 Mo (300 Mo conseillé)
5. Port USB
6. Microsoft Windows XP, Windows2003, WindowsVISTA , Window 7
7. Carte vidéo qui prend en charge couleur 16 bits ou plus
25
Port USB
Témoin lumineux
Base
26
Installation du logiciel
Branchez tout d'abord le CamScanner sur un ordinateur à l'aide d'un câble USB avant l'installation.
C. L'assistant InstallShield a bien installé le pilote de numérisation de documents CamScanner
(CamScanner Document Scanner Driver). Cliquez sur “ Finish ” pour quitter l'assistant. ( WindowsXP /
Vista / 7 n'a pas besoin d'installer ce pilote)
A. Insérez le CD-ROM fourni avec votre CamScanner dans le lecteur de CD-ROM. Appuyez sur
Setup.exe pour lancer l'installation. Si Autorun est activé sur votre système, la fenêtre d'installation du
logiciel du CamScanner (CamScanner Software Setup) s'affichera automatiquement comme suit.
Cliquez sur “ Install Driver ” pour installer le pilote.
B. Cliquez ensuite sur “ next ” comme suit :
27
D. Une fois l'installation du pilote effectuée, cliquez sur ”Install Software ” comme suit.
28
E. Choisissez la langue d'installation (nous prenons ici l'anglais comme exemple). Ensuite, suivez les
instructions de l'assistant Installshield, étape par étape.
G. L'installation du dossier de destination peut être choisi comme suit :
F. Choisissez “ I accept the terms of the license agreement ” lorsque la fenêtre suivante apparaît.
H. Cliquez sur “ Finish ” pour achever l'installation.
29
30
Guide de référence rapide du logiciel
Spécifications
Fenêtre principale
Barre d'intitulé
Barre de menu
Barre de défilement
Zone vidéo dynamique
Zone d'édition des images
Barre de raccourci clavier
Barre de statut
Illustration de la barre d'outils
1:numérisation image
2:ouvrir
3:sauvegarder
4:basculer vue
5:annuler
6:rétablir
7:zoom arrière
8:zoom avant
9:vue normale
Type de produit
Capteur CMOS scanner
Paramètre capteur
Capteur image numérique pixels actifs
CMOS 5 méga pixels
Format optique
1/2,5 pouces
Barre d'outils
10:lancement num. auto scan
11:arrêter numérisation auto
12:première image
13:image précédente
14: prochaine image
15: dernière image
16: tourner à droite
17:tourner à gauche
18:tourner...
19:rogner image
20:déplacer image
21:PDF
22:DOC
23:JPG
24:param. num.
25:imprimer
26:écran d'impression
27:à propos de
Pixels actifs max.
2592H x 1944V
Cadence prise de vue
30 PI/S(VGA)
Résolution conversion
analogique-numérique
12 bits intégrés
Sensibilité énergétique
0,53 V/Lux-sec
Illumination
50- ∽ Lux
Position angulaire
78°
RSB
40,5dB
Etendue dynamique
68dB
Température de service
-30 à +70 º C
Lentille
2G2P + IR
Ouverture numérique lentille
F 4,2mm Ouv. num. 2,8
Longueur dos flasque
0,8 mm
Tirage
0,8 mm
Distance focale
F=2,7mm
Alimentation
Câble USB
Consommation
150mW au débit maximum, 3,3V
Consommation courant (à 30pi/s)
< 15 mA
Suspend Current
< 5 mA
Résolution image
2592H x 1944V A3
Format sortie
YUY2
Interface communication
USB2.0 avec UVC
AGC/AEC/équilibre des blancs
Auto
Dimension (LxlxH) / poids
128 mm x 100 mm x 440 mm / 850g
Couleur
Gris foncé métallique
*La performance et les fonctions de ce produit peuvent changer sans préavis.
31
32
Dépannage
Veuillez tout d'abord consulter la liste suivante des problèmes éventuels et de leurs solutions. Si vous
ne pouvez toujours pas résoudre le problème après avoir consulté cette liste, arrêtez immédiatement
l'utilisation du produit et contactez votre revendeur ou bien le service clientèle CamScanner le plus proche.
Problème
Pas d'images
Solutions possibles
Vérifiez que tous les câbles sont bien connectés et que
tout est allumé
Veillez à ce que le projecteur ou l'ordinateur ne soit pas
en mode de veille.
Images floues
Il est possible que les lentilles soient sales.
Images foncées
Est-ce que l'appareil d'éclairage est allumé ?
Instrukcja obsługi
Należy dokładnie przeczytać niniejszą instrukcję przed przystąpieniem do użytkowania
urządzenia, aby otrzymać najlepszą możliwą wydajność
Remarque : Ce symbole sur le produit ou dans les instructions signifie
que votre équipement électrique ou électronique doit être mis au rebut
à la fin de sa vie utile, à part des déchets ménagers courants. Des
systèmes de recueil distincts en matière de recyclage dans l'UE sont
mis à disposition.
Pour de plus amples informations, contactez les autorités locales ou le
détaillant qui vous a vendu le produit.
33
34
Spis treści
Środki ostrożności
37
Cechy produktu
37
Wymagania sprzętowe
37
Zawartość opakowania
38
Elementy urządzenia
38
Instalacja oprogramowania
35
39-42
Skrócona instrukcja obsługi oprogramowania
43
Parametry techniczne
44
Rozwiązywanie problemów
45
36
Środki ostrożności
Zawartość opakowania *
Nie pozostawiać sprzętu bezpośrednio na słońcu i w pobliżu urządzeń grzewczych.
Jeżeli urządzenie wymaga czyszczenia, najpierw wytrzeć je ścierką zwilżoną roztworem
obojętnego środka czyszczącego i dokładnie wycisnąć; następnie przetrzeć suchą ścierką.
Nie wolno używać rozpuszczalników lotnych, takich jak rozcieńczalniki do farb, benzyna,
środki owadobójcze itd., ponieważ mogą zdeformować, odbarwić lub uszkodzić sprzęt.
Unikać kontaktu z wodą, aby nie uszkodzić urządzenia.
Przeczytać instrukcje Przed użyciem urządzenia należy przeczytać wszystkie instrukcje
Opakowanie produktu CamScanner zawiera:
1. Skaner dokumentów CamScanner i Wizualizer
2. Płyta CD (sterowniki, instrukcja, oprogramowanie)
3. Kabel USB
4. Podręcznik użytkownika
5. Karta gwarancyjna
6. Warstwa antyodblaskowa
dotyczące bezpieczeństwa I eksploatacji.
Zachować instrukcje Należy zachować instrukcje dotyczące bezpieczeństwa i eksploatacji
na później.
Przystawki Nie używać przystawek, które nie są zalecane przez producenta produktu,
ponieważ mogą one być niebezpieczne.
* W przypadku skanowania lub edycji dużej ilości danych obrazu. Powyższe wymagania sprzętowe to
wymagania minimalne; im lepszy komputer (płyta główna, procesor, dysk twardy, pamięć RAM, karta
graficzna), tym lepsze rezultaty.
* Nie wyrzucać opakowania, ponieważ może się jeszcze przydać.
Nie umieszczać produktu w miejscu, w który będzie narażone na działanie wilgoci, pyłu,
wiatru i drgań. Używać w następujących warunkach środowiskowych:
Temperatura: 0_C~40_C (32_F~104_F)
Wilgotność: 30%~85% (Bez kondensacji)
Podczas obsługi (w tym regulacji i przechowywania) lub przenoszenia kamery, należy być
niezwykle ostrożnym, aby nie uszkodzić głowicy kamery.
Elementy urządzenia
Nie wolno patrzeć bezpośrednio na lampę (LED) z bliskiej odległości. Można uszkodzić
wzrok.
Ramię kamery
Przełącznik natężenia LED
Cechy produktu
- Niewielkich rozmiarów skaner z technologią wykorzystującą czujnik CMOS (5MP)
Kamera
- Dostępny rozmiar skanowania: DIN A3
- Skanowanie zdjęć, dokumentów, książek i obiektów 3D z niezwykłym odwzorowaniem szczegółów
- Automatyczne wykrywanie dokumentów i zapisywanie plików
Ramię
- Bardzo szybkie i proste tworzenie plików PDF, JPG i DOC
Ustawianie
natężenia
LED
- 48-bitowa głębia kolorów zapewnia wierne odwzorowanie kolorów
- Niskie zużycie prądu przy wysokiej wydajności
- Szybki i prosty interfejs USB 2.0 typu Plug & Play
- Wyświetlacz – idealny dla biura i szkoły
Wymagania sprzętowe *
Komputer osobisty zgodny z Windows/Intel
1. Procesor Pentium lub lepszy
2. Napęd CD-ROM
3. 64 MB pamięci RAM (zalecane 128 MB)
4. 250 MB wolnego miejsca na dysku (zalecane 300 MB)
5. Port USB
6. Microsoft Windows XP, Windows 2003, Windows VISTA , Windows 7
7. Karta graficzna z 16-bitową głębią kolorów lub lepsza
37
Port USB
Wskaźnik zasilania
Podstawa
38
Instalacja oprogramowania
Przed rozpoczęciem instalacji podłącz CamScanner do komputera za pomocą kabla USB.
C. Kreator InstallShield Wizard pomyślnie zainstalował sterownik skanera dokumentów CamScanner.
Kliknij “ Finish”, aby wyjść z kreatora. (W przypadku systemu operacyjnego WindowsXP / Vista / 7
nie trzeba instalować sterownika)
A. Włóż płytę CD znajdującą się w zestawie z urządzeniem CamScanner do napędu CD-ROM. Naciśnij
Setup.exe, aby rozpocząć instalację. Jeżeli funkcja automatycznego uruchamiania jest włączona,
Okno Programu Instalacyjnego Oprogramowania CamScanner zostanie automatycznie wyświetlone,
jak poniżej. Kliknij "Install Driver", aby zainstalować sterownik.
B. Następnie kliknij “next”, jak poniżej:
39
D. Po zakończeniu instalacji sterownika kliknij ”click Install Software”, jak poniżej
40
E. Wybierz język instalacji (poniżej wybrano angielski).Wykonuj instrukcje kreatora Installshield
Wizard krok po kroku.
G. Wybierz docelowy folder instalacji, jak poniżej
F. W oknie License Agreement, które się pojawi, zaznacz “I accept the terms of the license agreement”,
jak poniżej
H. Kliknij “Finish”, aby zakończyć instalację
41
42
Skrócona instrukcja obsługi oprogramowania
Parametry techniczne
Główne okno
Pasek tytułu
Pasek menu
Pasek narzędzi
Pasek przewijania
Dynamiczny obszar wideo
Obszar edycji obrazu
Pasek klawiszy skrótu
Pasek stanu
Opis paska narzędzi
1:skanuj obraz
2:otwórz
3:zapisz
4:przełącz widok
5:cofnij
6:wykonaj ponownie
7:pomniejsz
8:powiększ
9:normalny widok
10:uruchom skanowanie automatyczne
11:zatrzymaj skanowanie automatyczne
12:pierwszy obraz
13:poprzedni obraz
14:następny obraz
15:ostatni obraz
16:obróć w prawo
17:obróć w lewo
18:obróć...
19:przytnij obraz
20:przesuń obraz
21:PDF
22:DOC
23:JPG
24:ustawienie skanowania
25:drukuj
26:wydruk widoku ekranu
27:o
Rodzaj produktu
Skaner z przetwornikiem CMOS
Parametry przetwornika
5-megapikselowy cyfrowy przetwornik obrazu
CMOS z funkcją aktywnych pikseli
Format optyczny
1/2,5 cala
Maks. ilość aktywnych pikseli
2592 x 1944
Szybkość odświeżania
30FPS(VGA)
Rozdzielczość ADC
12-bitowa chipowa
Czułość
0,53 V/Lx-sek
Natężenie oświetlenia
50- ∽Lx
Kąt widzenia
78°
SNR (stosunek sygnału do szumu)
40,5dB
Zakres dynamiczny
68dB
Temperatura pracy
-30 do +70 º C
Obiektyw
2G2P + IR
Numer obiektywu F
F 4,2 mm F/NO 2.8
Tylko odległość kołnierza
0,8 mm
Tylna odległość ogniskowa (BFL)
0,8 mm
Odległość ogniskowa
F=2,7 mm
Zasilanie
kabel zasilający USB
Pobór mocy
150mW przy maksymalnej szybkości transmisji danych, 3,3 V
Natężenie poboru mocy (przy 30fps)
< 15 mA
Natężenie podczas zawieszenia
< 5 mA
Rozdzielczość obrazu
2592 x 1944 A3
Format wyjściowy
YUY2
Interfejs komunikacyjny
USB2.0 z UVC
AGC/AEC/ Balans bieli
Auto
Wymiary (D x Sz x W) / Ciężar
128 mm x 100 mm x 440 mm / 850g
Kolor
Metaliczny ciemnoszary
*Wydajność i funkcje tego produktu mogą ulec zmianie bez powiadomienia.
43
44
Rozwiązywanie problemów
Najpierw należy sprawdzić poniższą listę możliwych problemów i ich rozwiązań. Jeżeli nie można
rozwiązać problemu (problemów) na podstawie listy, należy wyłączyć urządzenie i skontaktować się
ze sprzedawcą etalicznym lub najbliższym biurem obsługi klienta CamScanner.
Problem
Możliwe rozwiązania
Sprawdzić, czy wszystkie kable zostały prawidłowo
podłączone i czy urządzenie zostało włączone
Brak obrazu
Sprawdzić, czy projektor lub komputer nie znajduje się
w trybie uśpienia.
Rozmazany obraz
Obiektyw może być zabrudzony.
Ciemny obraz
Sprawdzić, czy włączone jest światło oświetleniowe.
CAMSCANNER
Kullanım Kılavuzu
Bu ürünü tercih ettiğiniz için teşekkür ederiz.
Lütfen cihazı kullanmaya başlamadan önce talimatları dikkatlice okuyunuz.
Uwaga: Oznaczenie umieszczone na produkcie lub w odnoszącej się do
niego instrukcji wskazuje, że sprzętu elektrycznego i elektronicznego po
upływie okresu użytkowania nie należy usuwać z innymi
odpadamipochodzącymi
z gospodarstwa domowego. W UE obowiązuje oddzielny system zbierania
produktów, które zostaną poddane recyklingowi.
W celu uzyskania dalszych informacji należy skontaktować się z punktem
sprzedaży detalicznej w którymdokonano zakupu produktu, lub z organem
władz lokalnych
45
46
Spis treści
Środki ostrożności
49
Cechy produktu
49
Wymagania sprzętowe
49
Zawartość opakowania
50
Elementy urządzenia
50
Instalacja oprogramowania
47
51-54
Skrócona instrukcja obsługi oprogramowania
55
Parametry techniczne
56
Rozwiązywanie problemów
57
48
Önemli Uyarılar
Kutu İçerikleri
Cihazı ısı kaynaklarına veya doğrudan güneş ışığına maruz bırakmayınız.
CamScanner paketinde şunlar mevcuttur :
Cihazınızın temizlenmesi gerekiyorsa, önce nötr bir deterjanla ıslatılmış nemli bir bez ile siliniz
1.CamScanner Belge Tarayıcı ve Görsel Sunucu
ve hafifçe ovunuz; daha sonra temiz bir bezle kurulayınız. Asla tiner, benzin, vb. uçucu maddeler
2.CD-RAM kurulumu (sürücü,kılavuzu, uygulama yazılımı )
kullanmayınız, bunlar cihazınız deforme olmasına, renginin solmasına ve hasarlanmasına
3.USB kablosu
neden olabilir.
4.Kullanım kılavuzu
Cihazı, hiçbir zaman su veya herhangi bir başka sıvıya batırmayınız. Bu cihazınızın tamamen
5.Garanti Belgesi
bozulmasına neden olacaktır.
Cihazı kullanmadan önce bu kullanma kılavuzunu okuyunuz ve gelecekte başvurabilmek için
saklayınız.
Sadece üretici tarafından verilen ve önerilen ek parçaları/aksesuarları kullanınız, aksi taktirde
cihazının hasar görebilir.
Cihazı nemli, tozlu, rüzgârlı veya sallanan yerlerde kullanmayınız. Cihazınızı aşağıda belirtilen
çevre koşullarında kullanınız:
Sıcaklık: 0_C~40_C (32_F~104_F)
Nem
6.Parlama önleyici örtü
* Yüksek kalitede görüntü verisini tararken veya düzenlerken, yüksek gereksinimlere ihtiyaç duyabilrsiniz.
Burada bahsedilen system gereksinimleri sadece bir kılavuzdur, genel olarak daha iyi bir bilgisayar
(anakart, işlemci, sabit disk, RAM, video grafik kartı) daha iyi sonuçlar demektir.
* Ürünü servise göndermeniz gerektiğinde kullanabilmeniz için, orijinal kutuyu ve ambalaj malzemelerini
saklamanızı öneririz.
: 30%~85% (yoğunlaşma yok)
Cihazı, kullanım esnasında (kurulum ve muhafaza dahil) veya taşırken, kamera başlığına hasar
vermemek için çok dikkatli olunuz.
Genel Açıklamalar
Cihazın lamba kısmına (LED) yakın mesafeden doğrudan bakmayınız. Bu gözlerinize zarar
verebilir.
Cihazın Özellikleri
Kamera kolu
LED aydınlatma düğmesi
CMOS sensör (5MP) teknolojili küçük ebatlı tarayıcı
Uygun tarama ölçüsü : DIN A3
Kamera
Resim, belge, kitap ve 3 boyutlu nesneleri yüksek kalitede netlik ve detaylı tarama özelliği
Belgeleri otomatik olarak bulur ve dosya olarak kaydeder
Çok hızlı ve kolay bir şekilde PDF, JPEG ve döküman dosyaları oluşturur
Kol
Gerçek canlı renk üretimi için gerçek 48-bit renk derinliği
LED
aydınlatma
seti
Yüksek enerji verimliliği için düşük güç tüketimi sağlayan tasarım
Yüksek hızlı USB 2.0 arayüz ile bağlama kullanma kolaylığı
Ev, ofis ve okulda görsel sunumlar için ideal çözüm
Sistem Gereksinimleri
Windows/Intel Uyumlu Kişisel Bilgisayar
1.Pentium CPU veya üstü
2.CD-ROM Sürücü
3.64 MB RAM (128 MB tavsiye edilir)
4.250 MB Boş Sabit Disk Alanı (300 MB tavsiye edilir)
5.USB Bağlantı noktası
6.Microsoft Windows XP,Windows 2003,Windows VISTA , Window 7
USB bağlantı noktası
Güç göstergesi
Taban
7.16-bit veya daha çok renk destekleyen video kartı
49
50
Yazılım Yükleme
Yüklemeye başlamadan once, ilk olarak CamScanner' ı USB kablosu vasıtasıyla bir bilgisayara
bağlayınız.
C. InstallShield Sihirbazı, CamScanner Belge Tarayıcı Sürücüsünü başarıyla yüklemiştir. Sihirbazdan
çıkmak için “finish” (bitir) simgesine tıklayınız. (WindowsXP / Vista / 7 için sürücü yüklemenize gerek
yoktur)
A. CamScanner ile birlikte verilen CD-ROM' u CD-ROM sürücüsüne yerleştiriniz. Kurulumu başlatmak
için Setup.exe simgesine tıklayınız. Eğer sisteminizde Autorun seçili ise, CamScanner Yazılım
Kurulumu penceresi otomatik olarak aşağıdaki gibi görüntülenecektir. Sürücüyü yüklemek için
“Install Driver” (Yükleme Sürücüsü) simgesini tıklayınız.
B. Daha sonar aşağıdaki gibi “next” (ileri) simgesini tıklayınız :
51
D. Sürücü yüklemesinden sonar aşağıdaki gibi “Install Software” (Yazılım Yükleme) simgesine tıklayınız
52
E. Kurulum dilini seçiniz (burada örnek olarak İngilizce seçilmiştir). Sonra adım adım InstallShield
Sihirbazı talimatlarını izleyiniz.
F. Lisans Sözleşmesi penceresi aşağıdaki gibi çıktığında, “I accept the terms of the license
agreement” (lisans sözleşmesinin koşullarını kabul ediyorum) seçeneğini seçiniz
53
G. Yükleme Hedef Klasörü aşağıdaki gibi seçilmiş olabilir
H. Yüklemeyi tamamlamak için “Finish” (bitir) simgesini tıklayınız
54
Hızlı Yazılım Başvuru Kılavuzu
Teknik Özellikler
Ana Çerçeve
Başlık çubuğu
Menü çubuğu
Ürün tipi
Araç çubuğu
Kaydırma çubuğu
Canlı video alanı
Sensör Parametresi
5 MegaPixel CMOS Aktif Pixel Dijital Resim Sensörü
Optik Biçim
1/2.5 inç
Aktif Pixeller Maks.
2592H x 1944V
Görüntü oranı
30FPS(VGA)
ADC Çözünürlük
On-chip 12-bit
Uyumluluk
0.53 V/Lux-sec
Aydı nlatma
50- ∽Lux
Görüş Açı sı
78°
SNR
40.5dB
Dinamik Aralı
Resim düzenleme alanı
CMOS sensör tarayıcı
k
Çalı ştı rma Sı caklı ğı
Lens
Lens F Numarası
Flanş Arka Uzunluk
Geçiş tuşları çubuğu
Durum çubuğu
Araç Çubuğu Açıklamaları
1: tarama görseli
2: aç
3: kaydet
4: görüntü yenileme
5: geri al
6: yinele
7: uzaklaştır
8: yakınlaştır
9:normal görünüm
10: otomatik taramayı başlat
11: otomatik taramayı durdur
12: ilk resim
13: önceki resim
14: sonraki resim
15: son resim
16: sağa döndür
17: sola döndür
18: döndür...
19: resmi kırp
20: el aracı ile resmi taşı
21: PDF
22: DOC
23: JPG
24: tarama ayarları
25: yazdır
26: Ekran görünütüsü kopyalama
27: hakkında
68dB
-30 dan +70 º C ye
2G2P + IR
F 4.2mm F/NO 2.8
0.8mm
Arka Odak Uzaklığı (BFL)
0.8mm
Odak Uzaklığı ( EFL)
F=2.7mm
Güç Kaynağı
USB güç kablosu
Güç Tüketimi
3.3V maksimum veri oranında 150mW
Güç Tüketimi Akımı ( 30fps için)
< 15 mA
Suspend Current
< 5 mA
Resim Çözünürlüğü
2592H x 1944V A3
Çıkış Biçimi
YUY2
İletişim Arayüzü
UVC ile USB2.0
AGC/AEC/ Beyaz Dengesi
Otomatik
Ebatlar (UxGxY) / Ağırlık
128 mm x 100 mm x 440 mm / 850g
Renk
Metalik koyu gri
* Bu ürünün performansı ve fonksiyonları haber vermeden değiştirlebilir.
55
56
Sorun Giderme
Lütfen öncelikle aşağıdaki listeden olası sorunları ve çözümlerini kontrol ediniz. Eğer tabloda
sorununuza çözüm bulamıyorsanız, cihazı kullanmayı durdurunuz ve en yakın CamScanner servisine
başvurunuz.
Problem
Olası Çözümler
Manual de utilizare
Tüm kabloların düzgün bir şekilde bağlandığından ve
herşeyin açık olduğundan emin olunuz.
Görüntü yok
Projektör veya bilgisayarın uyku moduna geçmediğinden
emin olunuz.
Bulanık görüntü
Lensler kirlenmiş olabilr.
Koyu görüntü
Aydınlatma bölümünün açık olup olmadığını control ediniz.
Înainte de a începe să utilizaţi acest aparat, citiţi cu atenţie MANUALUL DE UTILIZARE,
pentru a vă asigura că obţineţi cele mai bune rezultate cu putinţă
Elektrikli ve Elektronik Ekipman Atıkları (WEEE) Direktifine göre,
Elektrikli ve Elektronik Ekipman Atıkları ayrı toplanmalı ve ayrı
işlenmelidir. Bu cihaz geri dönüşümü olan parçalardan oluştuğu
için çöpe atılmaması gerekmektedir. Eğer gelecekte bu cihazı elden
çıkarmanız gerekirse, lütfen bu ürünü evsel atıklarla birlikte atmayınız.
Lütfen bu ürünün geri dönüşümünü sağlamak için size en yakın
Elektrikli ve Elektronik Ekipman Atıkları toplama merkezine gönderiniz.
57
58
Cuprins
Măsuri de precauţie la utilizare
61
Caracteristicile produsului
61
Cerinţe de sistem
61
Conţinutul cutiei
62
Privire generală
62
Instalarea software-ului
59
63-66
Ghid rapid de referinţă pentru software
67
Specificaţii tehnice
68
Depanare
69
60
Măsuri de precauţie la utilizare
Nu lăsaţi echipamentul expus luminii solare directe sau în apropierea unor surse de căldură.
Conţinutul cutiei *
Pachetul CamScanner conţine următoarele:
Când unitatea principală trebuie curăţată, ştergeţi-o mai întâi cu o lavetă umedă înmuiată în
1. Scaner de documente CamScanner şi prezentator vizual
soluţie de detergent neutru şi bine stoarsă; ştergeţi-o apoi cu o lavetă uscată şi curată. Nu utilizaţi la
2. CD-ROM de instalare (driver, manual, software aplicativ)
aparat solvenţi volatili, cum ar fi dizolvant pentru vopsele, benzină, insecticid etc., deoarece
3. Cablu USB
aceştia îl pot deforma, decolora şi deteriora.
4. Manual de utilizare
De asemenea, nu scufundaţi unitatea în apă, deoarece se va deteriora.
5. Card de garanţie
Citiţi InstrucţiunileToate instrucţiunile de siguranţă şi de operare trebuie citite înainte de
6. Folie antireflex
utilizarea aparatului.
Păstraţi Instrucţiunile Instrucţiunile de siguranţă şi de operare trebuie păstrate pentru a putea fi
* Este posibil să fie necesare cerinţe mai ridicate în cazul în care scanaţi sau editaţi o cantitate mare
consultate ulterior.
de date imagine. Cerinţele de sistem prezentate aici sunt numai cu titlu orientativ, deoarece, în general,
Accesorii Nu folosiţi accesorii care nu sunt recomandate de producător, deoarece pot provoca
cu cât computerul este mai bun (placa de bază, procesorul, hard discul, memoria RAM, placa video), cu
accidente.
atât rezultatele sunt mai bune.
Nu instalaţi acest produs într-un loc în care există umiditate, praf, vânt sau vibraţii. Utilizaţi acest
* Păstraţi cutia şi materialele de ambalare pentru cazul în care veţi avea nevoie de ele în viitor.
produs în următoarele condiţii de mediu:
Temperatură: 0_C~40_C (32_F~104_F)
Umiditate: 30%~85% (fără condens)
La manipularea (inclusiv configurarea şi depozitarea) sau transportul camerei, aveţi grijă să nu
produceţi un şoc la capul camerei.
Privire generală
Nu priviţi direct spre bec (led) de aproape. Acest lucru vă poate afecta ochii.
Caracteristicile produsului
Braţ cameră
Iluminare cu led Comutator
- Scaner de dimensiune compactă cu tehnologie cu senzor CMOS (5MP)
- Dimensiune disponibilă pentru scanare: DIN A3
Cameră
- Scanare foto, documente, cărţi şi obiecte 3D cu o claritate şi detalii uimitoare.
- Detectează automat documentele şi le salvează ca fişiere
- Creează fişiere PDF, JPG şi doc foarte rapid şi uşor.
Braţ
- Adâncime reală a culorii pe 48 biţi pentru reproducere color realistă
Set
iluminare
cu led
- Conceput cu un consum redus de energie pentru eficienţă energetică excelentă
- Simplitate „plug and play” cu interfaţă USB 2.0 de mare viteză
- Prezentator vizual – soluţia ideală pentru birou şi şcoală
Cerinţe de sistem *
Computer personal compatibil Windows/Intel
1. CPU Pentium sau peste
2. Unitate CD-ROM
3. 64 MB RAM (128 MB recomandat)
4. Spaţiu liber pe hard disc 250 MB (300 MB recomandat)
5. Port USB
6. Microsoft Windows XP, Windows2003, WindowsVISTA , Windows 7
Port USB
Indicator alimentare
Bază
7. Placă video care suportă culoare pe 16 biţi sau peste
61
62
Instalarea software-ului
C. Aplicaţia de asistenţă InstallShield a instalat cu succes driver-ul scanerului de documente CamScanner.
Faceţi clic pe „Finish” (la Windoes XP / Vista / 7 nu este necesar să instalaţi acest driver)
Înainte de instalare, mai întâi conectaţi aparatul CamScanner la un computer cu cablul USB.
A. Introduceţi CD-ROM-ul livrat împreună cu produsul CamScanner în drive-ul de CD-ROM. Apăsaţi
Setup.exe pentru a începe instalarea. Dacă funcţia Autorun (Pornire automată) este activată la
sistem, atunci fereastra de instalare a software-ului de la CamScanner va apărea automat, ca mai jos.
Faceţi clic pe „Install Driver” pentru a instala driver-ul.
B. Apoi faceţi clic pe „next” ca mai jos:
63
D. După instalarea driver-ului, faceţi clic pe „Install Software” ca mai jos
64
E. Alegeţi limba de instalare (aici am utilizat limba engleză ca exemplu). Apoi urmaţi pas cu pas
instrucţiunile aplicaţiei de asistenţă InstallShield.
G. Folderul de destinaţie pentru instalare poate fi ales ca mai jos
F. Alegeţi „I accept the terms of the license agreement” când apare fereastra Contractului de licenţă,
ca mai jos
H. Faceţi clic pe „Finish” pentru a finaliza instalarea
65
66
Ghid rapid de referinţă pentru software
Specificaţii
Cadrul principal
Bara de titlu
Bara de meniu
Bara de instrumente
Bara de navigare
Zona video dinamică
Zona de editare a imaginii
Bara de taste rapide
Bara de stare
Prezentarea barei de instrumente
1: scanare imagine
2: deschidere
3: salvare
4: comutare vizualizare
5: anulare ultima acţiune
6: repetare ultima acţiune
7: micşorare
8: mărire
9: vizualizare normală
10: pornire scanare automată
11: oprire scanare automată
12: prima imagine
13: imaginea anterioară
14: imaginea următoare
15: ultima imagine
16: rotire dreapta
17: rotire stânga
18: rotire…
19: decupare imagine
20: mutare imagine
21: PDF
22: DOC
23: JPG
24: setare scanare
25: tipărire
26: imprimare ecran
27: despre
Tipul produsului
Scaner cu senzor CMOS
Parametri senzor
Senzor de imagine digital cu pixeli activi 5 megapixeli CMOS
Format optic
1/2,5 inci
Pixeli activi max.
2592H x 1944V
Rata de eşantionare
30FPS (VGA)
Rezoluţie ADC
On-chip 12 biţi
Responsivitate
0,53 V/Lux-sec
Iluminare
50- ∽Lux
Unghi de vizualizare
78°
SNR (raport semnal-zgomot)
40,5 dB
Domeniu dinamic
68 dB
Temperatura de operare
-30 - +70ºC
Obiectiv
2G2P + IR
Număr F al obiectivului
F 4,2 mm Nr. F 2,8
Distanţă spate flanşă
0,8 mm
Distanţă focală spate (BFL)
0,8 mm
Distanţă focală (EFL)
F = 2,7 mm
Alimentare
Cablu de alimentare USB
Putere consumată
150 mW la viteză maximă a datelor, 3,3 V
Consum de curent (la 30 fps)
< 15 mA
Consum în suspensie
< 5 mA
Rezoluţie imagine
2592H x 1944V A3
Format ieşire
YUY2
Interfaţă comunicaţii
USB 2.0 cu UVC
AGC/AEC/balans de alb
Automat
Dimensiuni (LxlxH) / Greutate
128 mm x 100 mm x 440 mm / 850 g
Culoare
Gri închis metalizat
* Performanţele şi funcţiile acestui produs pot fi modificate fără preaviz.
67
68
Depanare
Verificaţi mai întâi următoarea listă de probleme şi soluţii posibile. Dacă nu puteţi rezolva problema
(problemele) după ce aţi consultat lista, încetaţi imediat să utilizaţi produsul şi contactaţi comerciantul
sau cel mai apropiat service CamScanner pentru clienţi.
Problemă
Soluţii posibile
Verificaţi dacă toate cablurile sunt conectate corect şi
dacă totul este pornit
Nu există imagini
Asiguraţi-vă că proiectorul sau computerul nu este în
modul „sleep”,
Imagini înceţoşate
Este posibil ca lentilele să fie murdare.
Imagini întunecate
Dispozitivul de iluminare este pornit?
Notă: Acest simbol aplicat pe produs sau pe instrucţiuni arată faptul că
echipamentul electric sau electronic respectiv trebuie evacuat la finalul
duratei sale de utilizare separat de deşeurile menajere. În UE există
sisteme separate de colectare pentru reciclare.
Pentru mai multe informaţii, contactaţi autoritatea locală sau comerciantul
de unde aţi achiziţionat produsul.
69