1
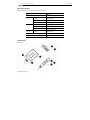
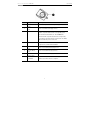
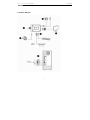
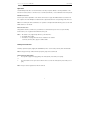
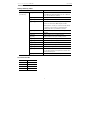
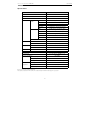
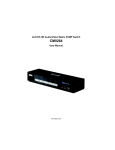
USB 2.0 DVI KVM Switch
RKV-2DVI
User Manual
USB 2.0 DVI KVM Switch RKV-2DVI
User Manual
Overview
The RKV-2DVI takes a giant step forward from prior cable KVM models in the Petite series, by offering DVI
functionality, USB 2.0 peripheral sharing (via a USB hub attached to the USB mouse port), a rich bass experience for
2.1 surround systems.
Another new feature of the RKV-2DVI is the implementation of a remote port selector. This means that you can now
control port switching from the desktop while the switch itself can be placed in a convenient, out-of-the-way,
location. Also, in addition to new hotkeys, the RKV-2DVI offers the latest mouse port-switching function – simply
double-click on the scroll wheel of a USB mouse to change ports.
Furthermore, the RKV-2DVI features enhanced Video DynaSync technology, which eliminates boot-up display
problems and optimizes resolution when switching between ports.
Finally, the RKV-2DVI's new Power on detection feature means that if one of the computers is
powered off, switch will automatically switch to the other powered-on computer.
Featuring an unbeatable combination of DVI functionality, USB 2.0 peripheral sharing convenience, and enhanced
user-friendly operations, the RKV-2DVI allows users to keep up with the latest innovations in desktop multimedia
applications.
Features
♦
One DVI video console controls two USB computers
♦
Fully DVI-Digital specification compliant
♦
Computer selection via remote port selector, hotkeys, and USB mouse
♦
Audio-enabled – full bass response provides a rich experience for 2.1 channel surround sound systems
♦
Multiplatform support – Windows 2000 / XP / Vista / 7, Mac, Sun, Linux
♦
Compact design, built-in all-in-one cables (2 x 0.9 m)
♦
Superior video quality – up to 1920 x 1200
♦
Compatible with widescreen LCD monitors
♦
Video DynaSync –Which eliminates boot-up display problems and optimizes resolution when switching
between ports
♦
Power on detection – if either of the computers is powered off, the RKV-2DVI will automatically switch to the
other computer
♦
Supports multimedia keyboards
♦
Supports wireless keyboards and mice
♦
Console mouse port emulation/bypass feature supports most mouse drivers and multifunction mice
♦
Mac/Sun keyboard support and emulation*
1
USB 2.0 DVI KVM Switch RKV-2DVI
User Manual
♦
USB 2.0 mouse port can be used for USB hub and USB peripheral sharing
♦
HDCP Compatible
♦
Non-Powered
Note:
1. PC keyboard combinations emulate Mac/Sun keyboards.
2. Mac/Sun keyboards work only with their own computers.
System Requirements
Console
♦
A DVI monitor capable of the highest resolution that you will be using on any computer in the installation
♦
A USB Keyboard and a USB Mouse
♦
Speakers and microphone (optional)
Computers
The following equipment must be installed on each computer that is to be connected to the system:
♦
A DVI video port
♦
USB Type A port
♦
Speaker and microphone ports (optional)
Cables
The RKV-2DVI’s innovative design features built-in KVM and audio cables for extra convenience. No further cables
are necessary.
Package Contents
The RKV-2DVI USB 2.0 DVI KVM Switch package contains the following items:
♦
1 RKV-2DVI 2-Port USB 2.0 DVI KVM Switch
♦
1 Remote Port Selector
♦
1 User Manual*
2
USB 2.0 DVI KVM Switch RKV-2DVI
User Manual
Operating Systems
Supported operating systems are shown in the table, below:
OS
Version
Windows
2000 / XP / Vista / 7
Linux
UNIX
Novell
RedHat
6.0 and higher
SuSE
8.2 and higher
Mandriva (Mandrake)
9.0 and higher
AIX
4.3 and higher
FreeBSD
3.51 and higher
Sun
Solaris 9 and higher
Netware
5.0 and higher
Mac
OS 9 and higher
DOS
6.2 and higher
Components
RKV-2DVI
Remote Port Selector
3
USB 2.0 DVI KVM Switch RKV-2DVI
No.
1
User Manual
Component
Description
Console Audio
Your console speakers and microphone plug in here.
Ports
2
3
Console Monitor
Port
Port LEDs
Your console DVI monitor plugs in here.
The Port LEDs indicate status. The LED lights on to indicate
that the computer attached to the corresponding port is
selected and has the KVM focus. The LED flashes to
indicate that the computer attached to its corresponding
port is being scanned by the Auto Scan function. The LED is
off to indicate the port is not selected.
4
KVM Cable
The connectors on the built-in KVM cables attach to the two
computers in your RKV-2DVI installation.
5
Console Keyboard
Port
6
7
Console Mouse
Port
Remote Port
Your console USB keyboard plugs in here.
Your console USB mouse plugs in here.
The Remote Port Selector plugs in here.
Selector Jack
8
Port Selection
Press the Port Selection Pushbutton to toggle the KVM and
Pushbutton
Audio focus between the two computers.
4
USB 2.0 DVI KVM Switch RKV-2DVI
User Manual
Installation
1. Make sure that the power to any device that you connect to the installation has
been turned off. You must unplug the power cords of any computers that have the
Keyboard Power On function.
2. Make sure that all devices you will be installing are properly grounded.
1.
Plug your keyboard and mouse into their USB ports, located on the side of the RKV-2DVI. The ports are color
coded and labeled with an appropriate icon.
Note: The mouse connector is actually a USB 2.0 port, and can accept any USB compatible peripheral. You
can even connect a hub to install multiple USB devices (This may require an extra power adapter).
2.
Plug your monitor into the DVI port, located on the front of the RKV-2DVI. Power on the monitor.
3.
Plug your speakers and microphone into the console audio ports, located on the front of the RKV-2DVI
(Optional).
4.
Plug the USB, video, and audio connectors of the KVM cables into their respective ports on the computers you
are installing.
5.
If you choose to use the remote port selector, plug its cable into the remote port selector jack, located on the
side of the unit.
6.
Power on the computers.
Note: By default the switch links to the first computer that is powered on.
5
USB 2.0 DVI KVM Switch RKV-2DVI
User Manual
Installation Diagram
6
USB 2.0 DVI KVM Switch RKV-2DVI
User Manual
Operation
The RKV-2DVI provides three convenient methods of selecting computers: Manual – click the pushbutton on the
Remote Port Selector; Mouse – click the mouse’s scroll wheel; and Hotkey – enter combinations from the keyboard.
Manual Port Selection
Press the port selection pushbutton on the Remote Port Selector to toggle the KVM and Audio focus between the
two computers. The Port LED lights to indicate that the computer attached to its corresponding port has the focus.
Note: Do not switch ports while a USB device is in operation. For independent USB switching, please see the USB
KVMP switches on our website.
Mouse Port Selection
Simply double-click the scroll wheel on your USB mouse to switch between ports. The mouse port-switching
function allows you to toggle back and forth between the ports.
Note: 1. This feature is only supported by USB 3-key scroll wheel mice.
2. The default setting is OFF.
3. This feature is only supported when mouse emulation is also enabled.
See Hotkey Summary Table, page 8 for further details.
Hotkey Port Selection
All hotkey operations begin by tapping the Scroll Lock key twice. See the Hotkey Summary Table for full details.
Note: If using [Scroll Lock] conflicts with other programs, [Ctrl] can be used instead.
Alternate Entering Hotkey Mode
♦
Press [Scroll Lock] [Scroll Lock] [x] [Enter]. The entering hotkey mode hotkey is now [Ctrl].
or
♦
Press and hold the remote port selector switch for three seconds. The entering hotkey mode hotkey is now
[Ctrl].
Note: These procedures toggle between the two methods.
7
USB 2.0 DVI KVM Switch RKV-2DVI
User Manual
Hotkey Summary Table
Combination
[Scroll Lock]
Function
[Enter]
Toggles the KVM and Audio focus between the two
ports. Note: If the KVM and Audio focus are on different
[Scroll Lock] +
ports, only the KVM focus switches.
[k] [Enter]
Only toggles the KVM focus.
[s] [Enter]
Only toggles the Audio focus.
[a] [Enter] [n]
Starts Auto Scan. The KVM focus cycles from port to
port at n second intervals. Note: Replace n with a
number between 1 and 4 (see Scan Interval Table below).
To exit Auto Scan, press [Esc] or [Spacebar]. Auto
Scanning stops when you exit Auto Scan mode.
[x] [Enter]
Toggles the hotkey invocation key between [Scroll Lock]
and [Ctrl].
[m] [Enter]
Enables/disables mouse emulation function.
[w] [Enter]
Enables/disables mouse port-switching function.
[F2] [Enter]
Activates Mac keyboard mapping.
[F3] [Enter]
Activates Sun keyboard mapping.
[F10] [Enter]
Auto detects keyboard operating platform.
[F4] [Enter]
Lists current switch settings.
[F5] [Enter]
Performs a USB keyboard and mouse reset.
[d] [Enter]
Invokes the Video DynaSync function, which eliminates
boot-up display problems and optimizes resolution when
switching between ports.
[r] [Enter]
Resets hotkeys to the default setting.
Scan Interval Table
n
Secs.
1
3 secs.
2
5 secs. (default)
3
10 secs.
4
20 secs.
8
USB 2.0 DVI KVM Switch RKV-2DVI
User Manual
Keyboard Emulation
PC Keyboard
Mac Keyboard
PC Keyboard
Sun Keyboard
[Shift]
Shift
[Ctrl] [T]
Stop
[Ctrl]
Ctrl
[Ctrl] [F2]
Again
[Ctrl] [F3]
Props
[Ctrl] [1]
[Ctrl] [F4]
Undo
[Ctrl] [2]
[Ctrl] [F5]
Front
[Ctrl] [3]
[Ctrl] [F6]
Copy
[Ctrl] [4]
[Ctrl] [F7]
Open
[Alt]
Alt
[Ctrl] [F8]
Paste
[Print Screen]
F13
[Ctrl] [F9]
Find
[Scroll Lock]
F14
[Ctrl] [F10]
Cut
=
[Ctrl] [1]
[Enter]
Return
[Ctrl] [2]
[Backspace]
Delete
[Ctrl] [3]
[Insert]
Help
[Ctrl] [4]
[Ctrl] [H]
[Ctrl]
Help
Compose
F15
Note: When using key combinations, press and release the first key (Ctrl), then press and release the activation key.
9
USB 2.0 DVI KVM Switch RKV-2DVI
User Manual
Troubleshooting
Symptom
Possible Cause
Action
Power off all devices on the installation; power off
DVI graphics card is not
Monitor does not display
compatible with cable
after the KVM cable set is
set hot-plugging.
the RKV-2DVI; confirm all KVM cables are properly
connected; power on the RKV-2DVI; power on the
computers.
hot-plugged.
Graphics card
Upgrade to the latest graphics card driver.
driver is not up-to-date.
Mouse and/or keyboard is
not responding.
Power off all devices on the installation; power off
Switch needs to be reset.
the RKV-2DVI; wait five seconds; power on the
RKV-2DVI again.
Mouse port-switching
function is not responding.
Mouse does not support
This feature is only supported by USB 3-key scroll
this function.
wheel mice.
Mouse emulation is
Enable mouse emulation. See Hotkey Summary
disabled.
Table, page 8, for details.
Keyboard is
Switch to the alternate HSM
Cannot switch ports by
incompatible with
invocation keys. See Alternate
pressing [Scroll Lock] twice.
[Scroll Lock]
Entering Hotkey Mode, page 7,
invocation.
for details.
Factory Default Hotkey Settings
Setting
Default
Port Switching
[Scroll Lock] [Scroll Lock]
Auto Scan Interval
5 seconds
Keyboard Operating Platform
PC Compatible
Mouse Emulation
On
Mouse Port-Switching
Off
10
USB 2.0 DVI KVM Switch RKV-2DVI
User Manual
Specifications
Function
RKV-2DVI
Computer Connections
2
Console Connections
1
Port Selection
Connectors
Remote Port Selector, Mouse, Hotkeys
Console
KB
Ports
Video
1 x USB Type A Female (Silver)
1 x DVI-D Female (White)
Mouse
1 x USB Type A Female (Silver)
Speakers
KVM Ports
1 x Mini Stereo Jack Female (Green)
Mic.
1 x Mini Stereo Jack Female (Pink)
KB
2 x USB Type A Male (Purple)
Video
2 x DVI-D Male (Black)
Mouse
2 x USB Type A Male (Black)
Speakers
2 x Mini Stereo Jack Female (Green)
Mic.
2 x Mini Stereo Jack Female (Pink)
Remote Port Selector
LEDs
Cable Length
1 x Mini Stereo Jack
KVM
2 (Green)
Remote Port Selector
2 (Green)
KVM
2 x 0.9 m
Remote Port Selector
Emulation
1. 8 m
KB / Mouse
USB
Video
1920 x 1200
Scan Interval
3, 5, 10, 20 secs. (default 5 secs.)
Power Consumption
Environment
5V, 3.05W
Operating Temp.
0–50ºC
Storage Temp.
Physical
Properties
-20–60ºC
Humidity
0–80% RH, Non-condensing
Housing
Plastic
Weight
0.50 kg
Dimensions (L x W x H)
11.10 x 7.80 x 2.50 cm
Thank you for purchasing a quality Rosewill Product.
Please register your product at : www.rosewill.com for complete warranty information and future support for your product.
11