1
CUSTOM Cable
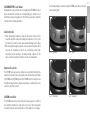
1. Open the Velcro and remove the padding from the headband. Take care not
to damage the cable.
2. Place the new opened headband pad on the underside of the headband. Make
sure to lay the cable in the crease of the pad on the outer edge of the band.
Tip: to do this, splay the headphones slightly, over both knees, for example.
3. First close the middle Velcro fastening and then the two outer ones.
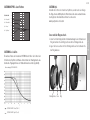
The cable couldn’t be more flexible – and just like the headphones, can be
modified with ease. Various cable options and headsets can be found at:
www.beyerdynamic.com/custom
Changing the Cable
1. Pull the cable, which is connected at one side, out of the headphones.
2. When inserting the new cable, make sure that the slot in the connector
housing is turned towards the detent in the housing shell.
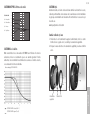
Changing the Ear Pads
1. Place the lip of the ear pad in the notch at the top of the headphone casing.
2. Then turn the ear pad on the right-hand casing clockwise and the left-hand
casing anti-clockwise until the lip of the entire pad is sitting outside the
casing.
1.
2.
Maintenance
1.
2.
Notch
Notch
For reasons of hygiene, the ear pads and headband should be cleaned occasionally
with a soft damp cloth. Take care that water does not come into contact with the
transducers. You may need to change the ear and headband pads from time to
time as a result of normal wear and tear. This is easy to do yourself. In the event
that other components need to be replaced, please contact your local beyerdynamic
representative.
english
8|9
Changing the Headband Pad